


gogmorgo
-
Posts
5984 -
Joined
-
Last visited
-
Days Won
4
Content Type
Profiles
Forums
Gallery
Everything posted by gogmorgo
-
Removing rear interior molding
gogmorgo replied to Spinnakerblue89's topic in MJ Tech: Modification and Repairs
Wait. Not all Comanches look like this? 😂😅
-
Distributor issues 92 HO
gogmorgo replied to JeepSchmidt O'Guinness's topic in MJ Tech: Modification and Repairs
I’d say you’re better off changing the whole distributor vs just the sensor. Especially if you need to disassemble the thing to change it. Just my experience on it, but the couple times I got code 54 the distributor shaft itself had so much play in it that I suspect the sloppiness was leading to an erratic cam sensor signal. The one time it was bad enough to actually puke oil up under the cap. -
Removing rear interior molding
gogmorgo replied to Spinnakerblue89's topic in MJ Tech: Modification and Repairs
You can try drilling and extracting but usually if you’re stripping out a Torx bit it’s stuck enough you won’t grab it with much. I very carefully cut one of mine off, then when I had everything flammable out of the way welded a nut onto it and pulled it out that way. The loctite on them from the factory basically dictates heat. You might get them with an impact, but you need to make sure the bolt head is cleaned out very well and the bit is the correct size and sunk all the way in. And you need to be dead nuts straight onto it. Mine didn’t strip out the bolt, but I did break two new 1/2” impact bits before I gave up and cut it off… the guy at the parts store was not thrilled with me when I brought the second one in for warranty a half hour after I picked it up. -
Distributor issues 92 HO
gogmorgo replied to JeepSchmidt O'Guinness's topic in MJ Tech: Modification and Repairs
When I’ve put in the ‘94+ distributors I’ve had to reclock the spark plug wires to make them work. I think it was just one position clockwise. They run fine after that. I think it was this thread that inspired me to do it. https://www.cherokeeforum.com/f2/distributor-cap-rotor-78168/ I’ve also seen people mention cutting off the ears and going with the older style hold-down. But that’s more effort than moving the spark plug wires. -
The cat cleaning up my exhaust smell was a definite plus. I personally didn’t notice a power loss through the butt dyno but that’s the primary concern. They say usually not more than 5hp loss anyhow due to the restriction. My primary motivation was that the way the world is going it would probably be easier to put a cat in now while I was replacing most of the system anyhow than it would be to deal with whatever consequences of not having one might turn into in the next few years. Probably wouldn’t ever be an issue for most of us, but it’s not a huge amount of money.
-
I don’t really need one right now. But Napa is currently showing zero inventory in Canada. I’m sure I could figure something out if I needed to. Napa can pull from the US distribution centres if they really need to, and the local parts store is pretty well connected too. It would just be a matter of waiting.
-
That’s not too bad then. They want $325 to ship up to the Great White North. 😂
-
Walker 46701 for the short bed. 47605 for the long bed. I’ve seen a couple other manufacturers with different numbers but they look essentially the same as the Walker, at least in online pictures. RockAuto.com shows stock for both. And they’re usually accurate. Dunno what shipping something that big will set you back, or what shape it’ll be in when it gets to you. For me it was prohibitive. I managed to get them “locally” but wouldn’t have got them otherwise. The Walker stuff is acceptable quality but not much more than that. If you’d prefer stainless it’s definitely worth talking to a local exhaust shop… if you’ve got one. I didn’t at the time. If your option is cutting down the long bed to fit a short bed you’re better off going full custom. The bends are similar but the hangers are in the wrong place and it needs shortened in two spots.
-
I went with a Walker 22502 muffler this fall. Its a stainless “quiet flow” muffler, not whisper quiet but it’s much better than what I had before. The loudest thing on the truck is my studded tires now. I also put a stainless cat on at the same time, Walker 15773. The two are both slip-fit, 2-1/4”. They fit well with the Walker tailpipe on my longbed and whatever stock replacement downpipe I put on a while back, no cutting necessary. If you can track down the tailpipe it was convenient, but if you’ve got an exhaust shop locally they should be able to bend one up for you out of stainless. I’m also in the same boat. Sick of rattling my neighbours’ dishes in their cupboards. Now I need to do something similar for my ZJ.
-
Have you pulled the spark plugs to check for carbon buildup, or other signs of overfueling? Dieseling is usually caused by very hot deposits igniting off air/fuel mix in the engine. It’s almost never caused by lingering power supply to the ignition. Carbureted and TBI setups are more prone to it because there’s more volume of fuel in the intake after shut down than a port-injected vehicle. Carbs with their mechanical fuel delivery will simply keep going as long as the engine runs, but injected engines shut the fuel delivery off and don’t keep going beyond a few pops. Bad gas or excessive cold operation can also lead to carbon deposits, as can excessive oil burning in the cylinder.
-
-
Rear Yoke and Crush Washer
gogmorgo replied to CheepComanche's topic in MJ Tech: Modification and Repairs
I'd be curious if there's any warranty left to be had from whoever did the rebuild. Should've had a new nut on it which makes me wonder if the crush sleeve was crushed properly. It takes quite a bit of torque to crush them down, especially when you're also torquing a distorted nut down, although I suppose the pinion depth could have been trial and errored a few times, wearing out the nut. But if there's still some wiggle in it after you tighten the nut down that's probably what's going on, insufficient crush. Ideally you'd want to pull the shafts and carrier to confirm you've got the correct rolling torque on the pinion, and that it rolls nicely without any notchiness to it. But if you have a torque wrench that goes to somewhere in the neighbourhood of 250ft-lbs and set it to the max, you don't really run the risk of crushing the sleeve down further than you want. The handful I've done have taken well over 300lb-ft to budge the sleeve at all. -
Rear Yoke and Crush Washer
gogmorgo replied to CheepComanche's topic in MJ Tech: Modification and Repairs
Is it making noise? Best case scenario you can try tightening it and hoping it solves it. You’re going to want around 250ft-lbs. Red loctite on it absolutely. But at minimum I would pull it and the yoke off and change the pinion seal. The extra movement in the pinion will wreck it. RTV on the yoke splines when it goes back together. There’s two common reasons the pinion would be loose. The first is because the seal was changed and the nut was reused without loctite on it. Its a distorted thread lock nut and spinning it off and on will wear down the threads so it quits locking. The second is because the pinion bearings are worn and loose. Which usually means there’s enough metal floating around the axle that the other bearings won’t last much longer. That’s not to scare you. Its very possible you can just tighten the nut and it’ll be fine. But you might also want to change the oil just to make sure there’s not a ton of glitter in it. -
Tool recommendation for pop rivets
gogmorgo replied to pizzaman09's topic in MJ Tech: Modification and Repairs
We’ve got a basic Arrow at the shop. I’ve put in 1/4” rivets in with it without breaking it, although I’ve definitely had it jam up a few times and I’ve needed to pull the tip off and extract a rivet tail from somewhere it shouldn’t have been. If you’re wanting to spend money anyhow I’d recommend getting a pneumatic rivet gun. You might not be able to get it into every nook or cranny that you can a manual riveter, but if you want power out of your rivet gun for heavy rivets, that’s your best bet. -
The headlight ground goes through that 10-pin connector. Diagram credit to Cruiser54.com. Use pin positions, wire colours tended to change year to year so they're not 100% reliable. I'm uncertain where it goes from there, but I'm certain it exists somewhere on the internet if you google it. It makes a lot of sense that this could be a ground issue. The turn signals working can be explained by the fact a dual-filament bulb will ground through the opposite filament's circuit when the bulb is missing the proper ground. But using that pinout and a test light will tell you whether it's a ground problem or a power delivery problem. You can connect the clamp on the test light to the positive battery terminal to check a ground. Lighting circuits are very basic electrical diagnosis. You need power to the bulb and you need ground coming away from the bulb. Somewhere the path is broken. Start at the component that's not working, figure out which side is not working, then trace the fault back up the circuit until you have it pinpointed. When two electrical components fail at the same time the most likely culprit is where the circuits come together. There are wiring diagrams in the Master Thread in the DIY and tech writeup forum. While the Renix diagrams aren't fully accurate for a '91+, the lighting circuits are mostly the same. Again look for connector pin locations rather than wire colours because the wire colours aren't fully reliable.
-
Will this gauge cluster work
gogmorgo replied to Smokeyyank's topic in MJ Tech: Modification and Repairs
Good call. I completely forgot the standard mph speedometer doesn’t go that high. The metric ones all do 😅 -
Will this gauge cluster work
gogmorgo replied to Smokeyyank's topic in MJ Tech: Modification and Repairs
Must be the 3/4 cluster I’ve heard about but not sure I’ve ever seen. Odd seeing the giant fuel gauge but with temp and oil pressure gauges. All ‘91 to ‘96 clusters are interchangeable, provided you swap the temp and oil pressure sensors. If you want to maintain your odometer reading you can swap your old speedometer into the new cluster. -

-

-
I had to go rescue a friend a couple years ago because a new tire that was only six months old did that on the way home from the tire shop. $#!& happens. Didn’t even make it thirty miles home, and she felt it let go before her tire pressure light came on, and then discovered her car only had an inflation kit instead of a jack and spare. I’ve also got a barn-find car parked outside on tires that are date stamped ‘97. Took a bit to figure that one out because they switched from three to four digit date codes in 2000. I’ve had it down rough gravel roads in the mountains. I’ve driven the snot out of the car going up and down steep twisty mountain roads. I’ve had it up over 85 mph. I’ve driven it 200 miles in one go at 65mph on a hot day. I’ve put almost 5000 miles on them in the last four years, still plenty of tread and no age cracking, no issues with them holding air either. I’ve even driven them on snow and ice and while I can’t pretend they’re that great in comparison to the studded Hakkas and X-Ices on my daily drivers, they’re not really any worse than a KO2 either. Its a low bar, I know, but it means they’re definitely not rock hard. I’m not going to argue that it’s a particularly smart move, and I do intend to replace them, it just hasn’t presented itself as a very pressing concern, and they’re a bit of an oddball size and any time I’ve looked into it I haven’t found a tire I’ve liked. That all said, I’ve recently handled some tires less than three years old with significant age cracking. Moral of that particular story is don’t leave your winter tires sitting outside in the sun all year. But it’s also another anecdote as to why regulated safety inspections care more about the condition of a tire than its age.
-
No one cares about the age of a tire other than people who sell new tires. . When inspecting a tire there’s criteria for tread wear and damage, but there’s nothing in the inspection manuals about age other than limiting the depth of age cracks to around 1/8” in the sudewall. If tire age was a serious concern it would be called out during a safety inspection. That said, they’re $100 tires brand new at Walmart. I’m sure they’ll hold air and keep you rolling around if you’re in desperate need and can’t afford anything else. But when all that’s holding you on the road or trail is four little patches of rubber, do you really want to go with the bare minimum?
-
1996 Cherokee no start
gogmorgo replied to railroad sam's topic in MJ Tech: Modification and Repairs
Your ‘96 has a Chrysler column, not the old GM Saginaw column like the MJ had. Your only ignition switch is the one in the steering column that you already changed. You don’t have an extra one deep in the column. Assuming your XJ is an automatic, just for a hoot let’s test the neutral safety switch. Its a pretty common problem. They get gummed up full of stuff and quit working. It starts out intermittent and gets more frequent. If your reverse lights also don’t work you should definitely look into this. The connector is near the transmission dipstick tube, it’s an eight-pin connector but there’s only six pins in use. Unplug it. You’re looking at the middle two pins in the row opposite the latch, should be black wires but I never trust wire colours. (Conveniently one of the middle pins on the latch side of the connector is vacant so you shouldn’t have trouble figuring out which two pins). B and C in the image below: D and F should be vacant. If you’ve got a multimeter you can probe the two pins on the switch side, you should have continuity between B and C in park and neutral. If you move on to the vehicle side, of the two corresponding pins, one should have some continuity to ground (but not perfect through the coil of the relay) and the other should get 12V when you turn the key to start (you may need a helper to turn the key for you). This will also confirm if your new ignition switch is working for you. If you don’t have a multimeter but you do have a test light, you can check for power at those positions on the vehicle side of the connector when you turn the key. I don’t remember if B or C is the one that gets power from the switch, so check both of them. You can also hook the test light up to the positive battery terminal and probe the other or the two pins to check the rest of the circuit, but be aware the test light might be enough to trigger the starter while you’re doing it. If you don’t have a multimeter or a test light, or you want to confirm the NSS is at fault, you can just jump those two pins on the vehicle side connector, leave it unplugged, double check you’re in park, then go and turn the key. Assuming all is well other than the NSS, it should start. To drive, once it’s started, remove the jumper between B and C and plug the connector back in. Or just keep jumping the solenoid. There’s a guide with an illustration (I stole part of it) for jumping the NSS at the bottom of this page: http://gojeep.willyshotrod.com/HowtoNSSrebuild.htm Plus a handy guide for cleaning the switch out if you’d prefer not to pay for another one.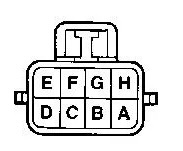
-
Indicator Lights to Gauges
gogmorgo replied to Manche757's topic in MJ Tech: Modification and Repairs
Oil pressure sending unit. The coolant temp sensor is for the ecu, not the gauge. You want to change the coolant temp sender at the back of the head. -
If you’re ever wondering about wheels, http://colorado4wheel.com/images/jeepwheels/xjwheels.html
-
Was out cruising around looking at properties today and spotted one sitting in a driveway. I think it’s one I’ve passed on the highway a couple times. No pictures cause there was a guy on a bike with a couple dogs near the end of the lane, and I’d already driven past him twice and both times he had to stop and call the dogs in to let me by, not a lot of space on the rural roads. I would’ve had to turn around and go by him twice more just for pics, didn’t seem worth it. Maybe I’ll be back one day.