All Activity
- Past hour
-
Yes! Ship with some assembly required (i.e. welding, painting)?
-
I've had an idea rattling around in my head about reproducing a factory style roll bar. I have a tubing bender (JD squared) that I'm going to use to build a custom cage for another project, along with a few other things. I got the bright idea to take a factory rollbar and make what amounts to copies. Easy enough, right? Well, there's one snag. The biggest die I can get only fits 2.5" tubing. The tool doesn't support bigger. The factory bar is 3" tubing. I know I won't mind when I build mine. But I know some of you out there would love for someone like me to offer them up for sale. Question is, would people want them if they were made out of smaller tubing? Let me know your thoughts...
-
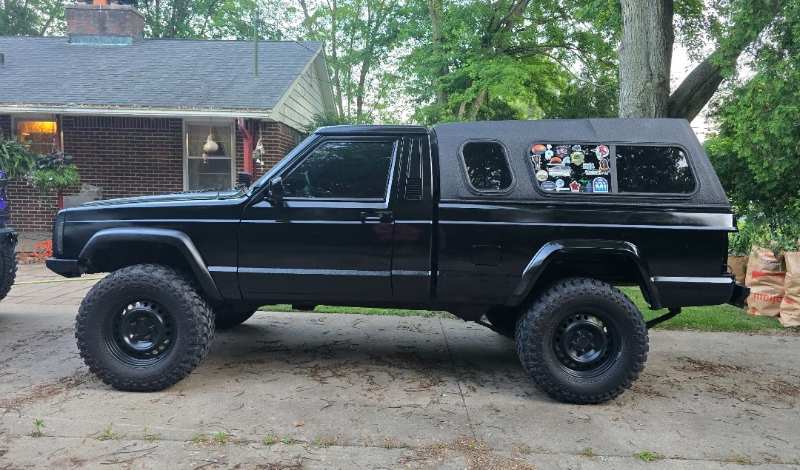
June 2025 - Squirrelly Dan the Adventure Truck
bruceb replied to 89 MJ's topic in Comanche of the Month (MJOTM)
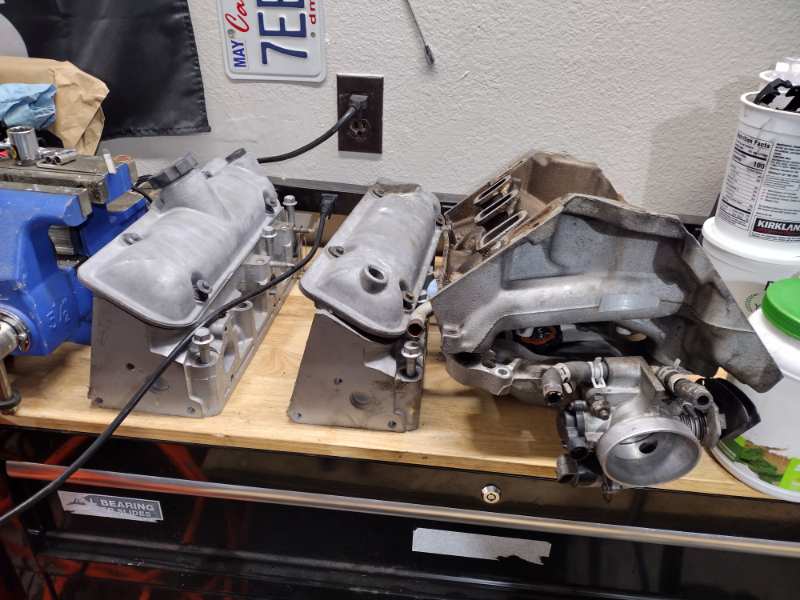
I have the 2.8L V6 in my '86, and my current project is building up a 3.4L V6 for when the 2.8L gives up the ghost. A good website for the swap is: https://www.lunghd.com/Tech_Articles/Project_XJ/Project_XJ.htm I have also taken the next step to increase HP with 3400 heads and intake, which I am in the middle of doing. The aluminum heads and intake are from a 1999 Pontiac Grand Am GT. A good background article on this swap: https://www.ls1.com/forums/showthread.php?t=4706 Since the '86 came with the V6, I decided to stick with a V6 (vs a LS V8) but with a low $$ power build to pump up the HP. So it is not your normal route, but cool for me to have something reliable and different.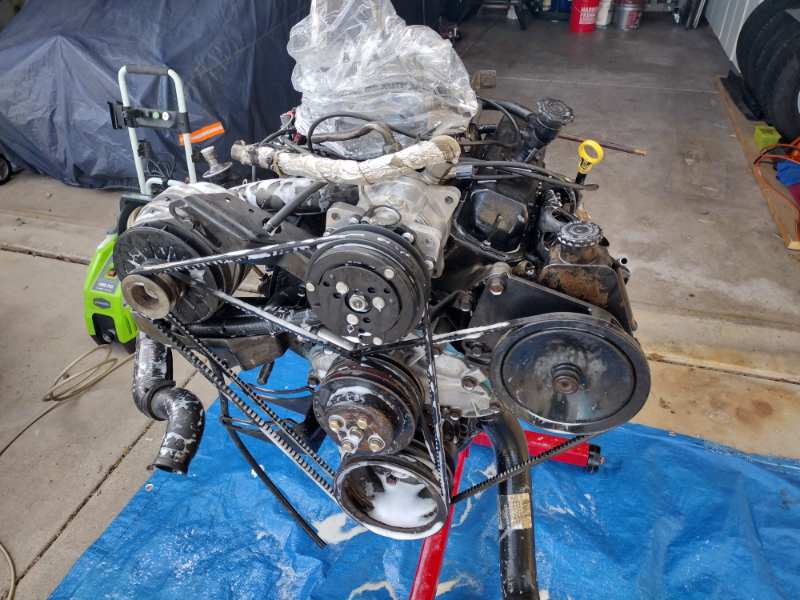
- Today
-
Suggestions and insight on moving a travel trailer
AeroNautical replied to AeroNautical's topic in The Pub
That's incredibly reasonable. This might be the way I go, thanks. -
As soon as they arrive I'll be sure to post my feedback here, in the meantime I've tried to start trimming out any unnecessary bulk from the engine bay harness I have, which is a 91 HO harness and man do they have some confusing things going on here
-
Fixed. Good suggestion
-
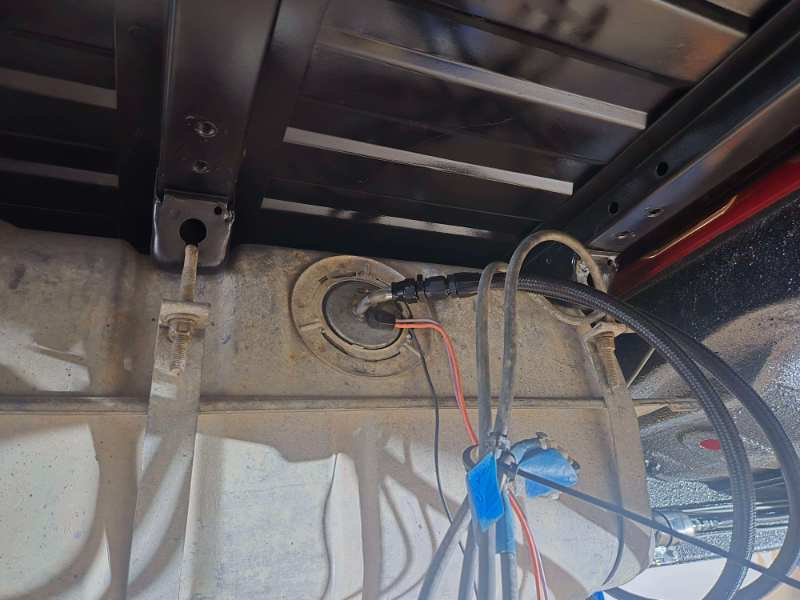
I am interested in how this will turn out. I am looking for a good solution to connect AN lines to the factory sending unit.
-
Maybe put Indiana in the title. Thanks
-
Chunk, A 1984 XJ
eaglescout526 replied to eaglescout526's topic in Member Projects: Other Cool Stuff
I’ll work on something this evening. -

Need some dimensions - yet another lift thread
Gojira94 replied to Tex06's topic in MJ Tech: Modification and Repairs
Quick numbers - your lift is: 2.8" rear 4.0" front Which gives you .8" of rake R > F, so it looks almost level, with the weight of the topper probably not sagging it at all with those beefy leafs. -
I think you definitely need to convert that note pad to a write up!
-
A project that someone started, but didn't finish. The MJ body looks pretty good. https://www.facebook.com/share/1ArwWdRRtP/
-
Suggestions and insight on moving a travel trailer
jeeper_chiefb replied to AeroNautical's topic in The Pub
For my delivery he charged $1/mile cash. -
Project Morris: The 89 to 99 Comanche Long Bed
Gojira94 replied to RuBacon's topic in Member Projects: Your Comanches
Looking at your lift question thread, it appears you have a stock-ish lower plate/ shock mount. And your compressed shock length at ride height is about 2 1/2" - 3" of uptravel. I thought maybe you'd moved the lower shock mount higher at first. In your case, if your lower mounts are near stock location, it's difficult to say why the body of the shock is positioned that high. Put some more pics of the rear shock setup in your lift question thread? -
Need some dimensions - yet another lift thread
Gojira94 replied to Tex06's topic in MJ Tech: Modification and Repairs
I found this thread to be helpful. Extracted from M.R. 277. There is a +1" difference in factory ride height front and rear for 4WD models. 6" lift for a 4WD model would be 13.75" front and rear would be 15.2". It's also my understanding that the factory rake (rear height > front height) is about 2 inches, with these measurements equally changed with lift (or sag). -
Bump I'm gonna give this until the end of July. Then it's getting chopped and scrapped. someone needs to save it.
-
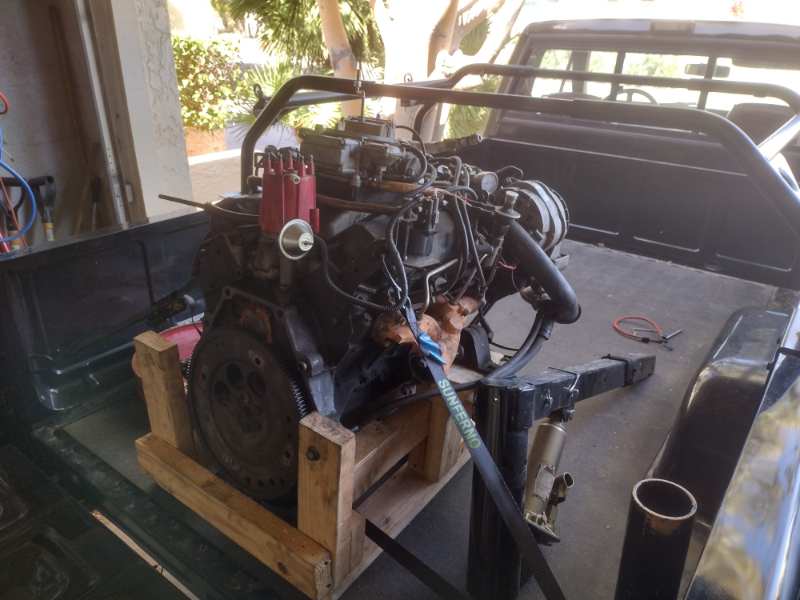
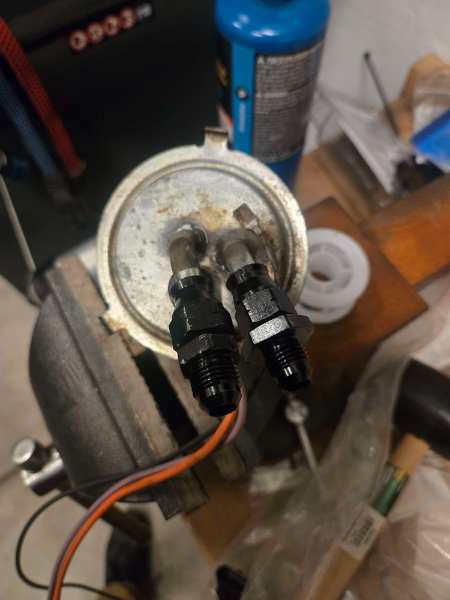
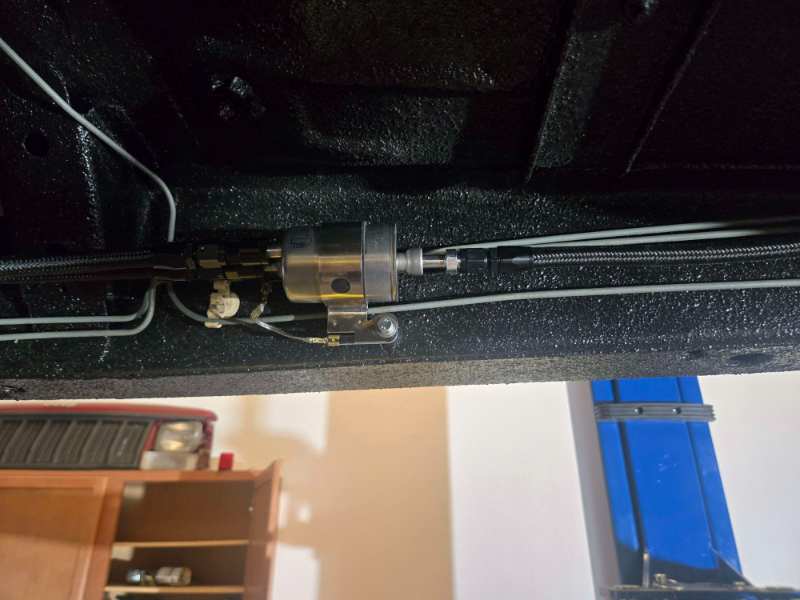
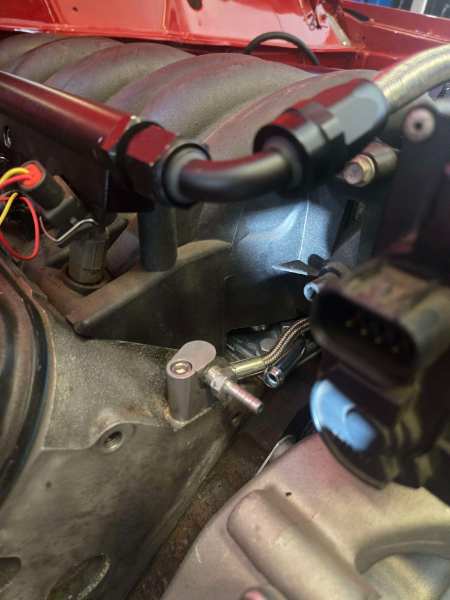
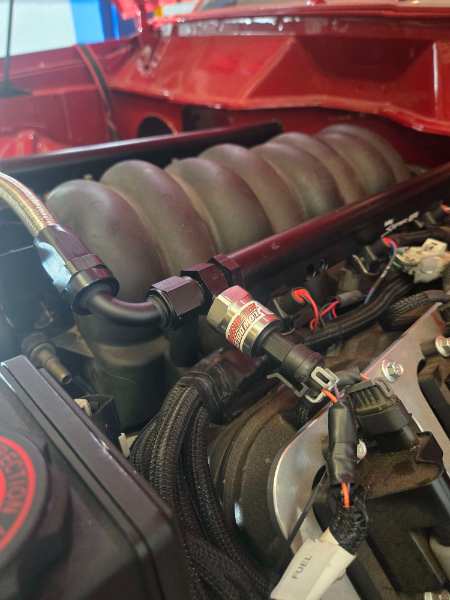
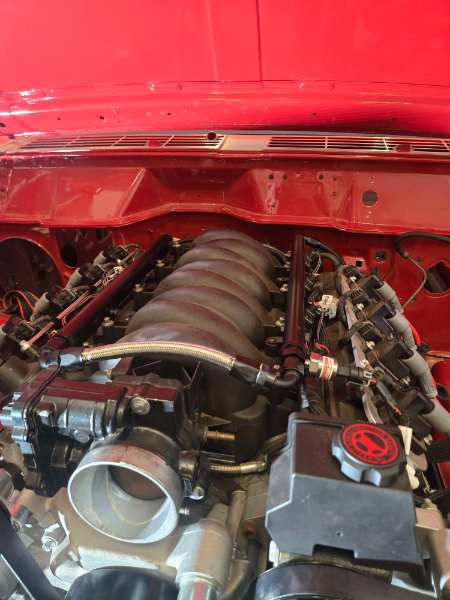
I've decided the best way to move forward with this build is to set myself minor goals/objectives to move on to the larger objective of having a running driving truck. That being said the current objective is to get the motor fired now that it's sitting in the bay. This weekend's step towards that was building an LS compatible fuel system. I'm lucky to have great stores near me that I can go to and close my eyes when I swipe on $400+ of AN fittings and line. SDHQ and Speedway motors are going to be a danger to my bank account. So I landed on a full AN fuel setup, using a corvette style filter regulator. I also decided to add a fuel pressure sensor at the fuel rail so it can be monitored by the Holley Terminator X. To start, I added Compression AN fittings to the fuel pump hanger. I have to say, I probably wouldn't recommend this method. After cutting off the barbs, there isn't enough length left before the bends for the face of the hardline to rest against the AN fitting to get a proper seal. Thus fully relying on the ferrule to seal the fitting. This may or may not hold pressure. I do have a second fuel pump hanger assembly, and found Racetronix's Barb AN adapters. I have both of the appropriate sizes on order and will report if I think it's a better solution, or if you should just hose clamp the line to the hard line. I used Speedways' LS1 AN filter regulator kit, mounted in the factory filter location with a spacer. I may need to work on this further as the single bolt holding it on doesn't seem ideal. At the engine side, I had quite the housekeeping to do. I needed to install my Amazon special LS6 PCV valley cover, swap the -8 feed fitting to a -6, add the pressure sensor housing and sensor, and shorten the Holley fuel crossover line that was obnoxiously long. Starting at the valley cover, I discovered the rear knock sensor was pretty rusty, and broke both the plugs unplugging them, so a quick trip to AutoZone and I got a Dorman replacement kit. I used the good AC Delco sensor that was in the front, and installed the new sensor and harness. I did seem to run into a clearance issue with the PCV output and the ICT Billet steam port crossover kit I'm using, so I'll have to come up with a solution for that. After getting the intake back on everything else was pretty straight forward.

-
Chunk, A 1984 XJ
eaglescout526 replied to eaglescout526's topic in Member Projects: Other Cool Stuff
https://www.jeepforum.com/threads/1992-xj-rke-keyless-entry-upgrade-ir-to-rf-oem-omg.1143482/ It’s a GM RF module actually. I did a Google search and found this link. I studied this link and the embedded camero forum link in his post that has the schematics for the harness for about a good week. It’s compatible with the later Chrysler era fobs. I made a whole note pad on it in my phone and studied that too to make sure I get this right. Ideally you want the module from a yard with the connectors. If not they’re simple female end metri pack 150 and 280 connectors. As far as years, it’s very compatible with all of them. You really just need to know where your unlock and lock colors and you need the keyless harness from an XJ. You could free hand it but that would be a royal pain and take too much time. I simply used the keyless set up I already had and just connected into that harness. If needed I could always do a write up of my experience -
That's really cool! How compatible is this with other years? Is this the infrared system like what came from the factory on my 95 XJ or something different?
-
Chunk, A 1984 XJ
eaglescout526 replied to eaglescout526's topic in Member Projects: Other Cool Stuff
This is by far really really cool. I was able to tuck the module away behind the lower dash panel. No issues at all. The only one that I’m gonna have an issue with is the fact that the lights stay on for about 40 seconds with the lock button pressed and about 2 when unlock is pushed. I’m not sure how to go about correcting that other than unplugging the wire from the harness and leaving it alone. But the lights to turn off when the ignition is turned on. So I’ll just push the lock button when I feel I need to and use the lock switch inside. But I’m happy with how this turned out, will be a lot more convenient for us. -
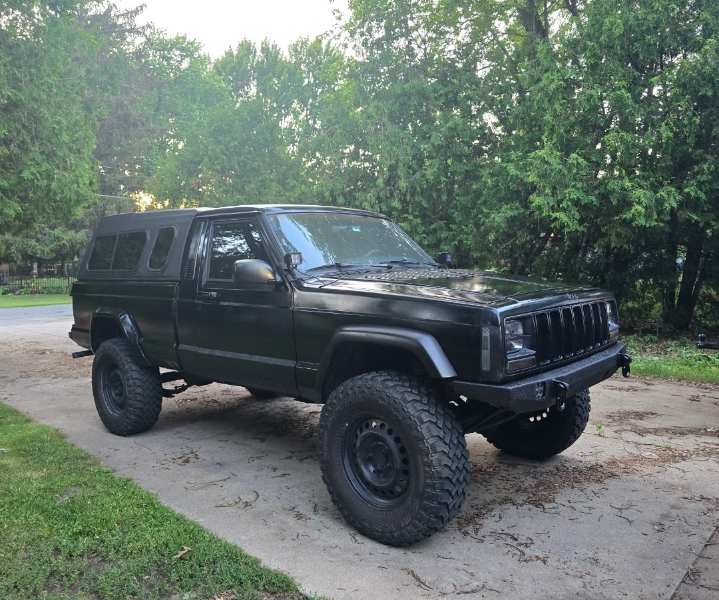
That looks so much better. I think purple would be really cool for long term paint.
-
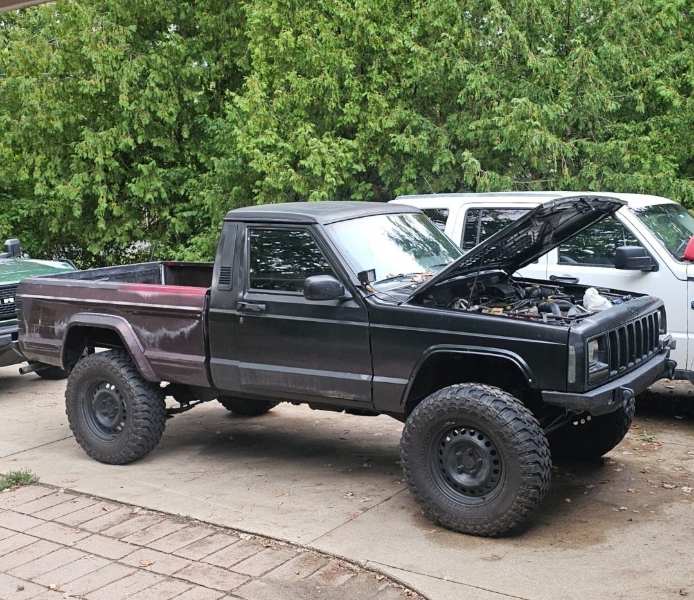
Wanted the Comanche to be one color so I gave it the good ole spray paint job. Turned out much better than I thought it would. Will eventually get a better paint job but I have to figure out what color first. Thinking either super dark blue/purple or maroon
-
- Yesterday
-
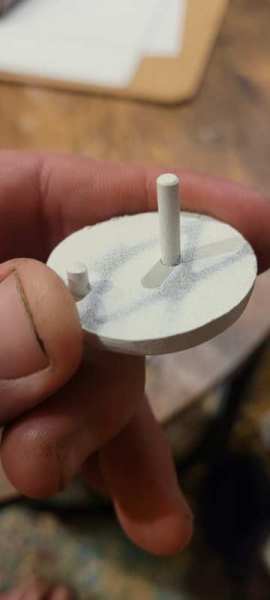
My gf had my letters with her... so here's the back of one of my "E"s. No threads.
-
Those are the little devils right there. None of my letters have threads on them and I broke nearly every single push nut while I was taking them off for paint. Thank you so much my dude, if you're ever in New Orleans the beer is on me! 🍻
.thumb.jpg.4a4a3d2a5e43898c335ffcf8d669571d.jpg)

.thumb.jpg.1661c994f7a5b4b3b1a579e2639a8e4b.jpg)