SoCalManche Posted May 24, 2020 Posted May 24, 2020 To christen my MJ's recent revival, I'm finally starting a build thread for my 1986 Jeep Comanche 2.5L / AX-5 / 4x4 / D30 & D35 / Long bed. To kick it off, I decided I was sick of smelling oil, so I've gone about doing the aluminum valve cover swap. The parts list I used is as follows: - '96 2.5L valve cover - Fel-Pro valve cover gasket (#VS50502R) - 1/2" x 6' heater hose (Prestone #HH0102) - Universal assorted rubber vacuum caps (Dorman #47396) - PCV elbow (Dorman #47079) - PCV grommet (Dorman #42344) - 1/2" hose clamps (MasterPro #MP5512V) - Metered orifice for PCV connection to throttle body (NOT CURRENTLY SET UP) So the swap is 99% done, I am unable to find a metered orifice to put in the valve cover, since mine did not have one on it when I got it. If anyone knows where I can snag one, please let me know! Anyways, had some fun with the paint, and man was it a pain to scrub and prep. But, overall fun experience, and the valve cover, air box cover, and TBI cover spruce up the engine bay a bit. Installing the PCV grommet and elbow in the rear of the valve cover was quick, and I wanted to explicitly make a note to other '86 2.5L out there that may get confused when people are discussing how you must change your PCV/CCV lines when you do the valve cover swap; we are the rare ones that do not need to do this. This photo shows why: F For starters, we have a solid vacuum harness (can't tell if metal or hard plastic) where all our lines hook up that plugs directly into the throttle body, as pictures above. There is a port on this harness not shown that pops up next to the front of the valve cover for the old PCV valve to connect to, going directly into the throttle body, while the rear elbow was connected to the vacuum harness, shooting off to the air box. As you can see in the picture, I plugged that connection on the vac harness (on both ends), and did a direct line to the air box. Hose is a bit big for those ports which is why I am bypassing it, and if you just throw a hose clamp and crank it down on the airbox port, you'll be fine. Whenever I get the brass metered fitting to pop into the valve cover, I will probably use the vac line already there, as I think the diameter will be relatively close enough to also lock down with another hose clamp. My TJ is setup the same way with this valve cover, but I'm under the assumption that all you 4.0-ers out there have it reversed, hence needed to swap it back? Bottom line, my '86 seems to be stock with the front PCV valve shooting directly into the throttle body, while the rear PCV elbow goes directly to the air box. I will update once I get that fitting popped in the valve cover, and start her up. And yes, it seems I don't have a picture of my engine bay pre-upgrade which sucks because would have been nice to have a side-by-side comparison. Oh well, if I missed anything, feel free to ask me to clarify; cheers guys!
SoCalManche Posted May 27, 2020 Author Posted May 27, 2020 So I got the metered orifice for the valve cover. Hooked a line up super professionally as you can see, and now of course, I run into the problem of oil getting through the orifice a bit and into the line to the throttle body. Do I need to do the top Cruiser has listed on the aluminum valve cover?
SoCalManche Posted May 28, 2020 Author Posted May 28, 2020 I went back and looked at the valve cover mod tip, and it seemed much simpler than initially looked over. Knocked it out pretty quick and oil stopped coming out of the metered orifice. Now I believe hissing is coming from the exhaust manifold...an MJs work is never done!
SoCalManche Posted June 8, 2020 Author Posted June 8, 2020 Today was the big day after tireless working to get emissions ready to go; Smog Check Day. I sit there in waiting area trying to listen in on their conversation to hear how poorly she is probably doing on the test, and then I'm met with this: Hell yeah, baby! The satisfaction of seeing how low those numbers are makes the work well worth it. Suck it, California!
JMO413 Posted June 10, 2020 Posted June 10, 2020 Good work! Good to see another one ready for the road.
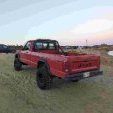
SoCalManche Posted June 10, 2020 Author Posted June 10, 2020 Got to try the ol' ball joint trick for the last bolt holding the toolbox down. It revealed a secret; not a factory bed liner! I'm digging the long bed look without the toolbox, though. Now to find a factory roll bar...
Pete M Posted June 10, 2020 Posted June 10, 2020 On 6/8/2020 at 7:07 PM, SoCalManche said: Today was the big day after tireless working to get emissions ready to go; Smog Check Day. I sit there in waiting area trying to listen in on their conversation to hear how poorly she is probably doing on the test, and then I'm met with this: Hell yeah, baby! The satisfaction of seeing how low those numbers are makes the work well worth it. Suck it, California!
SoCalManche Posted June 11, 2020 Author Posted June 11, 2020 Hot damn is it awesome to finally have a sway bar! OEM 28mm sway bar with Rough Country (#1128) sway bar links, and Energy poly bushings and brackets. Had to go pick up the bolts to mount, and ouch, $11 for 4 bolts. Don't lose those bolts! For reference for anyone that needs them; M10x1.5x30. Anyways, she drives like a brand new truck! It's unreal! I had popping underneath that I thought was a shot steering box (PO also assumed this) and when I threw the bar on, seemed to re-align things to run just right. I ordered drop brackets because it definitely sits a little too close to the coils. Still waiting on those. So stoked!
SoCalManche Posted July 17, 2020 Author Posted July 17, 2020 Been doing some small stuff here and there, but 'rona has taken some of my wallet and motivation to work on the MJ. Today I finally got around to pulling these hideously large Hella lights from the front, and man does she look better already (even with two large holes in the bumper). Also looking to check the rear axle u-bolts for proper torque as the rear end has a rattle somewhere and I can't exactly pinpoint it. Also checking front steering linkage as I still have a mild popping noise that is occuring in turns. And lastly going to try to get this damn belt tight once and for all.
SoCalManche Posted August 27, 2020 Author Posted August 27, 2020 She's been sitting in the garage for a couple weeks since I've been waiting on an OEM 4.0 PS pump to come in the mail due to the initial 4.0 pump pulled from a donor being somewhat seized. It arrived a couple days ago, but finally got to the upgrade today, and I must say, she looks so much better with the 4.0 pump. Steering seems to be much smoother, but the main reason for the upgrade is for the PS belt tensioner. Since mine is an '86, the only way to tighten the belt is with the alternator/ac bracket, but NO MORE! I will never have to touch that bracket again (hopefully) now that this bad boy is here! Very happy with the upgrade. No more belt squeal!
eaglescout526 Posted August 28, 2020 Posted August 28, 2020 Probably the best upgrade any 86 2.5L owner should do.
SoCalManche Posted August 28, 2020 Author Posted August 28, 2020 2 hours ago, eaglescout526 said: Probably the best upgrade any 86 2.5L owner should do. I agree completely!
SoCalManche Posted November 26, 2020 Author Posted November 26, 2020 Been a while since I've done anything to the MJ. Have an alternator coming soon, I still need to put on the roll bar, need to rebuild the ZJ steering box, and refresh the rear springs with bushings and all that jazz. In the meantime, I did a fun little upgrade courtesy of @eaglescout526. When I got the truck, my minimalist console was broken at the mount points, so I've been running without one for a couple years now. @eaglescout526 built one of these for himself, and naturally I immediately wanted one. It comes with built in air flow that shoots out under the bench; it's pretty sweet! Unfortunately, I had taken a picture of what it looked like beforehand, but that picture has magically vanished, haha. Oh well I guess. (Also borrowed the shift boot from the TJ for the time being since mine was all shredded )
eaglescout526 Posted November 26, 2020 Posted November 26, 2020 Huh, I guess yours is a bit longer than mine. Whoops! Better to have too much than not enough.
SoCalManche Posted December 7, 2020 Author Posted December 7, 2020 California got shutdown again, and being in the bar industry, I'm laid off once more (thanks COVID). Gives me time to finally put on these sway bar drop brackets though; shout out to @HOrnbrod for the JK rear sway bar drop bracket mod to even out the angles and clear the springs better. Gotta grind down the right side a tad due to a clearance issue with the stabilizer that's there. Should I try to get the links and springs more parallel?
SoCalManche Posted December 7, 2020 Author Posted December 7, 2020 9 minutes ago, fiatslug87 said: Don (HOrnbrod) passed away two years ago. RIP to Don; he had a lot of good info to pass on to the community. I'm gonna drink a dram of whiskey in his name. Cheers to him!
Pete M Posted December 8, 2020 Posted December 8, 2020 as long as the links and coils don't contact, you're good to go.

Recommended Posts
Create an account or sign in to comment
You need to be a member in order to leave a comment
Create an account
Sign up for a new account in our community. It's easy!
Register a new accountSign in
Already have an account? Sign in here.
Sign In Now