The BOMB Posted November 14, 2010 Author Posted November 14, 2010 well with the tires on order and the jeep just sitting, I decided it was time to paint it we had 75 as a high temperature two weeks back so I decided it was perfect weather to paint it wasn't going to get any nicer this year and i didn't want to wait till spring. (short of hanging poly in my shop which would have been way to much work.) So I dug out the ol' spray gun and the used the remainder of the shopline primer I had, So I taped it off, Then I primed all the rough or unprimed stuff Then i sanded the rough stuff, and wiped it all down and painted it olive drab this is after the first coat, It turned out looking great and I really like it! That is all for now... more to come :thumbsup:
btm24 Posted November 14, 2010 Posted November 14, 2010 Very nice i love the army green :cheers: Brandon
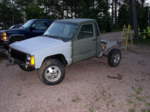
The BOMB Posted November 16, 2010 Author Posted November 16, 2010 well i got the jeep all back together, also threw on the bushwackers, i bought 6 months ago when i must have had money to burn it isn't much of an update but it is all i have, I am still very impatiently waiting for my tires and wheels... more to come :thumbsup:
Carl'sMJ Posted November 17, 2010 Posted November 17, 2010 Looking real good! :thumbsup: The paint job seemed to turn out good. Which brand spray can bed liner did you use on the underside of the bed? I thought I saw a Dupli-Color can in one of the pics, but I couldn't tell for sure. Also, was the olive drab rattle can or spray gun?
Motion Offroad Posted November 17, 2010 Posted November 17, 2010 and the control arms don't look too beefy. Rock Krawler has the "beefiest" arms on the market. Lower arms are made of 2" SOLID STOCK Uppers arms are made of 1 5/8" SOLID STOCK No welded bungs; as the arms themselves are machined to accept the joints. I don't think you'll find something stronger anywhere....
comanche12 Posted November 18, 2010 Posted November 18, 2010 good job on your mj! love the army green color :thumbsup: but i wish that your would make better pictures since blurry give me headache :ack: but good job though :thumbsup:
Dave U Posted November 18, 2010 Posted November 18, 2010 Lookin' awesome so far bro! Keep up the battle. :Canadaflag: :bowdown:
jeffhughes Posted November 18, 2010 Posted November 18, 2010 Looking ot make a long arm kit for my MJ. could you send a few pics to me? or post a few on here? By the way. Looks great!
The BOMB Posted November 24, 2010 Author Posted November 24, 2010 well it has been a while since I posted, school has been busy but I have gotten some serious work done on the ol' jeep, well the first thing that i did was paint the jeep letters black after 24 hours well after the jeep was painted i decided that now would be a great time to fix the only thing that was truly wrong when i bought, the jeep it was leaking brake fluid from the slave cylinder. shifter hole looking down and after an hour of fighting the whole rear of the drive terrain came out; here is the said to be bad throwout bearing/slave cylinder this thing was absolutely gross so me and my dad took it to the quarter car-wash it was 7degrees F out side i don't think i have ever been so cold in my life when that water hit. here the drive-terrain all clean :D i also took this opportunity to scrape all the gunk of the bottom of the trans tunnel so it started looking good before after here is the new and old slave cylinder it cost $130 stupid expensive puegot tranny here it is cleaned needing a slave cylinder ready to go back in then it all went back in (making sure to grease the shaft) then we also rebuilt the master cylinder which was really simple it came out ran a (hone)sp down it then installed the rebuild kit it cost me $9 then we started to bleed the freshly built system and discovered that the line between the slave and master cylinder was leaking :headpop: the main thing i hope is that it wasn't just that line all along. a new one has been ordered and is on its way in... And in other news these came in :banana: still waiting on tires... more to come :thumbsup:
snowboard3r411 Posted November 27, 2010 Posted November 27, 2010 congrats man that thing is really coming together love the green all over i have always wanted to do that :cheers:
knever3 Posted November 28, 2010 Posted November 28, 2010 Great work, it's so nice to see some pictures of a build, it seems the club has really slowed down this year. Keep it up!!
btm24 Posted November 29, 2010 Posted November 29, 2010 You did a great job painting the black on he back but why don't you tape off the insides of the letters? Other then that great work on the truck! Brandon
MancheKid86 Posted November 29, 2010 Posted November 29, 2010 Great work, it's so nice to see some pictures of a build, it seems the club has really slowed down this year. Keep it up!! agreed, i want to do a build, but no money XD this growin up thing sucks
The BOMB Posted December 6, 2010 Author Posted December 6, 2010 well I have been busy with school and such but... I finally got my tires!!! they are guard dogs purchased at treadwright in South Dakota they are 285/75/16 here they are under my jeep i also got this in the mail it is my replacement line between the slave and master cylinder I installed it, here is the old line and the split then i started it up and the clutch worked! there are still some odds and ends that need to be finished: not in any particular order: a brake line mirrors alignment vacuum leak and bumpers and rocker guards and some sort of interior that is all that is left i think... also as to the Joop, i will hand paint the inside more to come :thumbsup:
The BOMB Posted December 20, 2010 Author Posted December 20, 2010 Well i decided it was time to build a rear bumper for the JOOP. So i took a piece of 4x4 1/4 wall tubing and added some tow shackles and a receiver hitch and ended up with this thats me putting it on oh and what is this? Stay tuned more to come :thumbsup:
freakjeep93 Posted December 20, 2010 Posted December 20, 2010 thats a winch mount. that bumper looks great
ryno56 Posted December 20, 2010 Posted December 20, 2010 Say no to crack! Haha, nice sturdy looking bumper. Have you officially adopted the JOOP nickname? That's hilarious.
The BOMB Posted January 13, 2011 Author Posted January 13, 2011 well with one bumper done i decided it was time to start on the front, so i started with this i used the cardboard to make the mounts then copied them onto steal, i used this hole and the steering box to mount the bumper I then added a winch mount this is what it turned out looking like i then cut the plate at an angle to finish off the look I then painted the bumper And this what it turned out like i am very happy with the look more to come :thumbsup:
cody4359 Posted January 13, 2011 Posted January 13, 2011 you sure thoes welds are going to hold that winch on when you put a load on it?
shawn Posted January 13, 2011 Posted January 13, 2011 i very much like the style of those bumpers. infact, i like almost everything about that truck (except the flairs) --- ----- great work !
The BOMB Posted January 13, 2011 Author Posted January 13, 2011 you sure thoes welds are going to hold that winch on when you put a load on it? yep, the corner guard welds turned out looking like garbage because i had to add a filler piece and there were some tough gaps to fill; but the winch plate is welded solid on both sides with excellent penetration and a cross brace, the bumper would tear off the frame before the welds failed.
The BOMB Posted January 18, 2011 Author Posted January 18, 2011 well today i tore out the rear prop valve and ran one brake line back there and threw away the return line and capped it so all brakes are now done new line i also installed the mirrors the weight of the snow really dropped the bed down in this last pic that's all for now more to come :thumbsup:
comanche12 Posted January 18, 2011 Posted January 18, 2011 the weight of the snow really dropped the bed down in this last pic that's all for now more to come :thumbsup: those bushwack flares start growing on me, should I get one for my mj with my future 35" or 36" tires? looks good on your mj :thumbsup:
MancheKid86 Posted January 18, 2011 Posted January 18, 2011 i didnt like bush wackers at first, but if you have the right color scheme they work out great, seen an unlimited today, didnt even put the bush wackers on right, infact, about 6 inches of fender was infront of the grill o_O

Recommended Posts
Create an account or sign in to comment
You need to be a member in order to leave a comment
Create an account
Sign up for a new account in our community. It's easy!
Register a new accountSign in
Already have an account? Sign in here.
Sign In Now