

DirtyComanche
-
Posts
7945 -
Joined
-
Last visited
-
Days Won
11
Content Type
Profiles
Forums
Gallery
Everything posted by DirtyComanche
-
Replaced RMS. Now oil leak really bad.
DirtyComanche replied to howeitsdone's topic in MJ Tech: Modification and Repairs
Fel-pro is a double lip from the P/N on Rockauto. -
Definitely would check for vacuum leaks as Cruiser said, carb cleaner or flammable non-chlorinated brake cleaner works good. Otherwise just do all of his tips, grounds and cleaning stuff especially.
-
Replaced RMS. Now oil leak really bad.
DirtyComanche replied to howeitsdone's topic in MJ Tech: Modification and Repairs
I'd use actual emery cloth. It won't fall apart right away when you put oil on it. But you could try what you have. -
Replaced RMS. Now oil leak really bad.
DirtyComanche replied to howeitsdone's topic in MJ Tech: Modification and Repairs
I'd try polishing out the damage first. I'm not aware of any sleeve procedure that can be done to that part of the crank. Spray weld and turn down, yes, but that's likely as much money as a new crank. -
Not to get political, I'm a Canadian so your politics are your politics, but the previous admin rolled things back a bunch to support certain industries and the consumer as a whole. The new admin then brought back in the targets from the admin before the previous one, plus added an adjustment to them for the 4 "lost years." This means that FCA, Ford, and GM, who build a lot of pickups and SUVs that get less than stellar fuel economy, and now absolutely scrambling to come up with ways to meet the fleet average requirement set by the EPA. GM will pump out econobox cars and some electric vehicles, Ford is likely going to hit it out of the park with their electric F-150 sales along with a fleet of econobox cars/the Mach-E, and FCA... Well, FCA is going to do what they can to improve their existing product line, because they aren't in a great place. I do have to give it to FCA for still offering Hellcats and other neat things to the masses, but government regulation is ultimately going to put an end to that. Their only super high mileage weapon that is selling is the Wrangler 4xE, which is honestly a terrible product that takes advantage of the poor wording of the legislation, but they're not going to make or sell enough of them to fix their problem. I embrace change. My next MJ build will be electric. But that's a ways out, I need enough market uptake to be able to buy the components for cheap enough. The good news is I work super slow so my current build won't be done anytime soon.
-
They have to in order to meet the EPA guidelines for fuel economy.
-
I made a really crappy video on it at one point. Basically it's 3 "pelican" knock off cases. I've got a starter, alt, driveshaft ujoint, a bunch of sensors, ECM, fuel pump, FP regulator, some wire, and a bunch of tools. Then another small Rubbermaid Action Packer with some ATF, oil, brake fluid, and coolant. And a tarp, because I hate lying in mud. I don't carry axle parts because Dana 60.
-
Control Arm Calculations (Actual Geometry)
DirtyComanche replied to howeitsdone's topic in MJ Tech: Modification and Repairs
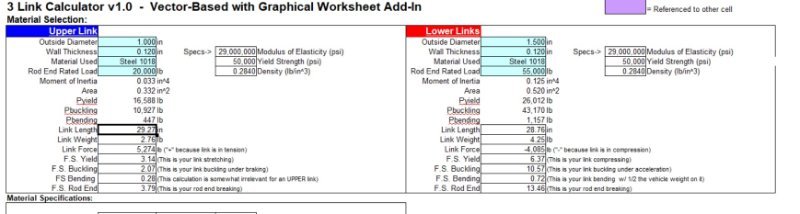
No. That calculator is meant for designing suspension, and while you can use it as a comparative tool, the primary function is design. In design the link length is rarely a starting dimension, instead it is the attachment points. Thus the link length is an output rather than an input, and the attachment points would be moved as needed if one is trying to produce a specific length. I don't have the 4-link calc open or a current setup loaded into it, but the 3-link is the same and here is a screen grab. Note that the "weird" 4-link with panhard (AKA 5-link) setup Jeep uses is probably better actually modeled in the 3-link calculator IF you're only interested in the geometry summary. THIS IS NOT THE DIMENSIONS OF A STOCK JEEP, I don't know them and am not likely to go out and measure. To explain the numbers in the input box: Upper link Frame End X dimension (29.25") is the distance from the axle centerline on the X axis the link end is away from the axle, in this case back from the axle. So if you were to measure straight back from the axle centerline with the tape measure flat and parallel to the centerline of the truck, my upper link end would be attached 29.25" back from it. The link calculator is actually meant to model the rear suspension, but we're talking front, so just roll with the fact that a dimension farther back is positive rather than negative. Upper link Frame End Y dimension (11") is the distance from the truck centerline that the upper link end is outwards from, as in it is 11" offset to the passenger (in this case, again, it's backwards because the link calculator is for the rear) side from the center of the truck. Upper link Frame End Z dimension (22") is how far from the ground (with the truck on the tires) the upper link is. This one is easy to measure, if the truck is on flat ground with the tires aired up, you can just measure from the ground to the center of this attachment point. So, 22" above the ground. Upper link Axle End X dimension (0") is how far forwards or backwards the upper link attachment is from the axle centerline. This is 0" in my case, meaning the upper link attachment point is dead center vertically above the axle tube, and would be similar on a Jeep with stock suspension. Upper link Axle End Y dimension (10") is distance from the truck centerline (or axle, whatever, your axle should be centered in the truck) that the upper link attachment is from side to side. So, in my case it's 10" outward. This means the upper link(s) are closer together at the axle than the frame. Upper link Axle End Z dimension (22.5") is how high from the ground, again tires on and aired up, the upper link attachment point on the axle is. In this case my attachment point is slightly higher than on the frame. Going to the Material tab gives me an upper link length of 29.27" for this link. If you are using the 4-link calculator everything works exactly the same, it will just draw in the second upper link as a mirror image of the first. The lower link numbers all mean the exact same thing, it's just the lowers, not the uppers. I'll explain the panhard bar inputs if somebody wants, but it's fairly obvious if you figure out the other ones. To use this tool to give you the comparative link lengths needed, after you input all the correct points for a stock Jeep, simply adjust the Z axis frame dimensions for both the upper and lower links by the amount of lift (add to them) or lowering (subtract) you intend. It will adjust the link length in the materials tab to keep the axle in the same location. This will not change pinion angle. Hope this helps. I could explain more if needed or screengrab a video of doing it I guess.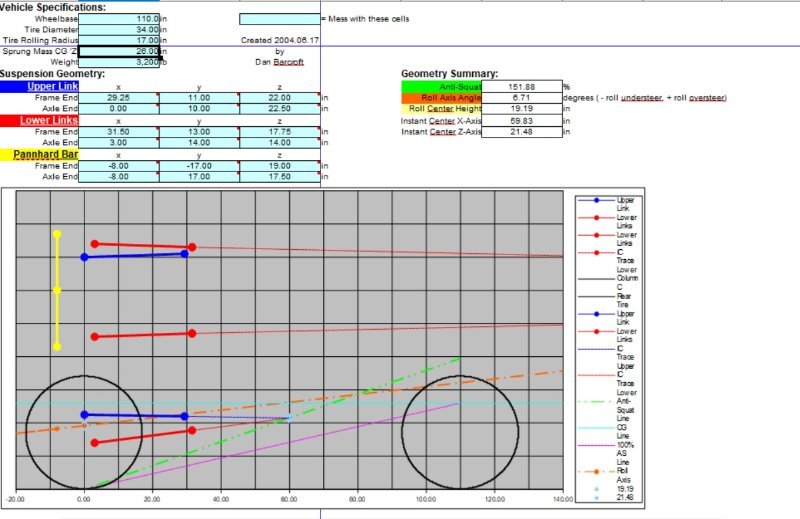
-
Control Arm Calculations (Actual Geometry)
DirtyComanche replied to howeitsdone's topic in MJ Tech: Modification and Repairs
If you're trying to be 100% correct from the get go, you need the Z-axis (horizontal separation) between the mounts as well. The LCAs are fairly straight, but I don't believe 100%, I do not have my notebook here to say exactly though. The UCAs have a significantly narrower separation on the axle side versus the frame, as in they're angled quite a bit, maybe 20 degrees or so. Conveniently what you need already exists, you just have to plug in the variables. You can find it here: https://www.patooyee.com/calculators/4BarLinkV3.1d.xlsx (Ignore any warnings about their unsigned security certificate, I can personally vouch for the person who holds that domain) There is a newer version of that calculator (6.something) but it doesn't run on OpenOffice, so I haven't used it. It's available from Irate4x4. -
Transmission crossmember studs
DirtyComanche replied to DirtyComanche's topic in MJ Tech: Modification and Repairs
I actually can drill most of them from the top... maybe all of them. Pending my decision on the passenger side floor. -
Door Panel Restoration Before/After Photos
DirtyComanche replied to Hust01's topic in MJ Tech: Modification and Repairs
How did you stretch it and attach it? Looks like a good way to save otherwise useless door cards. -
Transmission crossmember studs
DirtyComanche replied to DirtyComanche's topic in MJ Tech: Modification and Repairs
I'll be prepared for that then. I generally hate hand drilling things above my head. -
Transmission crossmember studs
DirtyComanche replied to DirtyComanche's topic in MJ Tech: Modification and Repairs
It's probably what I'm going to do then. I likely could just get away with leaving it, but yeah... Rather not. -
Transmission crossmember studs
DirtyComanche replied to DirtyComanche's topic in MJ Tech: Modification and Repairs
Next question... If I drill the threads out of my captive nuts, can I tap to 7/16 UNC? It looks like there's lots of meat there. The issue I've had that leads to this is that the threads in some of them are not great. A stud is better for this scenario in that as long as you put it in correctly it will never wear the threads out more, hence why I was just going to use them and call it good. I'm taking the crossmember on and off multiple times as the whole drivetrain has been in and out and whatnot a bunch. -
Transmission crossmember studs
DirtyComanche replied to DirtyComanche's topic in MJ Tech: Modification and Repairs
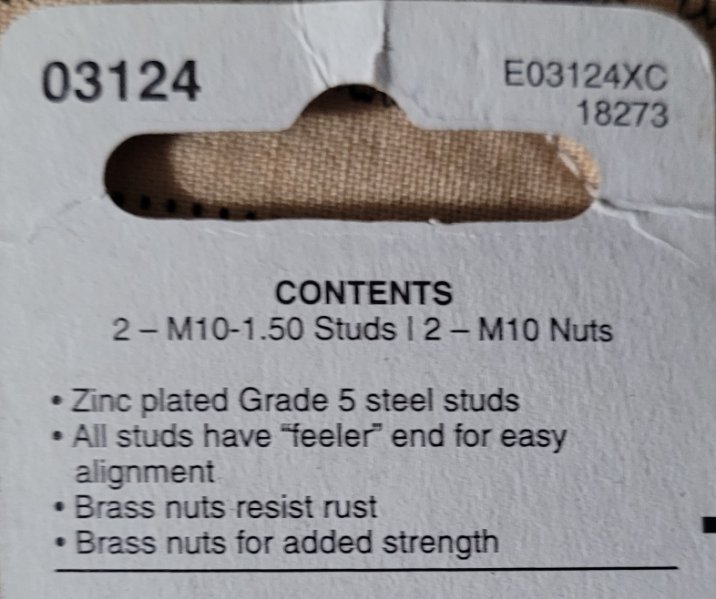
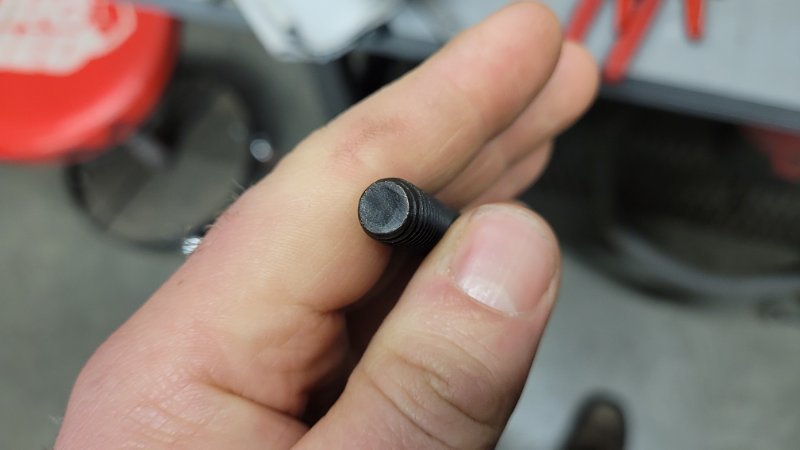
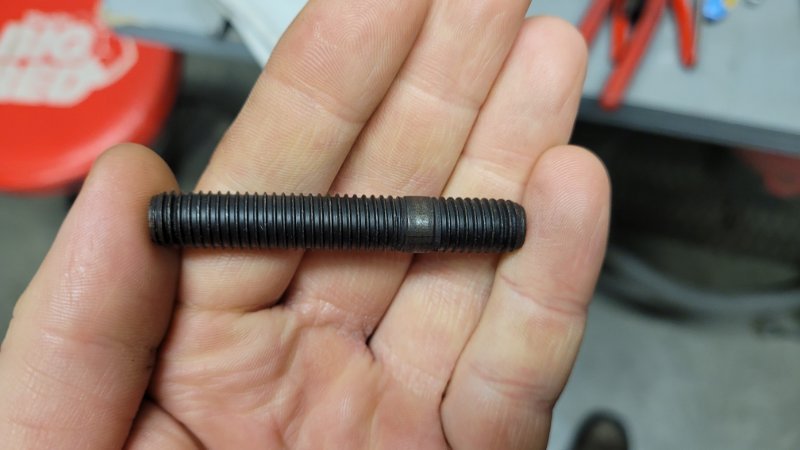
So, just in case anyone searches and finds this, do not use those Dorman studs. I ordered them without being able to see them, so you get what you get, and it's not acceptable for this application. There is no stampings on them to indicate strength, and the package labeling is very generic but calls them a "Grade 5". A grade 5 is more or less equivalent to 8.8, which is okay, but not ideal, but since there is no such thing as a metric grade 5 fastener the whole thing is highly suspect. Each end: Packaging: I didn't check if the nuts were brass or not. They are black, but there is a hard black coating used on brass (I assume it's an oxide coating) that looks similar to that. Regardless, the package is just generic BS from what I'd guess. But the real damning thing is the thread form: I'm guessing this thread is used for applications where there is extreme heat cycling as it would allow the fastener to expand and contract more without stressing it. I could be totally wrong about that, as I'm not familiar with this thread form. I do believe it is intentional as I ordered two packages and they are all like this. Regardless, it is not a proper load bearing thread as it is rolled with a very narrow crest and a wide root. I would not trust this stud in any sort of application where the failure of it would ruin your day.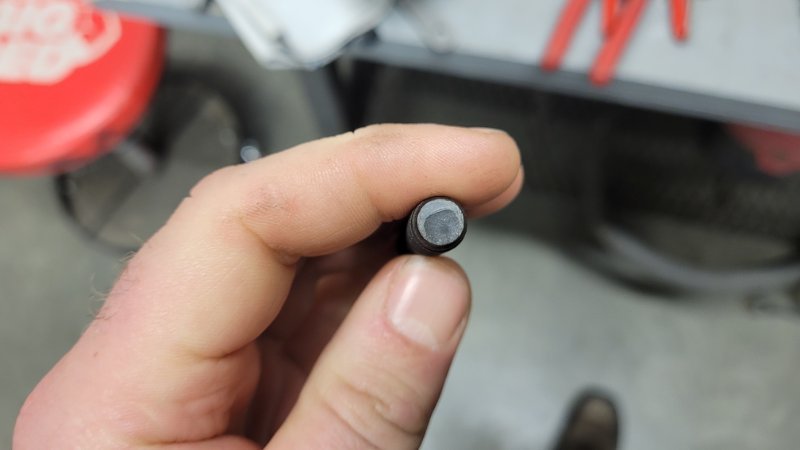
-
NEW MJ Fuel Sending Units
DirtyComanche replied to mrmel2you's topic in MJ Tech: Modification and Repairs
You got me there, I was thinking about newer ones for some reason. Probably because I've been trying to rid my life of steel gas tanks. -
NEW MJ Fuel Sending Units
DirtyComanche replied to mrmel2you's topic in MJ Tech: Modification and Repairs
The Cherokee one is quite different because it goes into the top of the tank on them. Likewise the Cherokee tank is a totally different shape (it goes behind the rear axle). A Cherokee sender does not fit in a Comanche tank without some significant surgery, and a Cherokee tank doesn't fit where the Comanche tank is. Sooooo, I'd say it probably isn't. -
Then it needs an overflow bottle. And all the other hoses to get hooked to something or plugged. Lots of closed system Jeeps running around with open system radiators. You can just block the overflow or use a cap without pressure relief.
-
I was hoping to find a used one but I'm not taking that chance. So I guess that's one less now. They'll probably wind up looking at the sudden influx of orders and do another run.
-
Your missing your CCV "harness" too. The vent thing from the engine and other vacuum lines. Also, not sure what's up with your charcoal canister. That's not where it normally lives.
-
Wrangler JK wheels for my Comanche
DirtyComanche replied to JimiGibbs's topic in MJ Tech: Modification and Repairs
Personally I wouldn't bother to do it. However, the book says they're both 27 spline, and Dana really only uses one spline profile* on anything modern, so there is a very high likelihood they're both the same size. There is potential for other issues, such as the stub length being wrong, or the shoulder diameter being different, which isn't data that appears to be readily published. JK axles went to a larger (30 spline) hub and outer, as I recall it, which would likely be the cause for confusion if nothing else is different. Also, my source info can be wrong. I had actually researched this to some extent as is was one of the ideas I'd had for the front axle for my current build, and there was some evidence that it had been done and worked. Then I realized it was stupid idea anyway as I really wanted the increased width of the WJ axle. Then I realized the WJ axles are low pinion and decided the whole thing was not worth pursuing, but there is WJ people that have swapped in HP center sections in what could only be described as pure insanity. *I may eat that in that JL axles, along with the latest Superduty stuff, may not use the same spline profile as the standard Dana spline pressure angle isn't efficient and there was effectively free strength gains to be had by changing it, but they hadn't done this by the time of the WJ. Dana tends to make only incremental changes and not redesign everything as a block, unless there is a distinct reason too. The JL axles appear to have been a complete redesign, whereas the latest Superduty stuff has significant changes with Ford changing their requirements regularly. -
This. It goes to the console and lights up the shift bezel if you have one.
-
Transmission crossmember studs
DirtyComanche replied to DirtyComanche's topic in MJ Tech: Modification and Repairs
Yeah, the factory bolts would have only been a 10.9 at best. They don't have a stamping on the head that I'm used to though, I think it's just a letter F. I think I'll just order a set of those Dorman ones and see if they work. -
Anyone have a good (not junkyard) source for the studs that are used to locate the transmission crossmember? Dorman 03124 seems to be the right size, and they're stamped as a 10.9.
-
Wrangler JK wheels for my Comanche
DirtyComanche replied to JimiGibbs's topic in MJ Tech: Modification and Repairs
The CV axle thing doesn't matter, or shouldn't. You can run the ZJ CVs in an XJ/MJ axle. The WJ ones should still fit either hub, just they're obviously not the right length (WJ axle is wider). I'm guessing he probably used the whole knuckle out assembly... At least that's likely what I would have done, assuming you wanted the steering option too.