

DirtyComanche
-
Posts
7933 -
Joined
-
Last visited
-
Days Won
11
Content Type
Profiles
Forums
Gallery
Everything posted by DirtyComanche
-
Exactly. Like I said, I think if he can get it to hook he should run a 12 flat in the quarter.
-
Locking Handle for Tailgate
DirtyComanche replied to MuchRespect's topic in MJ Tech: Modification and Repairs
Somebody definitely has. Not sure if I saw the pictures on here or ZuckerbergBook. -
I bet you got yourself a low 12 second car. In the 1/8th. Honestly, I think you should be able to do an 12 even in the quarter if you can get it to hook. I'm guessing that was the issue?
-
There's different throttle pedals that are bent differently... or they bend over time. Not sure which it is. I put one that was much higher in my XJ because it hit the floor otherwise at full throttle (floor isn't stock shape because doubler).
-
what to start with
DirtyComanche replied to williamlynch's topic in MJ Tech: Modification and Repairs
Depending what kit you get they will come with more things. Some have shocks and control arms included. Also I'd try it before changing the ujoints, unless they're already worn out, it may be totally fine with the old ones. I don't really do stockish/mild builds that often so I can't say what products are better or worse. I also can't tell you the best way to build it. My last mild build was a 3.5" lift and I was never happy with how it rode due to the control arm angles, hence the current build will be a long arm setup, but it may just be that I'm spoiled as most of the time I've gone with long arms or other major changes to improve ride quality. I would stand by the earlier comments to use Bilstein shocks for what you want to do though, there is some other options but the Bilsteins are great for a mild build. -
what to start with
DirtyComanche replied to williamlynch's topic in MJ Tech: Modification and Repairs
Yup. Ride quality has a lot to do with springs and other aspects of the suspension too. At 3" lift with short (stock style) control arms the ride isn't too bad, but it won't be as good as stock, all other things being equal. It's also going to wander on the road a bit unless you either buy adjustable/longer lower control arms, or shim you the frame side mounts (not sure if you can get enough adjustment just with shims). Also, if you have any worn components in the front suspension, you're likely to find out they're a problem once you lift it, as the lift tends to exaggerate wear issues. Likewise you may find you need to change out the u-joints in the driveshafts too, since they may have worn a set that was working fine at stock height, but now gives you some vibration. If you change one thing it inevitably affects other things. -
what to start with
DirtyComanche replied to williamlynch's topic in MJ Tech: Modification and Repairs
Is the truck stock or not? If it's lifted, what 3" lift? -
I'm in the crowd of throwing new gaskets at it and putting it back together. Those dry numbers are great. Also if the stud didn't break flush or below I'd just take it out with the welder. 10 minutes to do that if it goes well.
-
The tcase shifter being stuck in 4lo could be as simple as needing to drive it around a bit while pushing it to get it to come out, or it could need some adjustment or new bushings, or the tcase could be screwed internally. $200 or so for a used tcase and a few hours to swap it should be worst case scenario. I'd have already bought it.
-
Replaced RMS. Now oil leak really bad.
DirtyComanche replied to howeitsdone's topic in MJ Tech: Modification and Repairs
Maybe, but not likely. Rope seals were largely obsolete by the 1960s. I don't think there would be any AMC I6s that would use one and have any sort of interchangeable crank with a 4.0 based on that. -
Replaced RMS. Now oil leak really bad.
DirtyComanche replied to howeitsdone's topic in MJ Tech: Modification and Repairs
Rope seals use those, they basically pump the oil back out of the seal. As to it being right in this application I just assumed it is, as I don't recall if any of my 4.0 cranks looked like that or not, and I'm not aware of any way to add those short of a machining process with the crank out of the engine. -
Replaced RMS. Now oil leak really bad.
DirtyComanche replied to howeitsdone's topic in MJ Tech: Modification and Repairs
I'd try putting it back to stock if nothing else. There is a partial vacuum on it the way it was designed and routed into the intake. That filter *should* be okay like that but when you mod anything and there is another unexpected result, it is always good to back up a few steps and see if the modifications are causing the new issue. -
Replaced RMS. Now oil leak really bad.
DirtyComanche replied to howeitsdone's topic in MJ Tech: Modification and Repairs
Before you give up, make sure your CCV system is venting right. I toasted a 400 SBC because of that. Couldn't get the rear main to seal, tried multiple times, finally one day I ran it out of oil. Turns out it was a breather issue pressurizing the crank case. But yeah, those gashes aren't going to play will with a double lip seal, assuming they're as bad as they look. -
Replaced RMS. Now oil leak really bad.
DirtyComanche replied to howeitsdone's topic in MJ Tech: Modification and Repairs
Fel-pro is a double lip from the P/N on Rockauto. -
Definitely would check for vacuum leaks as Cruiser said, carb cleaner or flammable non-chlorinated brake cleaner works good. Otherwise just do all of his tips, grounds and cleaning stuff especially.
-
Replaced RMS. Now oil leak really bad.
DirtyComanche replied to howeitsdone's topic in MJ Tech: Modification and Repairs
I'd use actual emery cloth. It won't fall apart right away when you put oil on it. But you could try what you have. -
Replaced RMS. Now oil leak really bad.
DirtyComanche replied to howeitsdone's topic in MJ Tech: Modification and Repairs
I'd try polishing out the damage first. I'm not aware of any sleeve procedure that can be done to that part of the crank. Spray weld and turn down, yes, but that's likely as much money as a new crank. -
Not to get political, I'm a Canadian so your politics are your politics, but the previous admin rolled things back a bunch to support certain industries and the consumer as a whole. The new admin then brought back in the targets from the admin before the previous one, plus added an adjustment to them for the 4 "lost years." This means that FCA, Ford, and GM, who build a lot of pickups and SUVs that get less than stellar fuel economy, and now absolutely scrambling to come up with ways to meet the fleet average requirement set by the EPA. GM will pump out econobox cars and some electric vehicles, Ford is likely going to hit it out of the park with their electric F-150 sales along with a fleet of econobox cars/the Mach-E, and FCA... Well, FCA is going to do what they can to improve their existing product line, because they aren't in a great place. I do have to give it to FCA for still offering Hellcats and other neat things to the masses, but government regulation is ultimately going to put an end to that. Their only super high mileage weapon that is selling is the Wrangler 4xE, which is honestly a terrible product that takes advantage of the poor wording of the legislation, but they're not going to make or sell enough of them to fix their problem. I embrace change. My next MJ build will be electric. But that's a ways out, I need enough market uptake to be able to buy the components for cheap enough. The good news is I work super slow so my current build won't be done anytime soon.
-
They have to in order to meet the EPA guidelines for fuel economy.
-
I made a really crappy video on it at one point. Basically it's 3 "pelican" knock off cases. I've got a starter, alt, driveshaft ujoint, a bunch of sensors, ECM, fuel pump, FP regulator, some wire, and a bunch of tools. Then another small Rubbermaid Action Packer with some ATF, oil, brake fluid, and coolant. And a tarp, because I hate lying in mud. I don't carry axle parts because Dana 60.
-
Control Arm Calculations (Actual Geometry)
DirtyComanche replied to howeitsdone's topic in MJ Tech: Modification and Repairs
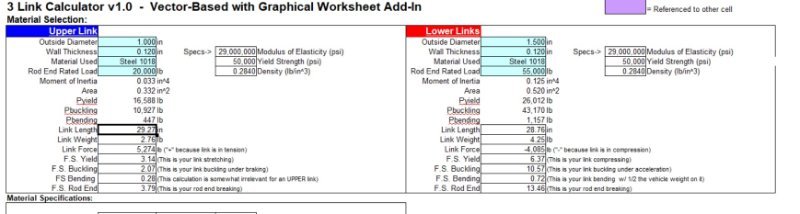
No. That calculator is meant for designing suspension, and while you can use it as a comparative tool, the primary function is design. In design the link length is rarely a starting dimension, instead it is the attachment points. Thus the link length is an output rather than an input, and the attachment points would be moved as needed if one is trying to produce a specific length. I don't have the 4-link calc open or a current setup loaded into it, but the 3-link is the same and here is a screen grab. Note that the "weird" 4-link with panhard (AKA 5-link) setup Jeep uses is probably better actually modeled in the 3-link calculator IF you're only interested in the geometry summary. THIS IS NOT THE DIMENSIONS OF A STOCK JEEP, I don't know them and am not likely to go out and measure. To explain the numbers in the input box: Upper link Frame End X dimension (29.25") is the distance from the axle centerline on the X axis the link end is away from the axle, in this case back from the axle. So if you were to measure straight back from the axle centerline with the tape measure flat and parallel to the centerline of the truck, my upper link end would be attached 29.25" back from it. The link calculator is actually meant to model the rear suspension, but we're talking front, so just roll with the fact that a dimension farther back is positive rather than negative. Upper link Frame End Y dimension (11") is the distance from the truck centerline that the upper link end is outwards from, as in it is 11" offset to the passenger (in this case, again, it's backwards because the link calculator is for the rear) side from the center of the truck. Upper link Frame End Z dimension (22") is how far from the ground (with the truck on the tires) the upper link is. This one is easy to measure, if the truck is on flat ground with the tires aired up, you can just measure from the ground to the center of this attachment point. So, 22" above the ground. Upper link Axle End X dimension (0") is how far forwards or backwards the upper link attachment is from the axle centerline. This is 0" in my case, meaning the upper link attachment point is dead center vertically above the axle tube, and would be similar on a Jeep with stock suspension. Upper link Axle End Y dimension (10") is distance from the truck centerline (or axle, whatever, your axle should be centered in the truck) that the upper link attachment is from side to side. So, in my case it's 10" outward. This means the upper link(s) are closer together at the axle than the frame. Upper link Axle End Z dimension (22.5") is how high from the ground, again tires on and aired up, the upper link attachment point on the axle is. In this case my attachment point is slightly higher than on the frame. Going to the Material tab gives me an upper link length of 29.27" for this link. If you are using the 4-link calculator everything works exactly the same, it will just draw in the second upper link as a mirror image of the first. The lower link numbers all mean the exact same thing, it's just the lowers, not the uppers. I'll explain the panhard bar inputs if somebody wants, but it's fairly obvious if you figure out the other ones. To use this tool to give you the comparative link lengths needed, after you input all the correct points for a stock Jeep, simply adjust the Z axis frame dimensions for both the upper and lower links by the amount of lift (add to them) or lowering (subtract) you intend. It will adjust the link length in the materials tab to keep the axle in the same location. This will not change pinion angle. Hope this helps. I could explain more if needed or screengrab a video of doing it I guess.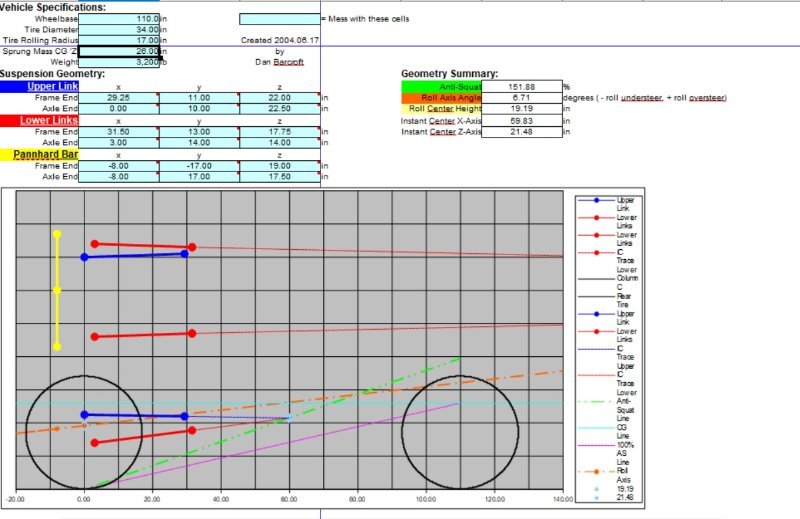
-
Control Arm Calculations (Actual Geometry)
DirtyComanche replied to howeitsdone's topic in MJ Tech: Modification and Repairs
If you're trying to be 100% correct from the get go, you need the Z-axis (horizontal separation) between the mounts as well. The LCAs are fairly straight, but I don't believe 100%, I do not have my notebook here to say exactly though. The UCAs have a significantly narrower separation on the axle side versus the frame, as in they're angled quite a bit, maybe 20 degrees or so. Conveniently what you need already exists, you just have to plug in the variables. You can find it here: https://www.patooyee.com/calculators/4BarLinkV3.1d.xlsx (Ignore any warnings about their unsigned security certificate, I can personally vouch for the person who holds that domain) There is a newer version of that calculator (6.something) but it doesn't run on OpenOffice, so I haven't used it. It's available from Irate4x4. -
Transmission crossmember studs
DirtyComanche replied to DirtyComanche's topic in MJ Tech: Modification and Repairs
I actually can drill most of them from the top... maybe all of them. Pending my decision on the passenger side floor. -
Door Panel Restoration Before/After Photos
DirtyComanche replied to Hust01's topic in MJ Tech: Modification and Repairs
How did you stretch it and attach it? Looks like a good way to save otherwise useless door cards. -
Transmission crossmember studs
DirtyComanche replied to DirtyComanche's topic in MJ Tech: Modification and Repairs
I'll be prepared for that then. I generally hate hand drilling things above my head.