Salvagedcircuit
-
Posts
1381 -
Joined
-
Last visited
Content Type
Profiles
Forums
Gallery
Everything posted by Salvagedcircuit
-
 Does anyone have the part number for the Thermal Fan Switch for the electric fan? Is it Standard Motor Products TS258? This is the switch found on the lower drivers side of the radiator. There is a bung hole (about an inch in diameter) with a thermal switch in it. It has a two wire connector. Thanks.
 -
I know what I'm testing this afternoon. Thanks a ton @87MJTIM!
-
Thanks for the info. Does anyone know if the temperature switch has the same connector as the fan? Maybe my connectors are swapped around. Or my temperature switch needs a replacement. Thanks!
-
Curious, on renix years, when does the electric fan come on with the AC? I was testing my AC this weekend, and while my compressor clutch kicked on once (squealed loudly), the fan never came on. I tested the fan separately and it runs fine with a 12v 10a psu.
-
'88 Comanche Chief (4x4, I6 4.0, Auto)
Salvagedcircuit replied to Silverhawk1991's topic in Member Projects: Your Comanches
Goals right there! I'm hoping to do the same thing to mine, but I'm torn between the chrome or black front trim. Also going to leave the front stock height with 235/75r15's Lookin' mighty fine if I say so -
That's a lot of fine handy work. Looking good
-
1 of 1 Jeep J10 Extended Cab FACTORY Prototype Pickup
Salvagedcircuit replied to WahooSteeler's topic in The Pub
Oh the wonders fb marketplace digs up!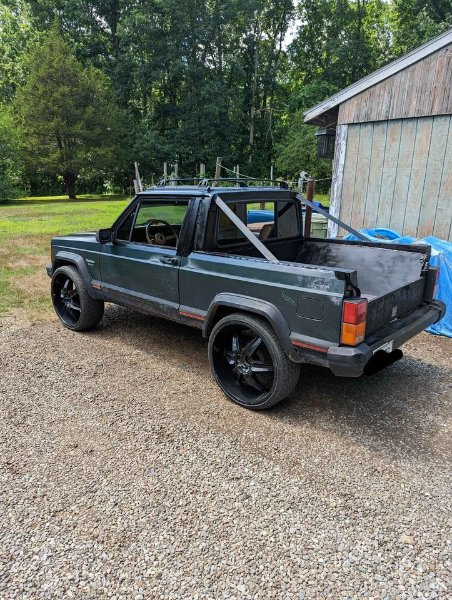
-
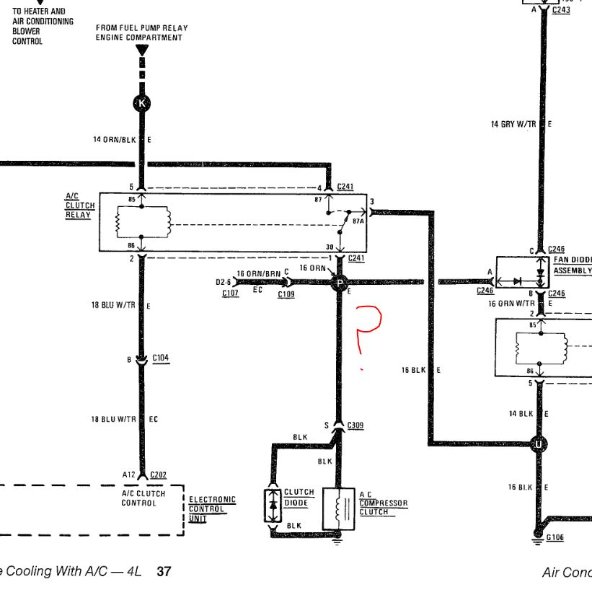
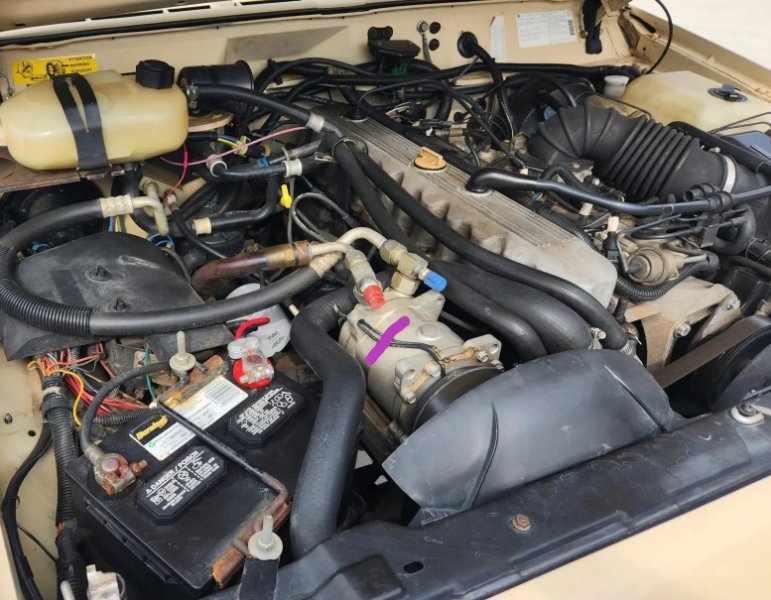
I have an '88 4.0L and the previous owner butchered the AC clutch wires. Mine is cut where there is a purple line in the photo. I am prepared to wire them up, but I have no idea where the two leads go to. One wire is a cut orange wire and I found the mating end, but the other wire has no mate. There does not seem to be any location for that wire to be attached to. I checked out the 88 electrical diagram and it seems that the re is supposed to be a protection diode between these two wires. Can someone send me a photo of how those two wires are supposed to look? Is there a diode or block between them? Thanks!
-
Rollbar dimensions wanted!
Salvagedcircuit replied to 89 MJ's topic in MJ Tech: Modification and Repairs
Awesome! Thanks for confirming @The86manche! Now I can cut some pipe to the right dimension and complete the missing portion of the rollbar! -
1 of 1 Jeep J10 Extended Cab FACTORY Prototype Pickup
Salvagedcircuit replied to WahooSteeler's topic in The Pub
Dang. That's one cool truck. -
The gavel went down. $35,525 Dang.
-
I didn't think any of the comanche's came with a bed light. Was this ever an option?
-
EGR ramblings and reach out
Salvagedcircuit replied to cruiser54's topic in MJ Tech: Modification and Repairs
If you take the .dxf files I uploaded to any waterjet shop, they can make you the part to whatever thickness your want. Big Blue Saw, which is now a part of Xometry, will take nearly any file type. -
Rollbar dimensions wanted!
Salvagedcircuit replied to 89 MJ's topic in MJ Tech: Modification and Repairs
Awesome! -
EGR ramblings and reach out
Salvagedcircuit replied to cruiser54's topic in MJ Tech: Modification and Repairs
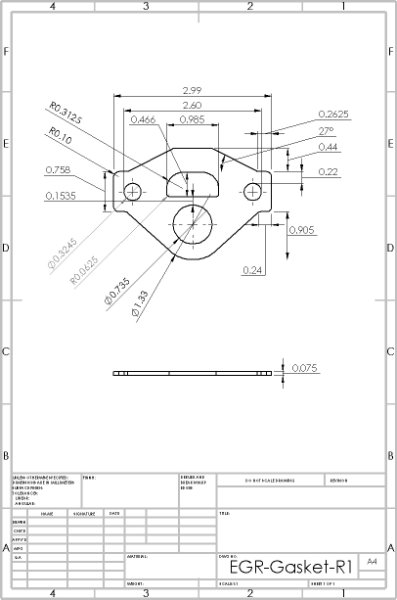
I grabbed my old EGR valve, cleaned up the mating face and gasket and took some measurements. This is a clone of my EGR gasket. This is provided in case EGR gaskets are no longer produced for our vehicles. There are (2) revisions of the files. EGR-gasket-R1, and EGR-gasket-R2. Choose whichever to your liking. I am not a draftsman by trade, so bear with me if the mechanical drawing is overly detailed. All files are released under Creative Commons CC0. Anyone can modify or remix for any reason whatsoever. EGR-Gasket-R1 EGR-Gasket-R2 Mechanical Drawing PDF EGR-Gasket-R1.DWG EGR-Gasket-R1.DXF EGR-Gasket-R1.STEP EGR-Gasket-R2.DWG EGR-Gasket-R2.DXF EGR-Gasket-R2.STEP EGR-Gasket-R1.PDF


-
Rollbar dimensions wanted!
Salvagedcircuit replied to 89 MJ's topic in MJ Tech: Modification and Repairs
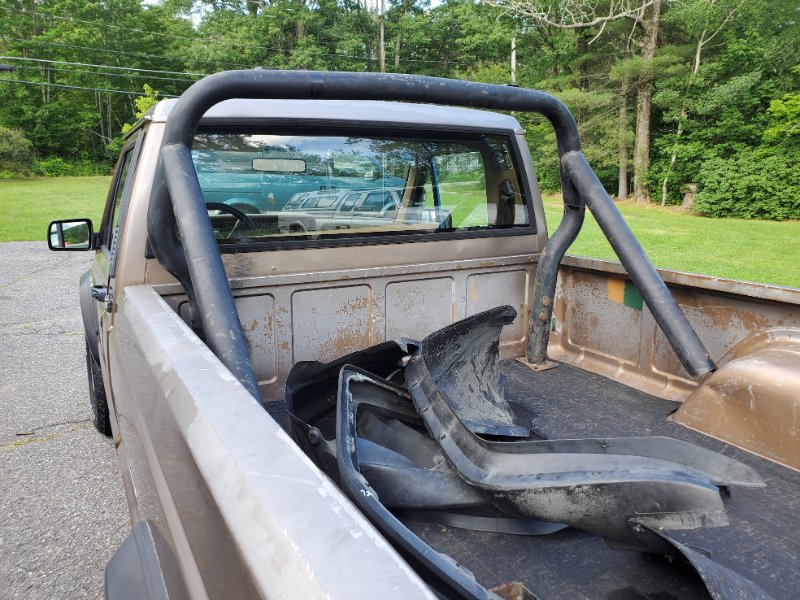
Is there anyway someone can confirm this dimension on a long bed sport bar? This is an old photo @HOrnbrod posted. Is there anyway someone can check if 36in is the correct dimension for the length of the wheel well support tube, measured from the weldment on the main loop to the flange mount on the wheel well bracket? I picked up a hacked up longbed sport bar here: https://comancheclub.com/topic/72136-is-this-an-mj-roll-bar/ I am looking to weld it up back to original condition. The last photo shows the current condition of the bar. Thanks!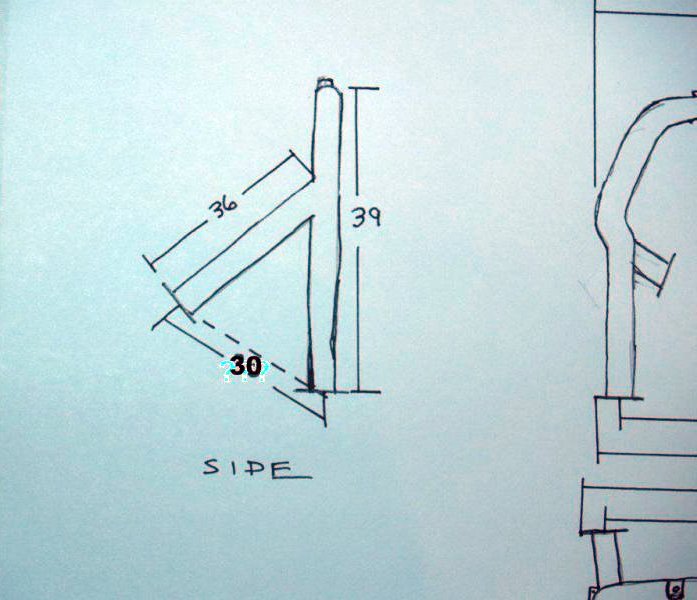
-
Trim panel retainer
Salvagedcircuit replied to 70barracuda's topic in MJ Tech: Modification and Repairs
I would also suggest looking through the Auveco part catalog pdf. They make an incredible number of OEM fasteners, clips and various odds and ends. -
EGR ramblings and reach out
Salvagedcircuit replied to cruiser54's topic in MJ Tech: Modification and Repairs
Do not be surprised if companies no longer sell block off plates. The EPA has been going after anyone making emissions defeat devices. A block of aluminum is incredibly simple to make, and I find it improbable the EPA will bother, but it's possible that any company making such a plate will put their business in jeopardy. Making a plate yourself or using a pipe plug is indeed the best way. I think someone should just post up a mechanical drawing of the dimensions and be done with it. The individual can either trace it with a jigsaw or waterjet some out of aluminum. Or just use a pipe tap. What is truly sad here is that the EPA has the power to pressure a company to comply with emissions. Why are they not pressuring the top tier auto manufacturers to release the specifications of OEM emissions equipment so 3rd party auto suppliers can clone the part? Why is the onus on the end user? -
EGR ramblings and reach out
Salvagedcircuit replied to cruiser54's topic in MJ Tech: Modification and Repairs
Threading and tapping the intake, then adding a pipe plug works great. It does not look stock, but it works great. -
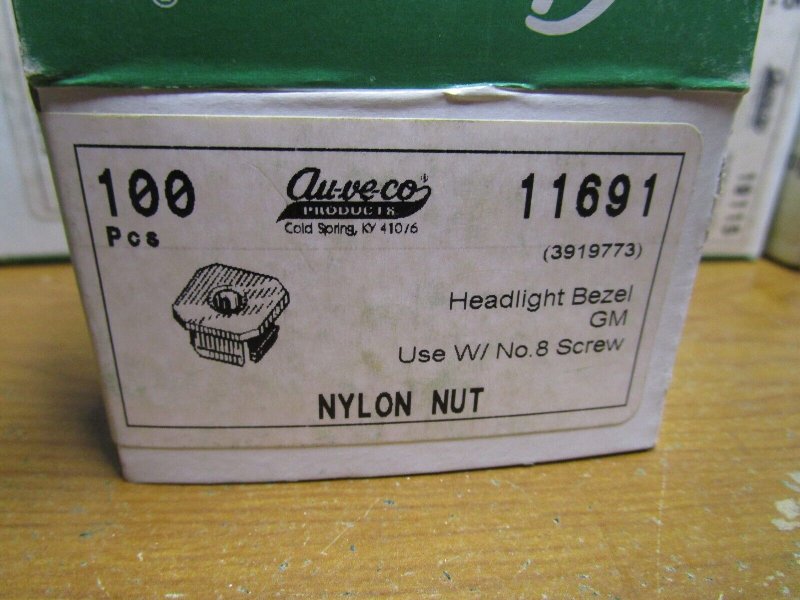
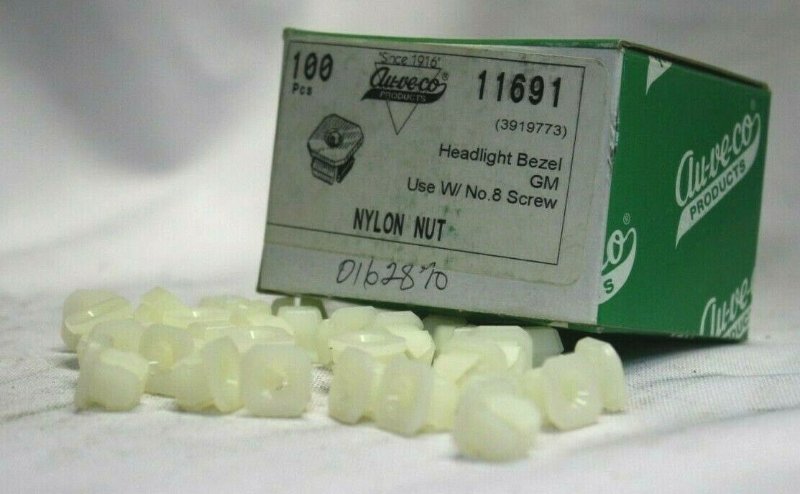
Interesting. That looks an awful lot like the insert used in the square speaker hole on the doors. Auveco 11691. They are an original manufacturer of the nylon screw nut.

-
Any link to the inserts?
-
Not a 4.0 based on the last photo, but still well worth every single penny of that $300! Too bad I'm wayyy too far from this
-
Yesterday I waved to a lady filling up at a stewart's in medina, ny in a sportruck. First one I spotted in the wild! It sounded like it was running on 4 cylinders. Now that I think about it, it could have been a 4 cylinder!

-
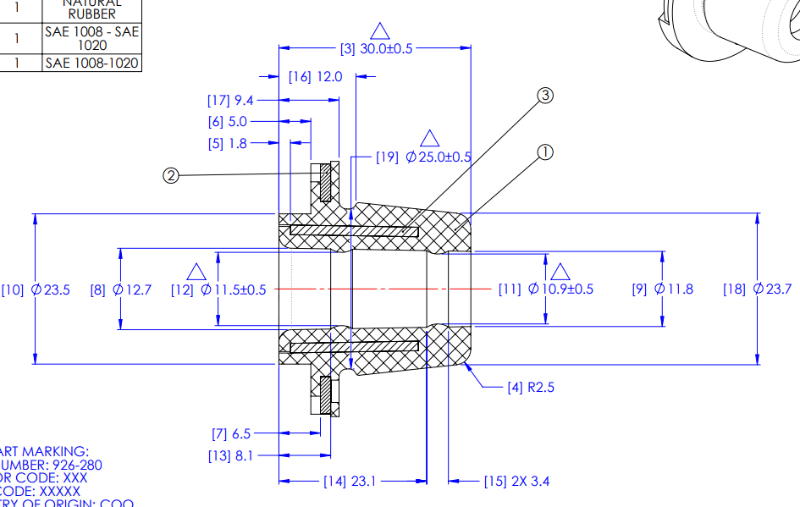
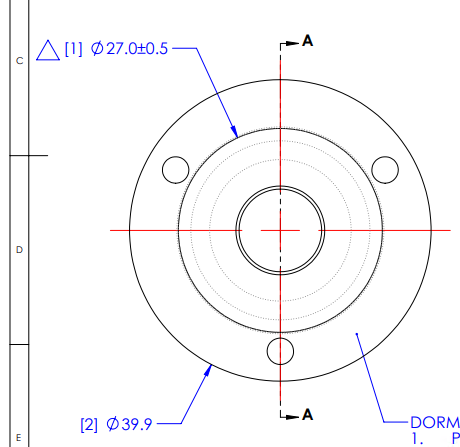
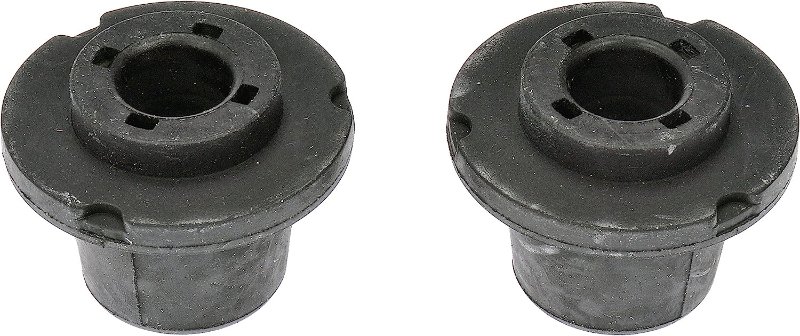
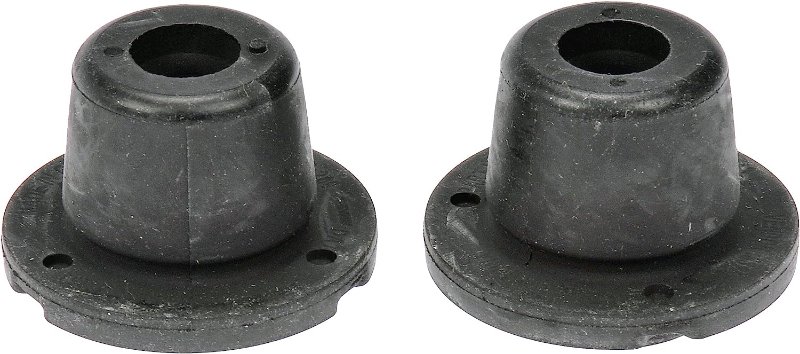
I reached out to Dorman over chat for dimensions of their nearly universal 926-280 lower radiator bushing and they were incredibly nice and sent me the technical drawings of the bushings. Here they are in all their metric glory. These bushings are different in nearly every dimension from the XJ/MJ lower bushing, so this is not a drop in replacement by any means. However, the ID is very close. 10.9mm = 0.429in, 11.8mm = 0.465in. The bottom XJ/MY radiator guide pin measures around 0.4375in, so that's not too shabby. These might work in a pinch if one was willing to drill out the mounting hole in the lower radiator support and trim the top of the lower bushing rubber.
-
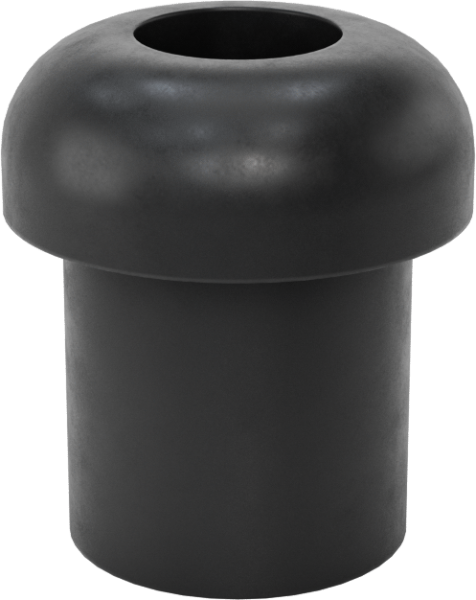
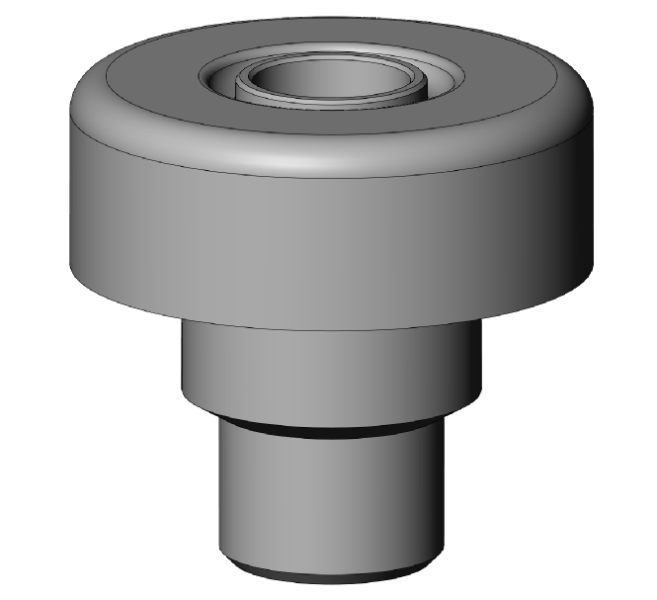
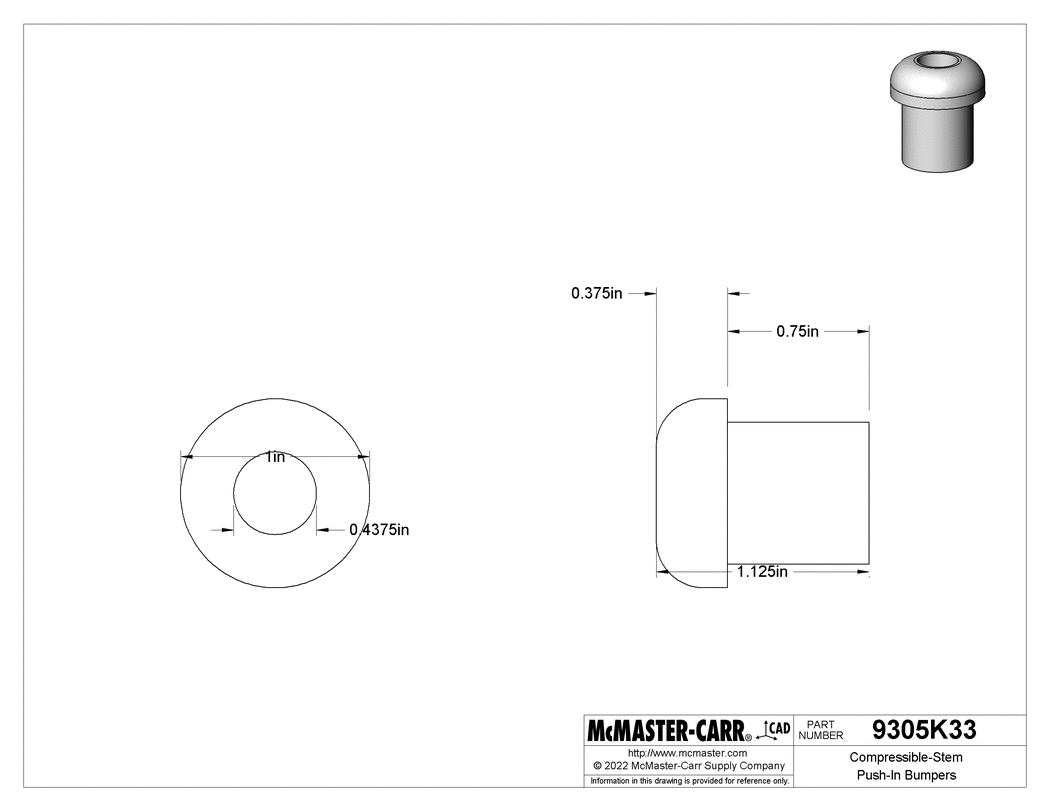
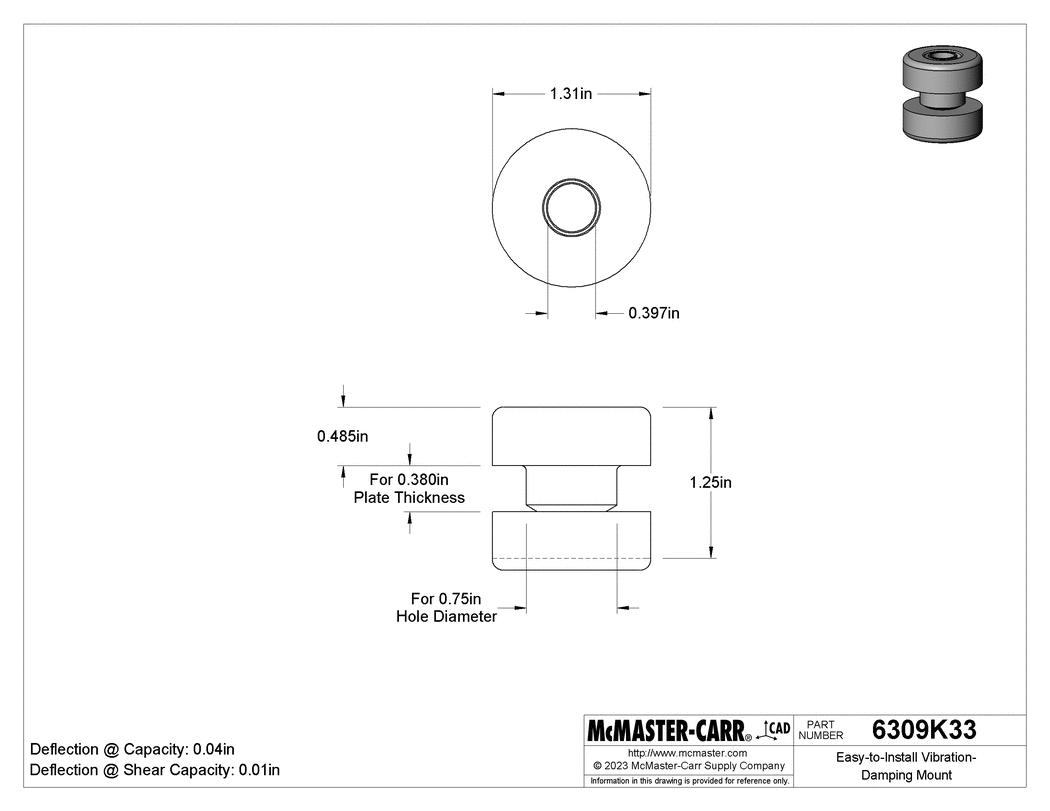
I found two potential bushings: Compressible-Stem Push-In Bumpers: Mcmaster 9305K33 Nearly an exact fit. I may have to cut the height of the top shoulder very slightly (0.125in) with an x=-acto. It says these are not for use outdoors though. I think I'll spray it with spray paint as a protective measure. It should not see too much UV because It'll be buried by the radiator, supporting hardware and the front fascia. Vibration-Damping Mount: Mcmaster 6309K33 These look chunky, but are not ideal. There is a metal sleeve in the middle and there is a good chance it might not press out. Metal sleeve on metal radiator guide pin = plenty of noise and wear. This may be solved by wrapping the radiator guide pin in heatshrink, but the heatshrink will likely not last in that situation. If the sleeve does push out of the bushing, the lower radiator pin should hopefully fit right in. I will also have to cut the height of the top shoulder 0.235in with an x-acto.