
OldSch88L
-
Posts
360 -
Joined
-
Last visited
-
Days Won
1
Content Type
Profiles
Forums
Gallery
Everything posted by OldSch88L
-

Any experts on aluminum wheel polishing?
OldSch88L replied to Warren99's topic in MJ Tech: Modification and Repairs
Aluminum wheels normally have clearcoat of them because otherwise, aluminum corrodes pretty fast. My guess is that you polished the clear on the 3 nice ones, but the fourth looks completely stripped of its clear and corroded. The only way is to sand it to remove the corroded layer, hope there's not too much pitting, polish it and then seal it with clear. It's a really tedious process. The Level II Alcoa wheels on my Ranger had a machined finish, so I had to start pretty coarse, 80 grit IIRC and went all the way to 3000 wet, then polish and finally clear. For clear, I used AlumaClear. It's popular in the heavy trucking crowd as it's pretty much the only clear that'll stick to mirror-finish aluminum. It's easy to strip with mineral spirits because the company recommends stripping it and starting over every 2 years to keep the glossy finish. My wheels are going on 4-5 years and still look nice and the clear ain't that dull yet. Also, when sanding, if you don't want to go through every single grit, you can skip steps. The general rule of thumb is "double", I.E. if you just finished 800 grit, you could skip the 1000 and go with 1500 instead, then 1500 to 3000 instead of 2000, etc. With some patience and elbow grease, you can get great results! -
OldSch88L 's crooked 1988 Comanche
OldSch88L replied to OldSch88L's topic in Member Projects: Your Comanches
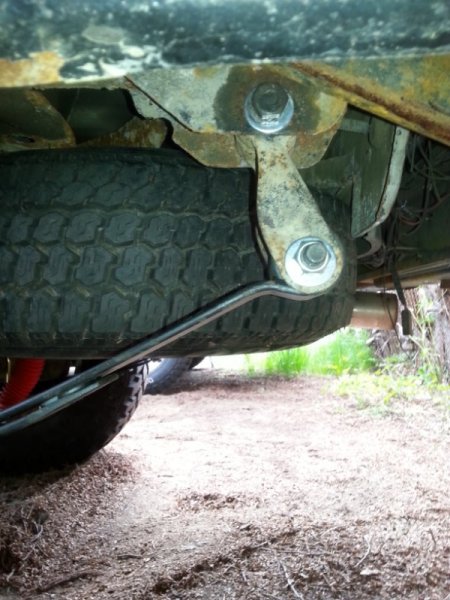
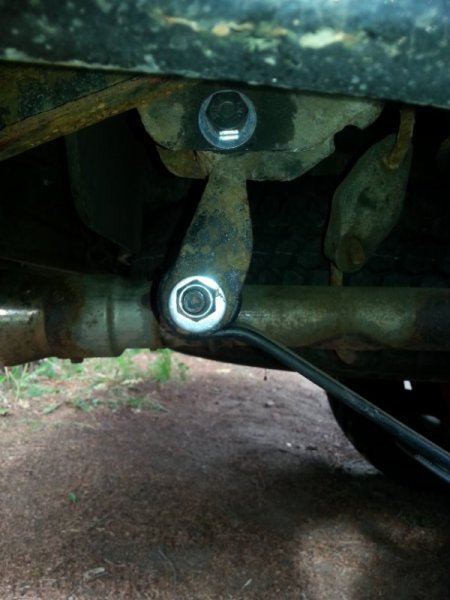
Ah thanks! Now the double shear part makes sense! Do you know if that braket puts the spherical joint in the same spot as the original braket? In other words, it I add it later, will I have to set the track bar and get an alignment again? As for the cross brace, I'll skip as my plans further down the line is to get a Badadfab behind the stock bumper winch mount, which pretty much braces the whole front end. -
1990 jeep comanche transfercase
OldSch88L replied to Mason Suntheimer's topic in MJ Tech: Modification and Repairs
A 4.0 liter manual should be a 23 spline short input shaft transfer case. -
OldSch88L 's crooked 1988 Comanche
OldSch88L replied to OldSch88L's topic in Member Projects: Your Comanches
Could you explain why? The RE bar I got installs without the need of that bracket, and nowhere in the instructions is it suggested as an upgrade... What's the benefit to this exactly? IIRC Rubicon Express only recommended it for their other model of track bar, the one for higher lifts (4.5 and up I think) while mine is for 3.5-4.5", #RE1600. Those drop mounts and drop pitman arms kind of confuse me honestly! And thanks for the compliments by the way! -
OldSch88L 's crooked 1988 Comanche
OldSch88L replied to OldSch88L's topic in Member Projects: Your Comanches
Thanks a lot! I'm going kinda for an "OEM Plus" look; keeping as much of the original look while upgrading what I can, in the mindset as the original! -
OldSch88L 's crooked 1988 Comanche
OldSch88L replied to OldSch88L's topic in Member Projects: Your Comanches
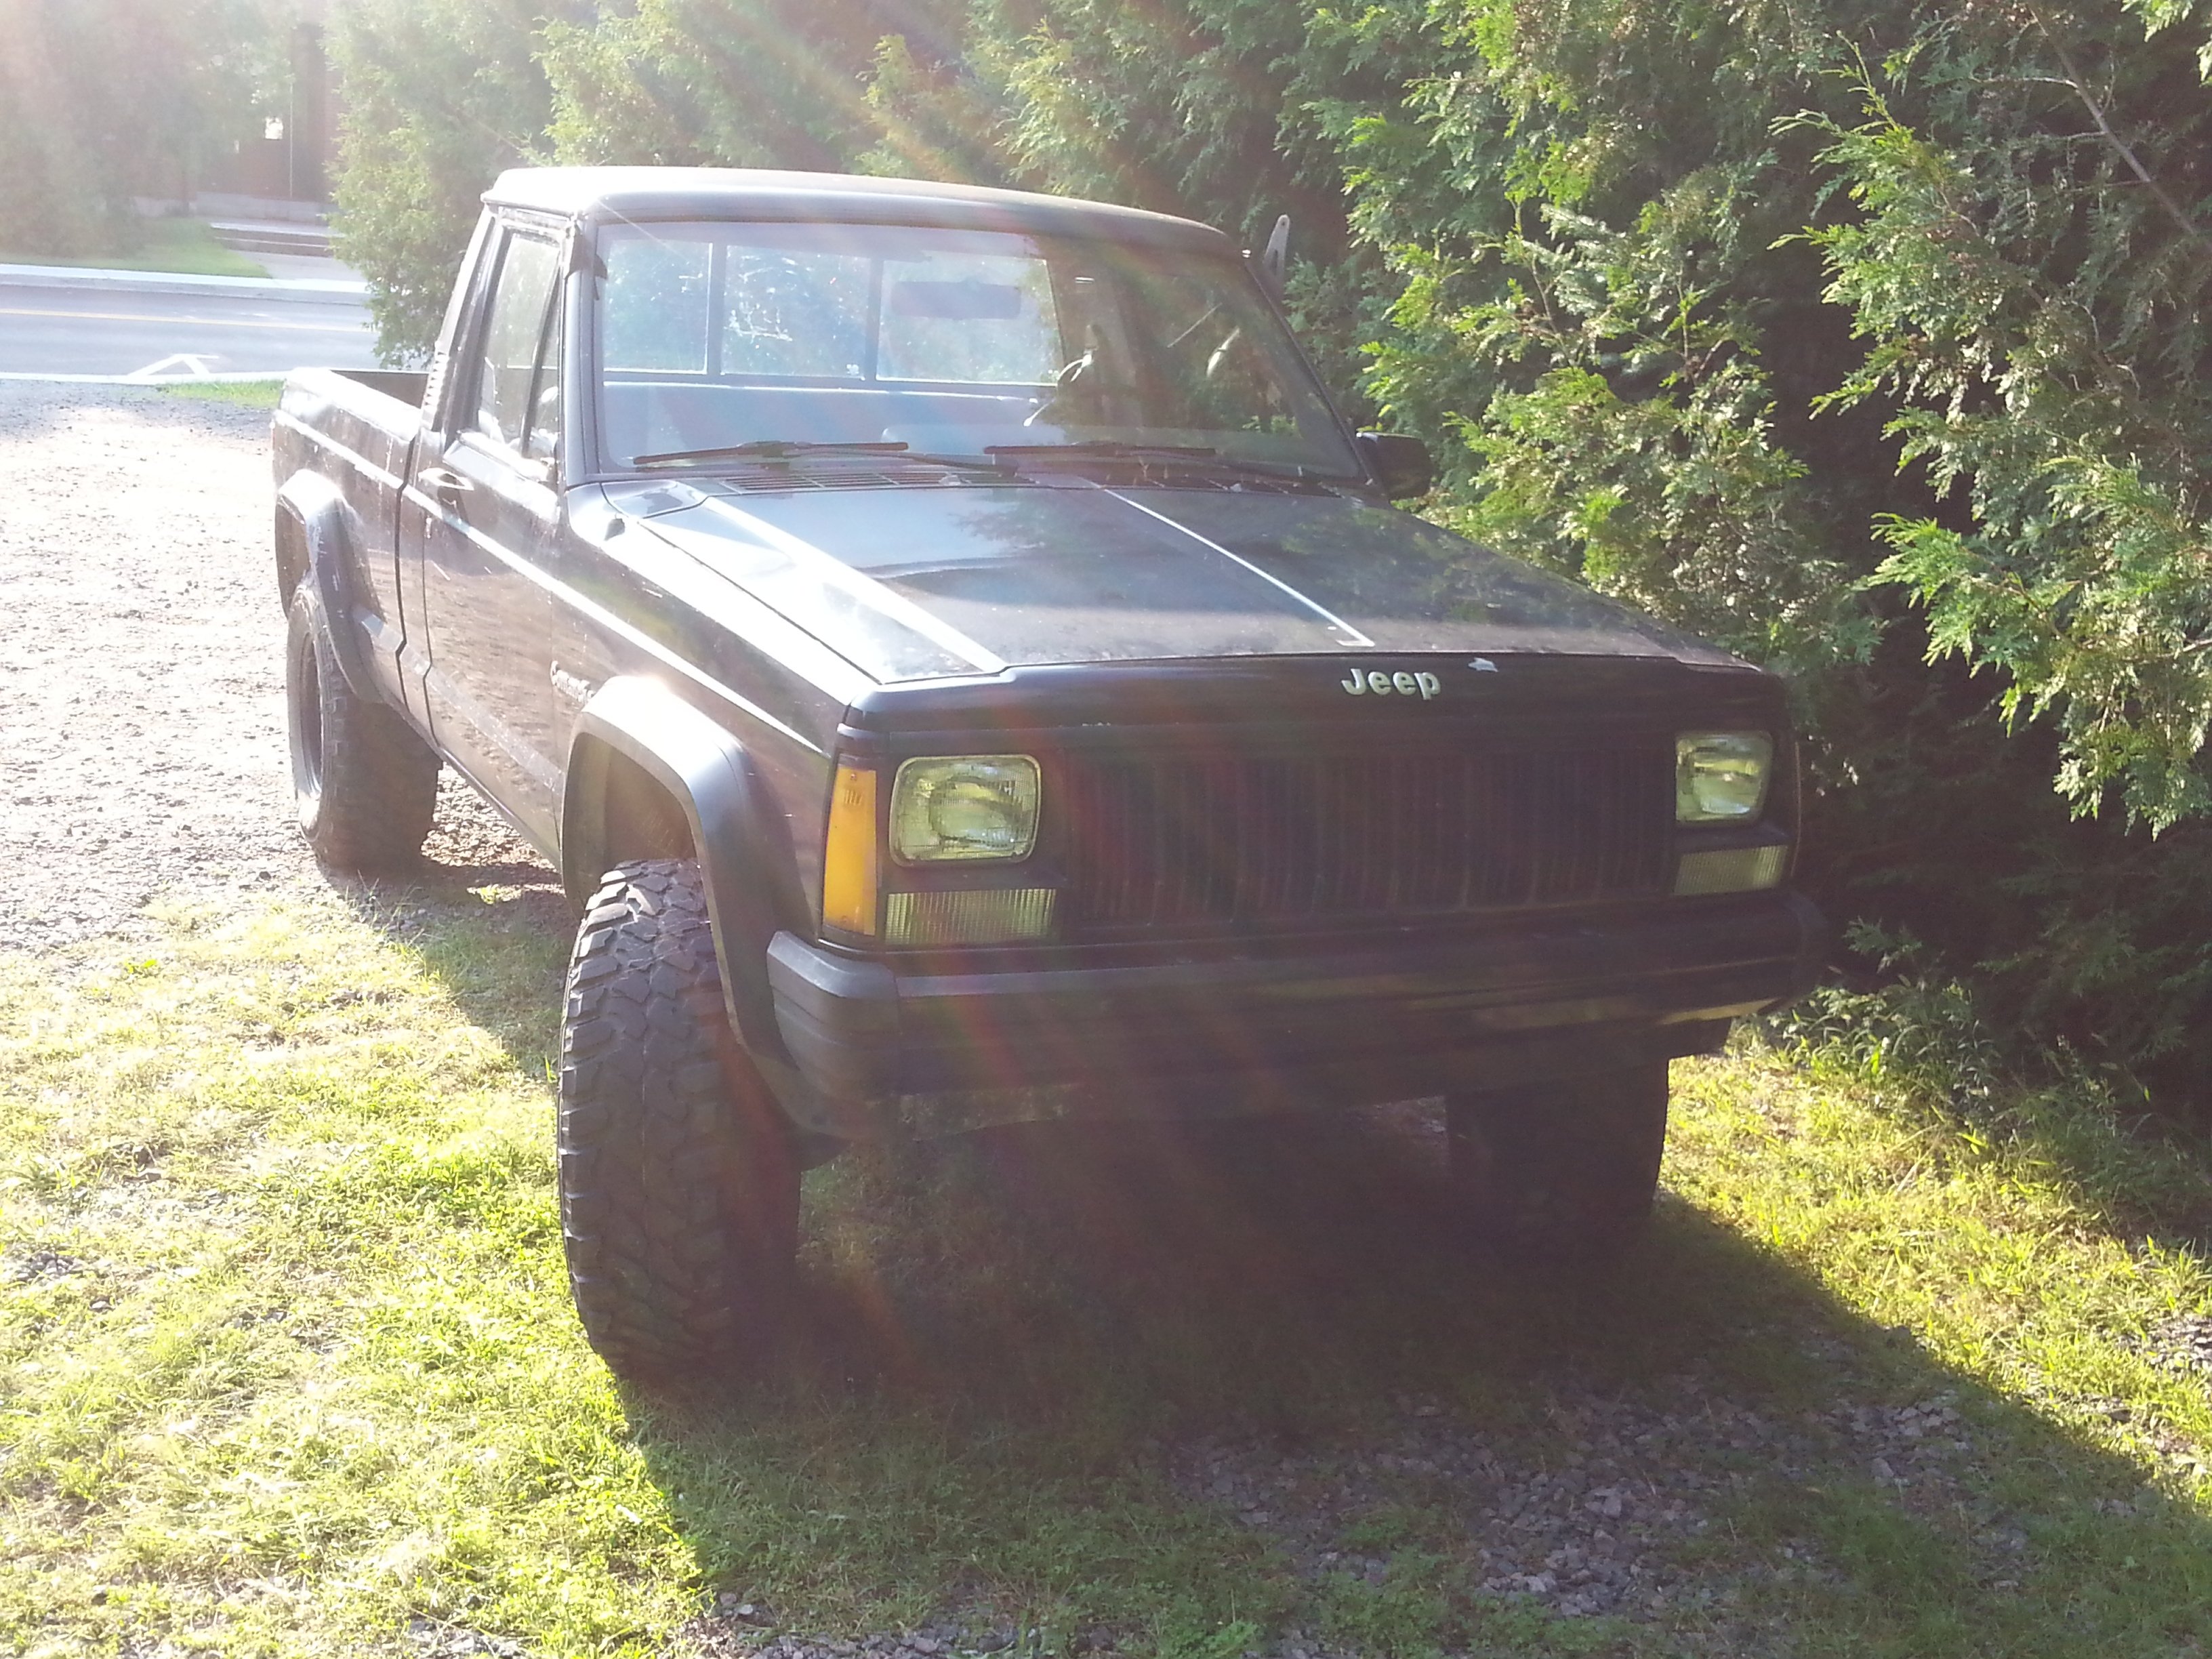
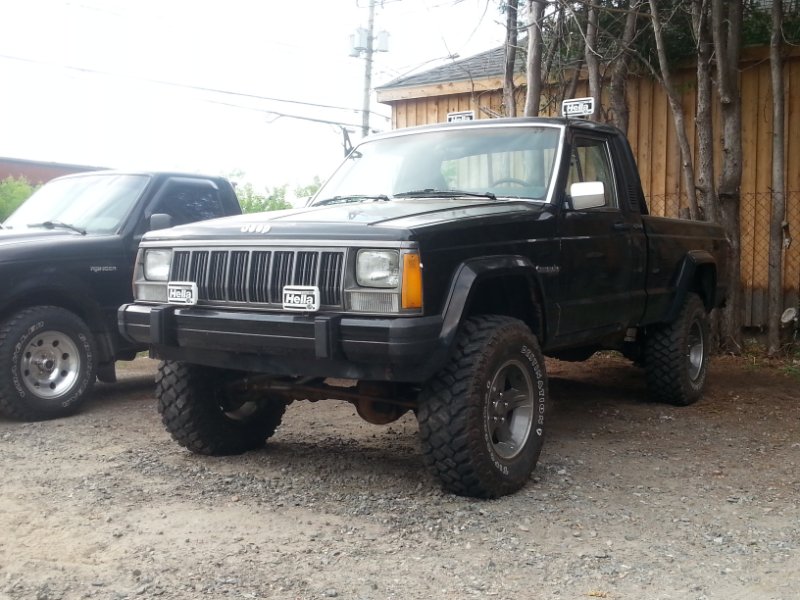
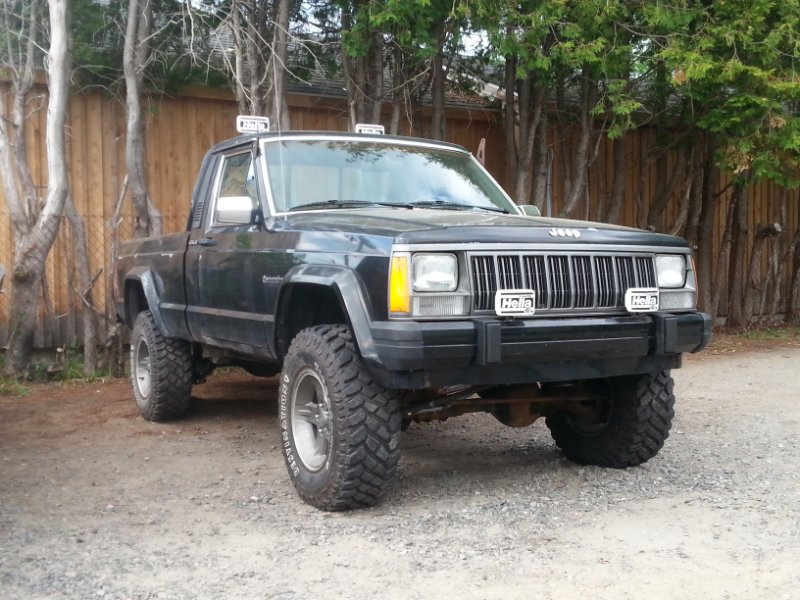
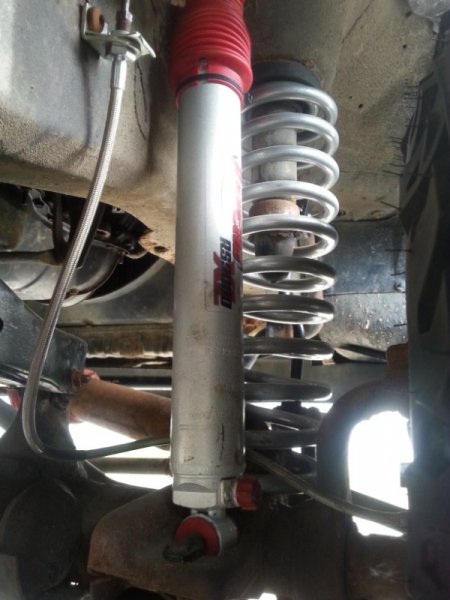
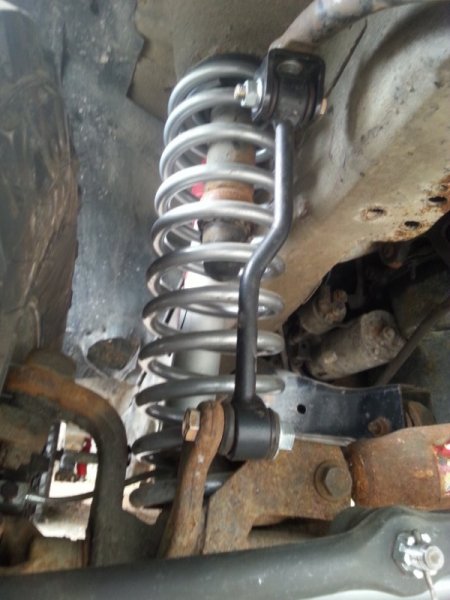
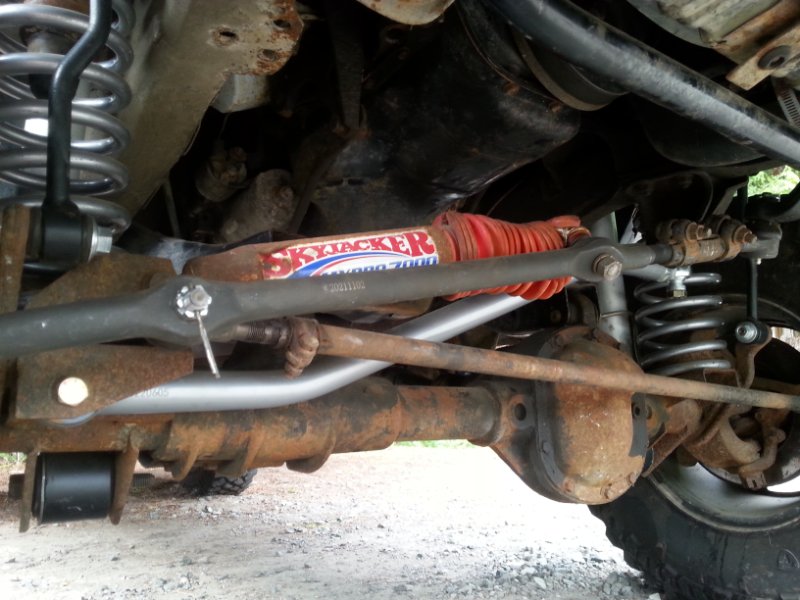
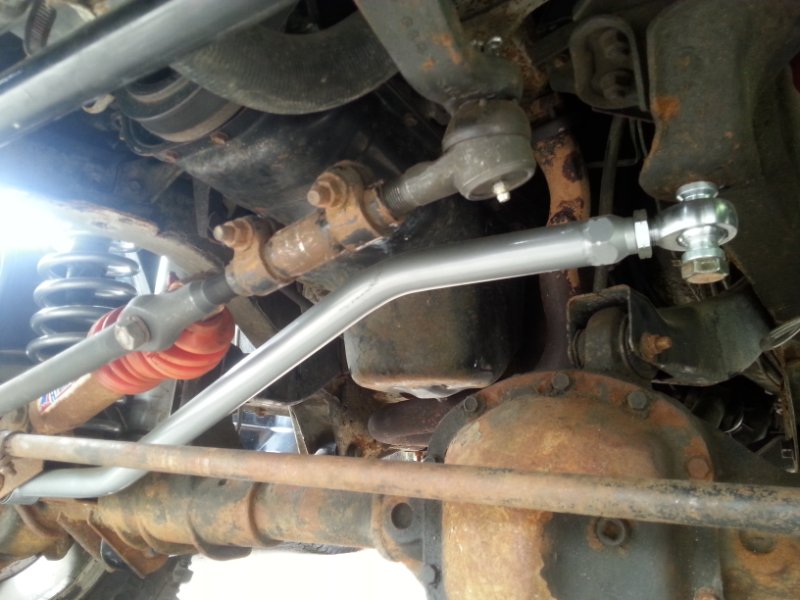
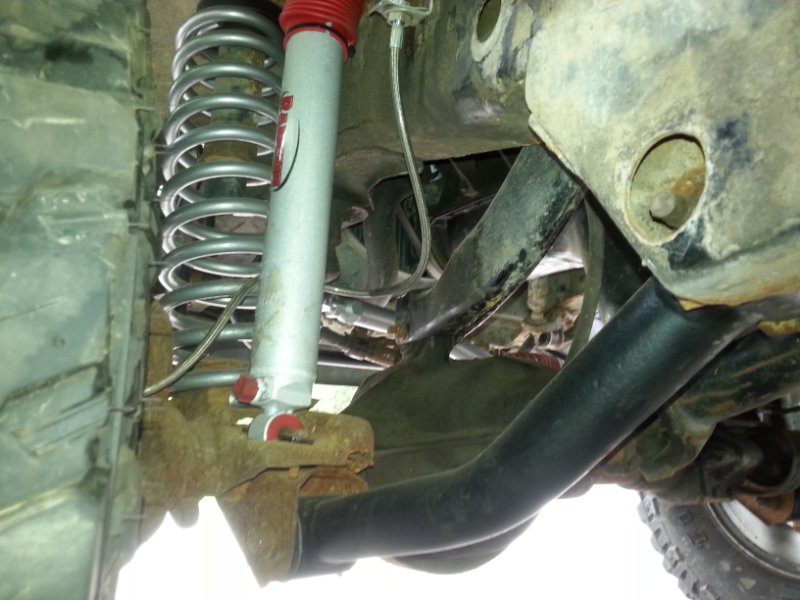
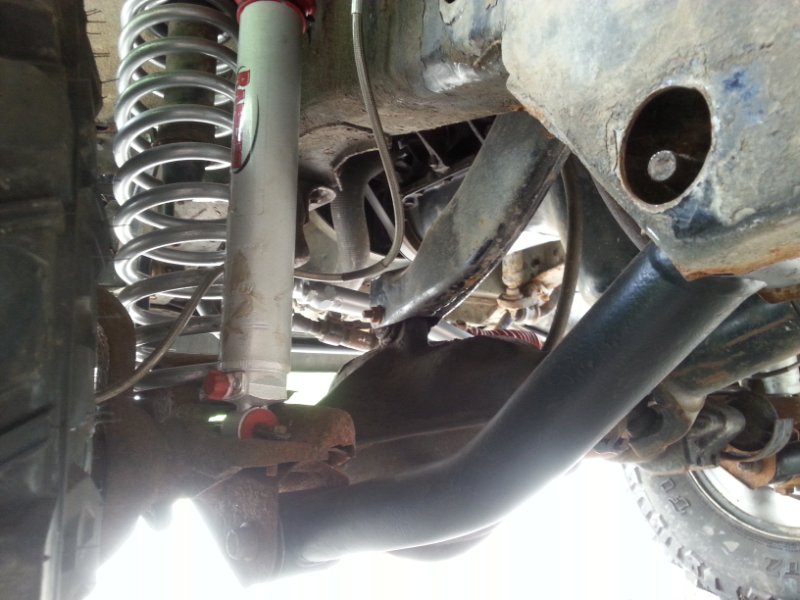
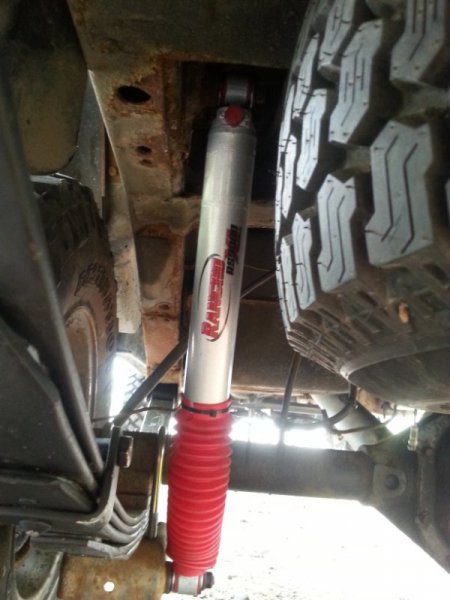
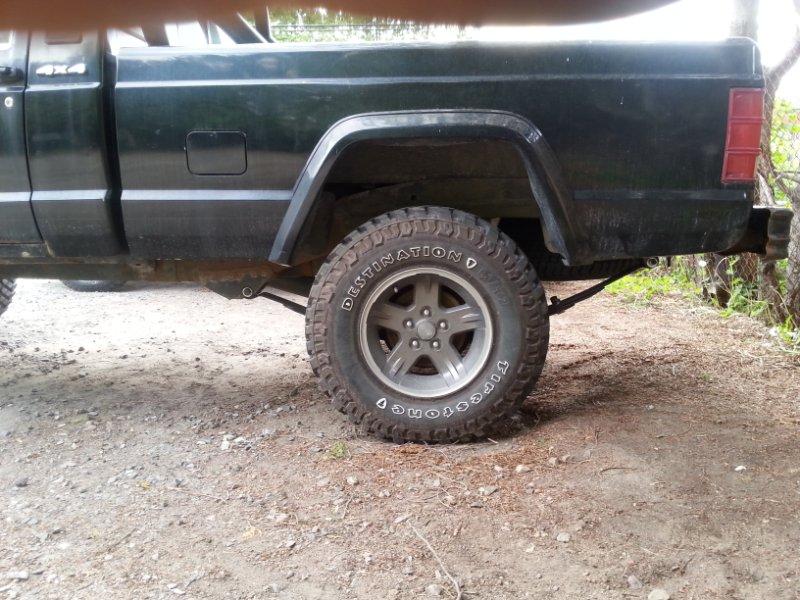
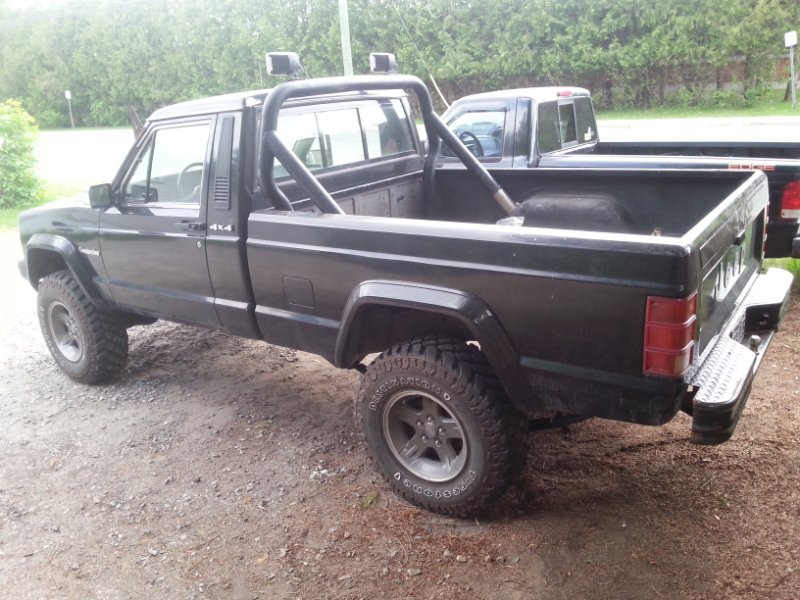
Well, I thought it should be time to finally put some pics, as I'm almost done with this round of upgrades. Here's what went on in the last few months. Rubicon Express 4.5" lift front coil springs, Energy Suspension polyurethane coil spring seats to replace the colapsed rubber ones (#2.6101G), put back in my refurbished tubular lower control arms, Rubicon Express adjustable track bar, all new tie-rods and tie-rod ends, Rough Country extended sway bar links, Rough Country stainless steel braided extended front brake lines, Rancho RS9000XL adjustable front shocks, Rusty's 4" rear leaf springs, 7 degrees pinion angle shims, removed the Chevy lowering shackles and put back the stock MJ shackles, 1998 Dakota rear flexible brake line, and Rancho RS9000XL rear adjustable shocks. Regarding the Rusty's leaf springs, based on what I read, I can tell that the quality is better than it was, now come painted and now built by a subcontractor in Canada. However, Rusty's R&D is what leaves to be desired... They are fiddly to install, as they seem to have too much arch when brand-new and unloaded. Initially, the rear looked more like a 5"-5.5" lift rather than 4 inches. I bounced the truck many times with no shocks attached and all the bolts loose, to help the springs settle. Then I let them sit two weeks, and today, I reinstalled the spare tire under the MJ, and went through the same process. It looks better, closer to the stance I want, but I'm still not a fan of those shackle angles. Time will tell if it gets better. Also, my front tubular lower arms are longer than stock at 16.25", and they're set as forward as they'll go with the maximum amount of shims, but still, the wheels aren't perfectly centered in the fenders yet. In retrospect I think I should have also bought some adjustable arms. I'm still on the finishing touches; bleeding brakes and the clutch master, and getting the truck aligned. Stay tuned for the first drive's feedback!!!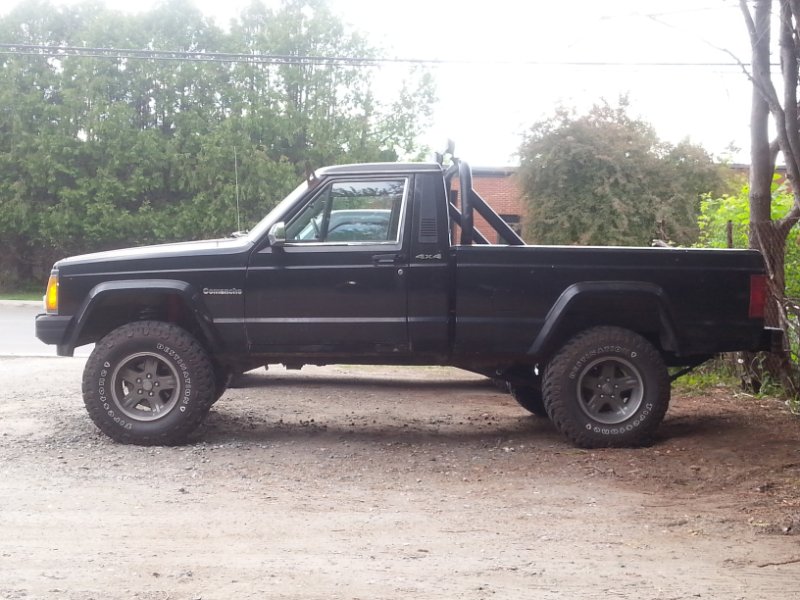
-
Leaf spring shackles flipping forward
OldSch88L replied to CO MJ's topic in MJ Tech: Modification and Repairs
I just installed a set of these myself. Yes, they are finicky to install. They barely go on with the shackles flipped when in the air, and I had to help one shackle flip back on the proper side while getting the truck on its wheels. I did leave all my bolts loose though, bounced the truck many time before installing my shocks. It's been a week and the shackles are halfway between stock position and vertical, just by sitting in the driveway. Keep in mind that like the O.P., I also don't have my spare tire anymore. I'll put it back under the truck, drive it for a while, then loosen and retighten the leaf and shackle bolts to see if it settles better. -
More details would help... Front axle nut, I'm pretty sure it's a 36mm on a 4x4. Otherwise the front bearing is held in by three 12-points bolts, something like 13 or 14mm, can't remember which...
-
91 Pioneer Stripe Decal
OldSch88L replied to Gary from Texas's topic in MJ Tech: Modification and Repairs
Maybe check with eaglescout526? There was a topic in The Pub where he said he located an NOS one for a longbed, and talked about sending it to Phoenix Graphics for reproduction purposes... Didn't see any updates yet though. -
Bleeding brakes - what am I forgetting?
OldSch88L replied to JefCooks's topic in MJ Tech: Modification and Repairs
Do you still have the rear load-sensing valve? -
Notes/Pics from Dana 35 to Dana 44 MJ swap
OldSch88L replied to coolwind57's topic in MJ Tech: DIY Projects and Write-Ups
Check to make sure your Dana 44's vent is not clogged up. I kept blowing axle seals before I finally figured that out, and axle seals aren't fun to do on a 44. And for U-bolts, people might notice that they aren't listed on RockAuto for Comanche, but after comparing with my '98 Ranger, it turns out that they're the same as a 1998-up Ranger with a 8.8 axle which are listed on RockAuto. -
AMC= All Makes Combined Or as NickInTimeFilms said in his video, working on the Idle Stepper Motor on his 2.5 Comanche: All Mistakes Combined
-
86 2.5 TBI randomly dies
OldSch88L replied to TFGgarage's topic in MJ Tech: Modification and Repairs
Did you clean and flush the gas tank to get rid of the 12 year old junk inside? New fuel filter? Feels like fuel starvation to me. I'd test the fuel pressure for starters... -
OldSch88L 's crooked 1988 Comanche
OldSch88L replied to OldSch88L's topic in Member Projects: Your Comanches
His truck is also awesome! Looks classy with the rare grille and chrome accents! -
OldSch88L 's crooked 1988 Comanche
OldSch88L replied to OldSch88L's topic in Member Projects: Your Comanches
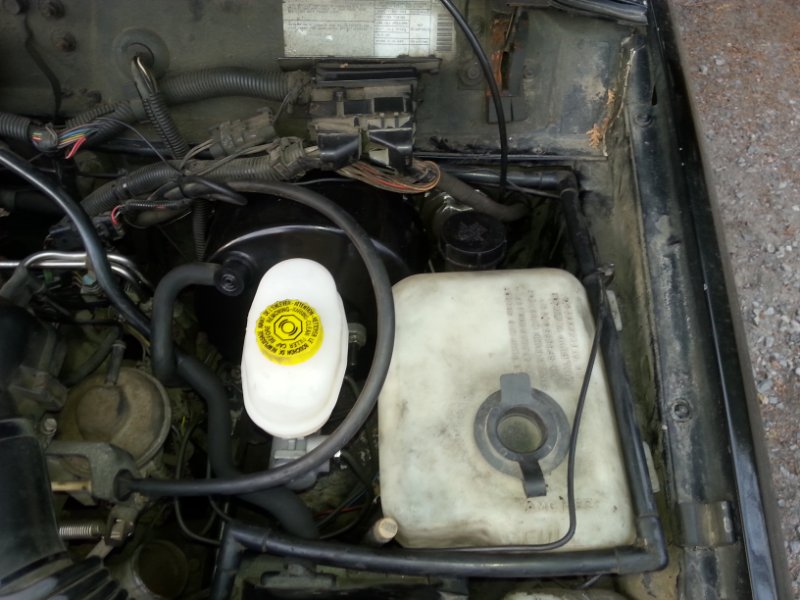
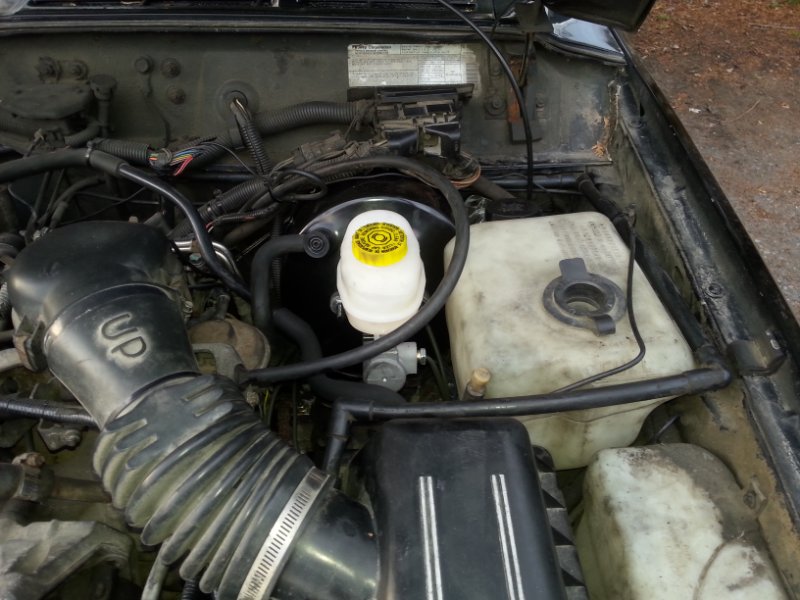
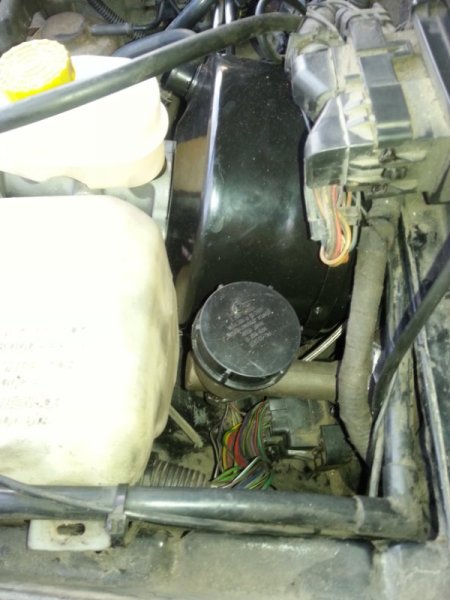
Found out the original brake booster leaked vacuum pretty bad, making the engine run rough. Perfect excuse to upgrade the booster and master the '96 Cherokee one! I was also running the stock-style clutch master with a TJ AX5 and external slave, and the MJ master kept leaking, my last one not even lasting a year. And it never felt right, like it was missing a bit of travel to properly disengage the clutch, making shifting difficult. So I modified and installed a proper TJ (or '99 4-cylinder manual Cherokee, same part #) clutch master, and all is fine now. The following weeks will focus on finally installing the 4.5" lift kit, with Rancho adjustable shocks, stainless extended brake hoses, extended sway bar links, adjustable track bar, and putting back in my reconditioned RC-style, longer tubular lower arms. Stay tuned!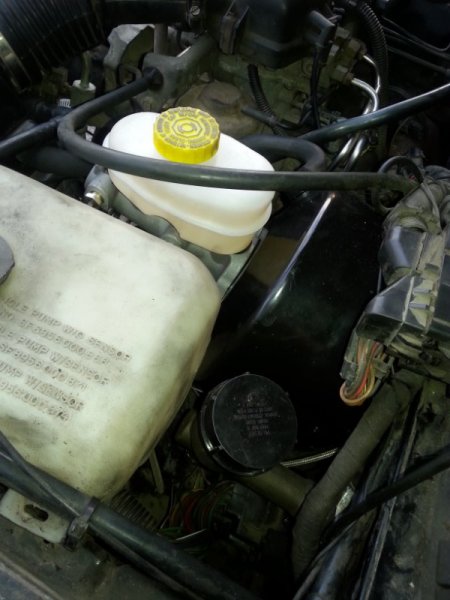
-
Finally done on the '96 XJ booster and master, and '99 XJ clutch master, but man is it tight in there now!!!


-
Wasn't there rumors or talk about the floor and seat braces being in the works by Key Parts???
-
I'm finally dealing with the scary/sketchy/annoying stuff; last week-end I finally modified and put in a Jeep TJ clutch master to go with the TJ external slave and transmission, to replace my second stock MJ master that lasted less than a year, and still wouldn't completely disengage the clutch. Works fine now. And today I finally put in a '96 XJ dual diaphragm brake booster. The stock brake system was scary; turns out that when my master let go a while ago, it leaked in the booster, ruining it, and also causing a vacuum leak that I've been chasing for months, making my truck run lean and rough on startup and open loop. I'll be installing the '96 XJ master in the coming days
-
Common problem I see in my line of work, espescially when I fix the clients' stuff. I'm a mechanic at a tool rental store, so I fix anything from weedwackers to excavators. Focus on the part that says "especially on clients' stuff"... We run all our machines on super unleaded, as well as use super unleaded to make some two-stroke mix, because it's the only grade without ethanol. Most people cheap out and run their machines on plain old regular, and man, modern regular fuel is utter garbage; just bottom-of-the-dumpster juice. The junk it leaves in carburetors if you barely let it sit for a moment it beyond me. And then even with an ultrasonic clean and a rebuid kit, we still can't get them to ever run right again. Do youself a favor, and run super unleaded from now on, and put some fuel stabilizer in the tank.
-
4wd Conversion Checklist
OldSch88L replied to AverageJoe10's topic in MJ Tech: Modification and Repairs
And by the way, now would be the right time to consider what you want to do suspension-wise, before you commit to have custom driveshafts made... -
4wd Conversion Checklist
OldSch88L replied to AverageJoe10's topic in MJ Tech: Modification and Repairs
Overall, I love it. It's expensive, but it's a quality piece, so can't really complain there. It's only shortcoming is also it's strong point: lots of adjustability, which is why it's truly universal. It just takes a bit of time and trial and error to fine-tune the adjustment to your needs. -
4wd Conversion Checklist
OldSch88L replied to AverageJoe10's topic in MJ Tech: Modification and Repairs
I'm not 100% positive on that statement, Pete... In my case (1988 2wd 2.5, 5-speed) I went with a TJ AX5 and a 242. I clocked the t-case as the OP also did. I first bought the Rusty's linkage, which is the same type as Azzy's, and also was "universal"... It didn't work because the 4 cylinder doesn't sit in the engine bay in the same spot as a 4.0 liter, so the transmission sits further forward as does the t-case. Because of that, the t-case's selector arm sits pretty much right below the 4x4 shifter, making it darn near impossible to link the two together and make it work properly. I got tired messing with it so I finally bought a Novak cable shifter to save myself the headache. For the same reasons, I had a 4.0 front driveshaft that I had to shorten. So safest bet is to start with 4 cylinder 4x4 parts if possible. -
Renix Speedometer issues
OldSch88L replied to Eagle_SX4's topic in MJ Tech: Modification and Repairs
My guess is the p.o. took off the needles to change the faces and put them back in wrong... Been there, done that, and it's a p.i.t.a. to get it right. In my town there's a street with a digital speed sign/radar, so I used that, with lots of trial and error, to put my needle back properly. -
Thanks for the reply! Last question, do you remember what year Wagoneer you used the leafs from, or remember how many leaves it had? I did a quick search and found, 5, 6 and 7 leaves front leaf pack for Wagoneer/Grand Wagoneer/J-trucks, and Crown even offers a 4 leaf heavy duty replacement, so I'm getting confused!!!
-
Hi there! Not to hijack this thread, but I just want to be sure of what I'm looking at in this picture. So, you have R.E. front springs, your custom MJ/Wagoneer fronts bastard pack with SOA? Are those still 265/70R17 tires on there? And are those leaf springs still on stock MJ shackles? How do you like the ride of your custom leaf pack compared to stock? I'm asking because I'm on 31s, I bought the same R.E. coils but haven't intalled them yet. I was in a dilema for the rear lift, and the stance of your truck is pretty much what I'm shooting for!