

AZJeff
-
Posts
1312 -
Joined
-
Last visited
-
Days Won
1
Content Type
Profiles
Forums
Gallery
Everything posted by AZJeff
-
I never have heard of bad experiences with Moog, and always thought of them as a "Tier One" aftermarket supplier of suspension parts. Please give us a summary of why you think Moog isn't so good.
-
I have successfully spray painted interior stuff in place, using that previously recommended SEM Color Coat. You need to do it in a garage or the like, where there is no breeze. You also need to cover stuff nearby with old sheets or other lightweight drop cloth materials. The SEM paint dries very quickly, so it's not like the airborne droplets remain sticky for very long.
-
Thanks. It's odd that when I shop for this on Amazon, it says it does not fit my MJ. I guess you cleared that up.
-
Are the wiper linkage bushings on the MJ's different than those for XJ"s? And are there more than one type of bushing that was used over the various model years of MJ/XJ? I am having trouble finding bushings for my wiper linkage at the usual on-line sites.
-
Thanks for finding that table. I knew it was out there, but had no idea I had already been shown this in response to a similar question before. Chalk it up to age. Yeah, that's my excuse.
-
I seem to remember this topic has been covered before, but I cannot seem to find it by searching the forum. For a 3.5 inch lift, what sort of choices do I have for decent rear shocks? I know one way to figure this out is to measure the max. axle droop and the height when against the bump stop, but I am also hoping someone has found some brands to be better than others, especially for a MJ that rarely carries any load.
-
Broken rusty screws in header panel
AZJeff replied to watchamakalit's topic in MJ Tech: Modification and Repairs
That’s cute. I have never seen one before. I am not a bit fan of drilling and tapping resins. That’s why most manufacturers use brass inserts when they need threaded holes in plastic resin pieces. -
Broken rusty screws in header panel
AZJeff replied to watchamakalit's topic in MJ Tech: Modification and Repairs
The method I would use is tedious, but would duplicate factory retention capabilities: 1. With Drexel tool or similar, grind surface of broken stud so a flat surface is present. 2. Using a punch, carefully create a divot in the center of the dressed stud face to allow drilling. 3. Drill a a small pilot hole (3/32”) on the divot. After the pilot hole is about 5/16” deep, start making the hole bigger with larger drills until the stud is entirely drilled out of the fiberglass header. 4. Clean the hole out to remove all drilling residue. 5. Cut a piece of “all thread” of the same diameter and length as the drilled-out broken stud. 6. Using “JB Weld” or similar, glue the stud into the hole. Allow to dry, and enjoy the results. -
Different MPG 1989 vs 1990 4.0 OHV
AZJeff replied to 1990Eliminator's topic in MJ Tech: Modification and Repairs
The amount of lift on a vehicle (above stock ride height) will also decrease fuel economy. I discovered that when I lifted my first XJ. Fuel economy dropped about 1.5MPG by adding 2 inches of lift. -
I got tired of buying crappy reman'd boxes for my old F150 from Autozone. They would get loose after about 2 years. When it came time for my MJ to get a new box, I went with a AC Delco reman from Rock Auto. I figure Delco probably took over the responsiblity for the Saginaw Steering gear products from GM, and I surmised that they might actually know more about how to do a reman correctly. So far, so good, but it's only be about 18 months.
-
I think you are confusing things here. The weight on the axle is NOT intended to deal with engine vibrations as much as it's designed to deal with some sort of interaction between the rear axle and the chassis (frame). Engine vibrations are usually dealt with by motor mounts and/or placement of mounts on the engine block. A 90 degree V6 that has no counterbalance shafts or split connecting rod journals has a weird type of vibration. If you were to be able to view a running V6 from the front of the crankshaft pulley, the engine will have a rocking couple that tries to make the crankshaft rotate about an elliptical path, with the narrow side of the eclipse being vertical. This is why, when modern V6's get very big in displacement, they tend to add in counterbalance shafts, because not reasonable amount of motor mount compliance can hide that second order harmonic elliptical vibration. This in the mechanical engineering explanation for V6 engine vibration. If you already knew all of this, I apologize, but it's worth noting that, for those of us who cruise around using a 4.0 engine, we are spoiled by it's inherent smoothness, and thus tend to forget how shaky a V6 can really be.
-
My wife drives a 2004 KJ with the V6. For all of it's life until the past year, the engine vibration in the cab was very minimal. Then, over the past 12 months, the engine seemed to have developed more vibration, and thought it was some sort of misfire type situation. It turned out to be bad motor mounts. After replacing all the mounts, the vehicle is back to being very smooth considering it's a V6. If you feel any significant vibration in your KJ when it's idling, check your motor mounts. I would bet they are collapsed, if they are the original ones.
-
Precisely. Who knows what sort of vibration the Liberty had in the rear end. The manufacturers put them on special shake fixtures to analyze the chassis for such types of behavior.
-
Keeping that weight on the 8.25 when installed in any vehicle except the KJ may actually INCREASE the NVH in the vehicle. Those weights are VERY specific in mass and mounting location, and are designed to deal with some unique vibration that was found on the KJ during development. (Notice how the weight actually hangs off only one side of the axle housing) i remember my ex-wife has a Ford Fairmont with a 4 cyl. engine it it that had such a NVH weight on the tail shaft housing for the automatic trans. My buddy had a Fairmont as well, but with a V8. The V8 Fairmont did not have that NVH weight. Different driveline, different vibrations.
-
That is a chassis-specific vibration damper. It's for NVH--noise, vibration, harshness. In other words, it's needed on a Liberty, but not on any other chassis. Take it off, and enjoy it as is.
-
SIdebar question here: The brackets you are using to lower the front sway bar mounts to the chassis I assume are a commercial item you installed. Who made them? I ask because when I was looking for those for my MJ, the ones I saw did not have enough of an "offset" to shift the mount location far enough forward to keep my extended sway bar links vertical when the tails of the sway bar were in their proper (horizontal) position. Because of this, I ended up making my own which was a big PITA. Just curious.
-
Which Light Bar Do You Have?
AZJeff replied to comanchefest's topic in MJ Tech: Modification and Repairs
When you turn those on, I bet the engine stalls due to the load on the alternator -
Wiring diagram for Power Windows
AZJeff replied to Phillip Gwin's topic in MJ Tech: Modification and Repairs
Here is the diagram from the 2000 XJ shop manual for the four door. I suspect a two door is the same, minus the other wires to the back doors.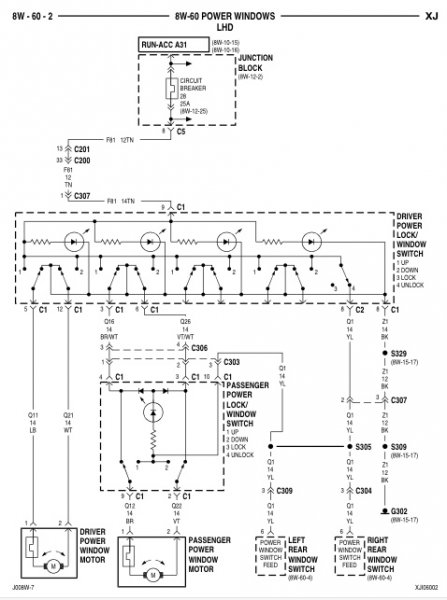
-
Wiring diagram for Power Windows
AZJeff replied to Phillip Gwin's topic in MJ Tech: Modification and Repairs
I have the ones for a 2000 XJ, which should be the same. Do you want just the diagrams for the wiring, or the pin-outs for the connectors as well? -
For an item that wears as much as a door check, I would not even THINK about using one from a junkyard when new ones are still available. I got mine from either Team Cherokee or Quadratec, I cannot remember which, but they were OEM.
-
I checked the shop manual for the 1988 NP207 and NP231 transfer cases. They both show a gear type pump attached to the output shaft of the transfer case. This would imply that, whenever the rear propeller shaft is turning, the transfer case lubricant is be moved by the oil pump contained therein. That means it's safe to flat tow a Jeep with one of these transfer cases indefinitely without fear of damage due to lack of lubrication.
-
I am about 95% certain your response is correct. The NP231 has a pump oil pickup point at the bottom of the ‘driven’ chain sprocket, and the pump is part of the output shaft. That means anytime the rear driveshaft is turning, the pump is running, regardless of what position the TC selector is in.
-
Epoxy and some thin aluminum sheeting cut/bent to shape (and glued to the inside of the piece) works well for this type of stuff. I have done that on several spots, and on my door panels as well.
-
The bushings on both ends of my leaf springs are looking pretty sad, and I was getting ready to order some new ones from Rock Auto, but the Moog part number they list and the dimensions listed for that part number are GROSSLY bigger than what's in the springs right now. So for starters: 1. do the XJ's and the MJ's share common spring bushing sizes? 2. does anyone have the CORRECT Moog part numbers to use (or some alternative, quality brand?)
-
Late factory spec. for the XJ/MJ caster is 7 degrees preferred, with a range of 5.25 to 8.5 degrees allowed. The max. difference in caster from one side of the vehicle to the other is 1.25 degrees or less.