

AZJeff
-
Posts
1312 -
Joined
-
Last visited
-
Days Won
1
Content Type
Profiles
Forums
Gallery
Everything posted by AZJeff
-
Bueller?
-
Yes,there is some axial play in the ball stud, but I think the amount that is considered acceptable is probably MUCH smaller than what I see in your photo. The blue seal on the new ball joint MUST be in contact with the knuckle to function correctly. If you cannot ream the tapered hole in the knuckle to get the ball stud seated far enough to get the blue seal in contact, you risk dirt and contamination getting into the ball joint over time.
-
AND THIS is why we have Comanche Club. I had old XJ's and newer ones before I got my MJ, and I had NO IDEA that they changed the ball joint taper at one time. What's up with that, BTW? I still don't think it's a bad idea to check the yoke on the axle, just in case. My axle was trashed by some former owner using other than the appropriate tools, and one side of the "C" for the yoke was splayed a good 7mm. There was no easy way to fix that. Thus, I wound up with a low pinion from axle from a 2000XJ as a replacement.
-
I hate to say this, but the most likely cause is the “C” shaped yoke on the end of the axle is splayed. This happens when someone in the past did not use the proper adapters to remove/install a ball joint. you can confirm this by measuring from the outside of the yoke on each side to see if they are equal (within 1/16”)
-
Recommendations for type of wire
AZJeff replied to jamespwsullivan's topic in MJ Tech: Modification and Repairs
I guess the secret to my suggesting solder is that I am a BIG fan of wiring looming (the corrugated type stuff) and Tie-Wraps (nylon wire ties). My wiring tends to be pretty secure, and because of that, I have never had a solder joing crack due to vibration. -
Recommendations for type of wire
AZJeff replied to jamespwsullivan's topic in MJ Tech: Modification and Repairs
Most of the wires are 16-18 guage in typical auto applications such as ignition, gauges, instrument panel stuff, and the like. Of course, charging/starting circuits will be larger, as will be some of the lighting. All of it, of course, is dependent on how long the wire run is, becuase the longer the run, the more voltage drop there will be. Your best bet is to look at what size the fuses are for each given circuit. You want your wires to be able to carry MORE current than the fuse will allow. The last thing you want to have happen is for the wire to overheat/melt before the fuse blows (unless you are trying to duplicate wiring from a typical Britsh automobile from the 1960's) The attached chart should give you some good recommendations as to what wire guage you need for a given current draw. Using the above chart, and picking a hypothetical example: -- Let's say a given circuit is fused for 10amps, and lets say the the wires run from the headlamp switch to the tail-lights, which is a run of about 15 feet. -- The chart says the MINIMUM wire size to use would be 16 guage wire. -- To be safe, I would use NO SMALLER than 16, and maybe even 14 guage to be safe. By the way, if you want REALLY good connections, any time you splice wires together, rather than using regular butt splices, try to solder your connections and use heat-shrink tubing to seal and insulate them. Those connections will be as good or better than OEM.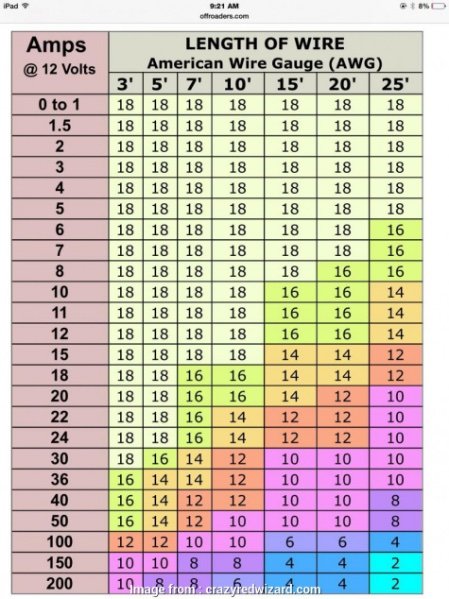
-
Hmmmm.....good point. I replaced the "distributor" shaft/housing a while back due to worn bushings, and it came with a new CMP. The one that came with the unit is of unknown brand, and we all know how Jeep control systems don't like aftermarket parts very much. It looks like the OEM part is discontinued, from my on-line search. Among the known brands that I see available, there is 1. Dorman (ugh, probably relabeled junk) 2. Crown (they are hit or miss) 3. NGK (usually good, if actually made by NGK themselves Any recommendations?
-
I am certain my fuel system is pressurizing, since I can turn the key to “on” and hear the pump run. The idea that the coils or injectors are not getting a signal at the correct time is an interesting concept. Now how to figure out how to measure that in real time…..
-
Bad XJ Heads - What year(s)?
AZJeff replied to WahooSteeler's topic in MJ Tech: Modification and Repairs
1999 should be ok. The years affected are 2000-2001 for the XJ. In all seriousness, just because an XJ has one of these heads does NOT mean the vehicle is living on borrowed time. Those heads crack when they get overheated. If the vehicle has a properly maintained cooling system, it will never overheat, and thus the head won’t crack. Unfortunately, the 4.0 cooling system is just barely adequate when all parts are functioning at OEM levels. Once poor maintenance comes along, the cooling system now can be less than acceptable, and then overheating becomes a real possibility. That, in turn kills an “0331” head pretty quickly. The good news is that a bad head can be detected visually by inspecting through the oil fill cap opening, as the crack always appears in a rocker arm boss directly below the cap. And I know all about this, since my MJ has an engine from a 2001XJ, and a previous owner let it overheat, and I discovered the crack when my oil started to look weird☹️ -
I would say your suggestion sounds plausible, except for one thing: if I shut the Jeep off, go away for some short interval (5-10 mins), and then go out to restart, it catches right away. If I wait some longer interval, like 30 mins for example, then we are back to two crank cycles to get it to start. Keep alive memory with the issue you described would become lost every time I shut the machine off, I would think...
-
I went and did some quick measurements on my MJ when I ran out to the hardware store this AM. Idle -- 48dbA Driving at 45mph (smooth paved road) -- 69dbA' I was unable to find a spot to go any faster than about 45-50, so what noise level there is a 65mph is to be determined. Also, since this is S. AZ, I am running my A/C all the time. The blower setting was at it's lowest level when I did my measurements, so fan noise was minimal. My MJ has foil-coated closed-cell polyethylene foam on the floor under the carpet, and the floor is bedlined under that. The foam is also glued to the roof. The hood has self-adhesive foil on the inside to reflect the heat off the painted surface, but no insulation beyond that.
-
No, they will need to be modified to pull the tank as far over to the “frame” as possible. In the best of conditions, there is only about 1.5 inches of clearance between the rear driveshaft and the tank at the front end, making sure that stays that way necessitates strap modifications.
-
As my sig line shows, my MJ has an engine/control system from a 2000XJ, so it's OBD-II. It also has a strange starting issue, and has had it for a long time. When I crank the engine to start it, it will crank just fine, but not catch (ignite), even after about 7 seconds of cranking. If I release the key, and then return it back to the start position, it then starts right away. It does this whether hot or cold. The only time it will start right away (on the first crank) is when the engine was shut off and left to sit for perhaps no more than 5 minutes, in which case, as soon as I turn the key to "start", the engine ignites immediately. The rest of the time, it's two cycles of the key to the "start" position before the engine will ignite. Once it DOES start, it runs smooth at appropriate idle speeds immediately, and has normal behavior otherwise. I replaced the CPS a few years ago, since it died, with a new Mopar unit. The vehicle never throws any OBD codes, so I am pretty sure all else is normal. (It has a new coil, new plugs, new MAP sensor, and new idle control solenoid, BTW.) Any thoughts?
-
STEP THREE -- Now you need to start adding the new oil to the system. My 1988 shop manual lists the following amounts that need to be added to various parts of the system: CONDENSER – before making the final connections with the new o-rings, using one of the lines that goes into the condenser, add in ONE OUNCE of new oil. EVAPORATOR – again, before making the final connections with the new o-rings, using one of the lines that goes into the evaporator, add in ONE OUNCE of new oil. COMPRESSOR – before making the final connections with the new o-rings on the compressor, you will want to add the oil. The shop manual says to add seven ounces of oil to the compressor. I recommend you add the amount that came out of the compressor when you drained it (and measured it, remember?), PLUS ONE OUNCE. (You add the oil in though the suction port, while turning the compressor shaft by hand.) What ever portion of the seven ounces is left after doing this, add that to the accumulator as described below. ACCUMULATOR – add whatever was left from the compressor fill above plus TWO OUNCES. STEP FOUR – now it’s time to have a professional fill (charge) the system. First, check to make sure all of your fittings are tight, of course. Then head to your favorite AC shop. Tell the shop what you did, and tell them you have prepared the vehicle to be converted to R134a, and you need them to check to make sure the system is evacuated of all remaining R12 and air, and that it will hold pressure. Then tell them you want it filled with the appropriate amount of R134a. (The general guideline is that you fill with 80% of what the original fill of R12 would have been.) Hopefully the shop finds no leaks, and they can fill sucessfully. That’s it.
-
I am assuming you don’t have access to two critical tools you will need to COMPLETELY convert the system, and that is a vaccuum pump and a charging manifold. That’s OK because I can guide you to the point where you need to recharge the system, and then you can take it to a professional to do that part. STEP ONE --- You must discharge the system to remove all the existing R12. It is against Federal law to just let the R12 escape into the atmosphere, so if you are wanting to be totally compliant with that law, you would need a professional shop to remove all the existing R12. Of course, sometimes just working on an old R12 system will cause a leak that will discharge all the refrigerant anyhow, if you get my drift. STEP TWO --- Once all the R12 is gone, now it’s time to replace all the o-rings with the new R134a compatible ones. This is simple enough—just disconnect each joint one and a time, and remove the old o-ring, and install a new one. Be sure to use proper oil to lubriate the new ring when installing. The newer XJ’s with R134a used PAG46 oil, so I recommend that oil for your lubricant. There will be two parts of the system you will want to actually remove while replacing the o-rings: the accumulator and the compressor. I will explain below. Part of your conversion will be installing a NEW accumulator. The part, aside from storing a bunch of the old R12 oil, also has a dessicant to remove moisture. On a system as old as yours, it’s probably worn out. New accumulators are cheap, and help assure a proper conversion. (All accumulators are compatible with both R12 and R134a, as long as you make sure they have the R134a o-rings on their fittings.) The other thing you will want to do is to drain the compressor of as much of the old R12 compatible oil as you can. You can do this by disconnecting the refrigerant lines from the compressor, and unbolting the compressor from it’s mount. Then orient the compressor so the inlet/outlet is facing down, and rotate the central shaft of the compressor so it will pump out all of the old oil. There will probably be an ounce or two in there. Catch and measure how much comes out, as you will neeed to know that for the next step. More to follow.....
-
I have done several conversions from R12 to R134a, and have repaired multiple R134a systems, so what I will tell you is based on what I have studied, and what I have done. Lubricating oil (to lube the compressor) circulates with the refrigerant in an automotive AC system. R12 refrigerant uses a different lubricating oil than that for R134a. You cannot use R134a with the old lubricant for R12. You MUST use R134a compatible oil. The good news is that, although your existing system probably has plenty of R12 oil in it, once you introduce R134a (and it’s oil), the old oil will NOT circulate in the system. Since it does not dissolve in R134a, it just sits in low spots in the system, mostly in the “accumulator”, (also known as the “receiver-drier”) and in the condenser. It remains there, harming nothing. Now for the bad news: The R134a oil is not compatible with the o-rings that seal all the connections in the AC system. They must all be replaced with new, R134a compatible type o-rings. They are not expensive, but there are a bunch. Basically wherever two pieces of the AC system join, there will be an o-ring. That means every joint will need to be disassembled, and the oil o-ring replaced with a new one (using the new R134a compatible oil to lubricate it during installation). The old hoses that are part of the R12 system also have a quirk about them. The new R134a refrigerant molecule is MUCH smaller than the old R12 molecule. That means an R12 hose will likely leak R134a right through the pores of the rubber hose. EXCEPT: if the R12 hose is old (original), it is probably soaked on the inside with R12 lubricating oil, and that oil acts as a barrier to keep the R134a from seeping out. (New hoses used in R134a systems have an added barrier layer to keep the sneaky little R134a molecules from escaping.) I give you all this background, so that you will know why you are doing certain things in your conversion. I will explain the conversion in a separate reply.
-
The fact that it seems to have all the "normal" stuff for an AC equipped vehicle suggests a former owner did a conversion (or maybe some sort of dealer conversion was done, but I don't know if they offered such back in 1992) If the AC compressor comes on, and the ECU bumps the idle speed up, there must be SOME refrigerant in the system. (There is a low pressure switch that will prevent the compressor from rotating if there is little or no refrigerant in the system.) Since it sounds like you have low refrigerant, you have two choices: 1. find some R12 (which is pricey), and get it refilled with that. (And finding someone other than a DIY who will recharge with R12 is tough.) 2. convert to R134a I would lean towards the latter approach, mainly because in a vehicle as old as ours, the parts of the system WILL fail sooner, rather than later, and refilling with the expensive R12 will make you go broke faster each time you replace one or more pieces that have failed. So a couple of questions: how knowledgeable are you about AC systems? Do you have any tools for charging a system, or do you have a friend who does? I can write up a long list of stuff you will need to do, but before I bore you, tell me about your experience/knowledge and or tools you have available.
-
That is exactly what happened on my old axle. Of course, the person who trashed the ball joint bores also splayed one of the “C’s” that the knuckle attaches to, so it was new axle housing time anyhow😠
-
Cruiser, the key thing you mentioned might be overlooked to ssome degree: "everything else being good" Plain water boils at 212* Put a working 16lb pressure cap on the cooling system, and it raises the boiling point to 252* Add a 50/50 mix, and the boiling point is now 267* If the OP's engine is TRULY overheating (as in getting hotter than about 215* or thereabouts, I would suspect some sort of faiiure to hold pressure as the most likely culprit. (Unless the dreaded head gasket failure that has been thrown out is proven to be a non-issue.)
-
A rad pressure cap that won’t hold pressure WILL cause these engines to overheat. Nominal operating temperatures are right about boiling point of water, and the combination of antifreeze and the pressure cap will raise the boiling point considerably. Given the cost of a rad cap, I would put a new one on on general principles.
-
Here is the list of stuff to check whenever and MJ/XJ overheats: 1. clean coolant. 2. good pressure cap or pressure bottle/cap (This is surprisingly a commonly overlooked issue) 3. good viscous fan clutch (its hard to test for this, so if the clutch is old, just replace it) 4. fan shroud (another overlooked, but critical, piece) 5. elect. cooling fan coming on as needed 6. good thermostat 7. a radiator that is free of external debris, and that is free of clogged passages (since it's hard to see inside an XJ/MJ radiator, use the coolant cleanliness as a guide to whether you should be considering a new rad. A neglected cooling system will destroy even a brand new rad in short order. 8. firm/new cooling hoses.
-
Most guys, when they first own an MJ/XJ with a 4.0, GROSSLY underestimate the amount of tension needed to avoid belt squeal on that belt setup. If you spend any time with these engines, a belt tension gauge is very useful. Lacking that, you can use the “approach to zero” method. this is where you tension the belt to what you think is “pretty tight, but maybe not quite there“. Then you drive the vehicle and load the belt by making sure the AC is on. If it squeals, bet out and add a SMALL AMOUNT more tension. Then drive it again. Repeat this process until the squeal is gone. My engine currently will squeal for about one second when I first kick the AC compressor on when it’s cold. Once it’s hot, the belt is stickier, and no squeal. That’s about perfect….tight enough, but it’s not going to trash alternator or water pump bearings.
-
I will add my $0.02 here and also discourage you from tightening the box. If you are ABSOLUTELY CERTAIN the box needs some tightening, do any adjustments in VERY SMALL increments, like 1/8 of a turn at a time. Use a paint pen to mark the shaft and the box with a starting reference point. GO SLOW. If you move the screw more than 1/2 turn, it's probably too much.
-
Leaking under passenger side dash after A/C fix
AZJeff replied to bezjeep's topic in MJ Tech: Modification and Repairs
Cruiser is correct. You might be able to snake a small piece of coat-hanger wire into the nipple on the heater box and loosen any crap that is plugging it up. Then maybe a vacuum with a crevice tool might be able to suck the stuff out the hole. The next level of attack to clean out the drain hole is a huge pain.....remove the heater box, disassemble, clean, reassemble, and reinstall. -
Bucket Seats, What to Buy?
AZJeff replied to comanchefest's topic in MJ Tech: Modification and Repairs
I installed Corbeau reclining "Sport Seats" in black cloth, and I sprang for the lumbar support option. These seats are VERY nice, with good firm cushions and some side support. They ran me about $750 for the pair. Not cheap, but well worth it compared to some worn out junkyard stuff with cigarette burns and coffee stains.