


ghetdjc320
-
Posts
5079 -
Joined
-
Last visited
-
Days Won
1
Content Type
Profiles
Forums
Gallery
Everything posted by ghetdjc320
-
I know we just brought this thread back from the dead but is anyone thinking of doing this again?
-

Replacing switch trim covers (instructions)
ghetdjc320 replied to ghetdjc320's topic in MJ Tech: Modification and Repairs
I was able to add the correct color filter to get these to produce the factory yellow/green as close as possible. I updated the installation notes with this new info. All the production units now come with the color filters. -
Ahh yes, that antenna grommet leak. I cut an extra floor plug I had laying around and used some marine sealant (I work on Jet Skis on the side).
-
Can you find one for me?
-
Yep, I’ve been able to fit a pair in a medium flat rate (slightly bulging but it fits )
-
Flat rate boxes are your friend! Since we are part of the states all flat rate boxes ship for the same price as conus. That’s how I’m able to ship the new switch trim covers out to everyone also for next to nothing. Takes about 5-7 days
-
Nice little rig! Any idea what tonneau cover that is on there?
-
[Help] Transfercase issues.
ghetdjc320 replied to killernoises's topic in MJ Tech: Modification and Repairs
Hmm, are the shift fork pins located correctly in the selector switch thing? Also see is the shift collar was accidentally flipped over. Unless you have metal shavings in your case it’s probably fine but just has some parts missing or misaligned perhaps. -
[Help] Transfercase issues.
ghetdjc320 replied to killernoises's topic in MJ Tech: Modification and Repairs
Sounds like your missing the snap ring on the main shaft that keeps the main shaft pulled back. It goes on in the speedo housing before the tail cone gets reinstalled. That missing snap ring causes just what you mentioned (can’t see the pic through) -
@Pete M The knuckles if their cheep enough! I’ll take knuckles from any xj/mj 84-89
-
I bet you never guessed I was a fan
-
Adjustable control arms
ghetdjc320 replied to Missobrien93's topic in MJ Tech: Modification and Repairs
I just adjust them with a good angle finder and tape measure. Adjust your lowers first to center the axle then use the uppers to set you castor angle using an angle finder on the inner C’s of your axle. Then center the axle with the track bar at ride height. There is also some preset number charts floating around online but the above method dials it in better. Most alignment shops don’t take the time to actually adjust all the links and track bar since the adjusting points don’t match the “stock” configuration in their manual. A good off-road shop could do it for you though if you prefer. -
Problem with Vacuum on the Heater & Deforster
ghetdjc320 replied to Top C's topic in MJ Tech: Modification and Repairs
I use a vacuum tester and check each line. Helps to find the problem right away -
Carbed 87 Comanche RENIX 4.0
ghetdjc320 replied to kaidenlem's topic in MJ Tech: Modification and Repairs
I’m referring to the GM connectors on the steering column for ignition ant turn signals. Nice to have those be plug and play . -
Carbed 87 Comanche RENIX 4.0
ghetdjc320 replied to kaidenlem's topic in MJ Tech: Modification and Repairs
You could but the YJ painless harness will fit pretty well on most MJs. Even the firewall plug connector will bolt in. It’s plug and play with our steering columns and most major components. Plus it has provisions for efi or carb and tons of alternator options. -
Carbed 87 Comanche RENIX 4.0
ghetdjc320 replied to kaidenlem's topic in MJ Tech: Modification and Repairs
Just a thought but painless makes a nice YJ harness for the 87-90 that could be so easily adapted into your MJ. I used it in my YJ along with a Holley efi system. -
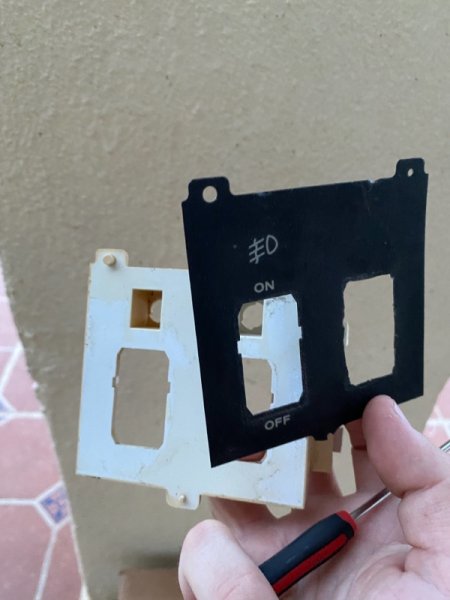
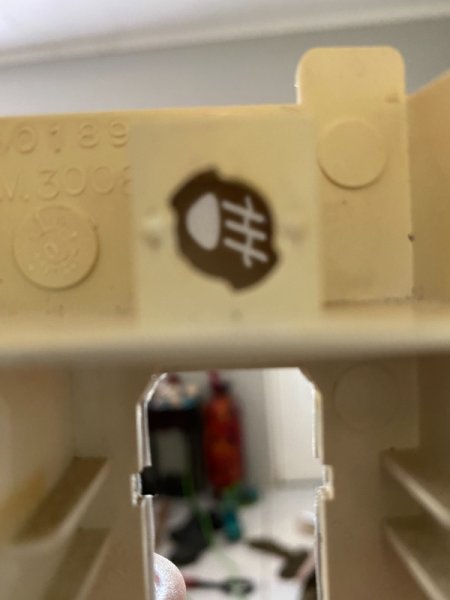
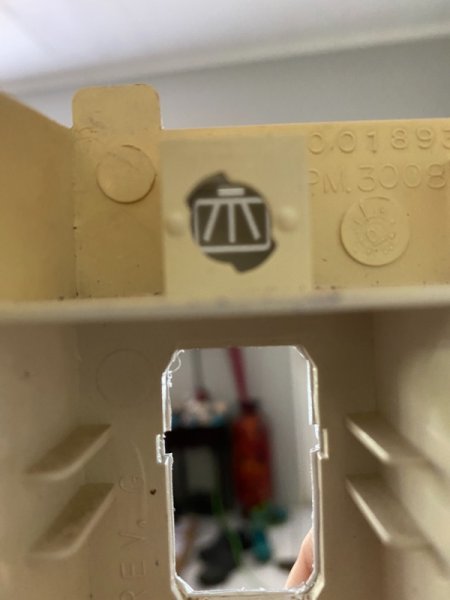
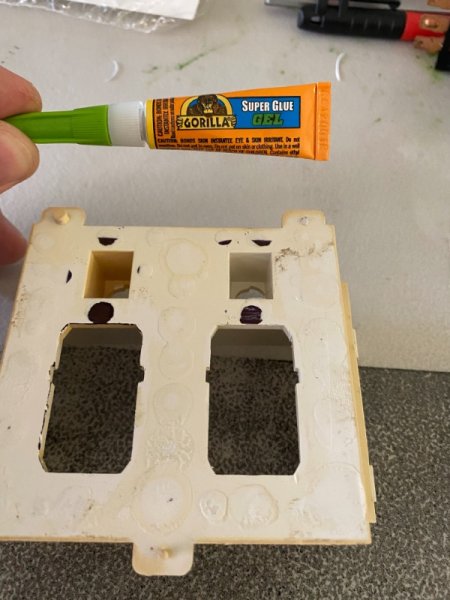
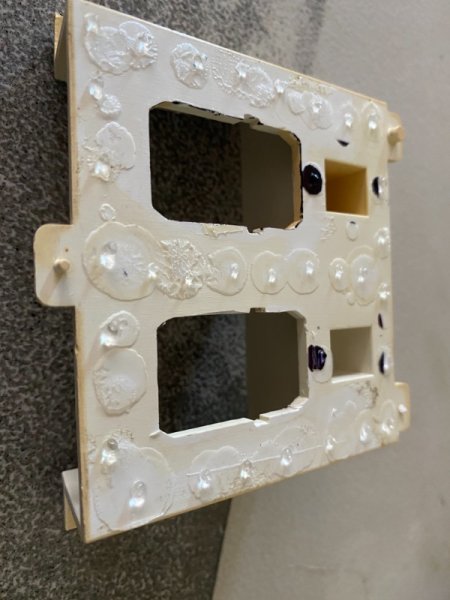
Apologies if this is in the wrong section. Please move it if needed. Just wanted to reference an installation guide for those who are replacing your switch trim covers with the new replacements. It’s fairly straight forward to install but here is a step by step: 1. Remove dash trim. There are a couple of screws just above the gauge cluster and a few others that will need to be removed. The bezel itself pops off once the screws are removed. 2. Remove the existing switch holder. (You can skip this step if you don’t have an existing switch holder and will be installing a new one) Each switch holder will have one screw and two tabs holding it in. 3. Using a thin metal instrument like a razor blade or utility knife, gently remove the switch trim cover from the switch holder. The cover is held on with adhiesive from the factory. Here is a pic for reference: 4. Optional: clean up the switch housing. Would also recommend cleaning up the blank face of the switch housing for proper installation of the new cover. 5. Test fit your new switch cover. Do not glue it down yet! You want to get an idea how it’s going to align on the housing. The switch cutouts need to be lined up As close as possible with the housing. This will ensure that the symbols are fully illuminated by the backlighting. Here is what that looks like: This alignment is crucial for the for proper oem appearance and illumination. TIP: align the switch trim cover switch cutouts with the plastic switch base. Each panel has been tested to align with the switch cutouts. If they are aligned well then everything else will line up just fine. 6. Glue the switch cover onto the switch holder. I specifically opted not to include the factory trim tabs for alignment. After testing them on different housings it became obvious that the moldings are not always 100% identical. I recommend using a gel type super glue. Place small dots of glue on the switch holder as shown: NOTE: be very careful not to use too much glue so that it doesn’t squeeze out when installed. If any glue gets on the face of the switch cover it may ruin it and be almost impossible to remove without damaging it. NOTE #2: Spray adhesives such as 3M “45” or “Super 77” among others also work well but don’t let you play around with alignment very much. The most critical aspect is making sure not to get any adhesive on the front of the cover. The back of the switch covers is a poly material that is fairly safe using a wide range of adhesives. The gel type super glue gives a few seconds handling time. As soon as you set the cover on, check and align the symbols so they are fully visible while looking through the light cutouts on the back. Each unit is test fitted before shipping out. 7. Once the glue has cured (make sure you follow the glue manufacturers recommendations) you can reinstall your switches and lights. If you also purchased new oem switches at the same time, the wiring from top to bottom is: ground, load, positive. These switches can be used to control just about anything. A note on lighting: these bezels have been made to recreate the factory yellow/green color using the standard original “74” bulbs. If you decide to use a standard white LED the glow will be slightly blue and will not look as good as the original filament type bulbs. I recommend sticking with the original types as this will produce the most oem appearance. We spent many hours and went through literally hundreds of different materials until we found this one that provides the best light difusión and symbol clarity. Using multiple layers, I was able to reproduce a finish that looks like it came from the factory when installed.
-
Are you going after a “Jeep Speed” style build?
-
T/C chain wear from Np231 cad delete
ghetdjc320 replied to Cochise's topic in MJ Tech: Modification and Repairs
Same here. I’m not sure if the OP understood my post. I was just mentioning the internal differences but have never seen a failure from the mod itself. You may notice a bid of driveline vibes if the driveshaft wasn’t balanced -
T/C chain wear from Np231 cad delete
ghetdjc320 replied to Cochise's topic in MJ Tech: Modification and Repairs
The old 231’s (94 I believe was the changeover year), had needle bearings on the main shaft that the Chan sprocket would ride on. They were later deleted. So basically, the 231 was updated when the driveshaft started spinning all the time. That being said, you should have no problems if your tcase is in good shape. If you run an sye, most will update the internals to the later style with no cage/needle bearing. -
Finally, switch trim covers!
ghetdjc320 replied to ghetdjc320's topic in MJ Tech: Modification and Repairs
This project has now officially moved to production! XJ and YJ versions also in the works. -
Reupholstering door panels
ghetdjc320 replied to eaglescout526's topic in MJ Tech: Modification and Repairs
I tried and the staples held fine but the card stock in mine was giving out. -
Finally, switch trim covers!
ghetdjc320 replied to ghetdjc320's topic in MJ Tech: Modification and Repairs
Yes they do and I’m also going to offer replacement plugs so you can add new plugs for your acccessories without hacking up anything. I’m starting with the fog/cargo and tranny/sport bar combos first this week. Doing one more prototype model to make some very fine adjustments with text and backlight color filtering. Here is what will be offered to start with: 1. Bezel cover (fog/cargo and tranny/sport bar eta this week) 2. Original switches 3. New light sockets for the symbol illumination (plug and play with the stock switch housings) 4. New switch connectors (pending) 5. Refurbished switch housings on an as needed basis Regarding the bezels: once I get this first batch finished I’ll move on to different and custom versions. If you want a one-off I can do that but if it’s just going to be one or two switch panels it will obviously be more costly. Regarding the replacement switches: they are NOS! Regarding the new light sockets: These twist and lock right into the old switch housings and use the same 74 bulbs as the originals. I’ve tested LED’s and they also work fine but obviously will give a different color. Regarding the switch housings: I’ve been sourcing used switch housings to refurbish and can send you a complete, ready to install panel if you prefer it that way. This can include switches, bezel, lighting and wiring as needed ready to swap right in. Will post last prototype this week and link the threads together. Will notify everyone and create a thread in the vendor section for orders. Let me know if you have any questions -
Brake upgrades - start with this
ghetdjc320 replied to ghetdjc320's topic in MJ Tech: DIY Projects and Write-Ups
That’s a tough call. I’ve seen the WJ clear 15” steelies but didn’t look like their was much room left. Would also depend on whether or not wheel spacers were used. -
Brake upgrades - start with this
ghetdjc320 replied to ghetdjc320's topic in MJ Tech: DIY Projects and Write-Ups