


coolwind57
-
Posts
992 -
Joined
-
Last visited
-
Days Won
6
Content Type
Profiles
Forums
Gallery
Everything posted by coolwind57
-

Sporadic delayed starting
coolwind57 replied to coolwind57's topic in MJ Tech: Modification and Repairs
Well, I'm 100% sure now. All good but it did not solve my delayed starting problem. This morning, engine fired to life only after about 1 second! But this is rare. It sat for a full day of non-use. Its when I start it throughout the work day that the excessive cranking happens (and fuel odor). My plan of attack at this point is to: 1. Remove and thoroughly clean throttle body and AIT. Then reindex TB butterfly. I'll go ahead and and check for a properly set TPS. I did all of this back in December, by the way. 2. Replace my CPS with the original one that I still have in my garage. It's not been modified to allow for timing advancing like the currently one. 3. Not sure what to do with fuel system, but I may fiddle more with my fuel rail and injectors.. Figure out a way to better test my injectors if it means removing them and fuel rail. I'm choosing these steps because I am at a loss and can think of nothing else to try. Always enjoy your thoughts and input, fellas. -
Sporadic delayed starting
coolwind57 replied to coolwind57's topic in MJ Tech: Modification and Repairs
No, I'm not. I used a small soft copper line to replace the broken, brittle stock plastic line, but I re-used that rectangular rubber grommet thing that sticks in the side of the throttle body. This worked for me wonderfully in the past, but I do like your method better. My copper tubing is stuck inside the grommet and the grommet is pushed inside the orifice of the TB as securely as I could get it. There's a possibility that the rubber may be blocking my copper tubing or I have a leak at the grommet/TB contact area. I'll surely check this after work today. Thank you Cruiser54 for continuing to share your thoughts on this issue. That mind of yours must have constantly-turning gears within.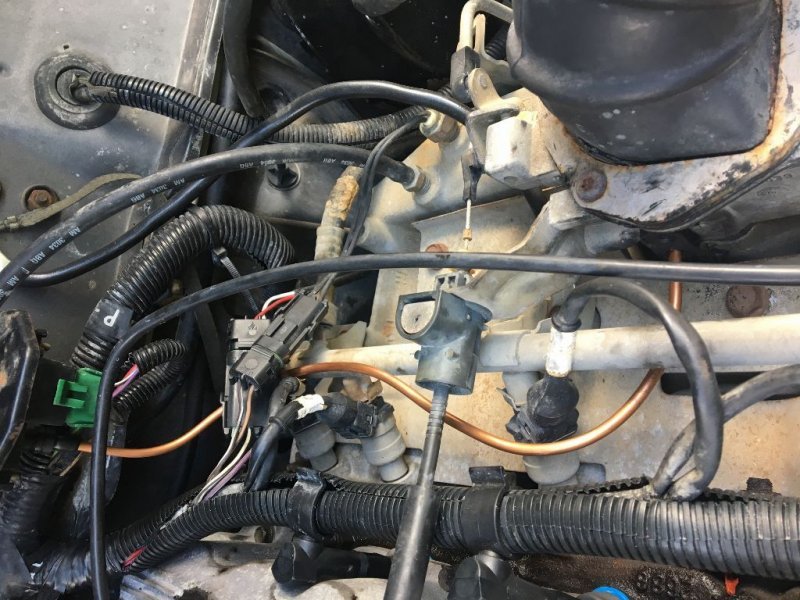
-
I'd like to see a pic of your engine bay. A filter on top of the valve cover is something I'd correct by getting the correct parts installled (vacuum harnesses, grommet/tubes, etc). Some guys have fabricated oil catchers devices on these lines coming out of the valve cover. Consider doing Cruiser54's valve cover mod (#25 at www.cruiser54.com) to cut down on the pulling of oil from the valve cover. Perhaps you found your issue with that fuel leak, but I'd still consider performing the above.
-
Adjustable Proportioning Valve
coolwind57 replied to Sylar's topic in MJ Tech: Modification and Repairs
Some guys are using these instead of, or in the absence of, the load sensing valve. I would recommend you inspect and fully understand the current orientation and modification of your rear lines first. When I bought mine, I had to deal with a previous owner hacking on the brake system. Know what you have exactly and then check out what other guys are doing and make your good decision that you feel works best for you. Some will insist on returning the load sensing valve to operate. Others have used these adjustable proportioning valves (I chose this route), and some have chose neither option. Do a search on this forum to acquaint yourself with your options. There's been lots of discussion so it'll be easy to find. -
HOrnbrod's link above is for a larger kit that allows horizontal mounting as well as the 3/4" X 16 adapter you're asking about. If you're wanting the nipple only, then try these guys: https://www.quadratec.com/products/51007_0020.htm Vakarian just told me that his local jeep dealer advised that the Mopar part is no longer available, although my dealer here in Southern Indiana sold me one last year. You may just need to call first before driving over. Mopar Part number is: 53007563AB Here's a Genuine Mopar on Ebay: https://www.ebay.com/itm/1991-2009-JEEP-DODGE-CHRYSLER-OIL-FILTER-ADAPTER-CONNECTOR-OEM-MOPAR-GENUINE/191946528853?fits=Model%3ACherokee&epid=1022063355&hash=item2cb0e79855:g:e4gAAOSw-itXsavY
-
You saturated them babies with some break-free first (or other penetrating oil), right?
-
no problem. I have some pictures and a brief write-up on this topic at the forum MEMBERS PROJECTS: YOUR COMANCHES page under "Coolwind57's" It's on page 1 about half way down.
-
Wrong Universal joint strap replacement?
coolwind57 replied to ruralandalone's topic in MJ Tech: Modification and Repairs
^^^Yea. I have same question as him. -
Got my Mopar 3/4"X16 nipple at the local Jeep dealership. You're gonna need a long and strong 22mm deep well socket to get that old sucker off.
-
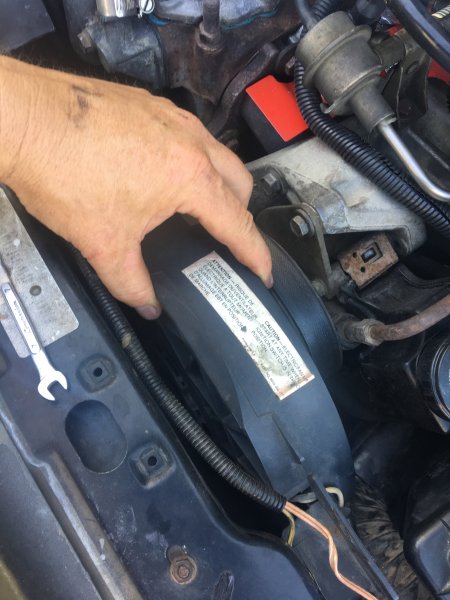
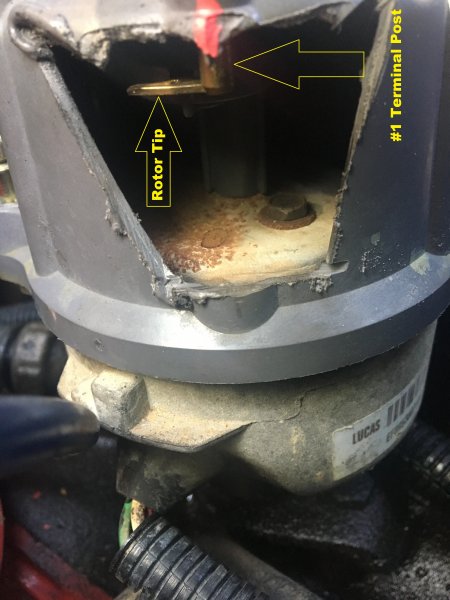
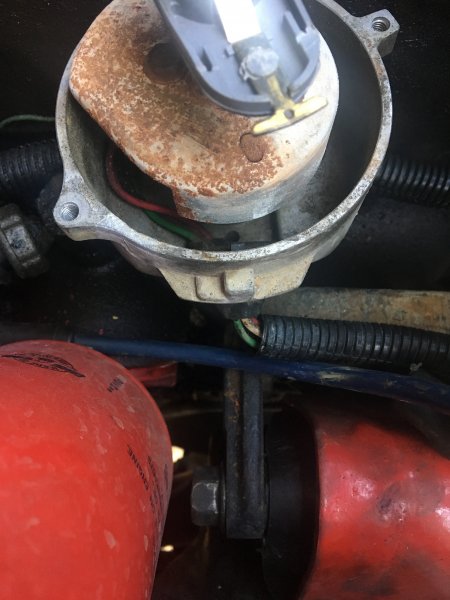
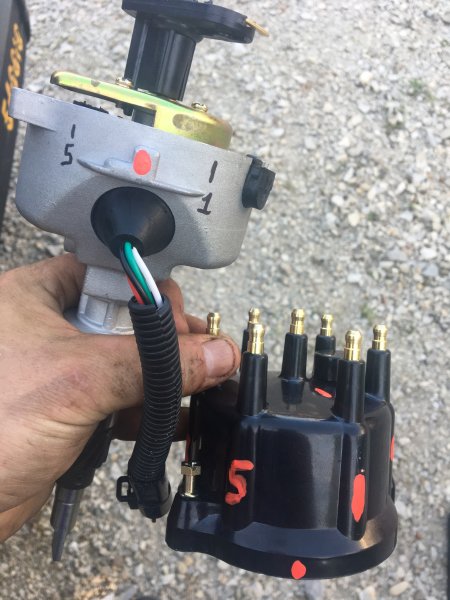
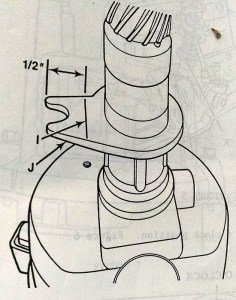
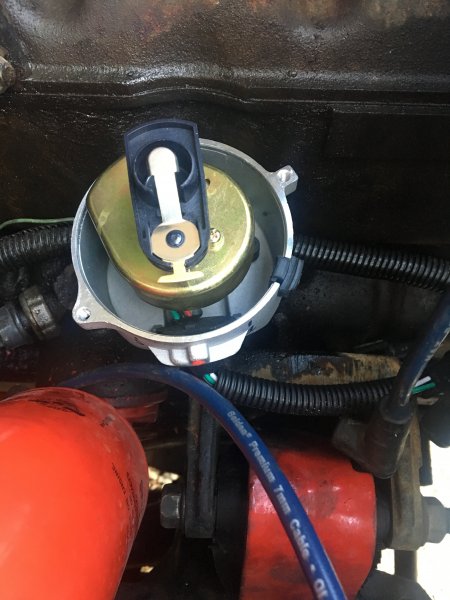
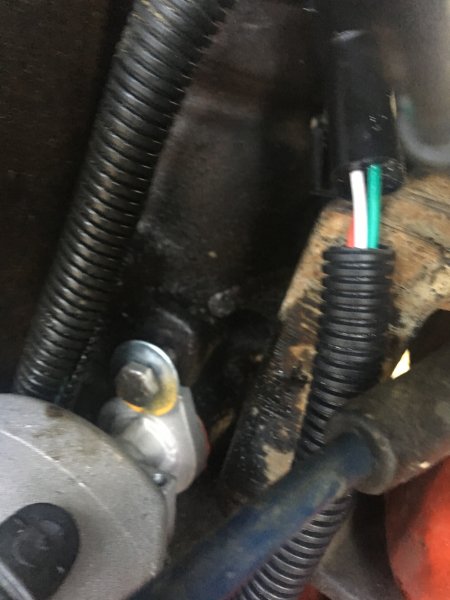
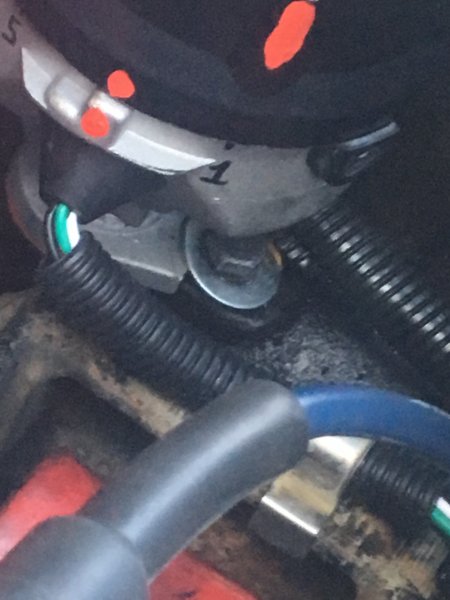
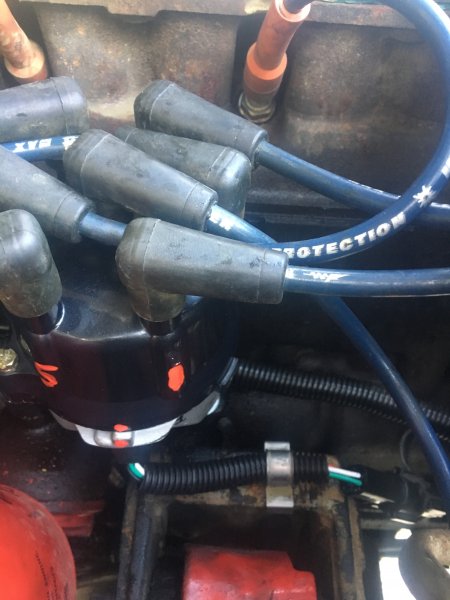
Last night, I installed a new distributor and using Cruiser54's method, I indexed it. If you're an amateur mechanic like me and you've never done this before then this my be the write-up for you. So here's some pics to show how an newby went about this job: 1. I began by disconnecting my NEG cable on my battery. I then removed my aux fan. Take the two bolts out along the radiator shroud area, pull the connector and then lift the fan assembly straight up out of it's bottom slots. This'll give you much needed room to manipulate that crank shaft. 2. Position your crankshaft/pistons at Top Dead Center (TDC): I had not done this before...ever. I read up as much as I could find on the internet and eventually it all sunk in and I figured out what I needed to do. I placed a 1/2" drive ratchet with a 3/4" socket onto the crankshaft/damper bolt. Remove your #1 spark plug. Number one is the one closest to the nose of your truck. With a flashlight, peer in there to analyze. You may or may not see the top of the piston. Remember what you see. I crawled under the front of my truck and pulled back my lower engine rubber cover, exposing my damper pulley. I rotated the damper CLOCKWISE (I heard on the internet that you should go clockwise) until I found a tiny little notch on the backside of the damper. I then scratched a line across the nice wide flat part of the FRONT of the damper. This is an area that you can actually see when you stand back up and look down into your engine bay. You can't see that tiny notch in this position, that's why we're marking the front of the damper while you're under there. Sorry no pics taken during this part. Rotate the damper pulley until your mark approaches the ZERO mark on this little tag plate situated just behind your damper pulley. It's got notches on it. Look for the number "zero." As you manipulate the damper with your ratchet, started looking for your etched line. Once near the "zero" position, you place the little notch on the back side of the damper pulley directly under the ZERO mark on your tag. The notch will become visible when you have it exactly under the ZERO. Now go grab a flashlight and peer into the #1 cylinder to see if you see the top of the piston. If not, then you'll have to rotate the damper pulley another rotation to achieve TDC--the highest point of the piston during it's compression stroke. I read that some guys put their finger over the spark plug hole to feel pressure, but the flasklight method worked fine for me. I was able to see the piston top just fine. 3. I then removed my spark plug wires from the distributor cap. By the way, cylinder numbers are in sequential order: 1 through 6, from the front to the back of the engine. no need to remove the remaining wires from their spark plugs. I removed the distributor cap and cut in a window, exposing the #1 terminal (where the spark plug wire connects...the one that runs to the #1 cylinder in your engine). I marked mine with my Daughter's nail polish just to try to get a more exact location of my terminal post. It's a bit harder to see it once you have it reinstalled. I reinstalled the cap just for kicks to see the orientation of my old rotor with the exposed #1 terminal. That horizontal brass piece you see to the left of my mark is the rotor tip. Don 't pay too much mind to what you're seeing here, as the camera angle makes it look like it is spot-on. In actuality, the rotor tip was a bit past the #1 terminal post more that the pic shows. I just couldn't get my camera at the right angle. I then removed the modified cap. 4. Paranoid I was going to screw this up, I took shots of my old distributor before removing. The intent was to record the position if the distributor housing in relation to other objects in the area, such as the motor mount. Also, notice that my rotor's positioning was around 5-o'clock (as you're standing at the passenger fender) after I set TDC. 5. Next, I pulled my old distributor after removing the 1/2" sized hold-down bolt. As you lift the distributor housing out of the engine, you'll notice that it rotates counter-clockwise as gears disengage. I think I remember the rotor position was around 3 o'clock by the time the distributor released from the engine. 6. Clean the distributor hole. Take a long flat screwdriver and position the oil pump slot to around 11 o'clock position. My pictures didn't take real well, but you'll easily see the slot that I'm referring to when you see it with your own eyeballs. I used a little RTV to "glue" my new distributor gasket in place. 7. Using my wife's Amazon employee's discount, I picked up this distributor for $44.29 2-day shipped: https://www.amazon.com/gp/product/B01BDY205Y/ref=oh_aui_detailpage_o01_s00?ie=UTF8&psc=1 Next step was to cut 1/2" off of my new distributor's mounting tab. One half inch equaled pretty-much where the bolt hole's inner edge was on the housing tab. I used an angle grinder, followed by a file. This diagram below shows 1/2' well past (and deeper) into the mounting tab. But on my distributor, the inner-most edge of the mounting bolt hole is where my 1/2" measurement terminated. Clean up debris from your distributor. I also marked the heck out of it, putting cylinder number locations on the cap as well as the housing itself. Again, I was addressing paranoia that plagued me. 8. Ok time for the install. I grabbed the new distributor (with cap off) and positioned the rotor at 4-0'clock. This automatically positioned the lower shaft slotted flat tip at around 11 & 4 o'clock. After confirming that the mounting tab was in the general area of the mounting bolt hole on the engine, I set the distributor shaft into the hole and successfully engaged the oil pump (that I had previously positioned at 11 o'clock). As I lightly pushed it in place, the gears engaged and my rotor rotated around the 5 o'clock position as the housing made contact with the gasket. 9. I installed the modified distributor cap with the cut-out window and twisted the distributor housing until the trailing edge of the rotor is just barely leaving proximity of the #1 terminal post of the cap. 10. I installed my mounting bolt, but it became clear that I was going to need a washer to hold this sucker down securely. Cutting off that much of the mounting tab left too little material remaining to properly secure the distributor to the engine. No big deal, I had a washer laying around. Notice it just happen to have a little yellow paint on it. Double check for the correct position of the rotor to the #1 cap terminal as you secure your bolt. I cranked hard on my bolt, deforming my washer a bit in the process. I wanted that sucker tight. 11. Pull of your modified cap and place your new cap on. Plug your connector back in and reinstall your #1 spark plug and all of your spark plug wires. 12. Reinstall your auxiliary fan and your NEG cable on your battery. Say a prayer, then fire that mutha up. At this point in the game, I've only driven it to work this morning, but I swear the engine does seem to run smoother and quieter.
-
Sporadic delayed starting
coolwind57 replied to coolwind57's topic in MJ Tech: Modification and Repairs
Wow. That is freakin' amazing. I'm not convinced that a new distributor and indexing solved my starting issues. I started my engine twice this morning and she started relative quickly but it usually gives me fits when i shut down and restart more frequently after the long evening/morning rest. I swear it seems to idle better, though. Second start this morning--although not so prolonged, had me smelling fuel a bit. I'm thinking fuel delivery. -
Sporadic delayed starting
coolwind57 replied to coolwind57's topic in MJ Tech: Modification and Repairs
I just installed the brand-new distributor and performed Cruiser54's method of indexing. I took photos and will do a write up on this tomorrow. Apparently, I did everything correct...the new distributor slipped down just fine, aligned with oil pump and using the window method, I got her indexed correctly, it seems. She fired up and ran just fine. Could be the placebo effect, but it did seem to idle smoother and I thought I was detecting slightly lower rpm too but I'm not 100% sure. All of this was a new experience for me: finding TDC, marking cap/wires, removing/installing new distributor, etc. I'm feeling pretty dang proud and I praise God I didn't screw anything up. I'm anxious to see if the new distributer (with a new synch sensor inside) will have a postive effect on my delayed starting problem. Should find out in the next couple of driving days. -
Sporadic delayed starting
coolwind57 replied to coolwind57's topic in MJ Tech: Modification and Repairs
Perhaps I'm not following how one sets the rotor tip without rotating the distributor housing/cap. Cruiser's Distributor Indexing instructions, step #11: 11. Reinstall the distributor cap with the cutout “window”. Rotate the distributor housing until the trailing edge of the distributor rotor tip is just departing from the #1 spark plug wire post terminal. -
Sporadic delayed starting
coolwind57 replied to coolwind57's topic in MJ Tech: Modification and Repairs
So it's NOT a matter of the wear/age causing some minor rotor misalignment from it's desired spark plug post terminal? I suppose my question should had been this: Are we modifying (cutting a locating tab on a distributor) to correct worn and out of adjustment parts or because Jeep didn't get it completely right at the factory to begin with? I am getting the purpose of it now, but at what point did a need to do this procedure develop? If Jeep didn't get this right from the start, then I should index (which involves the cutting the locating tab) this brand new distributor I'm fixing to install, right? -
Sporadic delayed starting
coolwind57 replied to coolwind57's topic in MJ Tech: Modification and Repairs
Cruiser, Ohm: I rented a fuel pressure gauge today after work. I think we're good as far as fuel delivery. 33-34 instant spike when key is turned on and 30-31psi at idle. Pull vac line to regulator and I get 38psi. Leak down was bad, but I'm not convinced that my very-used rental gauge was sealing 100% at the shrader valve. I lost all pressure within 5 minutes, slowly but steadily. Again, I think I had a bad seal at the valve. We can now assume that the instant spike of fuel pressure on KEY ON/ENGINE OFF mode would eliminate the possibility of a early fuel starve scenerio, right? Especially since engine starts are typically better when the engine has had at least a half-day of cool-down. Perhaps I'll now move on to the electrical equation of the problem... I'm going to stick the new distributor in maybe tomorrow if I find the time. I apologize for my poor little pea-sized brain, but what's up with distro indexing? What causes the need to do this? I am assuming that things wear/loosen and begin to migrate out of spec over time, maybe, requiring a realignment of distro gears with engine firing? If not, then didn't the factory get it right when they developed location of the alignment tab? Would I need to do this tab cutting with a brand-new distributer? Purpose of new distributer install is to eliminate the possibility of faulty sync signal generator & pulse ring. Thanks for helping me, everyone. -
Sporadic delayed starting
coolwind57 replied to coolwind57's topic in MJ Tech: Modification and Repairs
You're referring to the vacuum line? I pulled it and upon close inspection, found nothing. It was dry inside (no fuel) and there were no cracks/holes, etc. Hard fuel line with disconnect feeding the pressure regulator appeared to be fine with no visible leaks either. I'll rent a pressure dial for the fuel rail again and let you guys know the readings. I sure appreciate your assistance, fellas. -
Sporadic delayed starting
coolwind57 replied to coolwind57's topic in MJ Tech: Modification and Repairs
Already wrapped injectors with no improvement. -
Sporadic delayed starting
coolwind57 replied to coolwind57's topic in MJ Tech: Modification and Repairs
Unfortunately, cycling the key as you described didn't do anything. Same long crank times with smelly fuel start. I think I'm seeing a bit of a pattern afterall. Seems it starts much faster if the vehicle has been sitting for a long period of time. If I am starting, driving and shutting down frequently, it seems to be at its worst. Injectors not "staying closed" makes since in my mind. Symptoms are almost like a flooded carburetor on an old car. Gotta crank a while to get air to "flush out" all the excessive gas. I wonder if my new injectors just suck.... I did unplug each while running to see if idle was affected. Each passed this quick test. BTW, I did order a new distributor for $46 bucks so I'll be tossing that on maybe next weekend. But I'm sure leaning towards the fuel side now that you got me pondering. -
Sporadic delayed starting
coolwind57 replied to coolwind57's topic in MJ Tech: Modification and Repairs
Just realized that a new OEM distributor is only about $45. The renix pulse ring on my current distro is slightly rusted/corroded. All plug wire contacts under the cap are clean and the cap is new. I'm thinking of just yanking my old distro and sticking on a new one. By the time I go out and buy an analog multimeter to test my sync signal generator (or CPS) and mess around with testing it, I could have a new unit installed. i suppose that doesn't guarantee that'll fix my particular issue, however. I read where a dude simply unplugged his sync signal generator pigtail and his irregular-running engine suddenly ran tons better. As for my symptoms, my MJ does not start any better or worst plugged or unplugged. I'm not sure if this tells me anything or not. My cranking problem has progressively gotten a bit worse over the past week. Just seems that when it cranks over, it is dead to the world until late into the engine cranking process. Always a great poof of gas smell when it fires up too. -
I sold my 81 AMC Concord wagon last year. Had a factory 4-on-the-floor with the old Iron Duke 4-banger. Loved those blue vinyl seats on a hot day! It was in great shape and I did a lot of work to it. My band used it in promo photo sessions. Not a 50-60s wagon, but man did I get lots of compliments everywhere I went. People loved that car.
-
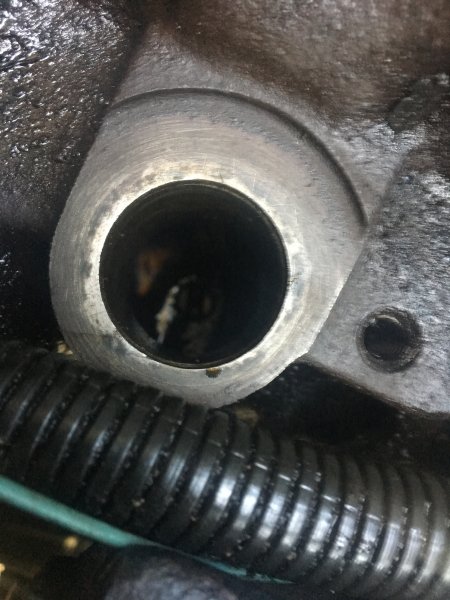
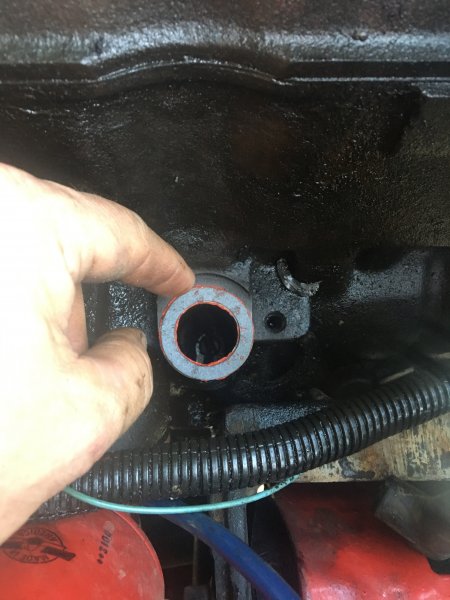
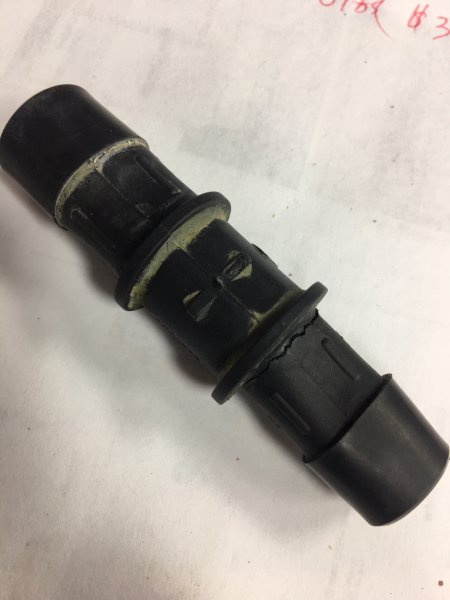
Ok, in a pinch I decided to use a plastic heater hose barbed fitting when I re-routed my heater hoses a few Months back. i know what you're going to say. My intention was to replace it with brass as soon as I sourced a 3/4" to 5/8: barb. The plastic one you see in the picture was purchased at Autozone and was made for automotive use. Well of course, intentions to replace this temporary solution was soon delayed and forgotten till I noticed a slow leak yesterday. Interesting what the part looks like after removal. in the pic you can see the crack. The hose clamps also deformed the plastic--likely made worse by the heated coolant. I could have had a catastrophic leak, so I consider myself lucky. By the way, I replaced with brass already. SO: Don't use plastic here you fool!
-
i ordered a bunch of stuff last week from the closeouts section. Amazingly, they happened to have everything I needed this time in the closeouts section. I saved more than half (even with shipping) from what i was getting ready to buy from Autozone.
-
Finally bought a Comanche!
coolwind57 replied to TieDyeJK8's topic in MJ Tech: Modification and Repairs
Headlight relay mod should be up near the top on your list. Congratulations on your purchase. Will be good to hang out with you here. Ask away and keep us up to date on progress. Hopefully someone will learn from you soon. Wiper blades, check fuse first. Mine quit working once and I found that the whole assembly worked it's way loose from inside the cowl. Bolts had simply loosened and dropped out. Rule of thumb: start by checking the easy stuff first (fuses, connectors, etc). These MJs had substandard wiring. But sometimes you got to dig in there deep and start dissembling things to figure problems out. Start with a good tuneup to see if that corrects your strange engine miss. Can't hurt and you probably need it anyway. In my experience, there's always something that is not quite perfect with the operation of my MJ. Good thing is that most of the time, it doesn't impede my use of the truck. Strangely, I find it kinda fun to track down and solve these minor annoyances. Makes you "become one" with your Comanche. -
Front brake question, HVAC question.....
coolwind57 replied to GreasemonkeySC's topic in MJ Tech: Modification and Repairs
I had heard about this before but I am struggling to picture it. The "U" channels on the tops and bottoms of each pad assembly slide across it's mating "rail" on the Jeep. Its this rail that wears down or something? Tried to find a pic here on the site with no success. If my description is accurate, then would that make only the inboard pad assembly the one sticking? Though rare, I have experienced this issue on occasion. I lubricated my rail with some anti-seize and I just replace my front brake hoses two days ago, so I'm still waiting to see if that took care of it. -
Sporadic delayed starting
coolwind57 replied to coolwind57's topic in MJ Tech: Modification and Repairs
Yep, looks like a PITA to me. Anybody know how to test them first to see if this is indeed my problem?