


coolwind57
-
Posts
992 -
Joined
-
Last visited
-
Days Won
6
Content Type
Profiles
Forums
Gallery
Everything posted by coolwind57
-
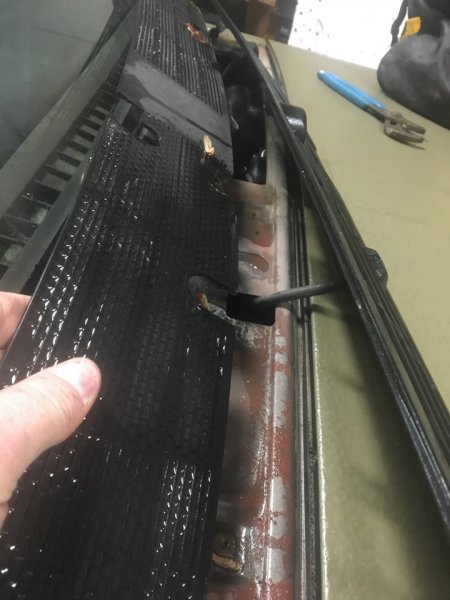
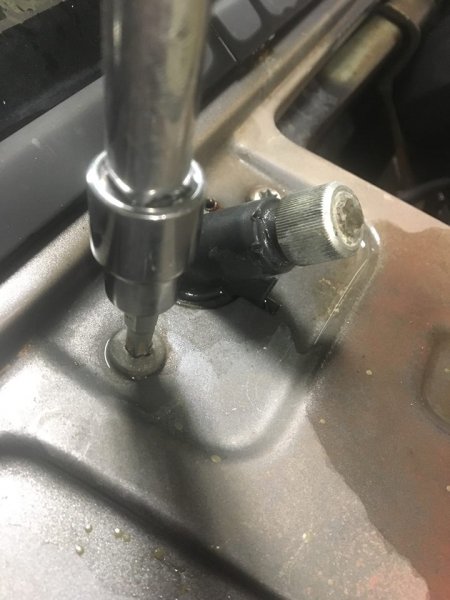
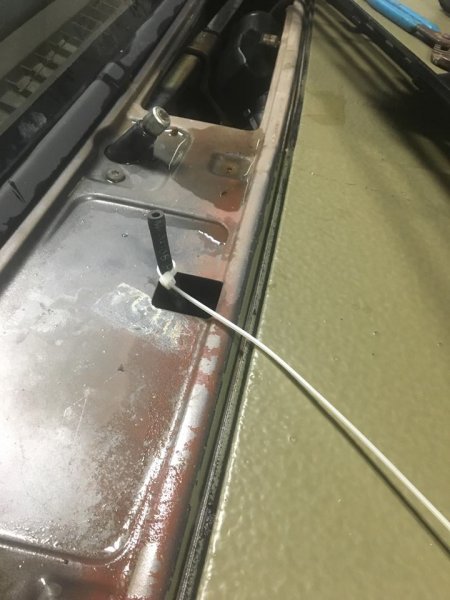
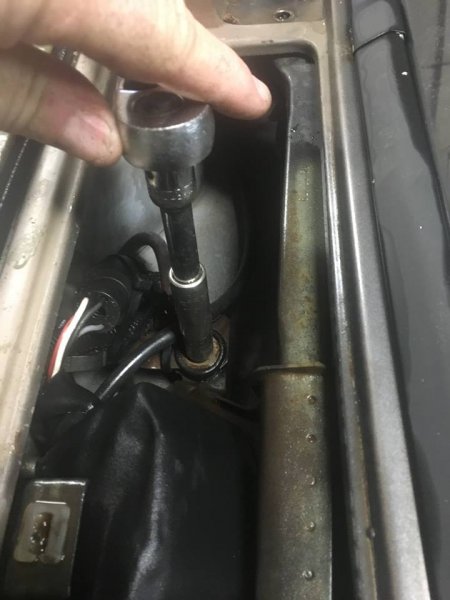
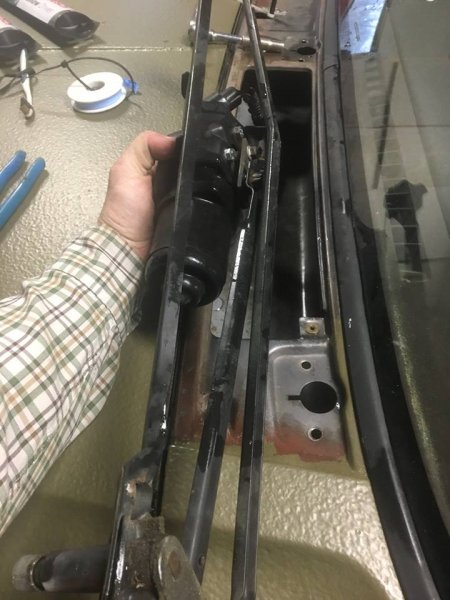
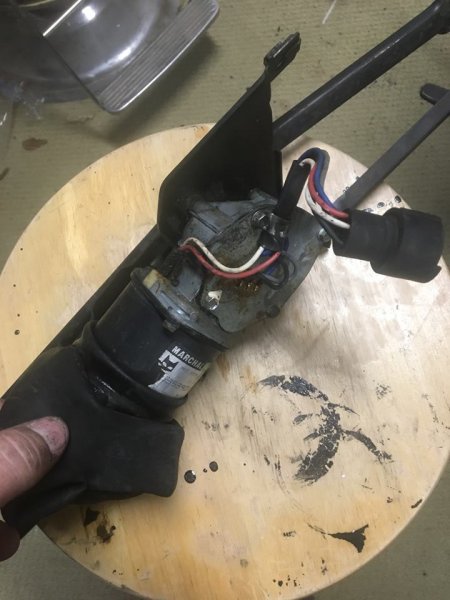
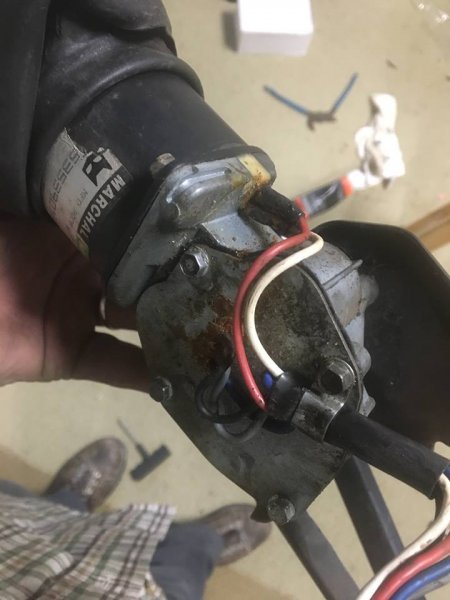
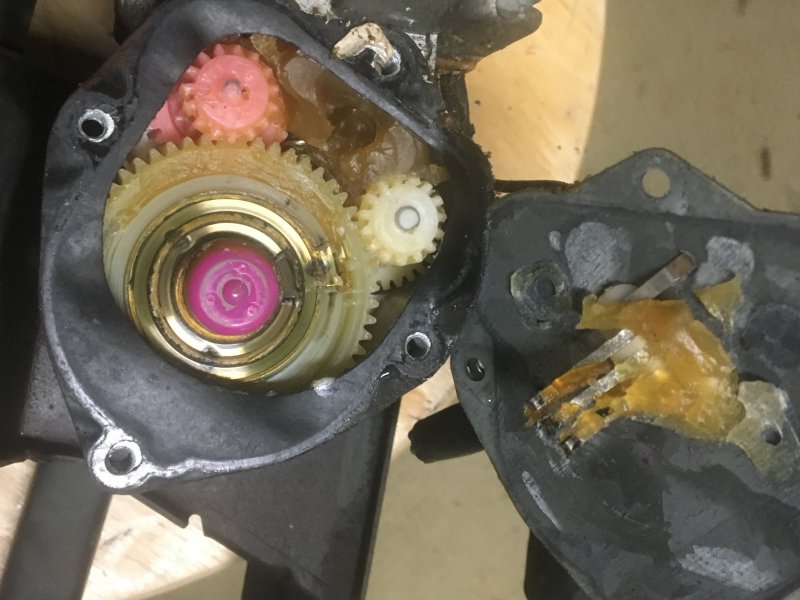
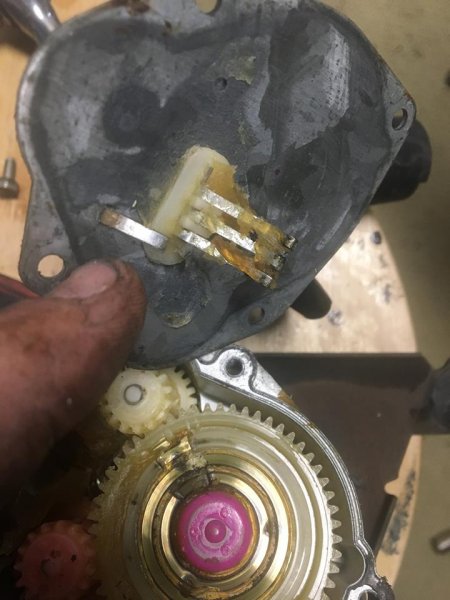
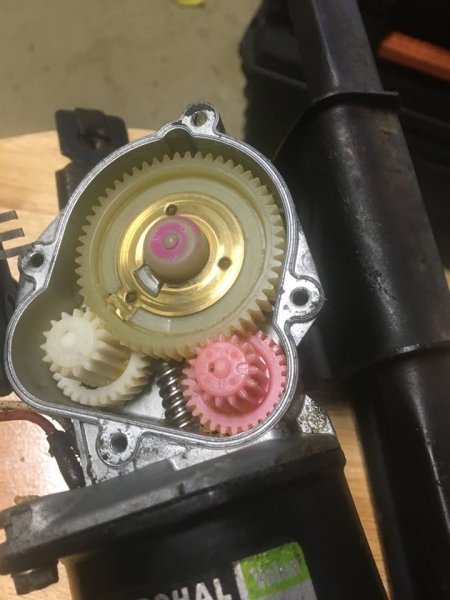
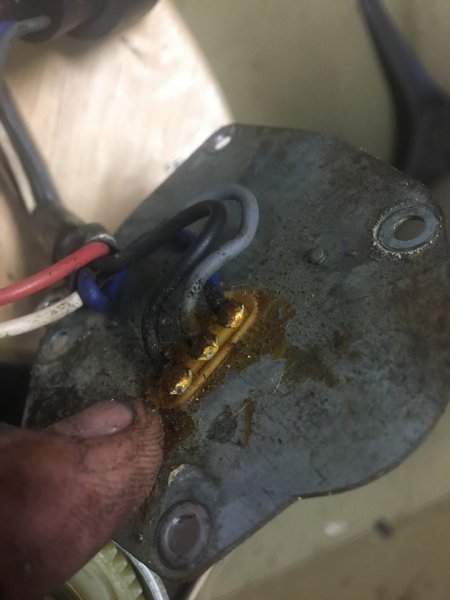
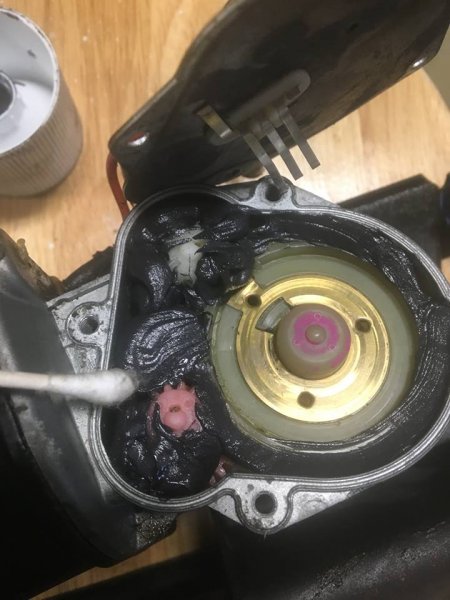
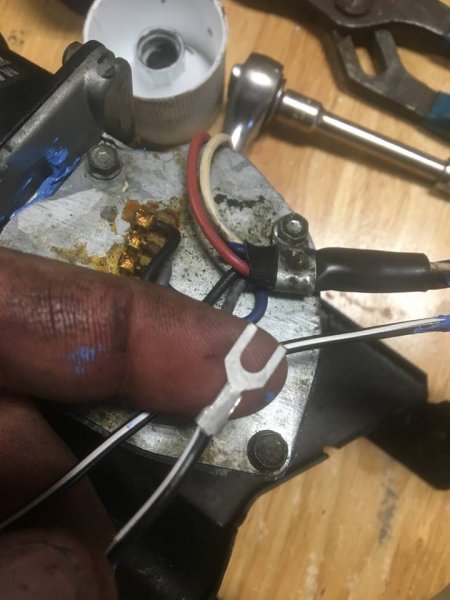
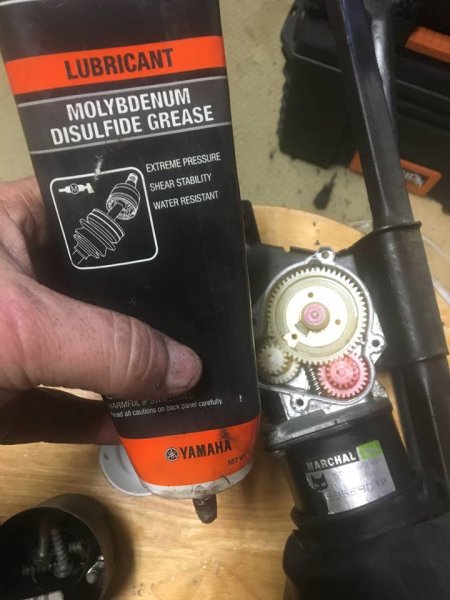
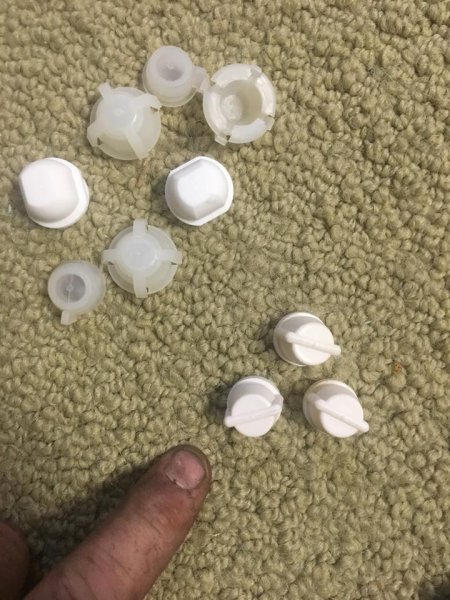
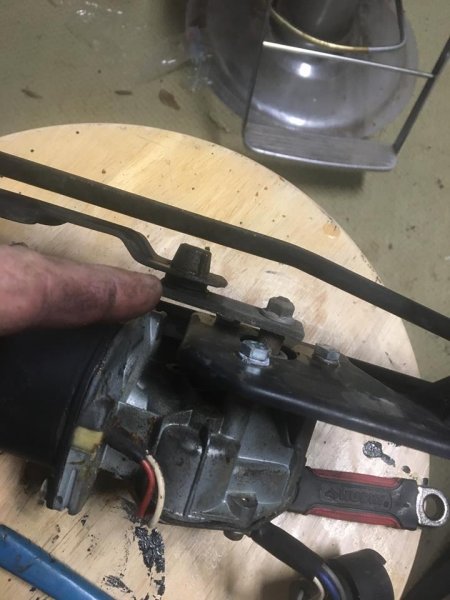
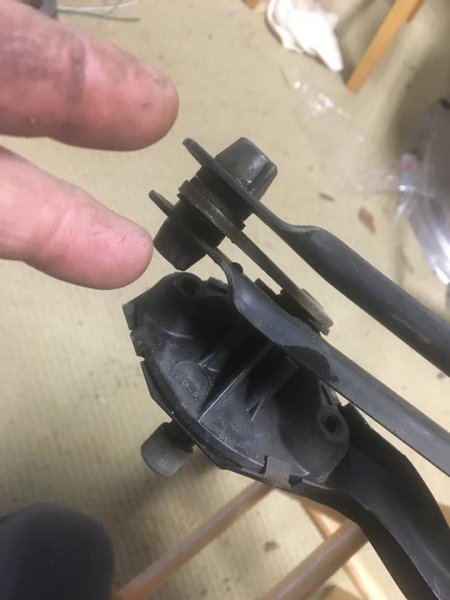
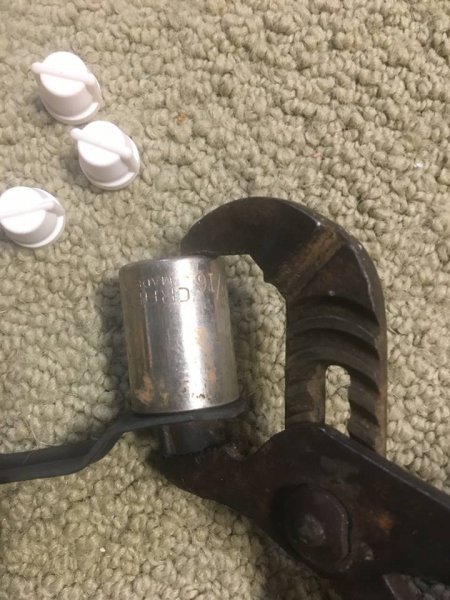
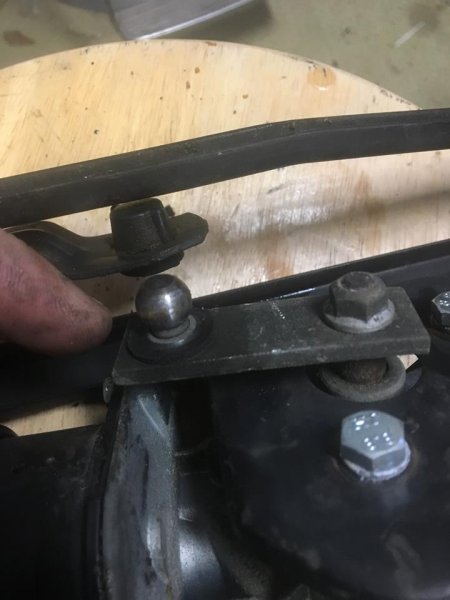
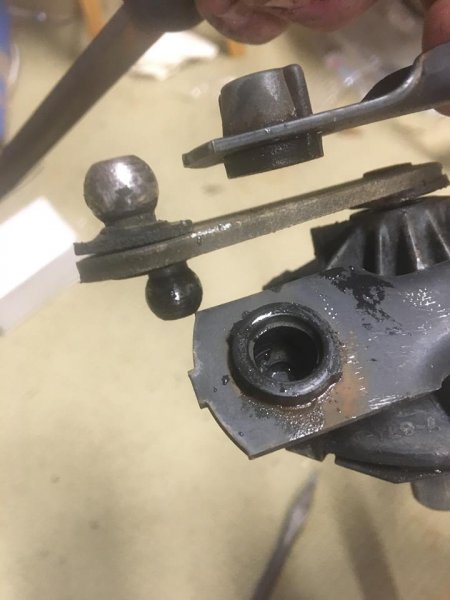
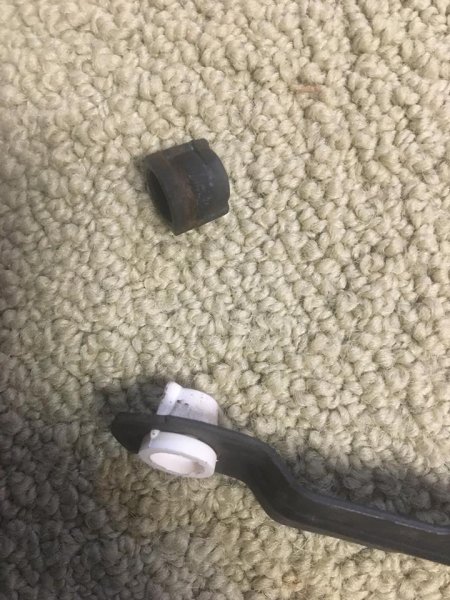
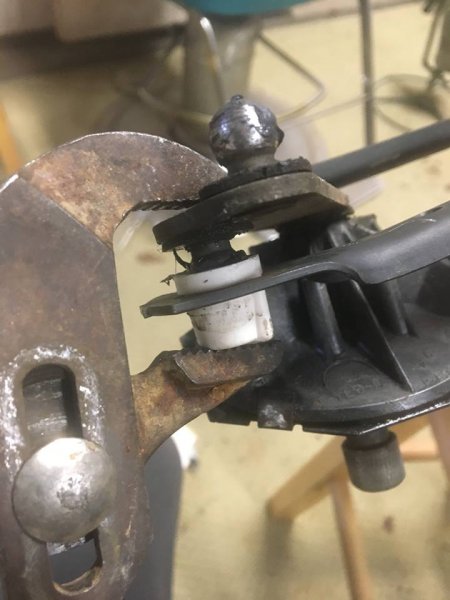
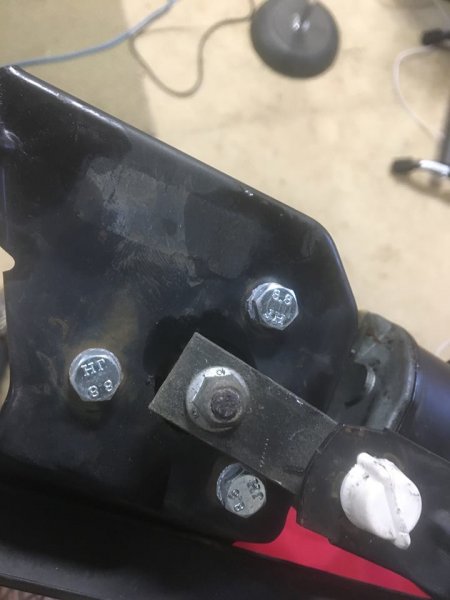
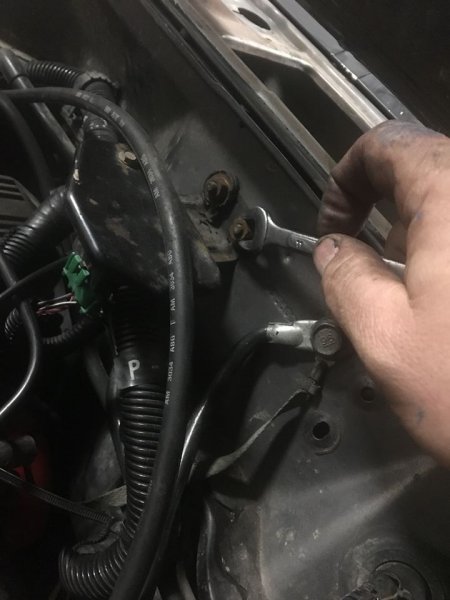
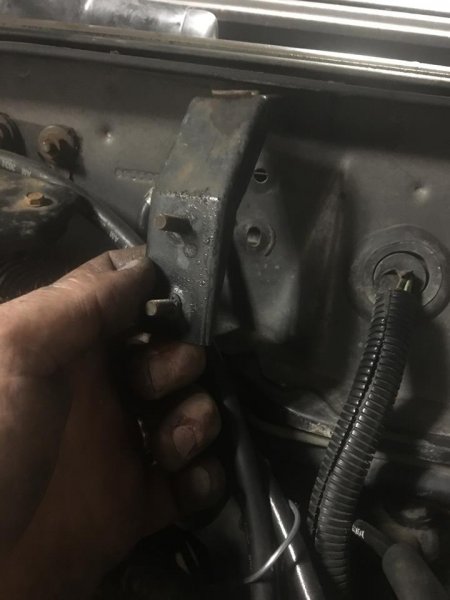
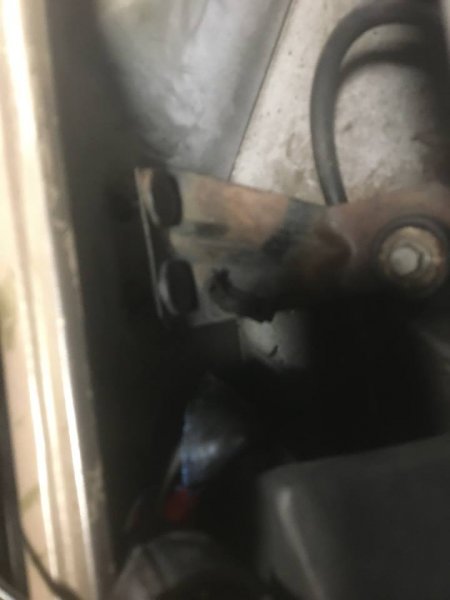
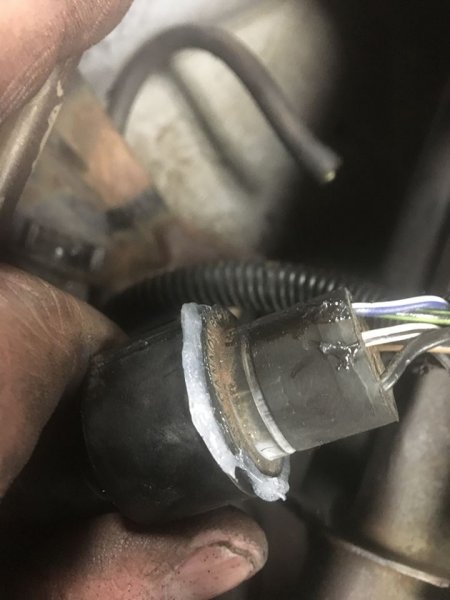
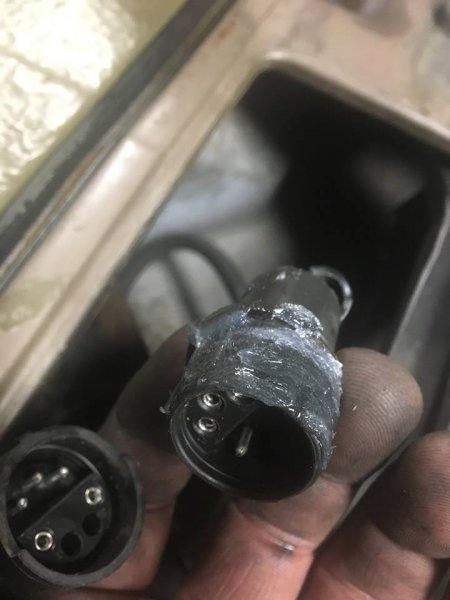
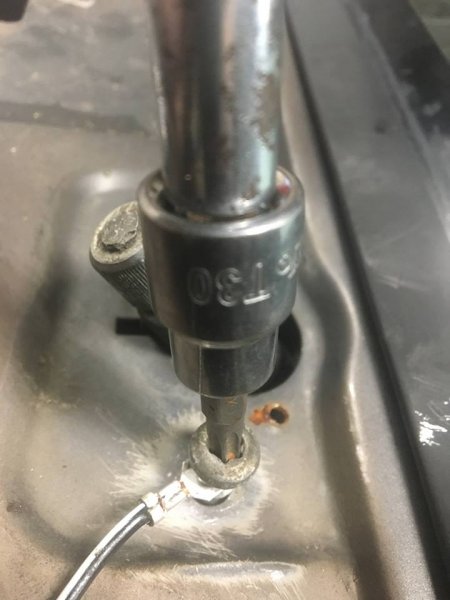
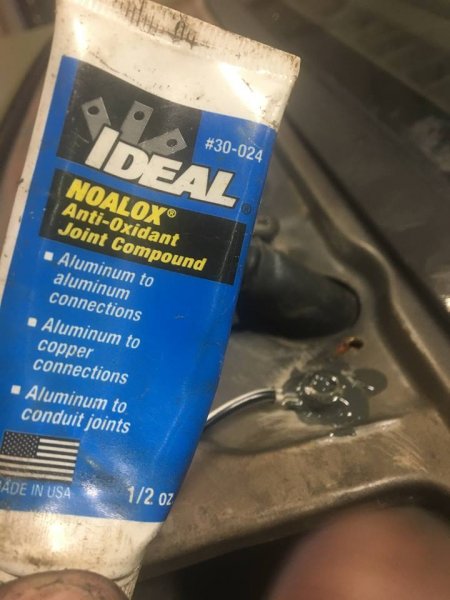
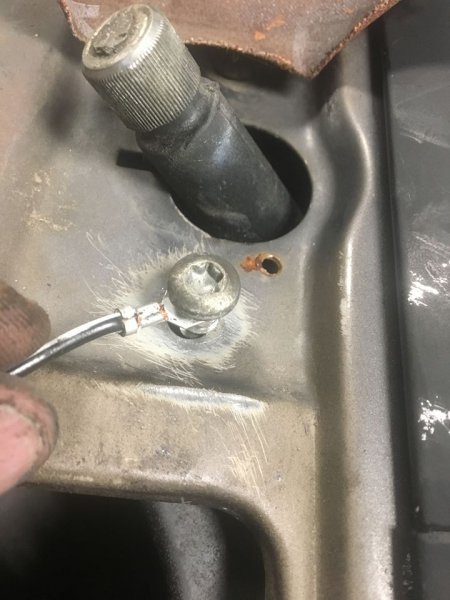
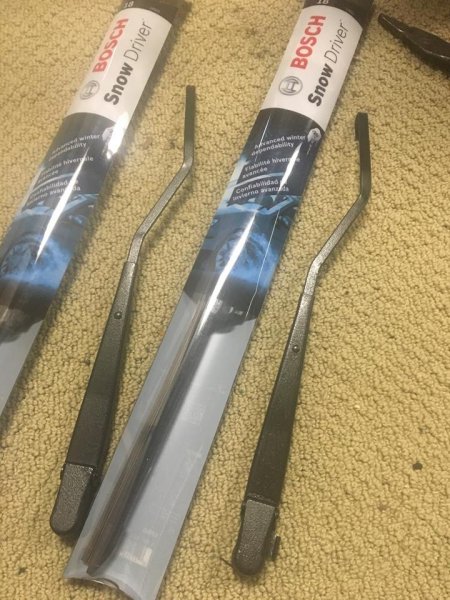
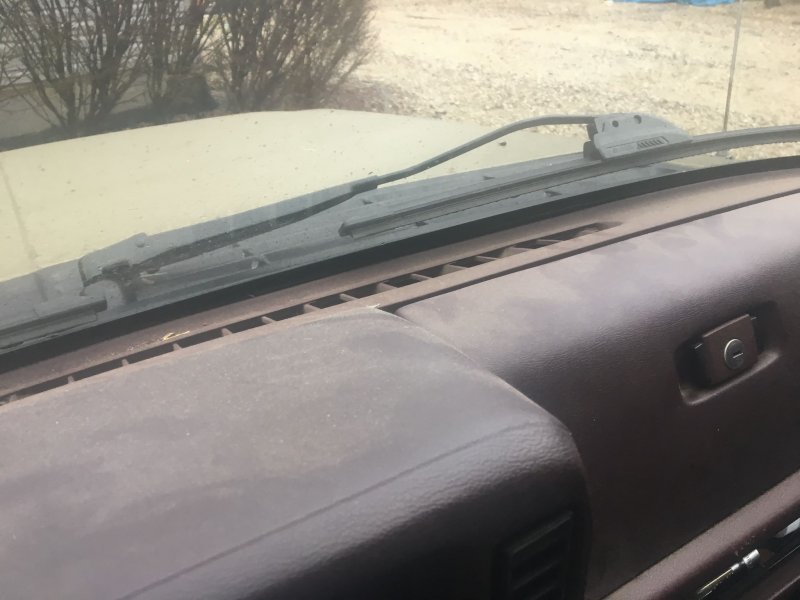
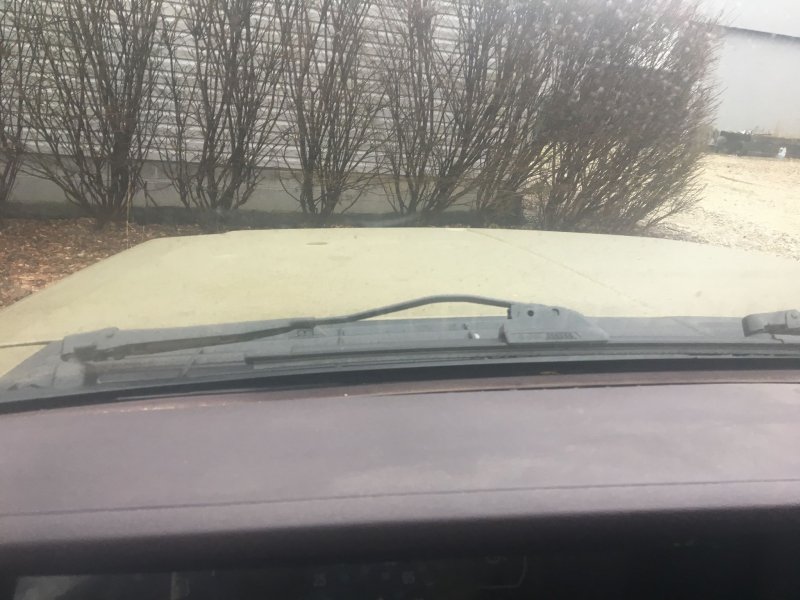
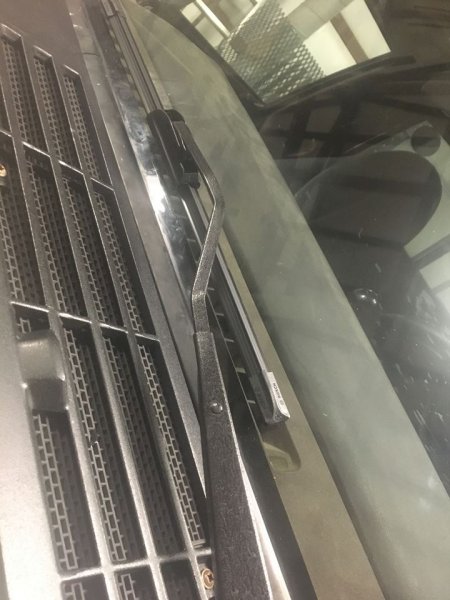
 Pic intensive. I just performed all of this work over the past couple of hours and took lots of pictures. So I thought why not share my work for those interested in the topic. I do acknowledge that others have touched on these subject areas but I hadn't seen a guy do these upgrades/mods/repairs all at the same time--and with pictures. If I'm wrong and this is viewed as redundant, then moderators can delete with my apologies. So here's what I did: 1. Replaced wiper linkage bushings--common wear items as these trucks age. Worn bushings make your wipers fly all over the place--they sometimes bang up against the windshield trim and they won't stay oriented and move around too much. Also could cause general looseness and noise. 2. Upgraded to 97+ wiper arms. They have a different terminating angle but more importantly, they have the J-hook instead of the side-pin. Many would agree that the J-hook is superior and holds the wiper blade with more stability, which may cut down on chatter and noise. 3. Added an additional ground wire for the wiper motor (Cruiser54's suggestion) 4. Cleaned out old, hardened grease inside the wiper assembly body, and repacked with moly grease (Cruiser54's suggestion). HERE GOES: Remove your wiper arms. If you're not familiar, grab a flat head screwdriver and pry that little tab over on the wiper arm body. It's close to the post coming out of your truck. Just stick it in between the wiper arm body and the tab itself and twist, moving it outbound as you lift your wiper from the windshield. This will lock it in an upwards position. Then pull your wiper arms up and off. If you'd not had them off in a while, they may be a booger. Gently pry and wiggle if necessary. Now, remove your wiper arm grill and interior cover. Next grab a T30 and remove the four (4) bolts that are nearest the two wiper posts that your arms were attached to. You can ziptie your passenger side washer tube to possibly save you from some future fishing of this thing later. There's a 10mm bolt holding the wiper motor body too. It's down in that sump area. Get him. Now this next step can be a pain. pull the detached motor assembly to the driver's side and try all kinds of turning, rotating and light manipulating until you successfully remove it from the sump area. Disconnect your wiring harness and bench it. This is what it looks like with the rubber protective cover pulled back, exposing the gear housing. The motor gear housing has four bolts holding the cover on. I think it's probably an 8mm bolt, but I had a 9/32 socket handy at the time, and it worked well for me. There's a gasket under this cover plate that you're removing, so try not to bugger it up. So, here's what mine looked like inside...lots of hardened grease. I used some screwdrivers, Q-tips and small shots of WD40 to loosen and remove that crap. I followed up with a very quick shot of carb spray followed with immediate air circulation so that I didnt melt those plastic gears. It was a risk, but I was quick at it and there appears to have been no damage done. It really worked well. Don't forget to clean those contacts on the inside of the lid. By the way, do you see that fourth contact that all alone by himself, pointing in the opposite direction? That's your ground. That contact is fed by the BLACK wire going to the wiring harness. **NOTE THIS WIRE AS CRUISER54 suggests adding an additional ground wire to it** Add an additional ground wire to your black wire. I ran about 12-18". The goal is to gain a second, more closely located ground source. I just attached my end to the body (You'll see later where I chose). The pic below doesn't show where I tied into the existing wiper black wire ground. I recommend soldering and sealing her up real nice. Cleaned up. I repacked my gear housing with a molyB grease. Using a Q-tip, I worked it into the teeth of the gears as best I could. Clean up your mating surfaces, reuse your gasket if you think it's still good. I did, and I also used a tiny bit of RTV just to ensure it sealed up well. Next job is to replace your worn bushings. Buy this kit. It'll have a bunch of stuff inside that you won't need. You just need 3 specific ones. Locate the three (3) bushings on your linkages that are to be replaced. Mine on my 89 were black. One near the center and two on the driver's side of the assembly. Grab you a flat-tip screwdriver and pop them off. It's essentially a ball joint. The old bushings can be easily removed by using a socket to cover the top and a set of channel locks to squeeze them off your linkages. Installing the new ones are reverse process. Notice that your channel locks are pressing the bushing inside the large socket you've placed there. Works like a charm. Again, installation is reverse of removal. Out with the old and in with the new. I chose to lube up the ball joint with some molyB grease, but perhaps you wouldn't have to. Use your channel locks to reinstall you linkages back together. Check the tightness of your three motor bolts!!! Why are mine so shiny and new looking? Last year, I had to replace mine because they became loose and some even popped out. I think I even had to retap one or all of them. That sucked. I'd recommend you remove, lock-tite and reinstall your bolts so they won't be a problem later. Once you're done with new bushing and reinstalling your linkages back, I'd strongly recommend popping your hood and removing the two brackets within that sump that will absolutely drive you crazy if you don't. There's two and both have two integral 11mm bolts with nuts accessible under the hood on the firewall. The lower bracket is where that 10mm bolt you removed earlier sits. It is attached through the firewall and also mounts your MAP sensor housing. The second bracket is to the right of it. This one is simply a mounting bracket for you wiper grill. Get them suckers out of the way. You'll need to in order to get your wiper motor.linkage assembly back in the sump with minimal cursing. Drop your motor/linkage assembly back into the sump. Reconnect your harness. I used di-electric grease just along the connector interior to help prevent moisure issues. Get your four T30 bolts tightened, with one having your new ground wire. I sanded to shiny metal here, then added OxGuard before final tightening. Reinstall your two sump brackets and reinstall the firewall bolts under your hood. Button down the rest, like your inner and outer wiper grill. I bought 1997+ wiper arms off of Ebay. I didn't pay much, maybe $20-25 for the pair. You can get them new on Amazon, eBay or Rock Auto. So here's the comparison. New style on the right. The curviture is very different and downward pressure is a bit more aggressive too. The big difference is the J-hook end. I cleaned my new eBay 97+ arms and shot them with black bedliner spray. Popped new wipers on and then installed them on the truck and tried them out. Zero noise and I'm back in business like a gangsta. They do look a little different on the truck. Not necessarily good, bad or better, just different in my eyes. I'm happy. All this work should pay off in the long run by not causing an unexpected loss of wipers at a most inconvenient time. I expect longer life and better performance with this work behind me now.
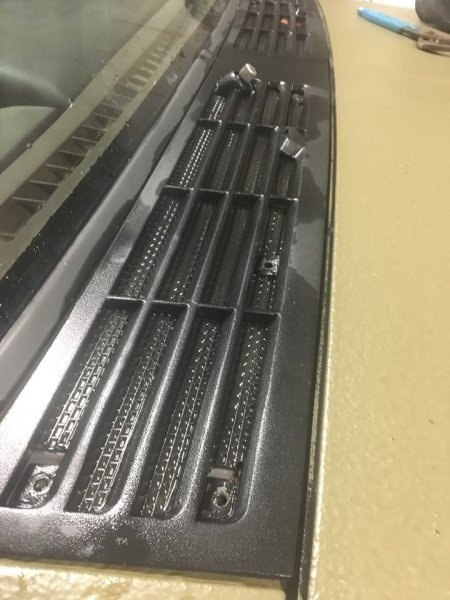


-
It's plug and play, bro. The mounting end is identical. Its just the wiper blade half that is bent differently, the half terminating at the J-hook. I bought my arms from eBay. I just now sanded them down a bit and shot on some spraycan truckliner black. Taking motor out now. I think I'll do my own writeup even though some others have covered this here and there.
-
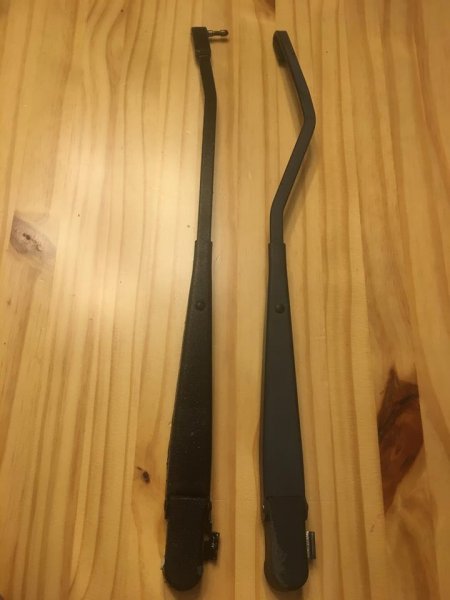
So, I'm upgrading to 1997+ wiper arms. I'm doing this while I do the all-to-familiar wiper bushing replacement. Just for those who are thinking about this upgrade, I thought I'd try to show the difference between the 1996 (and below) arms and the 97+. The most obvious difference is the J-hook end versus the older style side pin. Going from side pin to J-hook should provide more stability during wiper operation-keeping noise down and perhaps help prevent chattering and overall better wiper operation. The other thing to note, although it is not very clear in the photos, is the fact that the 97+ arm extends upright higher and then dips down steeply as the length terminates to the J-hook. This implys to me that the downward force of the blade would be increased over the older, more straight and level style. Anyhow, my truck is in the garage out of the rain and I've got my wood stove fired up. Time to hit it.

-
Simple Injector Troubleshooting
coolwind57 replied to coolwind57's topic in MJ Tech: Modification and Repairs
Nope. Not yet. I had a set of new aftermarket 746 injectors. I replaced with eBay remanufactured Bosch-brand. I was certain this would help But it didn't. It helps a little when I hold accelerator down while cranking. But cranking is still excessive. I've not figured this one out yet. I did see a drop in pressure after shutting the engine down last time I rented a fuel pressure tester...but it wasn't an immediate drop. The drop was over several minutes and didn't seem excessive. -
wiper arm issues, dang plastic
coolwind57 replied to Submariner's topic in MJ Tech: Modification and Repairs
Funny seeing this. I'm getting ready to do this very job this weekend. Got my bushings in today. Upgrading to the 97+ wiper arms too. Picked up a used pair on Ebay earlier. My local Pull-A-Part is not doing XJ/MJ these days. Used to have 12-15. Now only one 2001 XJ on the lot. Good reminder, cruiser54. Thanks. -
Glad to hear Don is recovering. Keep it up, my friend.
-
1989 Comanche Project: A Love Story
coolwind57 replied to Hudy's topic in Member Projects: Your Comanches
Very cool story. thanks for sharing! -
-
I had a 82 or 83 Diesel rabbit (car version of the Caddy) a few years ago. Had a manual transmission. They're a bit rare here in Indiana USA. You usually see diesels more than gasoline versions more often. I also had a VW Vanagon which I had converted to burn used vegetable oil. Smelled like fried chicken all the time.
-
https://swva.craigslist.org/cto/d/1986-jeep-comanche/6740748530.html Someone's gonna get a deal in Southwest Virginia. i'd scrap up 300-buck even if I had to raid my car seats for change if this MJ was in my area.

-
I'm diggin it. Thank you for jumping out and offering your ideas on this project. I'd be happy with either black or orange.
-
72 Commando for sale
coolwind57 replied to coolwind57's topic in Craigslist/eBay... i.e. Not Your Stuff
Looks like someone fattened his lip. -
This would be a really cool project. Five minutes from where I'm sitting right now. I'm buried with projects or I'd consider it. https://louisville.craigslist.org/cto/d/1972-jeep-commando/6732568783.html
-
Simple Injector Troubleshooting
coolwind57 replied to coolwind57's topic in MJ Tech: Modification and Repairs
So if I see improvement each time I do this, then it means that i likely have an injector or two that's leaking fuel into the chamber, right? -
I've been having delayed starting/excessive cranking issues for several Months now and I've slowly been getting around to checking components relating to the issue. The only thing left that I can think of that may be in the equation are my injectors. You may have seen my wining in other posts already, but here's the scenario: Most of the time, my engine cranks excessively before starting. I'm talking more than a few seconds--more like 8-10 seconds at times. I often stop and crank a second time to get her to fire and I usually always get a puff of strong gas odor & smoke from tail pipe. The only consistencies I've observed is this: She fires right up within a second or two if she sits for a day or two (cold). It's pretty consistent that the excessive cranking problem happens most if I have the engine warmed and shut down and park for a short stop (as in errand running) and try to start the engine again. This usually always causes an embarrassing amount of time to start. So I've checked, tested, replaced and/or cleaned IAC, MAP, O2, TPS, CPS. Got a new (bored) throttle body from MeanLemons. Checked fuel pressure and regulator function (very minor pressure loss after sitting, but I'd always had that gradual drop long before this issue). New distributor, new 8.2mm Thundervolt plug wires, Napa Gold distro cap with copper contacts. Removed and cleaned coil and contacts. Anyhow, no cigar. I'm suspecting that one of the injectors is perhaps not shutting off properly, maybe drowning a cylinder after engine shut-off? Does this sound right? Perhaps a flooded chamber or two is causing the "flooded-like" conditions--delayed starting/strong gas smell at start. So is there a way to check proper function of the injectors, preferably while still installed? The only thing I've done at this point was to remove each individual injector connector at idle and listen for engine rpm drop. As far as that goes, all caused a very slight drop in engine rpm--i understand that as a good thing. Any more simple tests that I can try before pulling them and the fuel rail? I currently have 1-year old 746 Bosch-copy 4-hole injectors.
-
I am curious if you have the "Metric Ton" emblem on the tailgate. Welcome Jkell from Sweden. You Swedes sure like your metal/rock and roll (like me). Looking forward to hearing about your progress on your fine looking Comanche.
-
hey jbellingham, glad to hear you got er starting! So your idle issue is more than just typical open/closed loop transitioning? You didn't mention addressing or checking your O2 sensor during your swap journey. Along with Cruiser54's tips, I'd look into the O2 as well as the MAP sensor and it's vacuum tube as they are two specific areas that can strongly effect idle issues. By the way, I successfully swapped out my aftermarket CPS with that original SIEMENS CPS that I had saved. I'm now getting a consistent .9 VAC. I had a .7 VAC flash up once, but it's a consistent STRONG .9 VAC. Huge number difference from a consistent .1 VAC on my aftermarket one. I'm still having some delayed starting issues, so it didn't solve my main problem. I think I have some injector issues, as I think at this point I've addressed everything else. So tell us how bad exactly is this idle of yours? Does it just drop down once? Die?
-
Digital Clock from a Cherokee
coolwind57 replied to coolwind57's topic in MJ Tech: Modification and Repairs
I never tried it. Looks like I made that suggestion a year ago. You renewed my interest in giving it a shot though. -
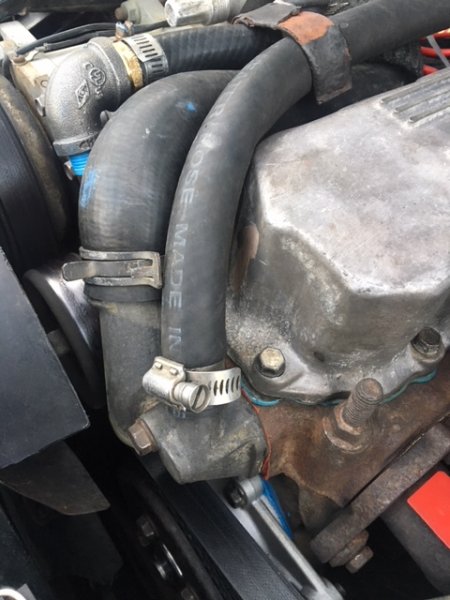
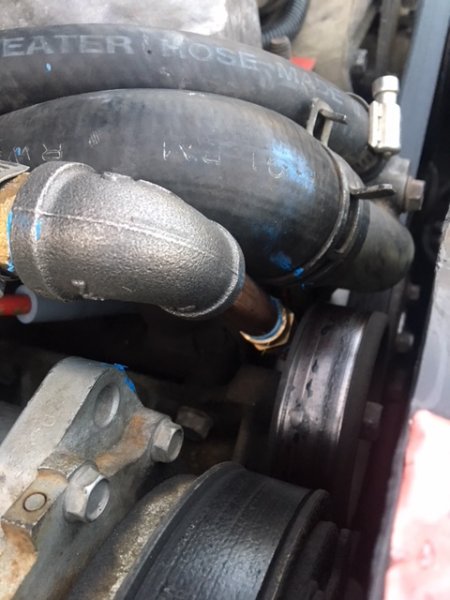
i replaced my water pump over the weekend. The one I replaced was actually working fine, but the metal heater core pipe had began leaking at the area where it threads into the pump. I removed the pump and the metal pipe just broke off within. Attempting to remove the remaining pipe inside the threads, I completely botched the threads. I considered JB Welding a new pipe in, but I didn't want to have to go through the extended process of doing a water pump removal again any time soon. Seemed more like a "fix' than a permanent solution. So I bought a new water pump and used 2 brass 3/8" nipples, with a coupler between them. Black iron is hard to find in 3/8", but brass is more available. This multi-piece set up allow for a easier installation. I installed the lower piece of brass onto the pump prior to pump install. I then installed the upper piece with coupler. Then topped it off with a 90-degree angle and a brass barbed fitting , which eliminated the angled rubber hose tip I previously had. Many ways to skin a cat, but this is how I chose to do mine.
-
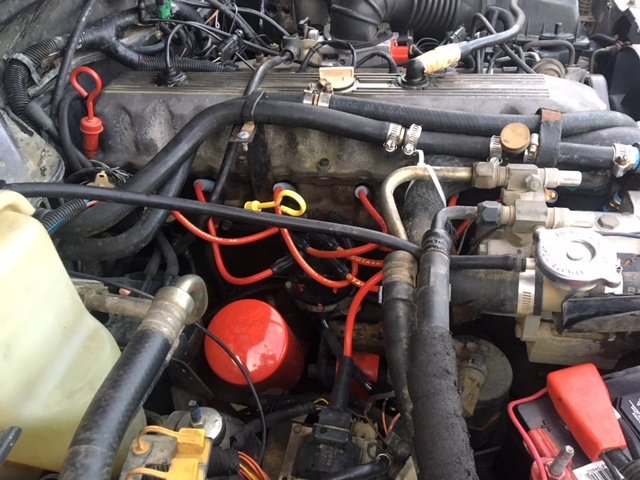
installed Taylor Thundervolt 8.2mm spark plug wires today. I had 7mm wires installed when I first bought my MJ, but they were problematic. A time or two I had to manipulate them because #2 spark was jumping. It was time to spring a little and buy these. They came well-recommended by MJers here on the site.
-
swaybar, pros? cons?
coolwind57 replied to Wounded_Fighter's topic in MJ Tech: Modification and Repairs
Some older cars didn't have them (1975 MGB for example) and in fact, some manufacturers apparently offered front and back as optional equipment back in the day. Of course the handling of the 1975 MGB kinda sucked. But I certainly ride the same wave on this issue as you, Pete M. My MJ went a few days with my front sway bar disconnected and i was a bit nervous. I babied it till my end links came in. I took mostly back roads to work and took it easy. I didn't really notice any difference during my normal driving experiences but I was anxious to get that sucker connected once again. i was blessed not having to experience crazy or emergency maneuvering, thank goodness. I'd not dump your sway bar. Like other have said: If you're a street driver, definitely have one on (upgrade, even). If you're an off-roader, then have one on with disconnects. -
Well, I didn't get a chance to swap out my CPS last night. I did perform the advancing mod on my existing CPS and I just performed the mod on the one I'm putting back on tonight. I suppose my case is not exactly the best example since my CPS is apparently bad, but I'm comfortable with doing this. It takes some strong smacks and strong words to get it to move but it'll slide with some persuasion. Just protect your bolt hole by putting a bolt in there before smacking with a hammer. If not, you'll deform it.
-
Yep, I feel your pain. I just happened to run across a small magnet today at work. I glued that sucker inside my 11mm socket, so I'm anxious to swap out my CPS tonight with a tool that is less likely to drop my CPS bolts during the tedious process. Multiple extensions and a u-joint on my 3/8" drive ratchet is how I accomplished it last time. Once, I dropped one of the bolts through that stupid hole on the top of the bellhousing, just beneith the CPS. I completely freaked out and had to open up the inspection cover on the bottom of the bell housing and use a tire iron to carefully pry on the flex plate to provide just clearance for the bolt to come out of the bottom. I nearly lost my religion over that whole ordeal.
-
Also, I'm quite certain that CPS design/function changed a couple times during the MJ/XJ years. An early Renix CPS may not work correctly in a later engine and vice versa. What's the engine swap, exactly?
-
I'm actively dealing with a similar problem as well. I was hopeful that I found my problem when I found that I had previously accidentally crossed my #5 & #6 fuel injector connectors. Despite this, she still ran very well over the last 3-months or so. Disappointed that this error was not the reason for my excessive cranking-before-starting issue. I finally got around to checking my CPS AC voltage yesterday. I checked several times and I think .2 flashed for a second at one point, but otherwise the CPS cranked out a consistent .1 VAC. This is NOT a good number. It apparently should be pumping out .5 VAC. So, if .1 is considered "bad", then I've been running with a bad CPS for these past few Months. My only symptom is the excessive cranking before starting (and usually a very prominent odor of gasoline once she does fire to life). I still have what I assume is the original "SIEMENS Made in France" CPS that I replaced last year. I had swapped it during a parts-cannon attempt to solve a previous problem, but I think it is still good. I'm going to install it tonight and see if this resolves my cranking problem. I'm anxious to hear what VAC numbers you're getting out of your CPS.