
Dzimm
-
Posts
3580 -
Joined
-
Last visited
-
Days Won
11
Content Type
Profiles
Forums
Gallery
Everything posted by Dzimm
-
I can add it to the list and see about making one. I do think though by the time you factor in print time, shipping, and then paint to match your interior, it's probably cheaper to source a factory one from elsewhere. I only say that because it's a shared part with the XJ and thus there are millions of them. I'll keep you posted when I get closer to it on the list.
-
97+ swap 4.0, AW4, D30/C8.25 w/3.55, lifted 4.5" with stock size tires. I get 18-20mpg highway depending on the wind. 92 4.0, AX-15, D35 w/stock gears (3.07??), Stock height. I got around 20-22mpg highway when the truck was in this configuration. No numbers on the new setup yet.
-
You are very unlikely to find a pre-built cord that is 25' long. It's just generally a bad idea to have that much exposed cord with that much power in it. You can make your own but it won't be cheap as you said. It doesn't necessarily create a fire hazard unless the cord gets damaged, but then I'd be more worried about getting electrocuted. Another option is to plug your compressor in by the dryer and get a longer airline to run outside until you can get the circuit installed.
-
Thanks! Didn't realize there were so many versions of it.
-
Does anyone know, do all XJs and MJs have the wiring for the dash clock even if it didn't have it? Also does anyone have a pinout or pictures of the plug?
-

bunch of tailllights in Boston
Dzimm replied to Pete M's topic in Craigslist/eBay... i.e. Not Your Stuff
So shiney! -
It appears the link text is the youtube link but the actual hyperlink is for this page. If you right click, or click and hold on mobile, click "copy link text" then paste in the address bar it will take you to the video.
-
One is used as a truck and for occasional cruising the back roads. One is strictly a street toy.
-
Typically no, however some have sold that high. Just have to find the right (crazy) buyer.
-
It can be easily bypassed. Remove the valve and lines around it. You'll keep the softline and the main line that comes in down the frame rail and tie them together at the fitting that's mounted to the frame. The secondary line will need removed and capped back at the distribution block, or replace it with an XJ distribution block. Also would be a good time to do the dual diaphragm booster upgrade as well.
-
Sounds good. May need to share them on google drive, I'm not sure if they will come through with all the proper stay if we upload and download through the messenger. PM me later if you get pictures and we can figure it out.
-
I actually only need pictures. If you could get me 50+ really good and clear pictures with even lighting of all exterior areas of the truck, I can certainly give it a shot. They have to be very evenly lit so a bright cloudy day is best. The pictures need to have as much of the truck in it as possible and in a large open area like a parking lot. The program I use has to have the camera sensor in it's database so not all cameras will work. I believe all of the main smartphone cameras should work tho.
-
Yeah I'm realizing how difficult ABS is. I made a makeshift enclosure for the printer and it helped immensely but still haven't gotten a good print with it. I'll have to look into the PETG. After some research it sounds like PLA actually fairs well in the elements, especially if it's painted with a UV resistant paint.
-
Transmission and 4 liter inline 6
Dzimm replied to jeeplover's topic in MJ Tech: Modification and Repairs
I would agree, the AX-15 seems to be the best manual trans offered in the XJ/MJ. Should be fine for any amount of hp you can get out of the 4.0 -
Thanks for the idea! I will definitely see about making replacement frames, the rubber flaps will have to be reused or custom made. At some point I may buy another printer and modify it to run flexible materials to produce the flaps.
-
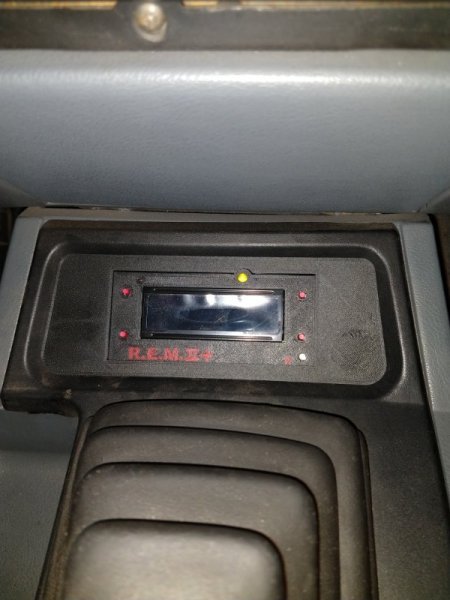
After some final tweaks and official test fit courtesy of JMO413, the center console REM mount will now be made available. Check out the vendors section for the sale post or Click here. Photo credit: JMO413 I am still working on the 3D model of an MJ. I've currently got about 85% of the truck showing up good in the scan. I'm starting to think I will have to manually model the rest as I'm having trouble getting a good scan of the front end and tailgate. Plenty of smoothing and cleanup to do on the scan portion as well. I have also modeled some leaf spring pads and am printing some currently. I'm going to try them out on my XJ and see how they do. Not particularly cost effective for the print time vs the price of what's commercially available but the material cost to print is nothing so I'm giving it a shot. If there is some part that isn't available or would be useful to anyone and could be 3D printed, let me know and we can see about getting one made.
-
I wouldn't read too much into value of 2wd vs 4wd. Overall condition of the truck is getting more important than anything else but 4wd can help make it sell faster. As far as gas mileage, a 2wd with manual trans will typically give you the best results with less spinning mass and manual shifts. Really though, I got the same 18-22mpg in my lifted 97+ swap 4.0 AW4 as I did with my 92 4.0 AX-15 when it was stock.
-
Leaf spring perches are the metal platform things welded to the axle that the leaf springs are sitting on. They are in a different location on the MJ and XJ axles, also the MJ is spring-under while the XJ is spring-over. The perches themselves are the same between the XJ/MJ so when you are looking to buy new ones, you will likely find them advertised for XJ. No adapters like that for a driveshaft. You can potentially have your MJ driveshaft modified given the swap you are doing it may be long enough to have it cut down. If a shaft is too short, it's usually better to have a new one built. Research the heck out of this before diving in and ask any questions before forging ahead. Plenty of threads on doing swaps like this.
-
Sounds like a flipper to me.
-
Very good point! I always forget to mention the fuel tank mounting. In my opinion the easiest method and what I did for my truck it to use some 97+ XJ fuel tank straps and bend them straight, then hooked them in the factory MJ strap locations and bend around the tank to meet up where the J-bolt notches are. This method reuses the MJ strap mount locations but you absolutely have to be certain to make some kind of spacer on top of the tank to keep the top of the fuel pump away from the bed. For mine, I used the pink panther insulation foam as the spacer as it won't really deteriorate and provides some cushion between the tank and bed. This method does not however help to pull the tank towards the frame rail, it rather pulls it upwards only. This leads to the tank sitting closer to the diff, my solution was to slightly tilt the tank in the rear away from the diff. This leads to the tank sitting a little bit crooked but doesn't have any affects to how it functions. Having a lift on the truck helps greatly with the clearance issue. If at all possible I would recommend taking to time to do as AZJeff mentioned and devise a way to pull it towards the frame rail in the rear if at all possible. I've seen some very nice mounts people have fabricated to mount these tanks.
-
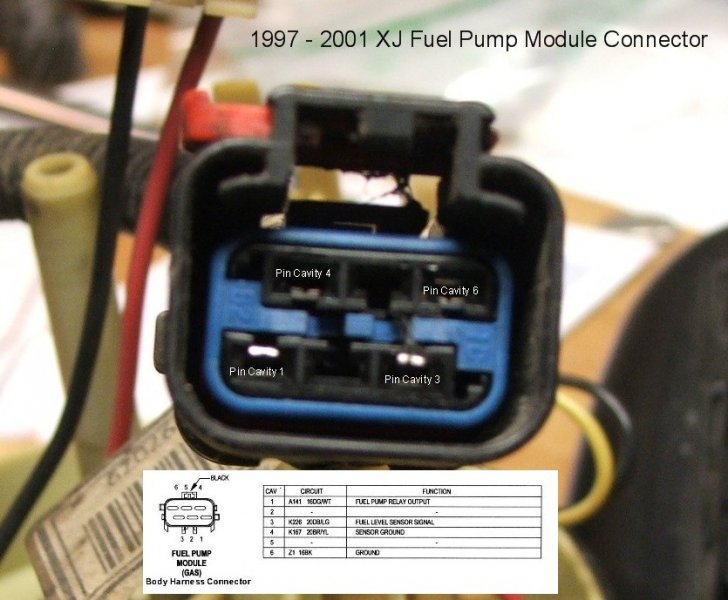
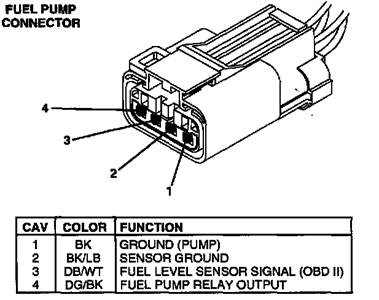
For the 22gal, the early 90s tank and later 90s fuel pump (96ish+ IIRC) is the best combo but a later 90s tank will work. The early tank has the corner near the diff angled to offer a ton of clearance, the later tank does not have this and sits within 1"-2" of the diff housing but still clears fine, just closer. You can fit the 22gal tank under a swb MJ, just need to modify a corner of the tank to clear the frame brace (I'm not sure if this is required on the lwb or not) and be sure it's got spacers to keep the top of the fuel pump off the bed. The 97+ thread in my signature has the info on how I did it. I cannot answer definitively for the 16gal tank but I believe it'll fit any MJ without modifications. Below are the wiring diagrams you'll need. XJ side is the actual picture, Dakota side is the diagram. I bought a Mopar repair pigtail online and made an adapter to make it easily replaceable. Wired correctly it'll function like it's supposed to with the 97+ gauge cluster.
-
Wonder if the yard owner knows what it is. Possibly why it's up off the ground and away from people's reach.
-
The problem I see is that with the added width you will need either a lot of lift, cut out a lot of sheet metal, or probably both to make sure your tires don't hit anything. You'd have to do something to widen the rear and then with that you'd either have to remove the bed or severely chop up an MJ bed. I don't see any reason it can't be done unless the pumpkin isnt in the correct spot to line up the front driveshaft. As mentioned it's probably not an advisable thing to do unless you really need the strength but it sounds like there are better options.
-
Axle/Gearing/Braking recommendations
Dzimm replied to Wargresh's topic in MJ Tech: Modification and Repairs
Value is totally depending on location and what is available in your area. In the rust belt, they fetch a higher price especially if they are rust free. Check the local craigslist/facebook market place for an idea of starting price. As far as axles, as Pete mentioned the Libby C8.25 is a very good axle as it adds tons of strength and disk brakes. If you go with this axle, make sure it's the one with a u-joint pinion instead of the flange. Whatever axle you go with you will need to make sure you get new perches welded on in the correct location and the correct pinion angle. With the disks brakes in the rear, you will want to get a WJ disk brake proportioning valve to replace your stock one. And as mentioned the dual diaphragm brake booster is a must as well. Everything is pretty much bolt-in swaps aside from the axle. Also keep in mind that with an axle swap you will need to have your driveshaft modified or have a new one built to the proper length. These are typically measured from center of u-joint to center of u-joint. The Libby C8.25 requires a driveshaft shortened by 1"-1.25" No matter what, don't drive the truck unless both the front and rear gear ratios match or without the front driveshaft installed. If they are both connected with different gear ratios, you will destroy stuff. Research this stuff to death and you should be able to get the knowledge to do it yourself. If you need help don't be afraid to ask and make sure you find a good welder to do the axle perches if you can't do then yourself. -
I want all the things.... I've never seen so many Super Birds/Daytona's in one place even in pictures!