


cruiser54
-
Posts
9413 -
Joined
-
Last visited
-
Days Won
14
Content Type
Profiles
Forums
Gallery
Everything posted by cruiser54
-
Yes. My point is if you have a Renix, don't ditch it in favor of an HO and think you will be amazed.
-
All versions of the 91+ heads flow better than the renix hands down. The 60mm TB Exhaust header 96 Block revisions for NVH and the addition of a crank girdle 96 belt tensioner design was a much better than the renix or early HO years 99+ equal length runner intake 99+ wasted spark system (this one had its issues but they were headed in the right direction). I agree with all of the above. But, the flow only helped at higher RPMs. Torque was no better. The HOs up to 95 used the same cam as Renix. The changes in accessories etc were nice to have. Can't dispute that. But still, the engine itself, longblocks compared were not night and day. Barely discernable. I worked at a Jeep dealer from 1980 through 1992. I got to order myself a new Comanche every 6 months beginning in 1986 and continuing through 92. When the 91s came out, myself and others at the dealership were disappointed. Couldn't feel any more power. I had 3 or 4 with the HO.
-

Flywheel Condition Opinion
cruiser54 replied to howeitsdone's topic in MJ Tech: Modification and Repairs
You're good to go. I'd rather have a known good flywheel scuffed than to risk buying some unbalanced and reverse engineered piece of crap off the internet. -
Renix 4.0s used the hex head bolt on the oil filter adapter. See if the valve cover bolts are loose. Very common. If you decide to replace the gasket, us only FelPro blue. Starters with oil on them indicate oil sender and/or distributor leaking.
-
I can't think of anything they did on the HO was a power adder except bigger throttle body and better flowing header. I ran an HO on Renix and it didn't run any better than my Renix on Renix Jeep with almost identical mods. The HO on Renix had the later header but the Renix on Renix did not. Both ran 60mm throttle bodies. Everyone wants the great magic of the HO, but Chryco didn't deliver. Well, except the liftgate emblem...and they gave us breaking pistons and incompletely drilled engine mount bracket holes. That was a disaster. Not to mention the 0331 head. Even their redesigned and improved header cracked with the same frequency as the HO versions.
-
Unknow Ground Connection / Instrument Bezel
cruiser54 replied to JimiGibbs's topic in MJ Tech: Modification and Repairs
CRUISER'S MOSTLY RENIX TIPS IMPROVING THE INSTRUMENT PANEL GROUND NOVEMBER 17, 2015 SALAD 27 COMMENTS The ground point for the complete instrument cluster on your XJ or MJ is located up under the driver’s side dash. If you lay on your back and look up under there with a flashlight, without wearing a hat, you will see a black wire attached to a shiny piece of metal almost directly above the hood release knob. The screw will have either a ¼” or 5/16″ head on it. This ground point is responsible for handling the ground circuit for the following items: Dome lamps, seat belt and key warnings, transmission power/comfort switch, wiper switch, headlamp switch and delay module, fog lamp switch, cargo lamp switch, all instrument panel grounds and illumination, power windows and door locks, cruise control dump valve, and a few more things. The problem is that where the ground point is located does not share good contact with the chassis where the ground should be. The solution is simple: Make up a jumper wire with #10 gauge wire about 10″ long. On one end, crimp on a ¼” round wire terminal. On the other end, crimp on a 3/8″ round wire terminal. Remove the screw from the existing ground wire and attach the small terminal of your jumper so that the original wire and your new jumper share the same attaching point, one over the other. Look above the driver’s side plastic kick panel just forward of the top of the hood release knob. You will see an 8mm stud there. Attach the large terminal end there with a washer and nut over it tightened securely. Use a coating of OxGard at all ground contact surfaces when attaching the screw and nut. **Special note for Comanche owners: Make your jumper wire 12″ long and attach it on the driver’s side kick panel close to the fusebox on the 8mm stud.** -
Don't bother with the intake swap. Not worth it. Better results can be had with a bored Renix throttle body which is bigger than a stock HO one. HO myth buster Renix in 90 made 182 HP. HO in 91 made 190 HP. That's 8 HP difference. HO only made more HP than Renix at higher RPMs and not a bit more torque. HO had a 58 mm throttle body versus a 52 mm throttle body on a Renix. That’s 20% more air available through the HO throttle body. The HO also had a better design header. See where I'm going with this? It’s only a 4% horsepower increase….. The whole 8HP was not mostly from the head, but from the bigger TB and better exhaust manifold. Put a 60mm TB from www.strokedjeep.com on your present manifold using the Renix head, eliminate the "crush" in your headpipe with proper re-routing, and go for it. HO stands for Highly Overrated. __________________
-
Long and skinny white plug. Really flat under the column.
-
CRUISER'S MOSTLY RENIX TIPS REAR MAIN SEAL DIAGNOSIS OCTOBER 31, 2015 SALAD 3 COMMENTS EDIT I’d be looking up ABOVE first, and VERIFYING the source of the oil leak YOURSELF. Everybody, who doesn’t own or have to pay for or perform your vehicle repairs, loves to poke their noggin UNDER the Jeep and come out bearing the false bad news that your RMS is leaking. Many mechanics, friends, and good old Uncle Bob seem to enjoy telling you it’s the rear main seal. Has a catastrophic ring to it, doesn’t it? A simple leak at the back of the valve cover or other source could produce the same symptoms. You don’t need to be a mechanic to figure this out. If you have good eyesight and a dim flashlight, you’re good to go on your own. Don’t jump on the RMS/oil pan gasket bandwagon right off the bat. Almost any oil leak on your 4.0 is gonna drip from the RMS area for two simple reasons: First off, the engine sits nose-up and any oil will run back to the RMS area. Secondly, the RMS area is also the lowest point on the engine. Simple physics and the old plumber’s adage apply here: “Crap flows downhill”. Valve cover gasket, oil pressure sending unit, oil filter adapter seals and distributor gasket, in that order, have to be eliminated as possibilities first. A little tip here. Rather than use a dizzy gasket, use an o ring instead. NAPA #727-2024. Tips 12 and 13 will help you get your distributor back in place correctly.
-
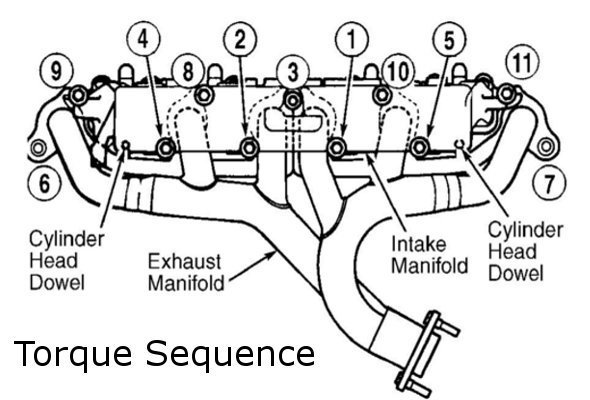
First, make sure all the intake manifold bolts are snug. The factory torque spec was too low. Best to remove the air cleaner to do it. Here's the sequence:
-
Unplug the stereo for now.
-
glad to hear of your progress!!
-
Or just solder and shrink tube them. That connector was there to ease the assembly process anyway.
-
Fuel injector electrical connector
cruiser54 replied to gvthnks's topic in MJ Tech: Modification and Repairs
Those connectors are as common as belly buttons on numerous vehicles. For sure, 87 to 90 fit. -
Do that and forget about it!! Put dielectric grease on it first. It took 36 years to get that way. How old are you now?
-
this also. CRUISER'S MOSTLY RENIX TIPS RENIX VACUUM HARNESSES NOVEMBER 17, 2015 SALAD 27 COMMENTS EDIT The vacuum harness that attaches to the front of the valve cover and includes the grommet/fitting, and is called the front harness, is Napa part number BK 715-1367 or is a Dorman 46003. The vacuum harness that is closest to the air cleaner, EGR etc, and is called the rear harness, is Napa part number BK 715-1366 or is a Dorman 46004. The tube from the rear of the valve cover to the intake manifold is part number BK 715-1365 or Dorman 46005 and comes with the valve cover grommet. The Throttle Body to MAP hose is no longer available. Click HERE to access a fix for that.
-
Here's an additional photo which may be useful in the future.
-
They run just fine without it.
-
Help appreciated. Fuel pump issue
cruiser54 replied to Johnfishin1's topic in MJ Tech: Modification and Repairs
What do the fuel pump and gauge sender have in common? They share the same GROUND. Behind driver's taillamp. -
Help appreciated. Fuel pump issue
cruiser54 replied to Johnfishin1's topic in MJ Tech: Modification and Repairs
CRUISER'S MOSTLY RENIX TIPS IMPROVING THE FUEL PUMP GROUND JANUARY 3, 2016 CRUISER54 54 COMMENTS EDIT The fuel pump and fuel tank sending unit ground at a sheet metal screw up behind the spare tire on an XJ, and behind the driver’s taillamp on an MJ. Not only is a sheet metal screw a lousy way to ground things, this ground path is long and travels through some connectors that are prone to corrosion and moisture. Locate the black wire on the HARNESS side of the fuel pump/sender 3 wire connector. Remove a 6″ length of the split loom covering. Strip back about 1/2″ of insulation from the BLACK wire. Take your new ground wire, preferably at least 14 gauge and 12 to 18 inches long as needed, strip it about 3/4″, and wrap it around the exposed part of the harness plug wire.Solder the connection. Tape it up and reinstall the split loom covering. At the other end of your new ground wire, add a crimp on eyelet. Attach the eyelet under a bolt that goes directly into the chassis. Be sure to clean the attaching point til shiny and apply OxGard to the contact surfaces. -
Go for it.
-
4.0's favorite oil? (and change interval)
cruiser54 replied to brucecooner's topic in MJ Tech: Modification and Repairs
Agreed. I run 15-40 in everything I own up here in Prescott. -
4.0's favorite oil? (and change interval)
cruiser54 replied to brucecooner's topic in MJ Tech: Modification and Repairs
Ever see this from the owner's manual? Jeep Engine Oil Viscosity This was taken from pages 82 and 83 of the 1989 Chrysler/Jeep owners manual. Selecting Engine Oil Viscosity When changing or adding engine oil select the proper grade by using the chart on the following page. Select the grade that corresponds to the ambient temperature range you expect to encounter before your next oil change. 30*F to 100*F+ 20W-40 or 20W-50 0*F to 100*F+ 10W-30 or 10W-40 -20*F to 60*F 5W-30 -
Wideband O2 Through REM
cruiser54 replied to Parei_doll_ia's topic in MJ Tech: Modification and Repairs
Sensor is supposed to have more resistance on the heater circuit. 8 to 13 ohms? -
4.0's favorite oil? (and change interval)
cruiser54 replied to brucecooner's topic in MJ Tech: Modification and Repairs
T4 with Wix or NAPA filters for the win. Silver is good for 3500 mile intervals, Gold for 7,500 which is factory interval except for severe service like taxi, postal delivery etc.