

Sir_Brando
-
Posts
125 -
Joined
-
Last visited
Content Type
Profiles
Forums
Gallery
Everything posted by Sir_Brando
-
I've been using a Curve8330 for almost a year now and love it. Haven't had any problems with it and i love the interface. Plus you can throw Pandora on it. My drives around wichita would be pretty boring without pandora comin through the speakers. Ill def get another blackberry when this one eventually dies. Sorry for your bad luck.
-
I was catching up on AMC's Breaking Bad series when I seen this. It's not a huge spot, but post worthy i think.
-
Newbie with a couple questions
Sir_Brando replied to ClemXP's topic in MJ Tech: Modification and Repairs
First thing I would do is just a simple flush. Flush kits are pretty cheap and 90% of the time it fixes that exact problem. Flushed my 97 GC Laredo with the same symptoms and ran like a champ afterwards. Also pulled a bar of soap sized chunk of stop leak out of the lower hose that the PO left for me. Welcome to the club! -
I was gonna ask where you are from cause those sound like the same exact ones ive been looking at. and they are! let me know which one you buy cause ill probably buy one of the others. i got a couple months before i decide on one so ill let you have your pickings. Itll be nice to see another comanche on the road around wichita.
-
Heat gun. just don't hold the heat on it for too long to keep it from getting too hot. they are cheap at harbour freight. That or a hair dryer. link: http://www.harborfreight.com/1500-watt-dual-temperature-heat-gun-572-1112-96289.html
-
Rattlecan "Deluxe Package"
Sir_Brando replied to WahooSteeler's topic in MJ Tech: Modification and Repairs
Fella's. Found this great thread doin a little searching. Bumping it because rollyourcar.com is no more. I went ahead and used the wayback machine and am posting the findings and some other links in the thread cause its great info. Roll-On paint job on an XJ - http://earlyxj.com/paint.htm rollyourcar.com - Here is the wayback link for the site:http://replay.waybackmachine.org/20090227115244/http://rollyourcar.com/default.aspx there are several pages to the website, I'm posting the important ones in order here Enjoy!! Home Welcome to Roll Your Car.com! This site is dedicated to the "paint job on a budget" process -- a method for painting cars that is cheap, safe and exciting! In most cases, a nice paint job can be achieved for $100 or less, with no special tools required. Use the menu at left to begin navigating! Introduction Introduction & History Basically, this process is about painting a car using a roller. The basic steps include: * Preparing the car, and scratching the surface with some 400 grit (or so) paper or a scuff pad to prepare for paint * Thinning and applying paint (various paints and thinners can be used) * Wetsanding (to remove imperfections and any orange peel) * More paint; more wetsanding * Polishing This idea of hand applying paint to cars, though it has been around for awhile in various forms, recently became very popular (online, anyway) due to a post by 69chargeryeehaa on the Moparts.com bulletin board. The original thread (some 43 pages) can be found . That thread was locked and placed into the tech archive, and 69chargeryeehaa started another thread, which was locked and placed in the tech archive in May 2007; it can be found . The newest thread as of May 2007 (part 3) is . The process has benefits and drawbacks, I will try to summarize those here: * Benefits o Inexpensive o Convenient o Easy, after some practice o Safe, compared to spraying catalyzed paints containing isocyanates o Easy to repair/touch up o Helps move slow projects along.. * Drawbacks o Can be time consuming o May not be as durable as hardened automotive paint o Shine typically not as refined as a basecoat/clearcoat job o A metallic paint job may not be possible I feel, as do the multitude of others who contributed to the above message threads, that the benefits outweigh the drawbacks in many cases. Would I paint a Viper with this method? No. A daily driver? Maybe not. Would I paint a work truck with it? Yes! Would I paint a weekend cruiser with it? Sure! Acknowledgements A big THANK YOU to: * 69chargeryeehaa (Martin) - the guy who introduced this method to the masses * Countless folks who came to Moparts to share their experiences (you know who you are!) and helped to fine-tune this method * Microsoft, for providing this website platform at no cost (you can get your own too, it's called Microsoft Office Live) About On Moparts, my name is Exit1965. In "real life", my name is Dave and I live near Sacramento, California. I initially became very interested in the process because I was (still am) restoring a 1967 Dodge Dart GT. I had been doing the bodywork myself, and was approaching the point of needing paint, but was dreading the fact that I would have to either shell out a minimum of $600 to several thousand dollars to have the car painted by a body shop. The $600 job would be/could be a crap-shoot quality-wise and the big $$ job was not something I wanted to shell out for. When I read about this method on Moparts, I immediately began experimenting with it. On the threads linked above, you can see the results of experimentation. Through my experiments (though they were not very scientific!) I wavered back and forth over whether I'd end up painting my car with this method or not. I had concerns over shine and scratch resistance. In the end, I decided to give it a whirl and painted my car red. Then I decided a red car wasn't right for me, so I painted it off white. Later, Marq, another long-time contributor to the Moparts thread, introduced the idea of using topside boat paint instead of the Rustoleum (or Tremclad if you're Canadian) that I and others had been using up to that point. I did some more experiments with the topside boat paint, then painted my car again using Brightside (a brand of topside paint). The most significant part of this paint job process for me is that it helped move the whole project along. Since the paint was a (potentially very expensive) unknown part of the restoration of my car, I was dilly-dallying with the bodywork and the rest of the project. After painting it, I jumped whole hog into getting it running, and finally, it is running and driving, you can see video here. Materials Materials Below is a table listing the materials needed for this type of paint job. Item: Primer Type: Spray or other Brands: Various Where?: Auto places, home improvement, Walmart Cost: $3-5/can; $7/qt Notes: I have used many different primers, or no primer at all, under the paint I have applied. Cheap rattle can primer works fine. Some type of primer (be it actual primer, or rattle can Rustoleum in a color close to your final color choice) should be used over Bondo, otherwise the Bondo will suck in the first 2-3 coats of paint. Item: Paint Type: Either a single part polyurethane (like topside boat paint) or an oil-based enamel Brands: Boat paints: Brightside, Petit Easypoxy, West Marine topside paint, Epifanes. Oil-based enamel: Rustoleum, Tremclad other "rust paint" brands. Where?: Boat paints: Marine supply shops (West Marine). Oil-based enamel: Walmart type stores, home improvement stores; paint stores Cost: Boat paint: ~$30/qt Enamel: ~$8/qt Notes: The original paint used for the process was oil-based enamel such as Rustoleum and Tremclad. Marq introduced the idea of using topside boat paint; many people (including me) find the boat paint to have a better gloss. A typical car will take 2-3 quarts of paint. You may want to get some mason jars to store the paint/thinner mixture. Item: Thinner Type: Mineral spirits Brands: Various Where?: Home improvement stores, paint stores Cost: $8/gallon Notes: The "low odor" type seems to dry slower than the standard type. The standard type can be found at some paint stores and may be labeled as "Paint thinner - 100% mineral spirits". From what I've read, mineral spirits works to thin many different brands of paints. It does not seem to be necessary to use the thinner that the paint manufacturer specifies. Item: Roller Type: High density foam roller Brands: Various Where: Home improvement stores Cost: ~$6 / 5 pack Notes: These are sold at big stores such as Home Depot and Lowes. They are sometimes labeled "Pro" grade and are high density foam. They are usually white in color. Item: Tray Type: 6" roller tray Brands: Where: Home improvement stores Cost: $1 Notes: The ones I use have bumps to squeeze paint out of the roller. Item: Tape Type: Blue painters tape Brands: 3M Where: Walmart, home improvement stores Cost: ~$3 Notes: The blue stuff is easy to remove when done painting. Item: Sanding block Type: Foam sanding block Brand: 3M Where: Home improvement stores, Walmart Cost: ~$3-4 Notes: These are semi-firm foam sanding blocks that come in various grits. They are designed to be used for sanding, but I used them to wrap the sandpaper around during wetsanding. Item: Sandpaper Type: Various grits: 400, 600, 1000, 1500, 2000 Brand: 3M, others Where: Walmart, auto paint shops, auto parts stores Cost: ~$3-4/pack Notes: Get the waterproof kind. Method Method First, everyone's method is slightly different. This goes for the paint people use, the amount of thinner, the sandpaper grits, the polish, and so on. I will do my best to integrate other people's ideas/techniques into this list, and at other times I might suggest something I haven't tried or seen tried, but I will base most of this from my own experience using both Rustoleum and Brightside (a marine topside paint). What I did is pretty similar to the way 69chargeryeehaa initially layed it out. You will probably come up with your own variation. Where the paint job really matters is in the preparation and then the final sanding/polish. You could apply 2-3 really thick coats, have tons of orange peel, then as long as you wetsand it out and polish it, you'll be OK. You might prefer applying 5-6 thinner/medium coats and dealing with little or no orange peel. As for what type of paint to use, I have used both Rustoleum and Brightside (a marine polyurethane topside paint). I like Brightside better; the initial shine is far better than Rustoleum, and it has UV inhibitors and Teflon in it which should help with durability, color retention and clean-ability. The marine paint is several times more expensive than Rustoleum type paint, but it is still cheap. The most important tip I can offer is that you should practice before you start in on painting your car. Practice on something that is vertical, such as a car door. If you practice on something oriented horizontally (like a hood), you will not notice problems with paint runs that you might notice if painting something that is vertical, which include the most visible areas of your car. * Preparation o Do the bodywork, sand off the rust, etc. o If you have Bondo on your car, it is a good idea to paint or primer over the Bondo before you go trying to paint your whole car. This is because the Bondo will suck up the first 2 or 3 coats of paint you roll on. When I painted my car, I would primer over the Bondo using various types of rattle-can primer, then quickly feather it in with the surrounding paint (using 400 grit wetsanding) and I was ready to roll over the panel. If I were to do it again, I would rattle can primer the area, then use a rattle can paint like Rustoleum to color the area a similar color to the paint I planned to use. I used an off-white color for my final paint, so I should have used a white colored enamel as a substrate for the final rolled paint. The reason for this suggestion is that (for a color like off-white, anyway), dark colors such as primer, or a rust colored factory undercoating, take longer to color over. Preparing the substrate with color similar to your final color will result in fewer coats of final color being needed to achieve 100% color coverage. o Use blue painters tape to cover things you don't want painted, such as weatherstripping. The good blue painters tape is pretty easy to take off, even weeks later. o Make sure before you paint, you go over the car with mineral spirits to remove any dirt, grime, oil, etc. It couldn't hurt to use a tack cloth after that step. o The surface should be dry before painting (i.e., wipe off all the mineral spirits you used to clean, and give it a chance to dry). o Try to be inside a garage when painting; the paint does not dry fast and the fewer things that fall into it, the better. o If after applying paint, you see an area that needs to be Bondod-- I have used Bondo right over Rustoleum, without sanding down to bare metal. Once you've done the bodywork and Bondod it, just go over the whole area with some 320 or 400 grit paper to get it smooth and feather it in, put some primer or spray-paint the same color (or close) to what you're using; feather that in with some 400 grit, then pick up the roller and continue with the paint job. * Mixing o I did not keep good notes on the ratio of mineral spirits to paint that I used; but a good rule of thumb is to mix the paint to about a 1% milk type consistency. o I would prepare the mixture in a large mason jar; that way I wouldn't have to stop during the paint job to mix up more paint. Just mix more than you'll need in the mason jar, keep the cap on tight and you'll have it ready when you need it. o Do not shake the paint to mix it; stir it. Shaking it will result in many bubbles, which are bad. * Application (This will need to be done from 3-10 times depending on color and paint thickness) o Again, this is what worked for me, but I have read about variations. o Get your roller good and full of paint in the reservoir of your roller tray. o Push (hard) most of the paint out by rolling it 8-10 times over the bumps on the roller tray. o When rolling a door (for example), roll side to side, in approximately 12-18" sections. With (in my opinion) the right amount of paint in the roller, you would have to press firmly on the roller while you're painting the car. The first 1-2 rolls over an area would be moderate speed and firm, followed by some lighter rolls to even things out. o I would roll side to side in 5-6" strips (the roller is 4"); so when painting a door, I would do those sized horizontal strips, going from top to bottom until the door was covered. o If you get bubbles, you can either blow on them, or roll over the area LIGHTLY with the roller (do not add any paint to the roller before doing this). This can help do away with bubbles and runs. Also, the practice of lightly rolling over an area (with no extra paint) a few minutes after the first time you paint it, will help even things out and blend in one "strip" (the 5-6" horizontal strips) with the next. o Keep in mind to apply LIGHT COATS -- light in terms of not a lot of paint per coat -- of a fairly light mixture (referring to the thickness of the paint mixture). If you try to put on too much of a thin paint, it will run; if you put on too thick a coat, you will have orange peel and/or runs. Orange peel can be sanded out -- it won't be there if the mixture is thin enough, but a thin mixture will require more coats. When I was using Rustoleum, I put on thin coats of thin mixture and had very little if any orange peel, but it took 8-10 coats to color. When I switched to Brightside, I put on thin coats of a thicker mixture, and I had orange peel, but it covered in 4-5 coats. o First coats tend to be splotchy/orange peely and otherwise bad looking. I would end up lightly wetsanding them with some 600 grit paper, to get them smooth, then the 2nd and 3rd coat (with about a day in between), then wetsand. o For door jambs, engine bays, etc., it is easier to use spray cans or spray the paint on if you have a compressor. I used a compressor and gun to paint my door jambs, and used a refillable rechargable spray can from Harbor Frieght to paint my engine bay. Using one of those refillable cans allows you to get the exact same color since you're using the exact same paint you're rolling with (although it doesn't need to be thinned quite as much). The Harbor Freight refillable can did not last very long, but it paid for itself the few times I was able to use it. o A common question is whether this paint can be put on plastic or fiberglass which may flex. The answer is YES. * Wetsanding - done after each 2 coats (or after the very 1st coat if it's orange peely) o Some people have wetsanded the same day as painting (after 10-12 hours); I waited at least a day before any wetsanding. Dry time will depend on temperature, humidity etc. o Wetsanding helps you get out the orange peel (if any) and also removes debris such as dog hairs and dust specs. o You can get by wetsanding every 2 coats, but if you happen to have lots of orange peel, another coat of paint on top of it is going to make life more difficult. If you have orange peel, consider sanding it smooth, then on your next coat use a thin application of a thin mixture to avoid orange peel. If you are putting orange peel free coats on, you can wetsand the debris out every 2 coats until it's done. o I preferred to use rougher grits (400 or 600) on the first few coats, and finer grits on the last few coats (1000 or 1500). o Have a spray bottle with water in it, a water container, your foam sanding block wrapped in paper, and go to work! Start by spraying the surface with water, and then dipping your sanding block/paper in water then start sanding it side to side. Use a rag to wipe off the surface. You can use water or mineral spirits on a rag to make it shine -- look at it from the side and you will be able to verify that the surface is uniformly smooth, orange peel is at acceptable levels or non-existant, and the surface is ready for the next coat. o Make sure you wipe down the area with a rag and water (to get wetsanding residue off), and before you paint it, clean it again with mineral spirits (as you do before each coat). * Polishing o I have not gotten to this step yet in any detail (as I work on the rest of my car), but I am really impressed with the work that Aussie Driver (Moparts handle) has done on his Miata. He recommends using Poorboy's SSR2.5 (swirl and scratch remover) and a cutting pad; though others have achieved good results with other brands of polishing compounds. o An orbital polisher such as a Porter Cable 7424 is a well recommended tool. o You may not need to do any final wetsand/polish if you are satisfied with the smoothness of the surface, and the amount of debris that have landed in the paint. o A third option is to to spot wetsanding/polishing on the final coat. If you find an annoying dirt speck or dog hair, wetsand it out with some 1500 grit paper, and polish that area back to a shine. -
window crank handle removal
Sir_Brando replied to captainkettel's topic in MJ Tech: Modification and Repairs
Someone needs to get a writeup done on this one. Maybe some pictures. -
replaced the damn parking brake cable.
-
Rubber Hose coming out of Rear Axle
Sir_Brando replied to Sir_Brando's topic in MJ Tech: Modification and Repairs
Awesome. When i first seen it i was hoping it was some super secret vacuum that would make my truck do more than 45mph if i replaced it. Thanks man. -
Searching for "rubber hose axle" comes up with nothing close, so here it is. After inspecting my parking brake cable, I noticed this rubber hose coming from the Axle and connecting to the frame goin nowhere. Obviously its not doing anything, but I am curious about what it is. It looks like someone was chewing on it at some point and I'm sure it has been like that the 4 or so years I've owned it.
-
I'm pretty sure i jinxed myself by reading this last month. Autozone special ordered it for me for $17 including tax. That's cheaper than anywhere online I found after paying for shipping. It will be in Sat afternoon. Are the rear cables supposed to be the same length? Mine aren't.
-
huh? :nuts: brand new car? what's that?! I only own old beaters and cheap vehicles... and will always keep it that way, even if my paycheck is ten times as big as it is now. sorry man. i don't care how much i love my truck, my wife and baby ride around in a cushion of metal, plastic, foam and airbags. Ill pay for safety. The Comanche isn't exactly a family car. ...not only do you check CL constantly, but decide to check CL for all the surrounding areas and states just in-case.
-
no whales here, but i did go to the oklahoma aquarium today and check out the sharks. then returned to watching shark week on discovery! :popcorn:
-
...when intentionally driving off the road to hit mud puddles or cans, you know exactly what reference point on your hood to shoot for to hit whatever it is dead center on the right tire. ...when after staring down another MJ you realize you're both thinking "holy $#!& there's another one!" ...you would rather drive your truck to pick up some groceries than your brand new car that cost 30-40x as much. ...you're wife says take the car today because i don't need it and your truck doesn't have AC, and you promptly decline. ...you can't keep your pride from growing even just a little bit when passing any other small pickup. ...you notice the letter spacing difference immediately after spotting a ranger tailgate from any distance. ...you LOVE your tailgate!
-
Is that headliner the other 2% :D But seriously, nice truck. Makes me feel like I abuse mine or something.
-
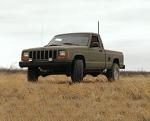
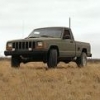
So I was visiting Vicksburg, MS over the weekend and yesterday i stop by a jeep chrysler dealership to check out a Journey to possibly replace our Avenger. Driving through the lot i seen this jewel and decided to talk to them about the truck instead. Used 1991 Jeep Comanche Posted: 19 days ago Year: 1991 Make/Model: JEEP COMANCHE Base Price: $3,995 Mileage: 76,593 Miles Engine Size: 4.0LL 6 Cyl. I found a little info on it to back up what i heard. http://www.lemonfree.com/64572448.html Its got good paint on it but nowhere near mint. Dents in the tailgate, standard old interior. It was a manual but didnt have 4wd. I asked him if they seriously thought they were gonna get 3900 out of it and he went on how the year and model and engine rarity and blah. then i cut in and told him what blue book on it was and that i only paid 350 for mine and he just handed me his card and we went our ways. Thats all, just sharing my find. If anyones in the area and wants a Comanche for the price, its sitting at Blackburn Motor Companys Chrysler Dodge Jeep dealership.
-
Rubber parking brake pedal pad...
Sir_Brando replied to JeffK's topic in MJ Tech: Modification and Repairs
i don't have a picture of it now but mine got replaced with some black duct tape, a rag and some creativity. was gonna get a new piece of rubber, but the new "pad" is doin an alright job at the moment. i have no brake release handle either, which has been fixed with some 550 cord and some fancy knot tying -
In-Flight Refueler for the Air Force. Only one at McConnell AFB with a comanche
-
bumpin this thread Any of you fellas know whats up with my decals? Its an 89 base. Is this an odd decal set? or have i just not seen enough mjs.
-
Hows it coming? I had the same problem and I did as I often do when the electrical gremlins start acting up, and kicked my left foot up and hit the fuse panel/wire nightmare. The gauge popped up to half tank, my wipers started working and my stereo stopped shutting off when i hit the left blinker. Been meaning to fix it but its still working since my last kick. Let us know how it goes!
-
That's nice. I was just looking for a replacement horn and i came across these: http://www.amazon.com/Hella-007424801-Twin-Trumpet-Bracket/dp/B000COBK8A Knowing that its wired for two horns, i think these are my replacements. Anyone have these horns or similar? I have no experience with Hella horns. If not, ill grab em and tell you how hella manly they are.
-
Yeah I was driving around Spokane, WA today and seen at least five. There's a couple back home around the Wichita area but we will only see each other maybe twice a month if that. Never see five in one day. And 3 of them had Roll Bars... WHERE DO I GET ONE??
-
* If you think any of your lights are burnt out, check them properly. DO NOT beat on them, EVEN if it is your hand and youre barely hitting them. Side markers are especially hard to come by these days. * Replacing your corroded battery cable end terminals and coating them makes a world of difference. * Not having a 4WD jeep not only sucks, but its embarrassing. However, this shouldn't keep you from making fun of anyones new girl jeep that they've decided to start making these last few years. JEEP ON!
-
1990 Rebirth ('97 Conversion)
Sir_Brando replied to Rymanrph's topic in Member Projects: Your Comanches
really diggin your truck. tryin to get a few things done with mine. you said the cluster and the console were out of a 90 cherokee? the temp and oil sens units just needed to be replaced or did you need different ones for the cluster. Other than that was the cluster swap just a remove and replace. One last thing, where did the lenses and clear side markers come from. I'm swapping everything out for LED and I'm looking for clear all around. Looking forward to seeing the end product :thumbsup: -
Project CRD MJ is born:
Sir_Brando replied to Sir Sam's topic in MJ Hardcore Tech: Epic Journeys to Greatness
Just spent the last hour reading this. Nice write-up. All i want to do is spice up my manche with a new dash/cluster. O.O Awesome job. can't wait to see the end product.