Gjeep
-
Posts
1221 -
Joined
-
Last visited
-
Days Won
3
Content Type
Profiles
Forums
Gallery
Everything posted by Gjeep
-
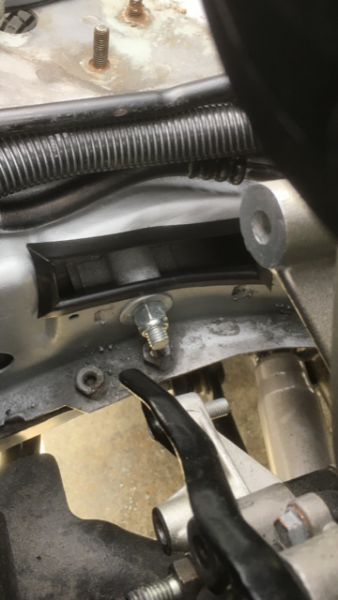
I forget the name of the mfg, but there was an aftermarket company that sold identical ground effects kits to the MJ. What you see in this pic, aside from the front air damn is self-induced.
-
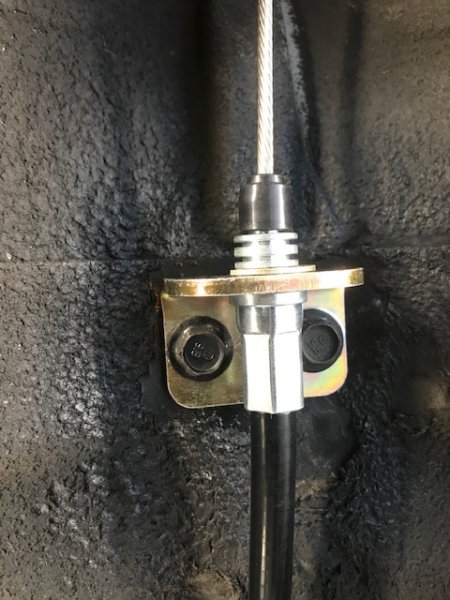
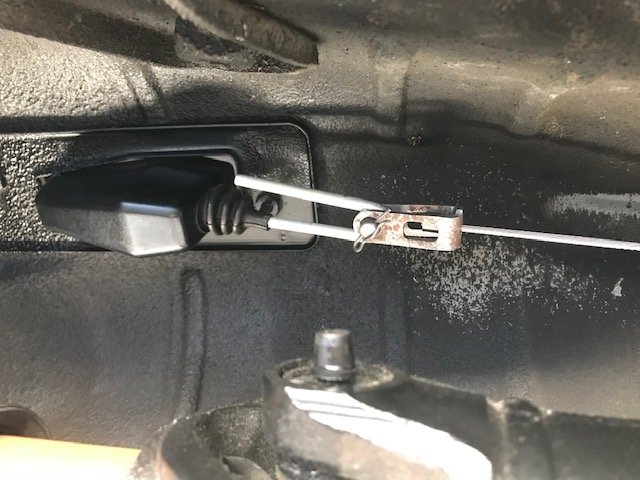
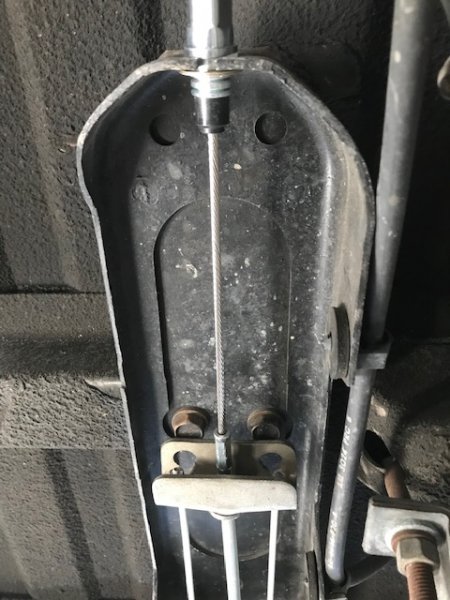
Got the XJ eBrake fully installed today and it holds. Took a little bit of doing, but came out well. Cables and under cab cable bracket were purchased from Control Cables.

-
Sure did. Thanks again!
-
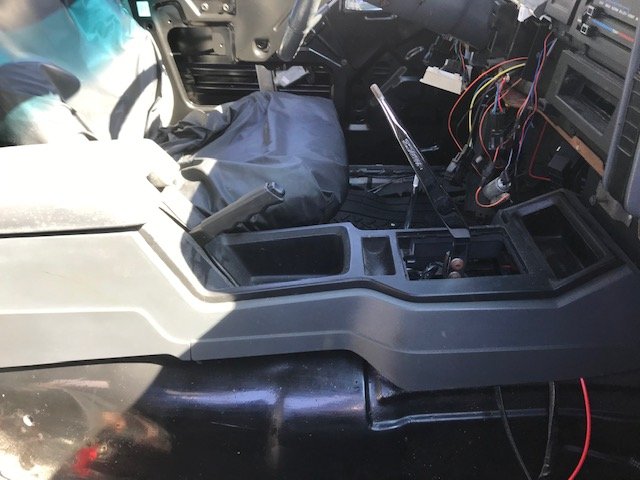
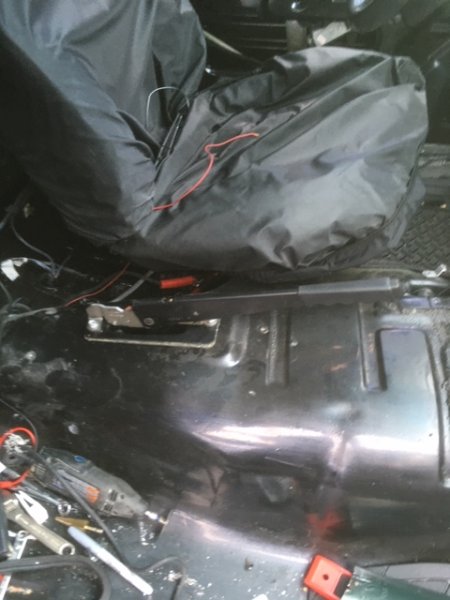
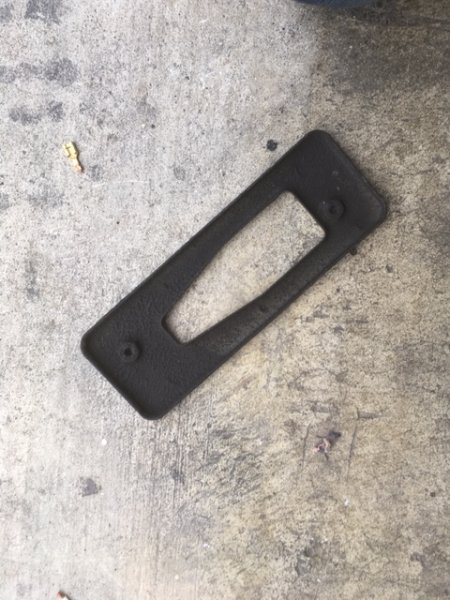
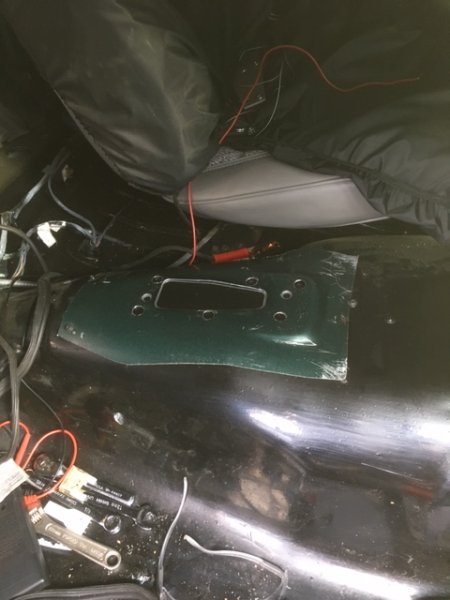
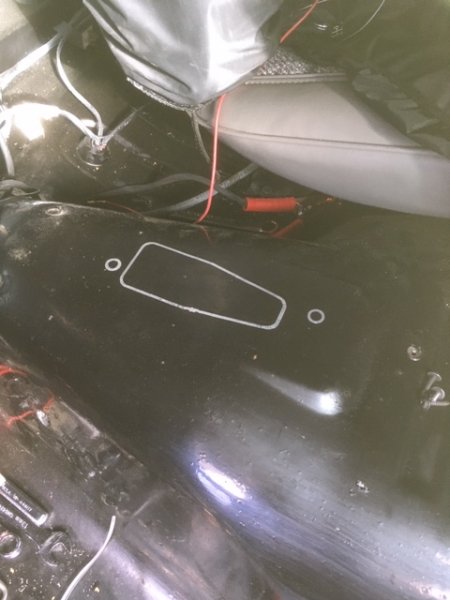
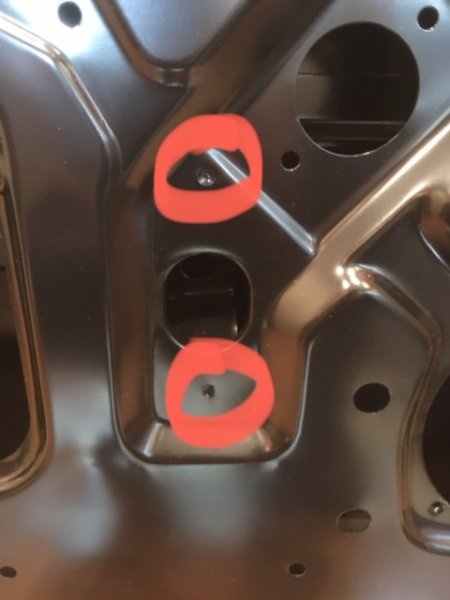
Adios 4th pedal on the far left...Moving to an XJ hand brake on the MJ. I've always preferred this set up. With an XJ floorpan cut-out I was able to neatly trace, cut and drill the holes needed -- in addition to getting the spot-welded XJ eBrake support blackplate. There's a difference underside at the trans tunnel between the XJ and MJ. The MJ has additional stamped sheet metal support in the trans hump (both driver and passenger side) -- though the passenger side is the only one that needs to be addressed for the XJ eBrake backplate to be installed. Need to grind-down about 1/2" so the XJ support can sit flat underside. Also with this setup, I'm able to attach my Rockford amp under the driver side kick panel.
-
Yes full console.
-
Hard to come by, but looking for these items in good condition -- no cracks or holes. Thanks
-
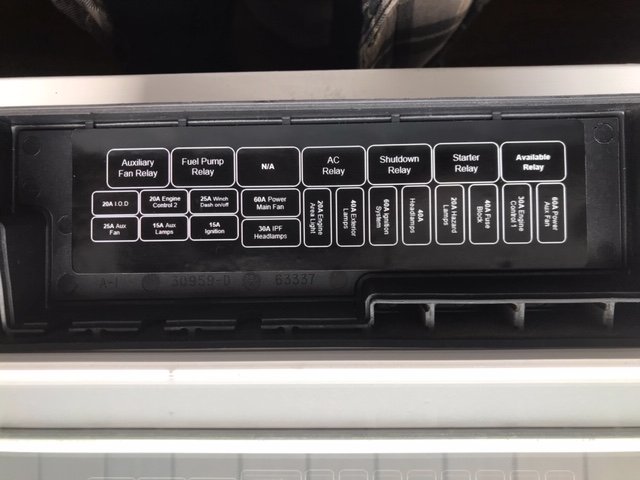
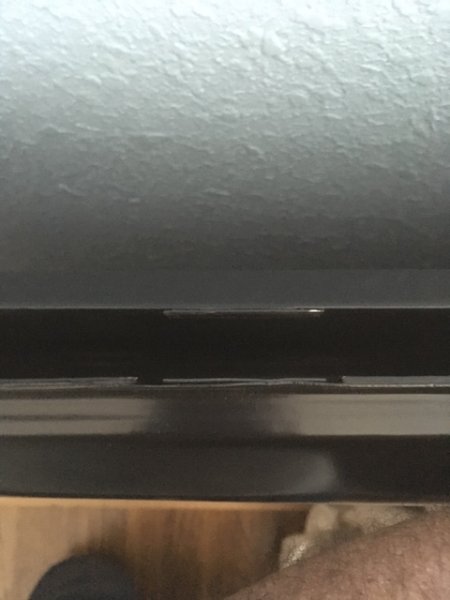
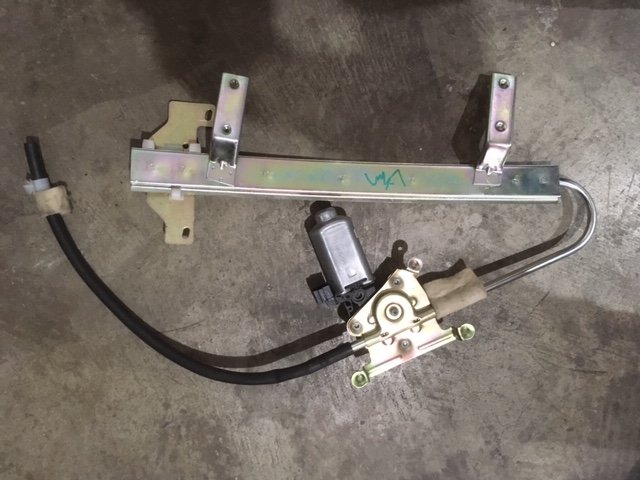
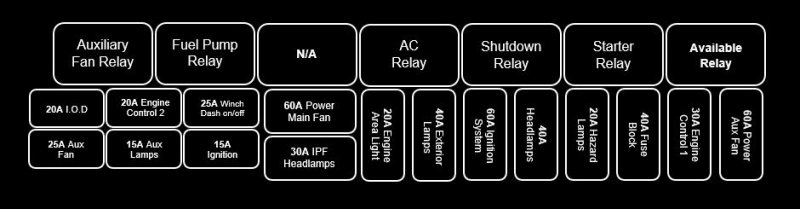
Had a little time to tinker and get the full window working with the Beijing regulator. The adapter bracket I made is just about spot-on. A few small tweaks to the design then I make the final brackets (they'd be the same for both sides). Here's a video snip...The setup won't be anywhere near as loud once sound deadening, door insulator, and panel is installed. But, success for now! IMG_8607.mov Also got the decals back from the automotive print company and installed it in the PDC. 6 months from now, without this label, I think I'd struggle to remember all the changes I made to this fuse/ relay center. This will keep things straight.
-
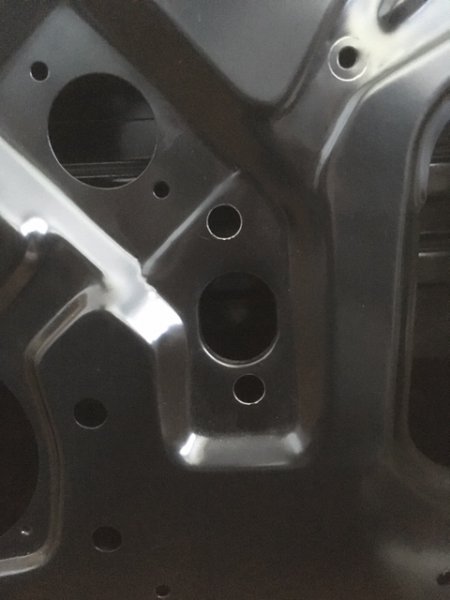
Half-way there to 97+ XJ full window upgrade…First step is finding a wreck you can cut on with driver and passenger doors. The 97+ XJ’s have full-length channels both sides of the window inner door to guide the full window up/down. The rear most channel on the 97+ (nearest to the door latch) is removable for when the regulator needs to be replaced. I considered using this channel on the front end of the larger window…I tried on some scrap doors, but the mounting bracket doesn’t fit the older doors shape properly. So I l removed the front window channel—It’s spot welded near the speaker opening and topside it needs to be cut-out carefully because I wanted 2+” metal to overlap onto the older door for strength/support. Lots of careful Dremel time. End result is this. The newer XJ window channel weatherstrip is also need—preferably 99-01 XJ because the weatherstrip is one complete piece (where as 97/98 were two pieces). The photo below helps show what that overlap of metal is for on the channel bracket. (I buzzed a straight line so the starting point can be seen.) This window channel bracket will be bolted in/ be removable so I can service the regulator if needed. The second photo is looking through the door handle/switch bezel hole at the channel bracket.) Holes are next drilled in the door shell first. Drilling these holes first provides the most accurate location to then mount the channel bracket. It’s the safest way to do it. I had trial runs in the past on several test doors to find the right way and spot to drill—and this is it. The nice part about the bottom hole of the channel bracket is lined up with the hole on the door shell that the door panel push-tabs push into. The second (upper) bracket hole location just needs to catch the tab on the channel bracket. Mine are offset by 1/8” and are 3/4” apart. I put everything into place before holes are drilled in the channel bracket—Insert the full window channel weatherstrip, followed by the channel bracket (loose but held in by the weatherstrip), and the full window. I rested the window flat at the bottom of the door, reached up through the speaker hole, and pinched the channel bracket to the inner door. Not too tight against the window, and not to loose…just right). While pinching the channel bracket to the inner door I slowly lifted the window with my hand up making sure it lifted flush against the original window channel. Then I brought it back down – my pinch adjusted right to where the channel bracket needed to be attached. I did this a few times to verify, then marked the channel bracket with a permanent marker through the holes I drilled on the door shell. This is how I established the location for holes on the channel bracket. After I finished marking the spots, I test lifted the window three more times (before drilling). All good. Then I drilled-out the channel bracket holes for both the driver and passenger side pieces, and test-fit. I’m adding nutserts to the channel bracket, so I enlarged the holes for the nutsert. JB Welded fills the minor divots back side of the channel bracket. I’ll sand it smooth and paint the bracket prior to adding the nutserts. Next step in adding the regulator and adapter bracket connecting the window to Beijing regulator for final test. The 97+ XJ window is held on to the power regulator by a 10mm metric bolt but I chose to use the original fat/flat-head torx bolt 84-96 XJ era because the notch it has best suits my adapter bracket that connects the full window to the Beijing regulator. Absolutely no chance of slipping.Then in all comes out again as I’m prepping for paint.

-
They painted absolutely everything...Even all the cracked rubber seals around the windows.
-
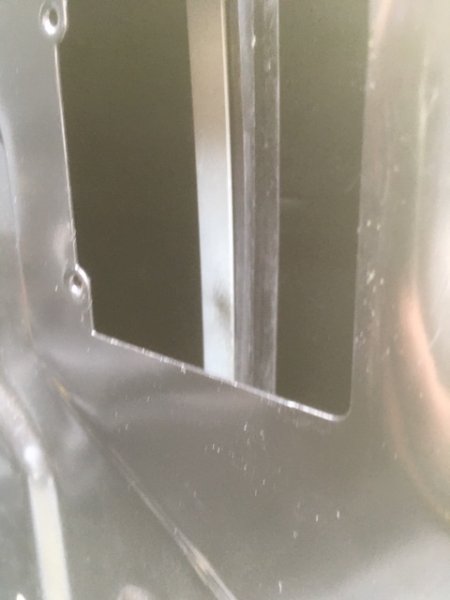
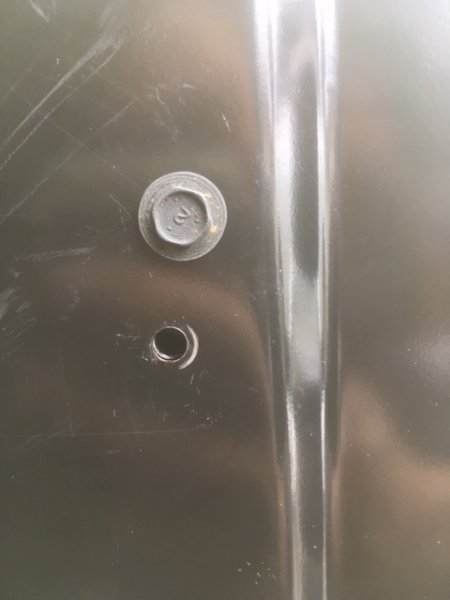
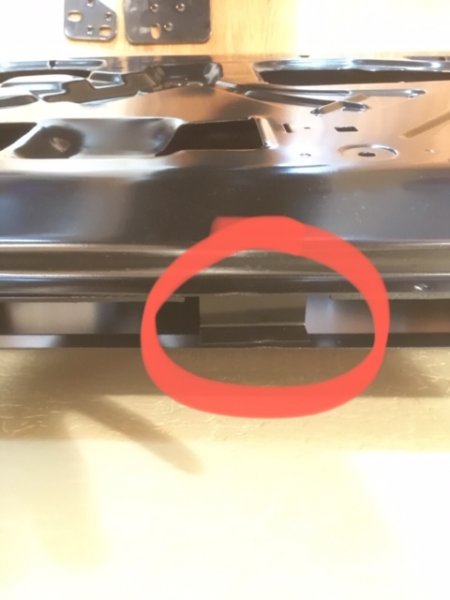
Plug for Command-Trac 4wd equipped (non-vacuum lines on trans hump -- Renix years). Selec-Track had a rubber plug and vacuum lines going through that same hole.
-
https://steinjager.com/shop/Sway-Bars-Rear-1997-2006
-
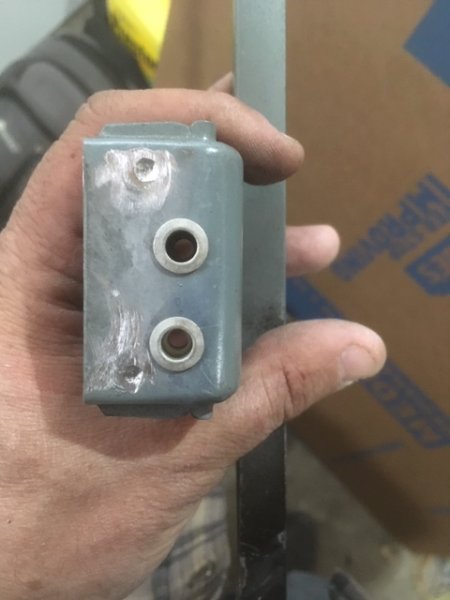
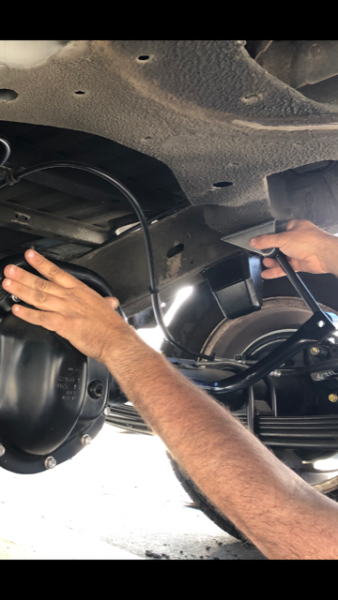
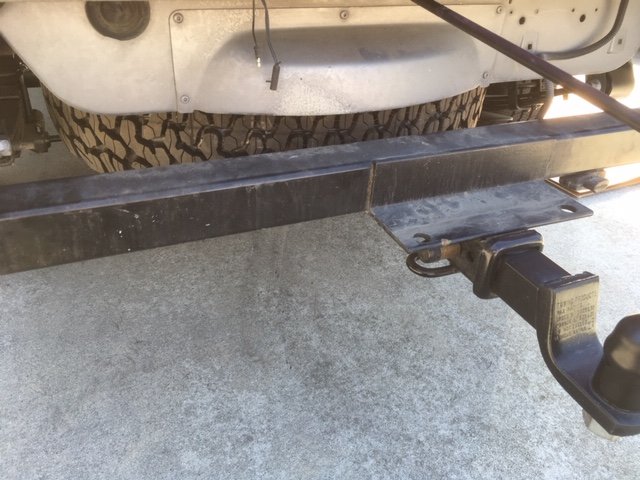
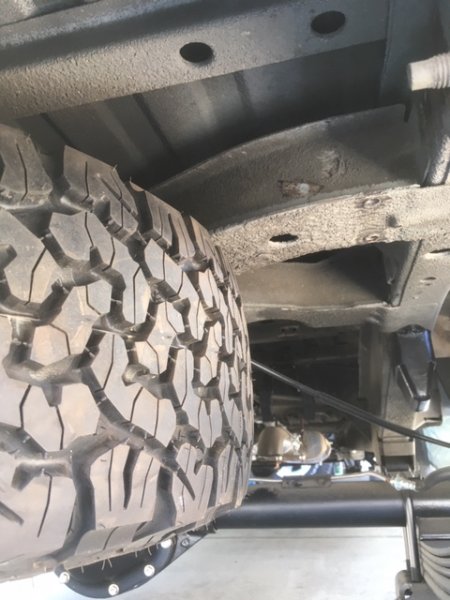
Crossed a few to-do’s off my list today…Test fit the 31” spare tire under the MJ and it fit with about 3/4” to spare. Then I looked at how to mount the TJ rear sway bar…Figured it out – going to mount it rear of the axle with endlink brackets attached the frame X-member. The endlinks themselves are NOS front end of a 1994 Ford Explorer 4x4; The brackets and associated mounting hardware are NOS Dodge Ram 2500 rear sway bar. Also took on the fun task of removing the linkage bushings off the tailgate and body. Nothing quite so tedious as drilling out rivets. Got it done without damage to the bushings. Also removed cowl screen, wiper linkage, and rear bumper.

-
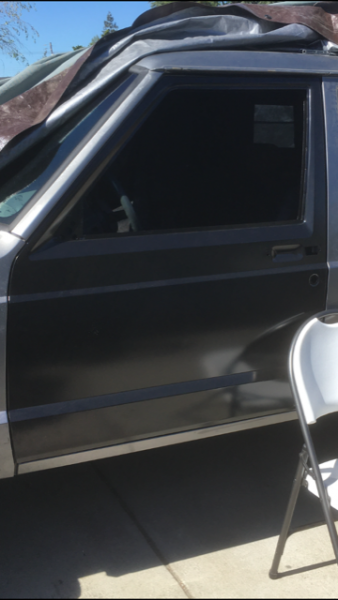
Got the new doors on – shimming and adjusting until all lines up/ closes properly. Took about 3 hours to get the door on and aligned to my liking. Next I started modifying the new doors to accept the full 97+ XJ window…First step is removing the no longer needed little ‘shelf’ the vent window base rests on at the start of the window opening. Then drill-out the spot-welded bracket for the bottom support/ attaching point of the vent window. More to come on the full window install…

-
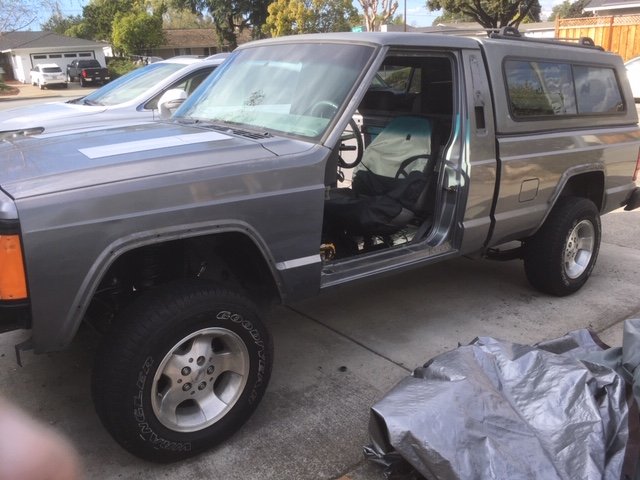
Got a little bit more done today on the MJ tear-down…Door wiring and old doors removed. Front/rear fender flares and liners removed as well as drip-rails and cab vents. Swapped out the Rough Country steering stabilizer I had on temporarily for a matching Bilstein to the shocks. Here’s a shot of one of the Beijing regulators I’m going to use on this MJ. All of the regulators I got from China many years back were different in design/build. As you can see the Beijing XJ 2500’s full window also had 2 mounts glass-to-regulator as the ‘97+ XJ’s did, BUT the glass was not the same glass used China to U.S…since none of the holes in the glass line up to attach to the regulator (so I made an adapter plate.) This regulator below is most like the U.S. regulators…the other Beijing regulators use an assortment of pulleys and very fine braided cabling. Those regulators actually haul-@$$ on the up/down. This one is on par with U.S. regulator speed. Next up is seeing how to fit the TJ rear sway bar…and deciding what endlinks to use. I’m looking to go with the TJ rear bar since the stabilizer arms are short and can be mounted in the forward direction, so I won’t have any issues mounting the 31x10.50 spare tire in the original location.
-
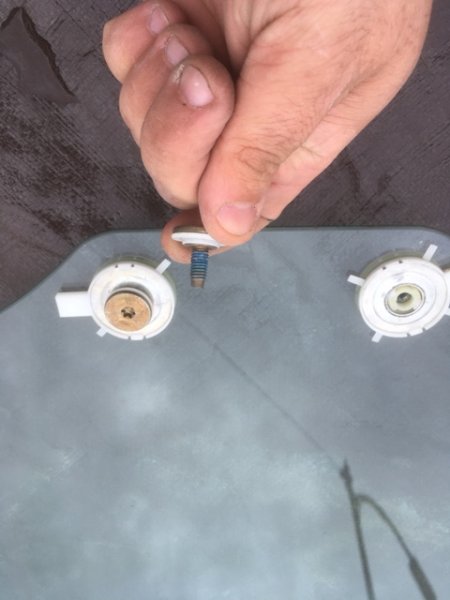
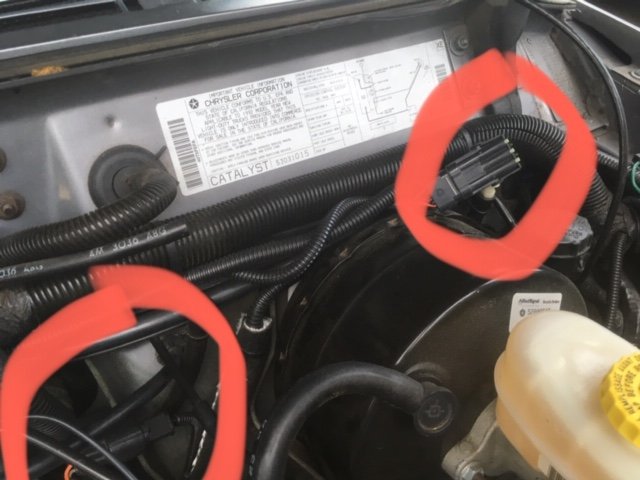
Getting that Hesco CPS relocation sensor (at harmonic balancer) has been driving me nuts since the stroker install. My goal was to have the bell housing CPS as primary, and the Hesco relocated CPS as fail-over. Finally, a light bulb went off in my mind...I put a 1/4" aluminum spacer under the sensor raising it just enough to catch the grooves in the harmonic balancer. I plugged in and the MJ started right up. Both working! Below is a photo of my wiring set up using a 3-pin Delphi Weatherpack connector and the go-between plug. At far right top side of the firewall is the Hesco relocated wiring harness connector end...this snakes to the harmonic balancer along the fuel rail harness and down the front of the engine. And at left is the standard bell housing CPS. Also started the tear-down of exterior badges and moldings. I'll be swapping the doors out soon and will pre-assemble the Beijing window regulator to work with 97+ XJ window. I'll be sure to detail this install as I know a few are interested in seeing the set up as I'll be running the pre-97+ XJ door panels.
-
Black Side Molding
Gjeep replied to Barb n Steve's topic in Vendors- members making products for MJs
All set, thanks -
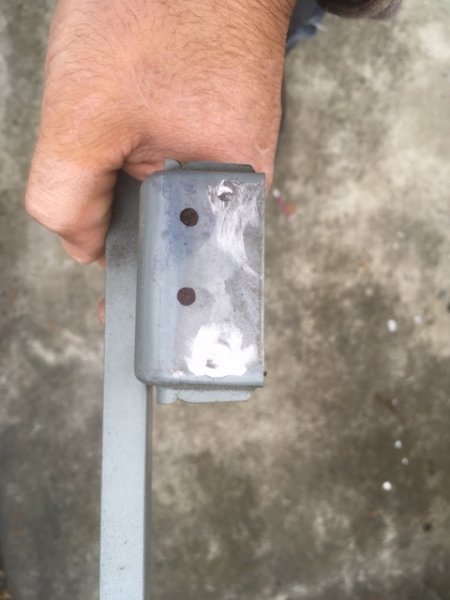
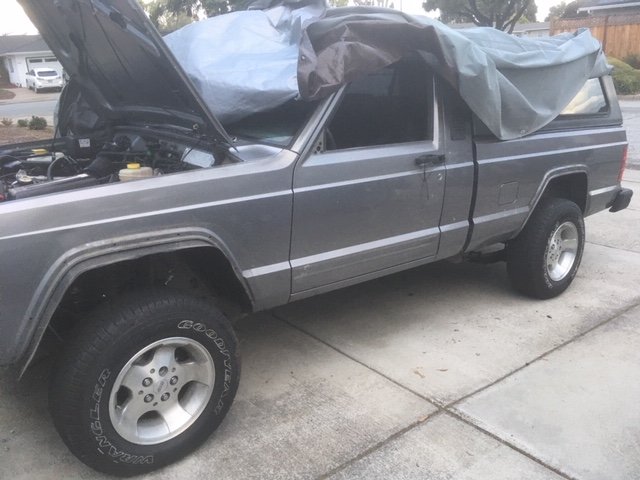
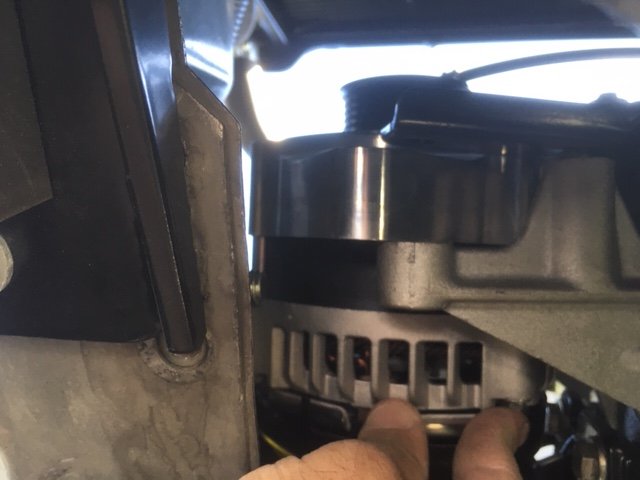
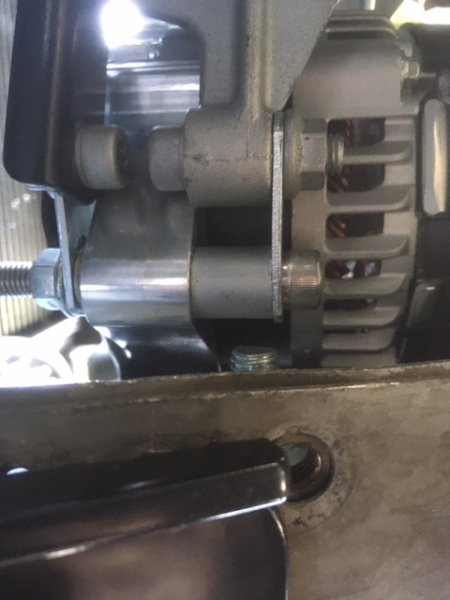
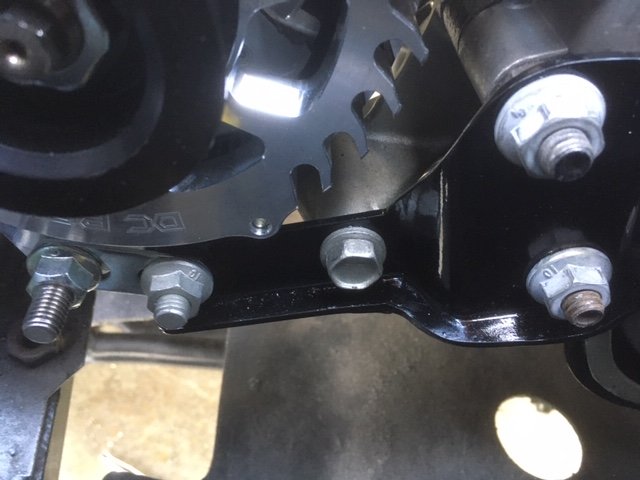
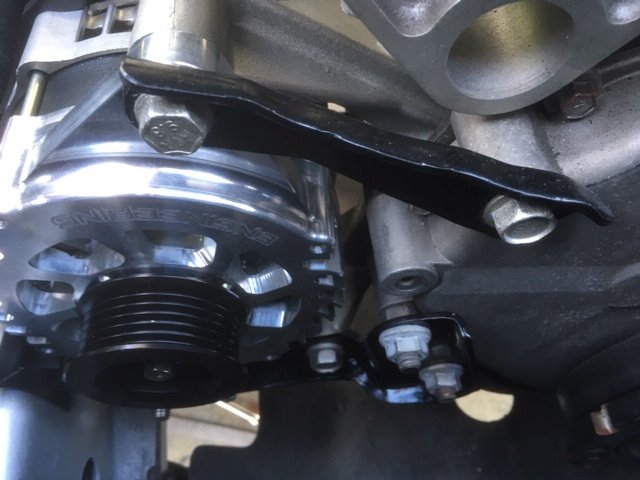
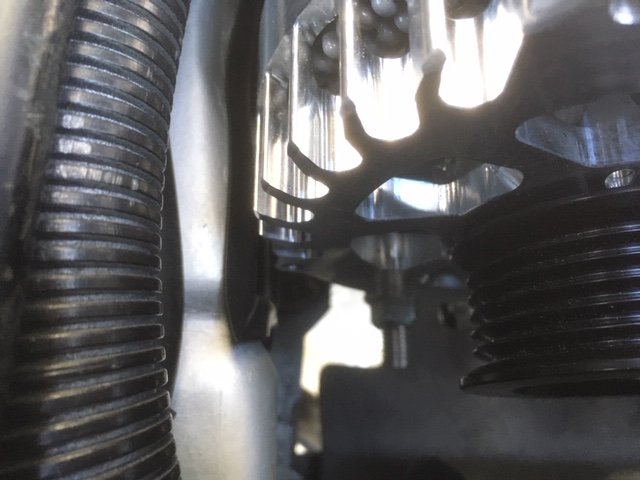
Last update my 01 XJ was rescuing the MJ because of an intermittently charging (brand new) high-output alternator…Since my goal is to paint this MJ mid- to end of summer, I need to make sure it is running properly so I can get it to a paint booth. I decided to go big and order a Nations (actually DC Power built) 270 amp alternator. What I like about it, besides its billet nose casing, is that it charges 190 amps at idle…since I have dual fans running constantly, am usually running AC, plan to have a kick-@$$ sound system, and have a winch I will play with from time to time...the volts add up quickly. I was hoping this alternator would be for the most part bolt-on as I had already ground-down the engine block mounted alternator bracket for clearance of the original replacement 150 amp alternator…It was no where near bolt-in. Instead, I had to do a whole lot of thinking and doing to get this thing installed. I cut out a clean 7” x 1.5” of sub-frame beside the alternator and trim it up with edging. (Actually, Jeep should have done something like this from the factory as even the standard alternator would be a hell of a lot easier to get in and out.) I came up with a bracket setup for the bottom side mount as when hung from the top bolt, the bottom was off-center by 1”. And that 1” was going to be more when adding bolt head consideration into the equation. So frustrating, but I was confident this was the right alternator for my setup. Trimming, cutting, drilling, test-fitting, and finally touching-up this and that...I made 2 parallel brackets for the bottom side mount, a thick ¾” spacer to get this thing mounted. After about a day of f-ing around with this thing, removing and then reinstalling the RHD primary efan, battery tray, and too much else it was ready to test drive. If this set up was not functioning properly, there was a chance I’d take a bat, then gasoline and lighter to the truck… Success! Drove the MJ around and round for about 45 mins AC full blast, dual fans running, and the battery gauge was pegged without any inconsistencies in voltage a couple hairs under the 14V line. And the stroker stayed at normal operating temperature the whole time. I’ll be going between this project and finishing up my ’97 XJ for the next couple months…I need to strip down the MJ, swap the doors for ’95 XJ doors (that have door side guard beam in them), and get the body prepped -- dings and dents pulled/ puttied, then sand the entirety for paint. Final piece to this chapter of build is I created an updated PDC decal that I’ll put on the underside of the PDC lid. It reflects the changes I made in there. I’m having several made as my ’89 MJ (which will be converted to the ’91 MJ electrical) will have the same changes done in the PDC.
-
88 Jeep Comanche Sportruck from Quebec
Gjeep replied to jeep.comanche88's topic in Member Projects: Your Comanches
Mopar had an add-on piece that gave you the option of running 4 lights across. My '89 MJ had it when i got it. It basically fit over the 2 original rollbar tabs. Mount 2 middle lights into the add-on piece and then mount the outer 2 lights and you're done. That's how it was done in Mopar aftermarket land. I think there's a pic of it in a Jeep accessory book 1990. Looks like this MJ owner mounted the middle lights differently. -
Reproduction switch trim covers
Gjeep replied to ghetdjc320's topic in MJ Tech: Modification and Repairs
Yes, mine will do the same. Backlit, all the fun like factory... Just accomplished differently. Factory was clear with different colors and layers of paint on the back side. -
He must have swapped or painted the interior -- Street Comanche's were either the early saddle (tan) color or black.
-
Clean truck. I don’t know that I like the black ground effects or the hood louver panels but it looks like a quality build and all the Street Comanche pieces are there.
-
Slowly but surely...Front end. Takes forever to get the bumper lined up and all the pieces attached to it straight.
-
Nor Cal here and I may be in May have my '92 done enough to drive it down.
-
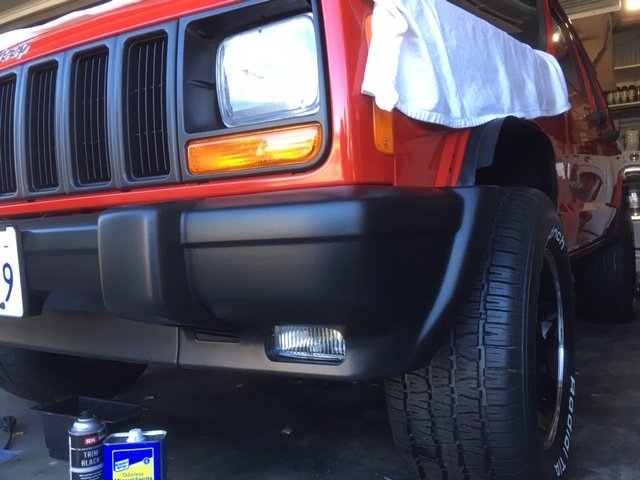
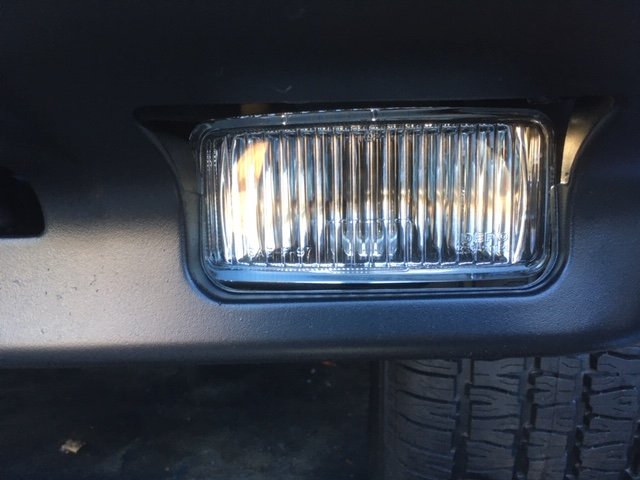
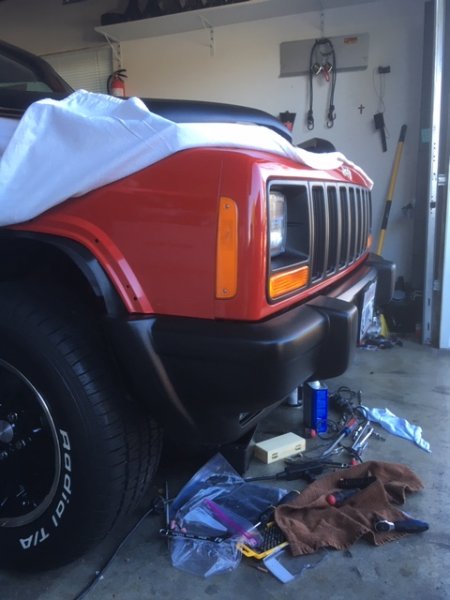
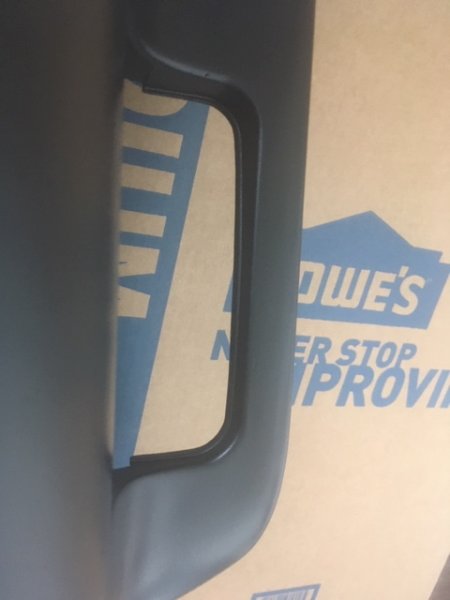
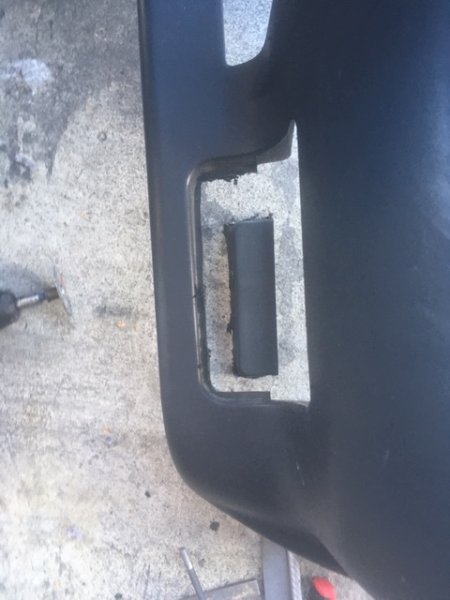
Spent some time cutting out the bumper corner driving light recess. An incredibly time consuming process to get it right -- mix of dremel, x-acto, assortment of files, wet sand paper, and finally SEM trim paint. One down and one more to go. Also got the bumpers back from powder coating and mounted the front one.


-
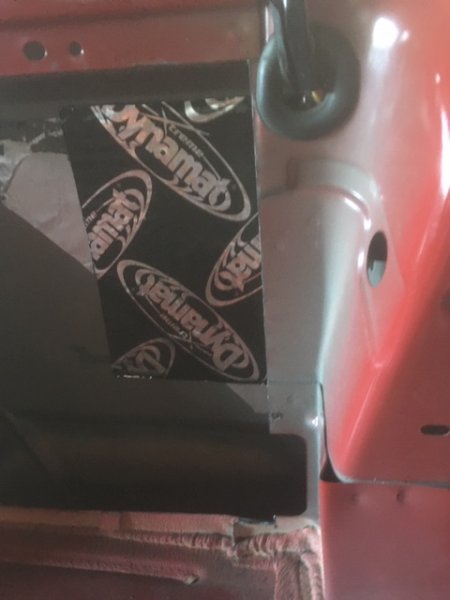
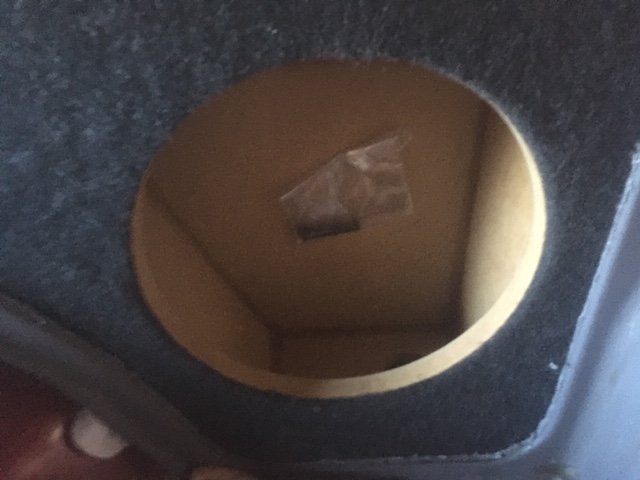
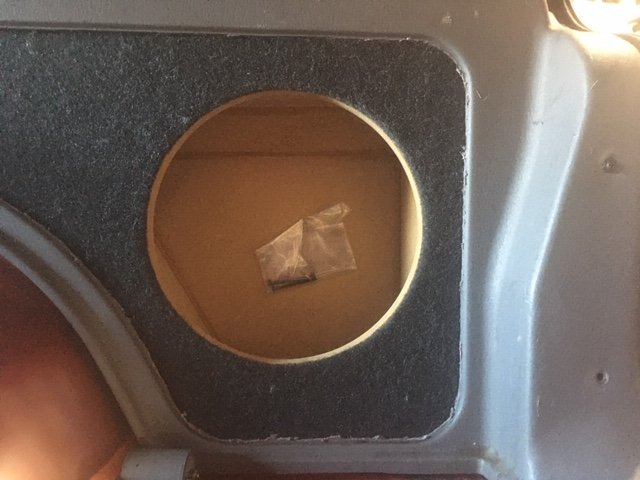
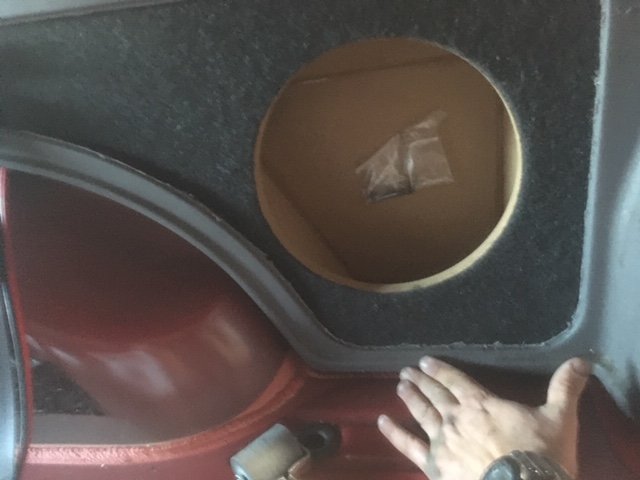
Some updates as I continued to install the sub enclosure...I stopped by a wrecking yard to get a scrap interior quarter panel I could practice on/ rough cut before putting the agate panels under the knife. Got the enclosure positioned and placed the cut-out quarter panel -- the speaker opening was off center by a lot. There would be no way to get a true speaker grille mounted up. That's just how it installs, even according to the instructions photo's. So I did some measuring and figured out that if I cut out some of the inner quarter panel sheetmetal I could position the enclosure so it was centered in the cubby section of the quarter panel trim. Once I cut and drilled as I needed to, I added M4 nutserts to the sheetmetal area so the enclosure could be taken up and down as needed without the fear of stripping out the hole and keeping things tight. And... the subwoofer speaker was now centered in the cut-out. Now I just need to add Dynamat behind the enclosure and arrange the wiring. Final step will be recovering the face of the enclosure with true agate color carpeting to match the rest of the interior carpeting.