


Gjeep
-
Posts
1221 -
Joined
-
Last visited
-
Days Won
3
Content Type
Profiles
Forums
Gallery
Everything posted by Gjeep
-
Fixing Water Leaks into the cab
Gjeep replied to BeatCJ's topic in MJ Tech: Modification and Repairs
I can tell you BOTH my MJ's had gaps in seam sealer at overlaps of floorboard sheet metal. My '89 most noticeably when I POR-15 sealed it (as it made it's way through and dripped on garage floor). There were zero rust holes in the metal (California trucks)(. Freeway driving rain water was getting in through those gaps. Both MJ's oddly enough ONLY passenger side floorboard. -
Sharp MJ and great color
-
The MJ's home and I'm exhausted... Showroom shiny. Seems like forever to get to this point.
-
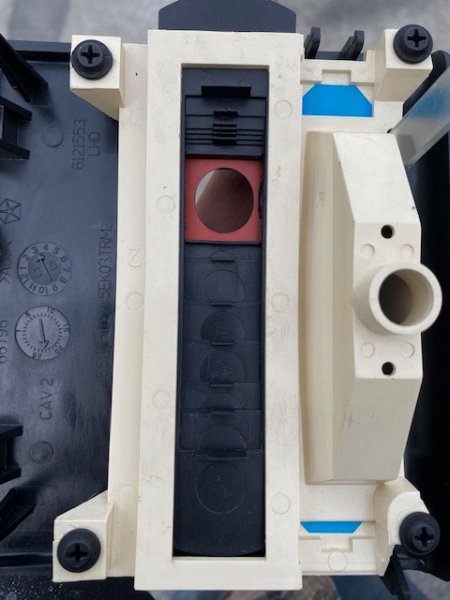
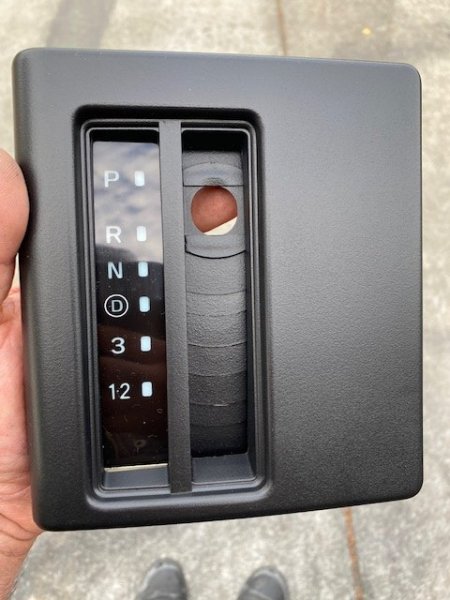
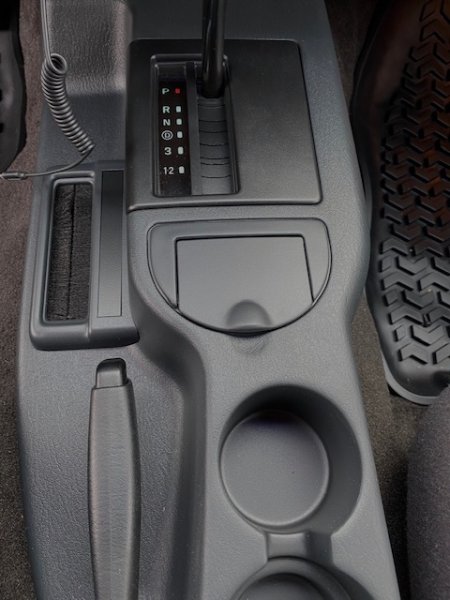
I'm closing in on getting this interior done, though still keeping an eye on the details. I do like the symmetry of the 97+ XJ's dashboard, but it lacks the contrasting color the original XJ dash had. Guess my eyes got use to it and needed to see that familiar appearance. Back when I purchased my '01 XJ new I blacked out areas of the dash and center stack bezel for that contrast... And I'm doing the exact same on this '97. Still need to paint the center stack but got the main overlay done. Also drilled out the plastic weld assembly of the transmission selector to paint and detail this part. Nothing NOS was available, so I renewed the old blacked it out as I did the dashboard inset, and put it back together with factory screws on the bottom-side. And here it is in place. The 4wd shift bezel is where I park my phone for charging while driving.
-
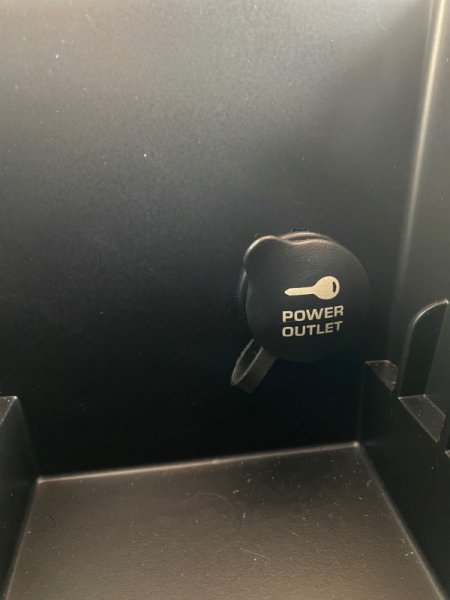
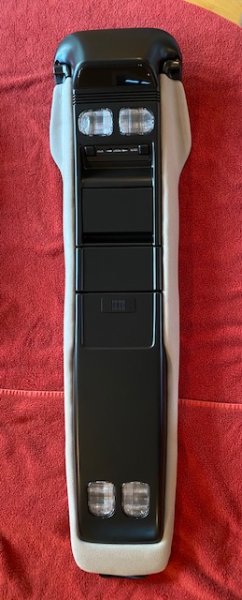
Been getting odds and ends done on the XJ in pockets of time... I disliked the ignition cylinder/ key setup on the ‘97 (and ‘98) XJ from the day I bought it. It looks like an afterthought that visually sticks out too far from the steering column shroud (just a bit under 1/2"). I went with the later ignition cylinder/ key that sits flush to the column shroud. Only minor Dremel-ing needed to happen to get it to fit-- The sides of the newer Mopar cylinder was a pinch wider than the original. A bit surprising. Also took a heat gun to the sub box...This box is a near work of art, but I did make a couple modifications to make it sit as it should in the quarter panel area. The most recent being peeling off the fuzzy carpet on the front side. It’s close to Jeep's agate, but not spot-on. So I scoured many a wrecking yard to find the perfect XJ back of seat carpet to use to recover it. Work in progress... And lastly added a wrecking yard Jeep-sourced power port in the center console.


-
90 Eliminator 5spd, 4WD, Boone, NC - $15K
Gjeep replied to NHMJXJ's topic in Craigslist/eBay... i.e. Not Your Stuff
Agree with comments, but looks like a decent repaint even if they missed on the 'Comanche' emblem placement, couldn't take the time to got to the local Pick N Pull and grab a decent used door panel map pocket (for the passenger side), and a HVAC switch panel that didn't have white crap all over it. I will say even if it was pure luck, he does have the 84-86 MJ/XJ metal front license plate holder. -
1992 MJ/ XJ factory silver, but the paint code pulled 2 versions of the silver -- when I shot test panels I went with the one that had a bit smokey-er hue. Matched the "Jeep" logo'd upholstery lettering perfectly. The other factory silver was a bit darker and more gray. Anyway, simple answer... I went with factory 'Silver Star Metallic'.
-
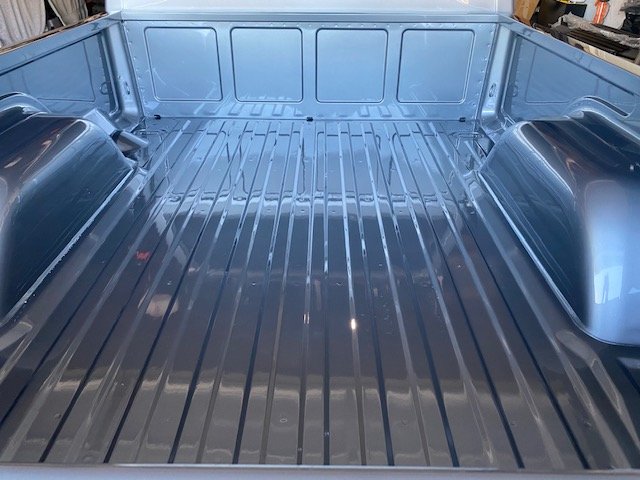
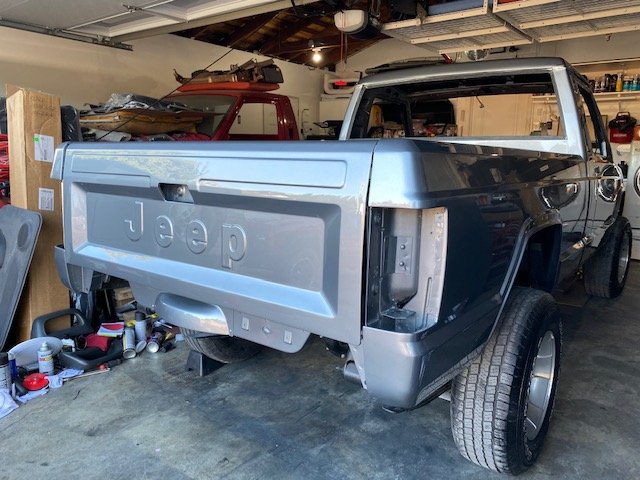
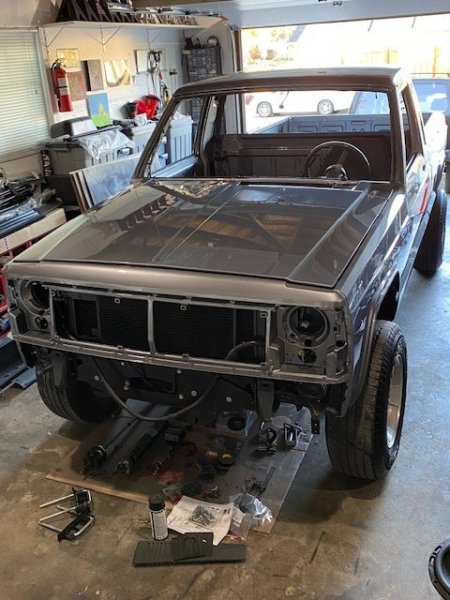
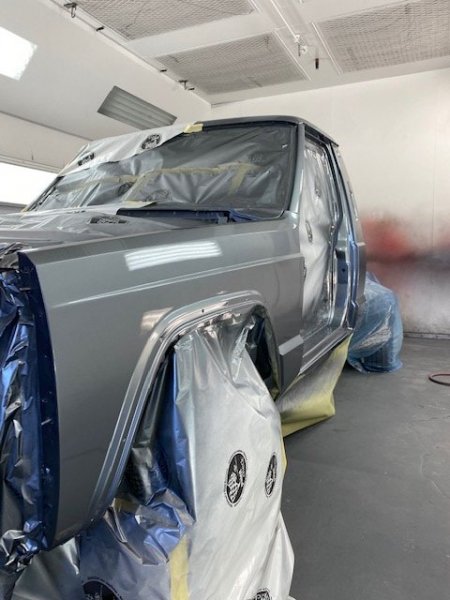
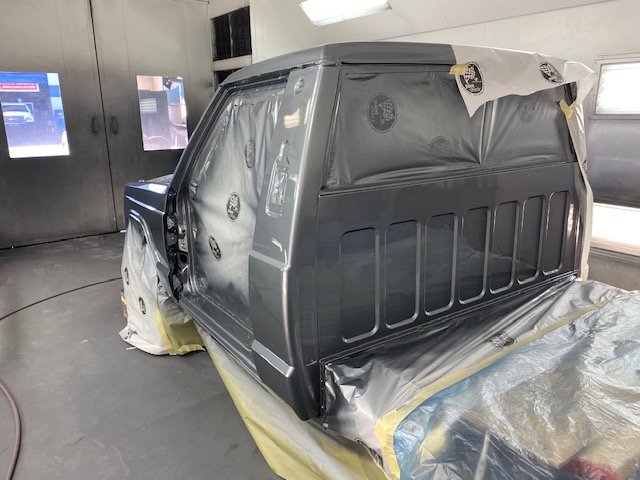
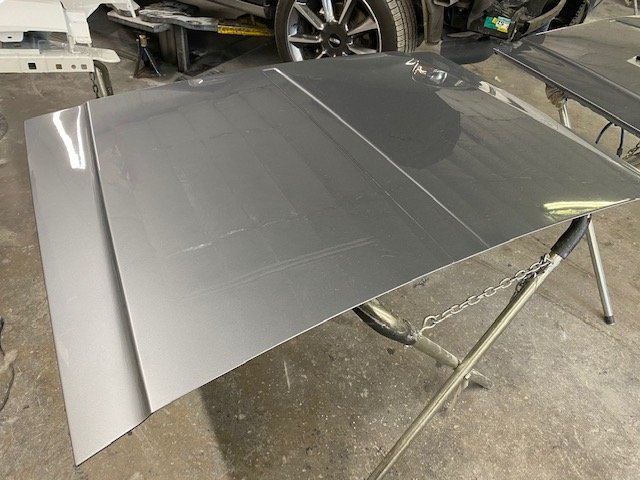
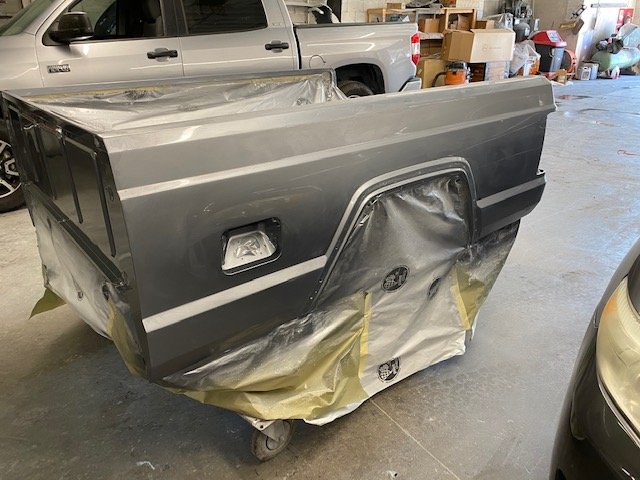
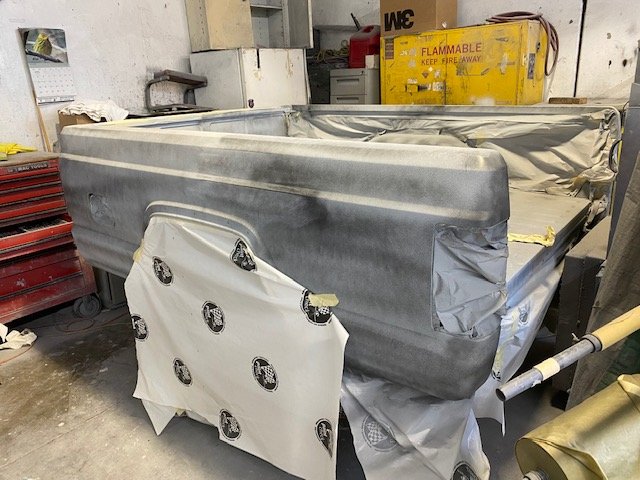
Busy end of week/ weekend -- Painted the MJ inside and out...jambs, cab, bed, etc. Done! Masked like hell so not to get any overspray! Will see how successful that was once I tear the masking off. Polishing all the parts and pieces, and aiming for completed (shell) re-assembly this weekend then back home it comes. (Bed photo work-in-progress polish.)
.jpg.5283ceb3b09ba7e50c955dc2d749dd53.jpg)
-
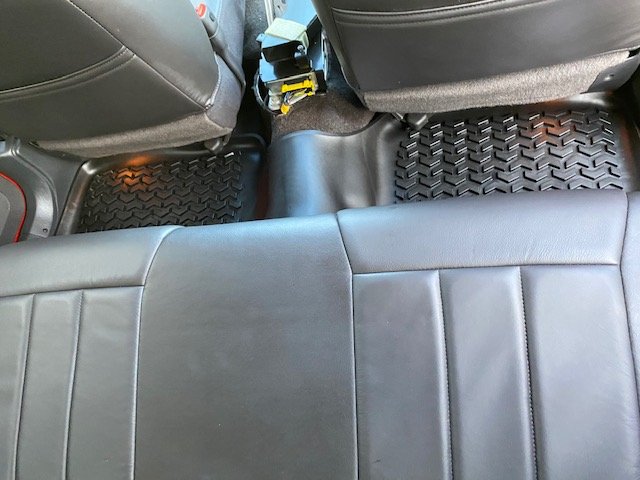
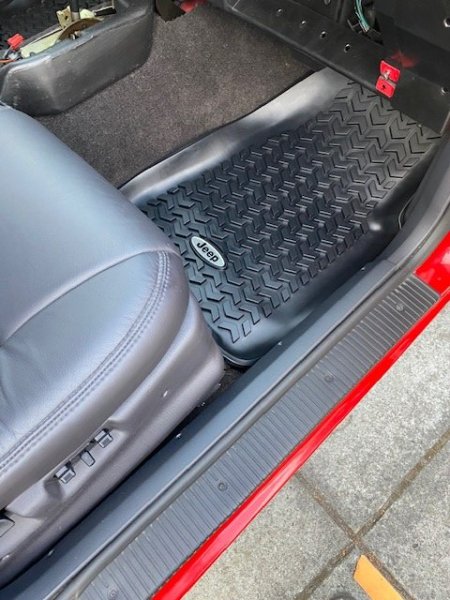
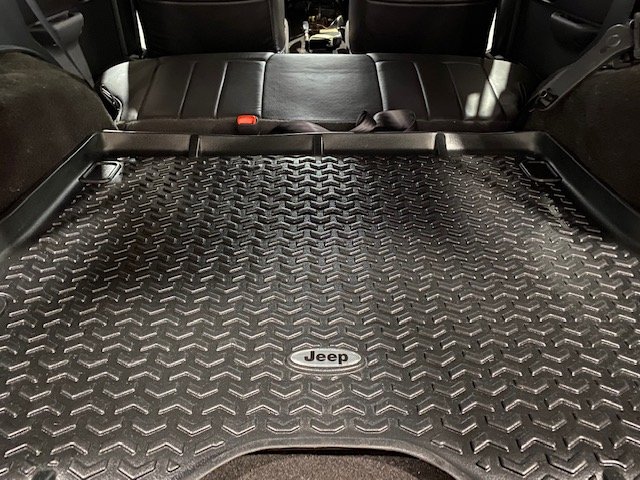
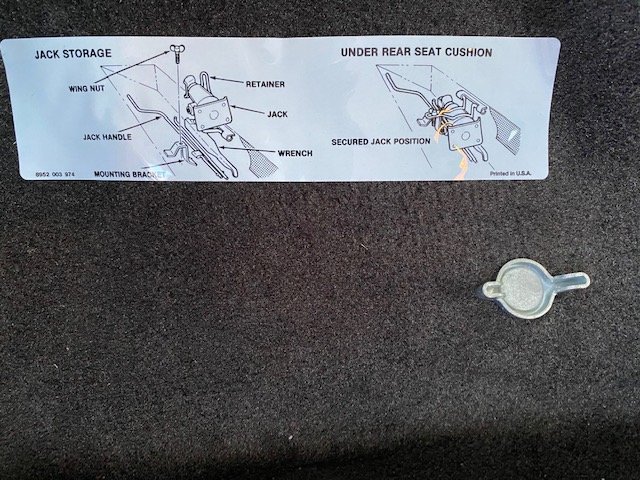
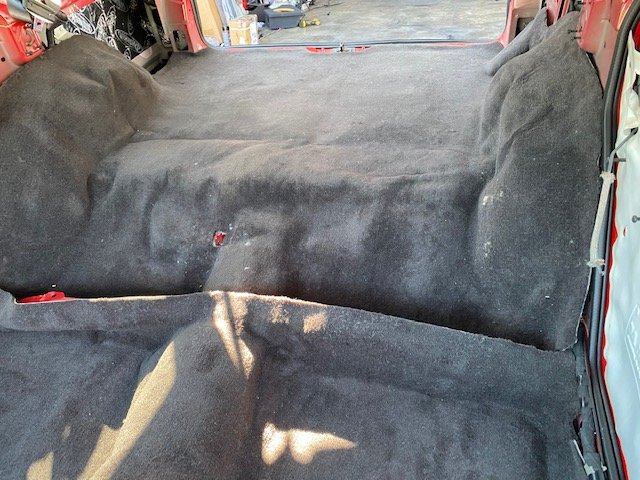
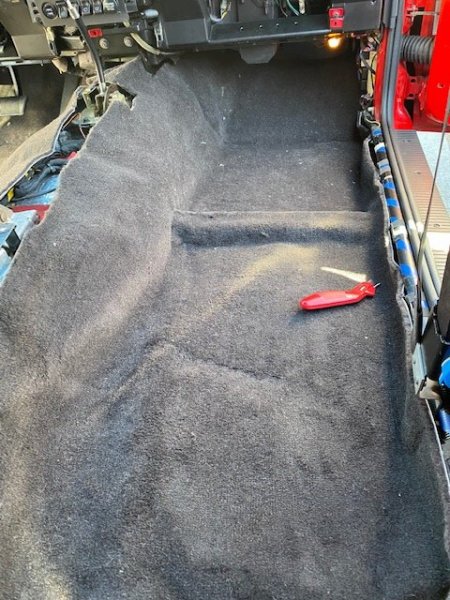
Been working between Jeeps odd hours...Got the cargo area carpet in and fit. Took just about as long as getting the passenger area of the carpet in. ACC carpet mats are placed under the Rugged Ridge 'Jeep' logo'd all-weather mats and cargo area tray. These all-weather mats are a nice quality, great fit, and most importantly to me -- cover the hump of the rear passenger area and the entire foot area behind the driver and passenger seats. I'm still waiting on a subwoofer I have on order to finish up that quarter panel area, and at long last found a NOS rear seat belt dual buckles to round out the set. Final touch was the OEM jack instruction label under the rear seat.

-
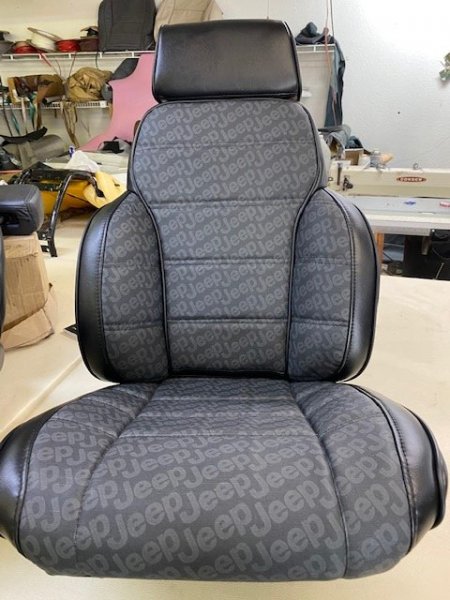
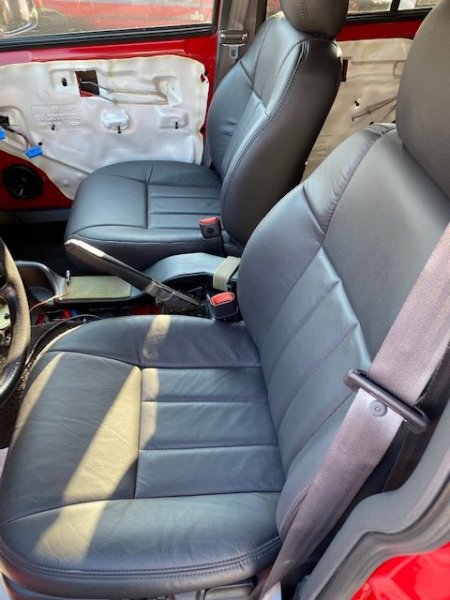
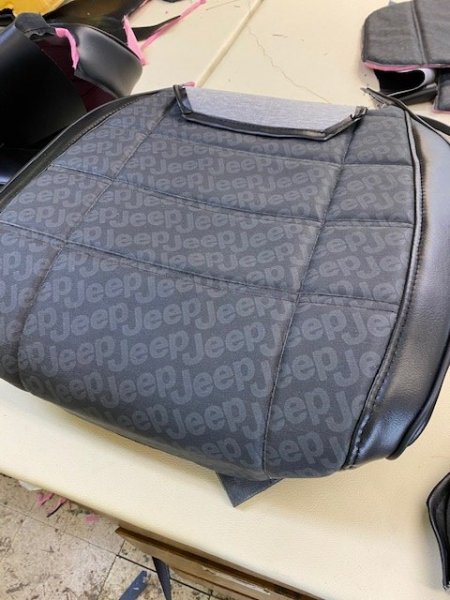
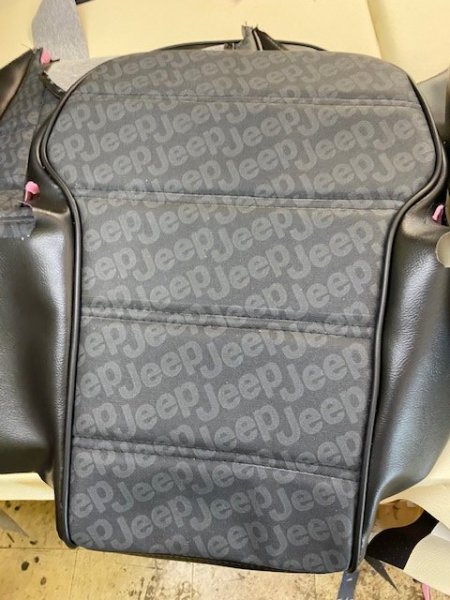
Super excited with the results on the MJ's seats. Just picked these up tonight.
-
Quick before and almost after pics -- I wasn't a fan of the original saddle/ spice interior color and so began my parts search for agate interior panels. It's not that I dislike saddle, it's just that I think it only looks good on a moss green XJ. (And it looks really good on that color.)


-
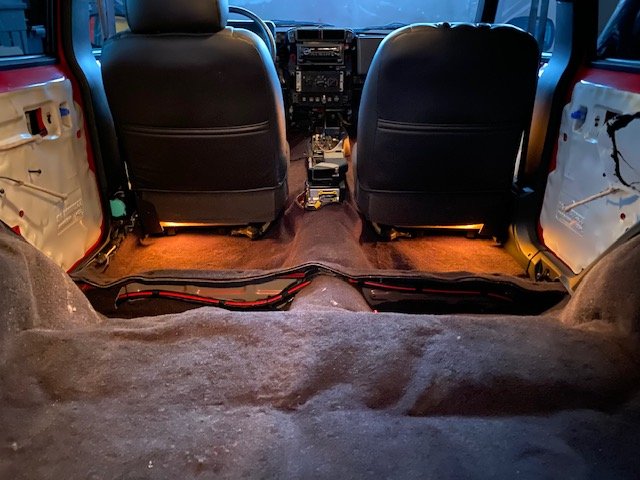
Nearly done with the carpet install. It has taken me a good 2+ full days to get things to look right in the passenger area. ACC is really the only good option for aftermarket replacement carpet. I’ve tried other vendors but haven’t been as happy with the final fit and quality. ACC’s weak point to me, at least on the XJ, is around the trans tunnel. The carpet typically fits like a paper bag. After several carpet installs over the years in both XJ’s/ MJ’s, I’ve learned what works for me is fully opening up the center section of carpet at the transmission tunnel, letting the vehicle idle on/ off for about an hour (heats up the carpet and flattens it out) add-in a mix of heat gun action, and then use zip-ties (like shoestrings) tighten things up for an exact fit. Works every time. I added wiring for the NOS dual power leather seats (available in ‘00/’01 XJ’s only), an inside the center console 12V port, and footwell lights for the rear seat passengers. I always thought that back seat area of the XJ, even with the overhead console lighting was too dark upon entry. I used stock ‘97+ XJ front footwell lights and attached them to the underside of the front seats. I’ve still got the cargo area carpeting to get fitted right and backseat in…then sort out the subwoofer fitment. Getting there.


-
It's block sand Wednesday. Hoping to get it all done today and redo any issue areas/ low spots.
-
Happy to say this has been a minimal bleed new carpet install. About 88% done on the front carpet. And have high hopes of getting the cargo area carpet in tomorrow. I can't get into the booth right now to primer the MJ until the 'accident' cars are through, so using this time to close the gap on finishing the XJ.

-
Didn't get as much as I had hoped done with the time I had today, but got the overhead console reassembled, hands-free mic tested, and unit installed in this XJ Sport that didn't come with one from the factory. Additionally, I got about half the upper plastic trim installed -- I had to look high and low to find the 'screw-in' a-pillars in agate color. Ended up buying then selling an auctioned XJ in South Carolina to find these a little over a year ago. This design was only available in very early '99 builds (when the agate interior came out as the gray interior option) and then the a-pillars changed over to the 'clip-in' design which always breaks whenever a-pillar trim is removed. No thanks. As always, getting there one small step at a time... As a side note for any '99+ XJ's with the newer style cargo light -- be sure to remove the purple wire from the connector to the light itself. It took me several melted/ destroyed cargo lamps on my '01 XJ to figure out the factory wiring ran too much current through that light with the on/off push-the-lamp-itself option. Sure I don't have the on/off light capability from the cargo area of the Jeep, but I don't care. I want to save the lamp itself. NOS ones are impossible to come by these days.
-
Chugging along on the XJ... Held my breath once again as I trimmed out a NOS overhead console bezel to fit the hands-free microphone grille I sourced from a '90's BMW (only thing out there that looks like it could belong in an XJ). Then I refinished the panels and let them dry. My goal for tomorrow morning is to get the overhead console re-assembled and up in the Jeep. Also hoping to get the upper trim panels installed!


-
I stopped by the upholstery shop working on my MJ's seats this afternoon to see how things were coming along...Happy to seat the one of two seats is about 60% together and looking great! Couldn't be happier with his work and how the upholstery looks together! Supposed to be done in a about a week. Then I'm going to turn him to updating some factory door panels along the same lines.
-
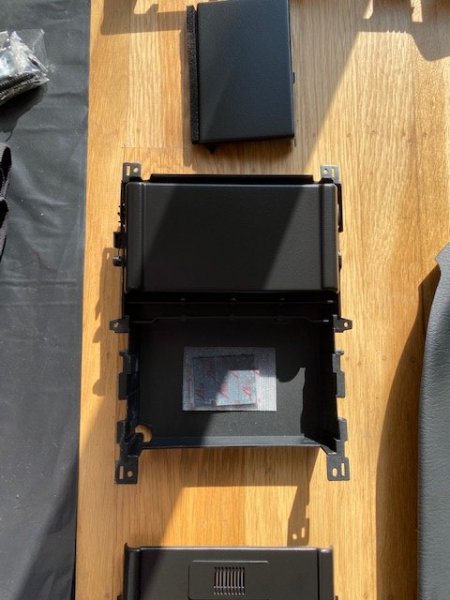
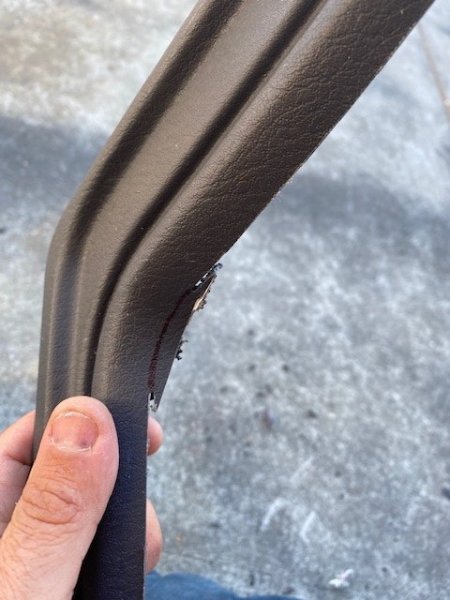
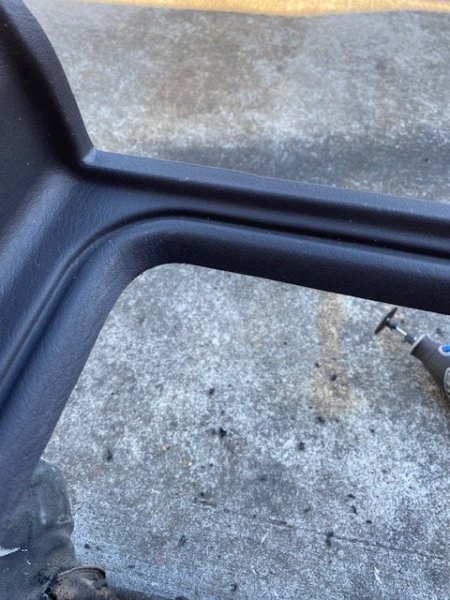
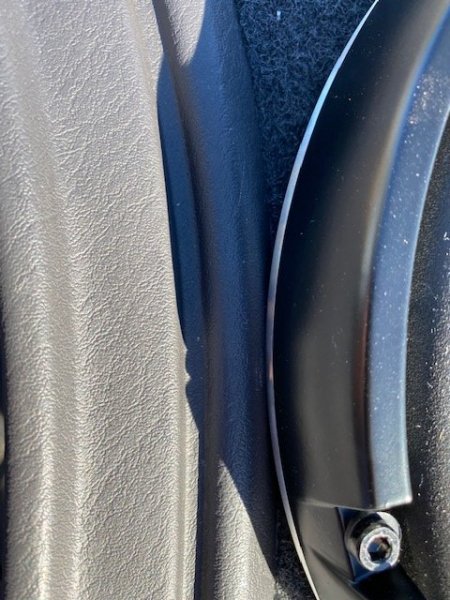
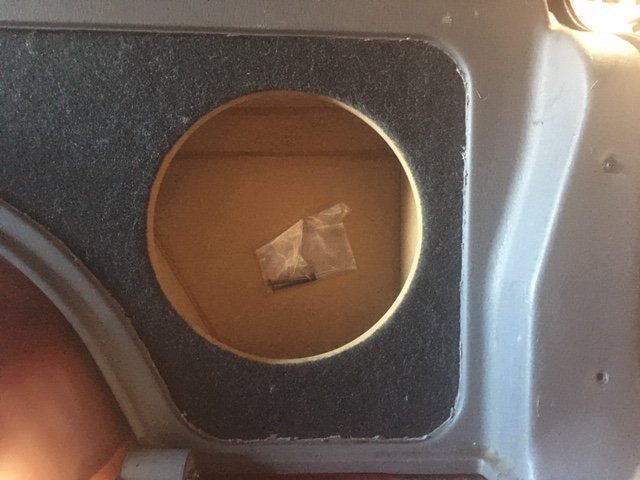
Got up extra early to tinker/ trim on the XJ’s passenger side interior quarter panel for subwoofer installation. Nothing quite as terrifying as botching the last NOS agate panel in Chrysler’s parts location. The below is my mist gray rough-cut junkyard tester panel from a while back. This cut follows both the enclosure manufacturers recommendation and the outer most line of the quarter panel insert. To me, it just looks to be too big of an opening. It loses the character lines of the original panel. The lower two pics are of the NOS agate panel I cut keeping to the inner most cut line with enough lip so I could keep the interior panel flush to the speaker enclosure. I used some thick foam tape to guide my eyes and be there as insurance should I slip up. Lucky for me I didn’t. First pass was the easier straight length cuts to the plastic opening. Next, I cut the corners triangular with plenty of room so I could carefully round out the openings with the Dremel. First step was marking the curve, then I cut. All went well…Many passes with 800 grit wet sandpaper and all looks factory to the eye. Since my goal is aesthetics on this sub, I decided to follow the more inside line of this panel. Really, I only saw two good options for this panels cut…The original wider cut top pic (mist gray panel) or the bottom smaller cut (agate panel). Another goal of this installation is making sure the speaker is centered in the carpeted area. But the way this enclosure was built, it wasn’t going to happen without extra effort. Further back on my build page around this topic I had already trimmed about an inch of vertical inside sheet metal to move the box back to center things up…But since I’ve decided to go with the smaller trim of the quarter panel plastic, I need to follow the line of the subwoofer and around out about 1/8” left and right of the speaker on the interior panel to make all right. Dead center top and bottom carpet space. Last step will be refinishing the agate color on the panel with the other cargo area panels and recovering the enclosure face with OEM Jeep fuzzy carpet material for perfect match cargo area. I got this carpet off the back of a ’99 XJ rear seat back panel that had no stains, frays or damage. Thank God for people who don’t use their cargo area…
-
Nicely done even if it doesn’t have an inline motor. https://bringatrailer.com/listing/1955-willys-truck-2/#?utm_source=motorious.com&utm_medium=article&utm_campaign=motorious
-
Just saw this post — looks great on your MJ. I like the simple white and black of your truck. Good meeting you!
-
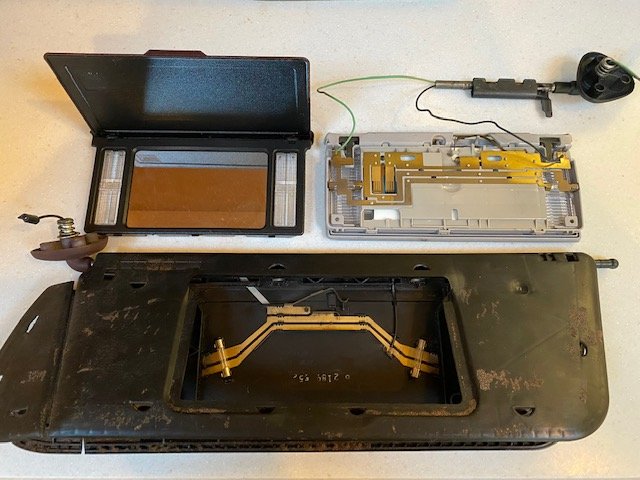
Taking a break from body work on the weekend and took some time to dissect the unique only to 1990 XJ/MJ vanity visor (which has the black mirror assembly inside...probably only important to me as I'm converting my '92 to a black interior...and '90+ is when the shorter sun visors came into being). First off, this one year only part is hard to come by -- so I heat up the thin plastic clips that hold the two plastic visor sides together. There's a total of nine that need to be carefully pried apart (and not broken) as these are how the 'teeth' on the inside area of this assembly holds the foam backed material into place. Two small flat screwdrivers are used in tandem at each clip location to carefully pry things apart. This was the first time I actually disassembled this years sun visor, and as seen in the photo below, this one year only item is quite different from the '91-'01 XJ visor assemblies. The '90 visor has the bulbs and copper runs as in and as part of the main visor. The newer style (at right) is a vanity mirror concealed unit. As far as replacing light bulbs goes, the first gen style I prefer. It's a hell of a lot easier to pop-out that mirror unit, than it is to pop-out just the clear lens of the newer style. I've cracked a lens both times I needed to change a vanity bulb on my '01 XJ. It's maddening, as I am very careful. The final challenging step of disassembly is pulling out the sun visor clip that retains in in place in the vehicle. the dual plastic hoops the hold the thick plastic pin in place need to be carefully pinched together while carefully pulling in out. This insures the visor sides can be full opened and new material put into place. and since the XJ I pulled this from had a Cordovan color interior, I need to paint the 3 screw mounting metal bracket black. Again, this was unique to 1990 -- that the mounting bracket is painted the vehicles interior color. All other years, this bracket is a generic black. Final step is swapping the vanity mirror lid with the Ford units that I found were similar a couple months back, as the XJ units again were the color of their given interior. I have several more of these visors to pull apart successfully (for both the '89 and current '92 MJ build). Good times!
-
The weekend has given me the chance to focus on the XJ...I decided to refinish the interior panels as they were all various shades of the agate color. Probably due to production year/ paint batches. I just knew I would eventually regret not just handling refinishing these -- so adhesion promoter, color, and low sheen clear is now covering these parts. The cargo area panels I’ll do last as I need to trim-out the passenger side quarter panel for the custom recessed sub box. After that I’ll refinish those also. Getting there...


-
I like what you’ve done. Especially going the extra mile finding stainless. To me, the grommets are most needed at the 3 push pins at the front. That’s typically where it tears and where I remove the splash shield when draining the lower radiator hose. I’ve never had issue at the oil pan mounts.
-
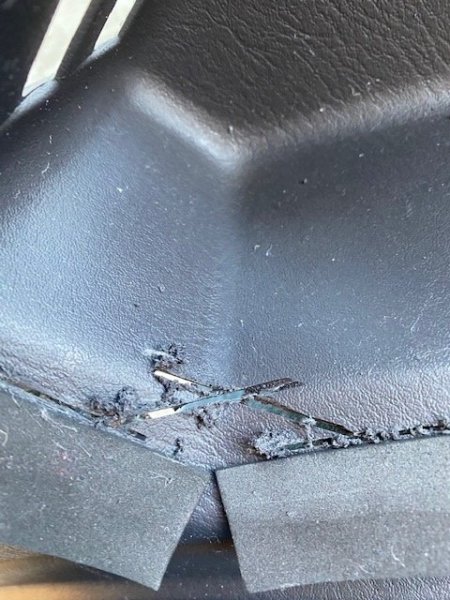
I found black M4 allen heads that fit perfectly into the rubber bushing for the underside of the top half of the seat frame from where it touches the bottom seat frame (latching area). The issue with the factory bushings from my perspective is they have about 1/8" of 'air' (not solid rubber) between the top surface and the bolt which fastens them to the seat frame. (Photo below on a spare seat frame I have.) What ends up happening (even with a low mileage MJ/XJ) is the top of that bolt tears through the rubber and cuts the bottom of the seat vinyl. Same as the bottom of the seat chrome latch sound mounting screws cuts through the top of the seat vinyl in the in between area. These rubber bushings I got are solid and the allen round will help them keep their shape. For the chrome latch area simple black velcro fuzzy side dots will be used at the contact point on the vinyl in between topside. Jeep upholstery has been dropped off for stitching with and ETA of 2-3 weeks. I'm going to check out their progress next Friday once all is cut-up. Looking forward to seeing the seats come together.

-
It's been a while since I posted on this thread -- as I've been focused on my MJ. Currently out and about with the 97 XJ really driving it for the first time since I bought it back in May 2019! Broke in the brakes, and stretching the legs of the various engine and suspension mods made. Running good! (I will say it did take some effort getting this thing started... seems the fuel may have lost its octane as I couldn't get it to start until I poured 5 gallons of fresh 92 octane fuel in the tank.) I'm picking up the recovered headliner, overhead console and visors this morning... And at the same time will be dropping off the MJ upholstery to get those seats done. Once I'm finished painting the MJ, I plan on letting the paint cure for about a month before re-assembly begins. In that time, I'm aiming to get the agate interior into this XJ.
.jpg.ed14b007c936edee65fe4601a1525ee6.jpg)