Gjeep
-
Posts
1221 -
Joined
-
Last visited
-
Days Won
3
Content Type
Profiles
Forums
Gallery
Everything posted by Gjeep
-
Agreed -- that Saddle interior and Moss Green paint look great together. Just something about driving around being surrounded by that interior color that is toooo much. Overwhelming. For my eyes, it just becomes hideous. Know that sounds crazy. Mist gray is far more pleasant/ calming and interior color to me.
-
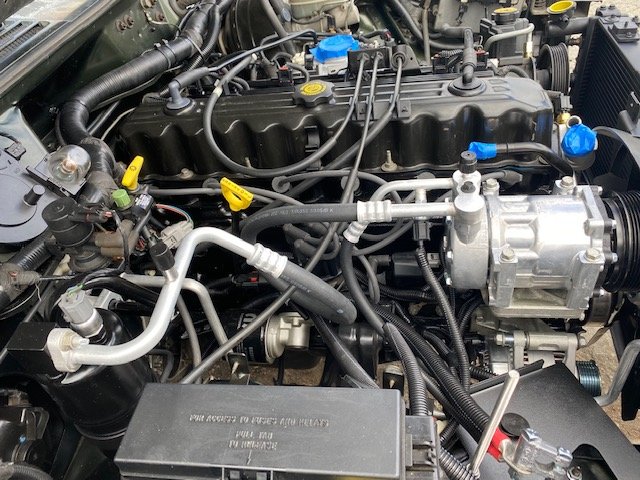
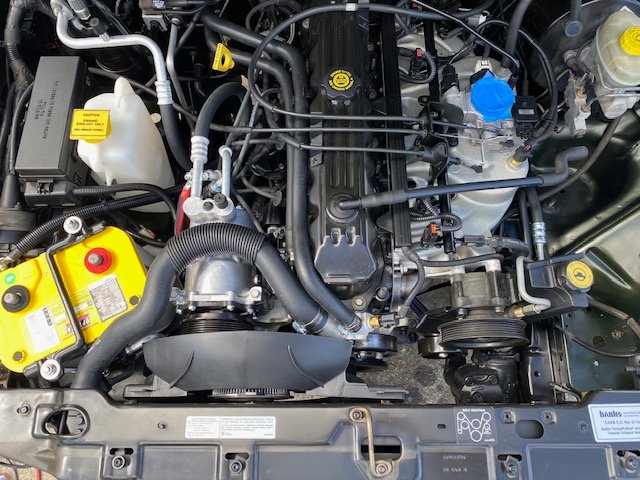
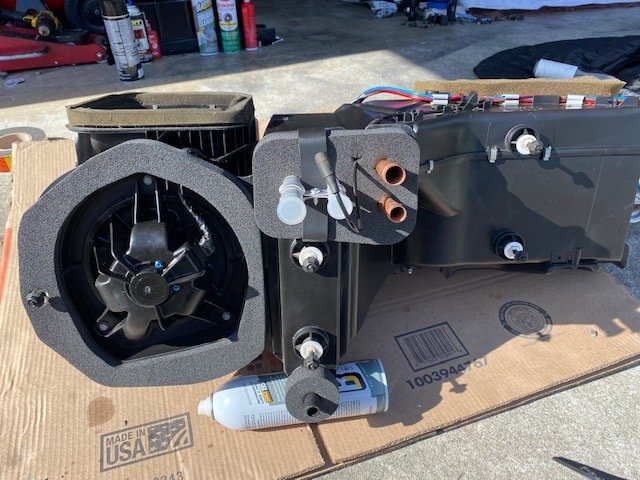
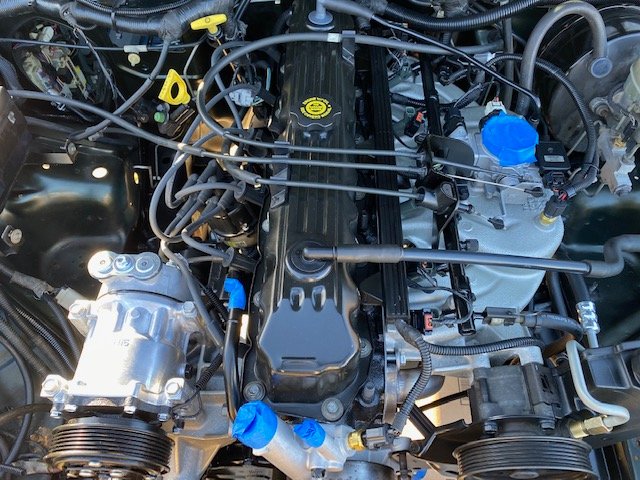
Still need to get the dash and all that goes with it back into place, but HVAC is in. Denso compressor requires PAG46 so I kept that oil consistent up to the 8oz required throughout. It's a nice unit made in USA. Once I get the XJ going (which will be a month or so from now), I’ll run it by an AC shop to get a full charge of R134a. Also managed to get a lot of the other accessories mounted up…It’s starting to look like a real engine. New brake booster, master cylinder, and proportioning valve is up next. Then on to the rest.
-
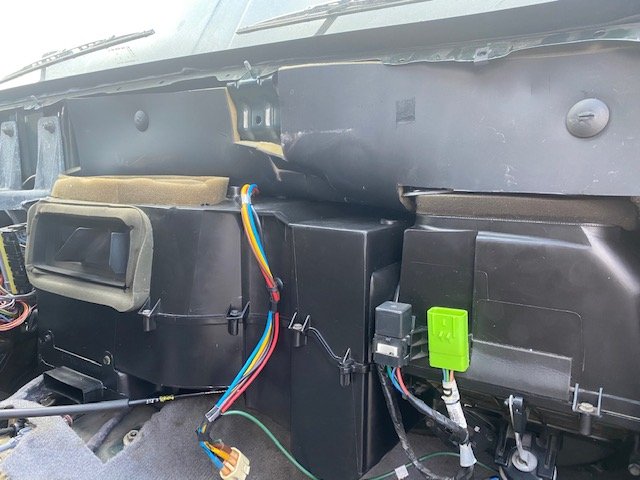
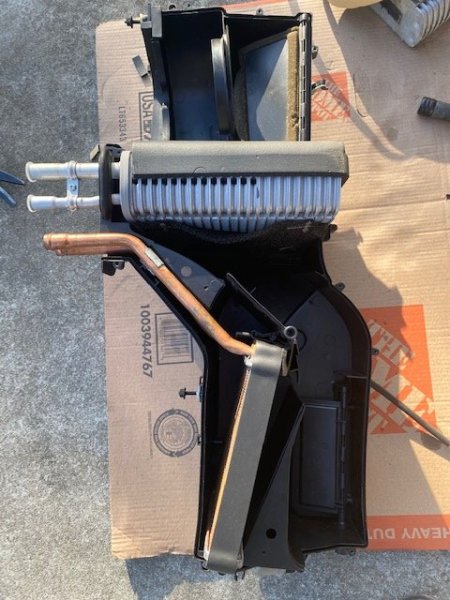
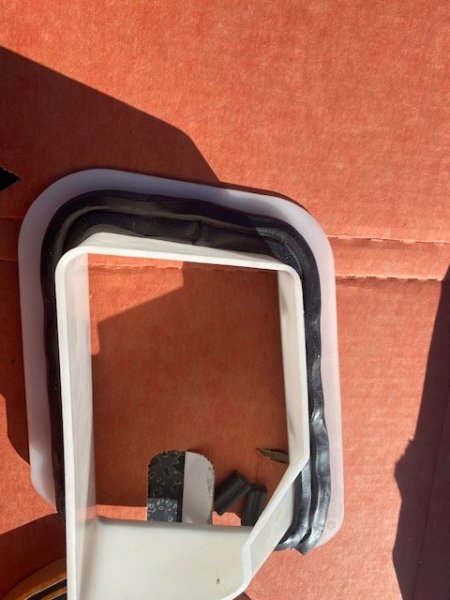
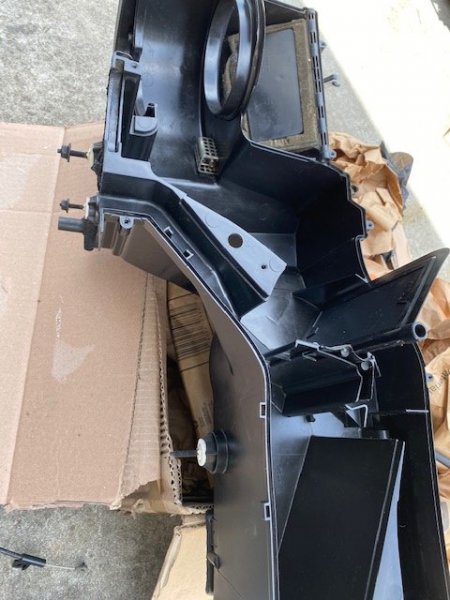
And the box is together... Also learned something new for all those with 97+ XJ's that may prove helpful -- The HVAC under dash box is 100% identical to that of the TJ. I knew the heater core and evaporator core were the same, but the plastic housing (box) is the same also. Good news!
-
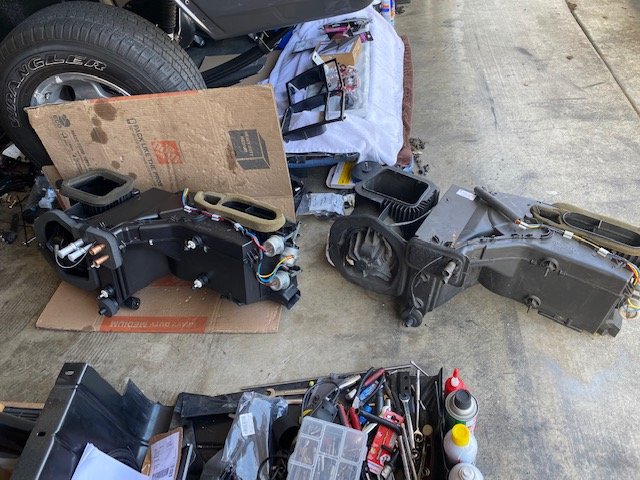
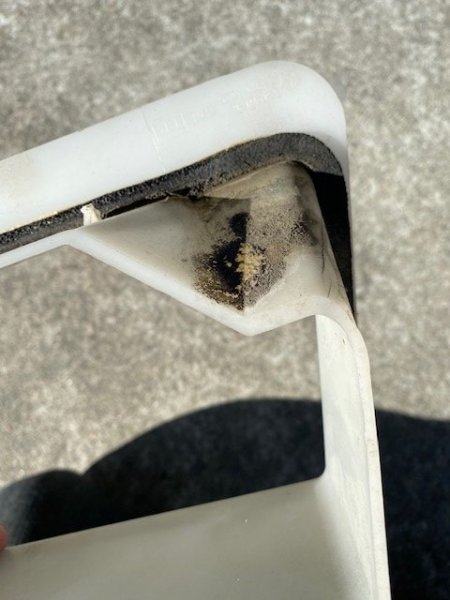
It’s been a learning experience with this XJ’s cowl insert (I believe these first came into use in 1996 on the XJ as I pulled one in a yard 20+ years ago for my ’89 MJ to see if it would work). We all know this area leaks and this tall-ish insert was a good way for Jeep to try and address this, but they used a flimsy foam seal around it (between the metal cowl and this plastic). Mine was completely flat and showed signs of leaking…so while I had the HVAC box out I wanted to get this right. I read a few through write up’s where guys used 3M windshield seal (rope tape) – made sense as the windshield sees plenty of water. I cleaned everything up and applied mine double-wide. It was firm and somewhat tacky. Not at all easy to get stuck on flat. I tried using my back, a jack with wood I teetered for leverage in sticking. No luck getting flat…and as a result, I could easily pull it down in the leak-prone corners. It just didn't stick well. Should have trusted my gut and gone with butyl tape…which I ended up using. Laid perfectly flat and stuck everywhere I put it. I’ve seen concerns about butyl drying out and my only experience with it is around the transmission tunnel plates and my 92 MJ’s CRL slider the original owner put in back in 1998 that was still sticking like hell when I removed it end of last year when I painted that truck. Hoping it does as well in the cowl area – high hopes.

-
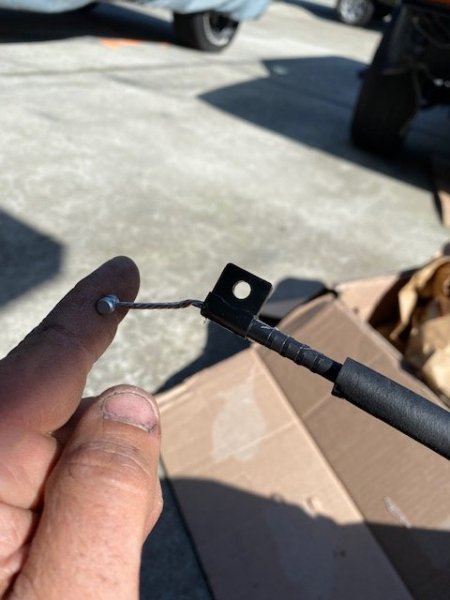
Overhauling the HVAC box is a good time no doubt. I can’t repair something without cleaning it. And this box was a container of thick dust. Took about 6 hours to get it looking factory fresh. Also had the issue of the cable pin-connect that is key to adjusting the temperature/ blend door snap. The PO assumed the heater core was bad and by-passed it. Not the issue. The older XJ/MJ’s as most of you know have this attached to a metal rod on the HVAC box blend door. The plastic arm itself is beefy…Just the pin wasn’t. Decided the best thing to do was drill it out and attach some stainless hardware loaded with grease. Fortunately a new cable was available so that repair is complete. Next up is getting the new heater core and AC components installed inside and out.


-
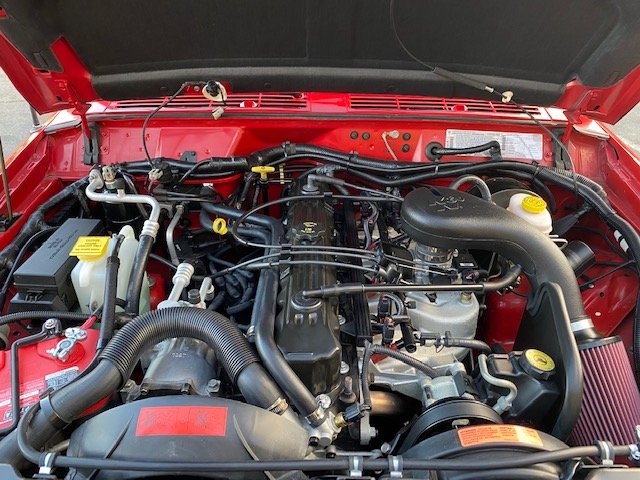
From a cleaned up bare block to majority of the accessories bolted up. Banks header was a fun install – they didn’t take into account with their bends ease of lower bolt installation. 1.5 hours just trying to get the lower, middle/right bolt in. Insane. Never had that challenge with the Borla headers. That lower pipe sits so low I actually needed to remove the motor mount shield to get that header on. (It's not as close as it looks in the photo below.) But it’s a stout unit with no doubt half a million solid miles ahead of it. Upgraded to the newer style intake and as many of you know only mild modifications to get things plugged in right – upgraded to the ’00 XJ vacuum tubing (extensions would work), IAT wiring extension (there is a company that makes these plug and play but the shortest is about 12” too long for this, so thank to ConnectionExperts.com Jeep terminals are available to shorten the wires properly), and finally trimming the wings of the ’98 XJ fuel line retaining bracket/ drilling a hole in the center allows for the line to be secured to the new style intake. Then to top things off a 62mm TB. Still waiting on the new alternator and next up is the rear main seal/ oil pan gasket replacement. After that on to the entirety of the front suspension, then HVAC re-do. Getting there…


-
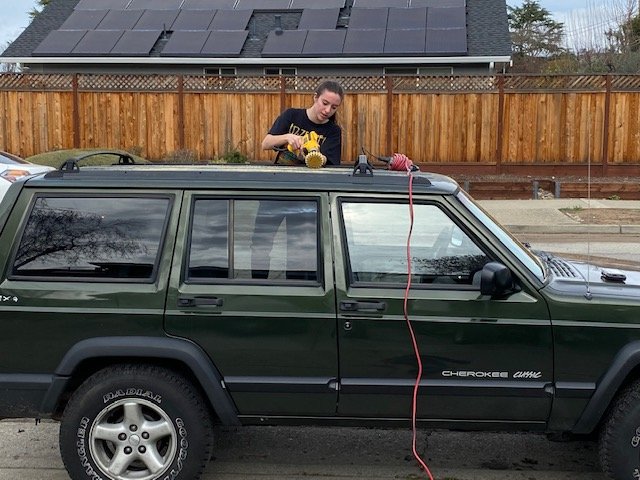
Chipping away at things...Previous owner flexed front end to maximum contacting and bending oil pan lip and trans lines; also bashing/ smashing oxygen sensor bracket/ connector (that somehow was still functional without terminals touching). So next up engine side is replacing the oil pan, trans lines, and oxygen sensor bracket/ sensor. After that on to 100% re-do/ build of the front end -- control arms, coils, shocks, brakes, bushings, and upgrading to the heavy-duty ZJ steering set up. You name it, it's getting replaced. In between time exterior work and misc other prep/ install work gets accomplished by up-and-coming Jeep enthusiast/ daughter, Bella. Currently removing some dried out cargo strips on the XJ's roof (to be replaced with NOS soon enough). Hard core.
-
Moss green. Hunter green was a 91/92 color only...
-
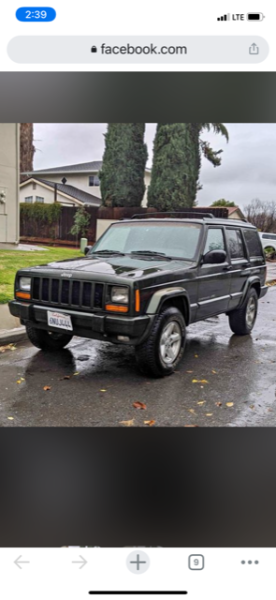
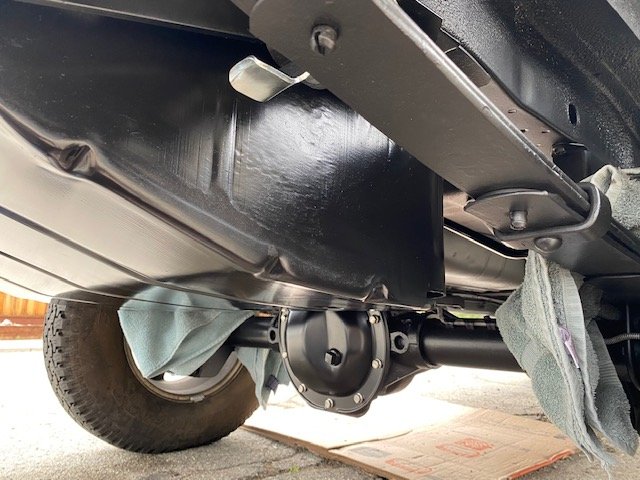
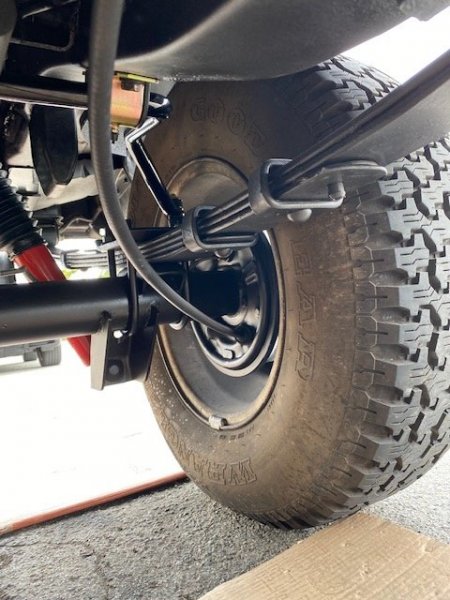
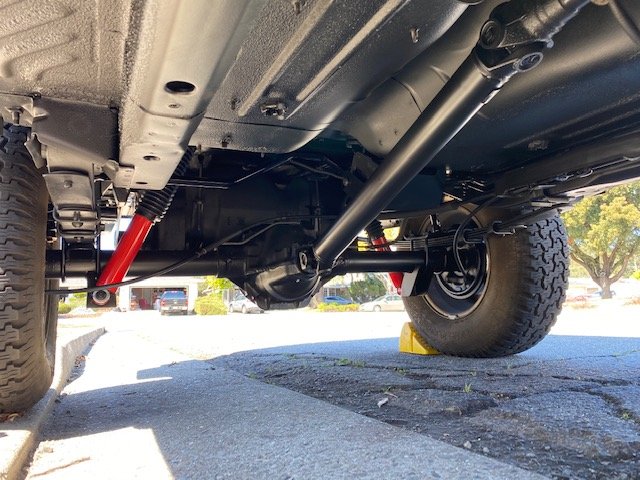
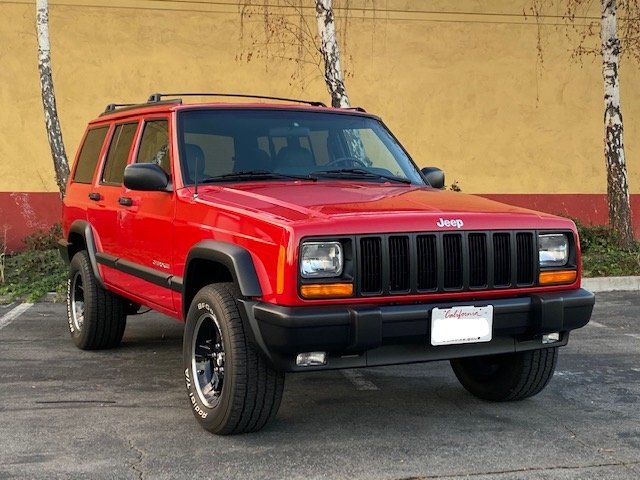
I recently purchased a ’98 XJ Classic 4.0L, AW4, NP231 166K for my daughters who will be driving soon (in about 6 months). Pic below from the Facebook ad. The truck lived its life about 2 miles from me...oddly enough, had never seen it. b Clean little XJ but going through it with a fine-tooth comb (not a crazy and fine a tooth comb as I typically do) and upgrading/ repairing. Oddly enough it was used as a tow vehicle for a salt water boat – I know that because he told me… and the rear axle and leafs were rusty for a CA vehicle. In fact, one of the passenger side leafs had split in half. The truck originally didn’t have a tow package, though he added a DrawTite hitch and Hayden trans cooler. Adding/ rebuilding the suspension entirely – all new -- will be a factory Up Country build complete with skids, hooks, etc. Rear axle and drive shaft are now new and installed. If you’ve seen my red ’97 XJ build, this Jeep will be getting a lot of the same treatment…heavy duty Addcco sway bars front and rear, KYB shocks, cross-drilled rotors, u-style manifold – this time a complete header to tailpipe Banks stainless steel exhaust (as Borla no longer makes a header for the 4.0L XJ… I like to keep the manufacturer components brand similar). Additional detail on the engine will be new pulleys/ balancer, sensors, alternator, starter, water pump, thermostat, battery/ cables, steering pump/ hoses, factory Jeep trans cooler, fuel injectors/ pump, K&N intake, motor/ trans mounts, etc. Head to toe AC/ heater core refresh...and I forget all what else. Tire/ rim combo I’ll be running on this truck will be NOS TJ ravines on BFG AT KO 30x9.50’s. Exterior-wise, I’ll be removing ‘Classic’ elements and adding ‘Sport’ trim/bumper details… I prefer the textured/ blacked out exterior flares and trim. ARB wiring loom will brighten the road at night and an starter kill/ alarm will (hopefully) keep this XJ out of harms way.


-
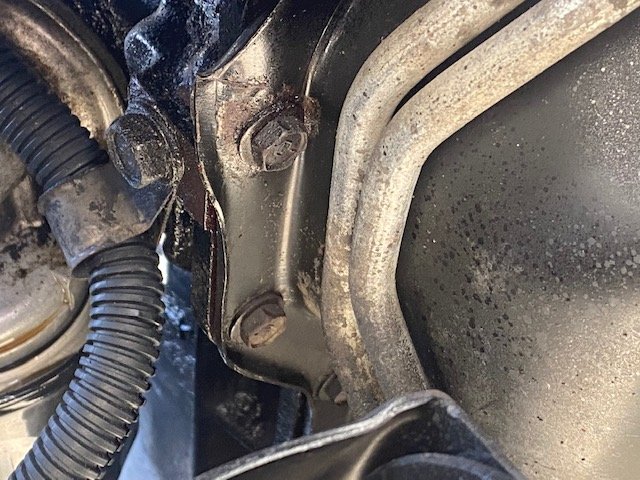
Motor mount shield -- learned something new
Gjeep replied to Gjeep's topic in MJ Tech: Modification and Repairs
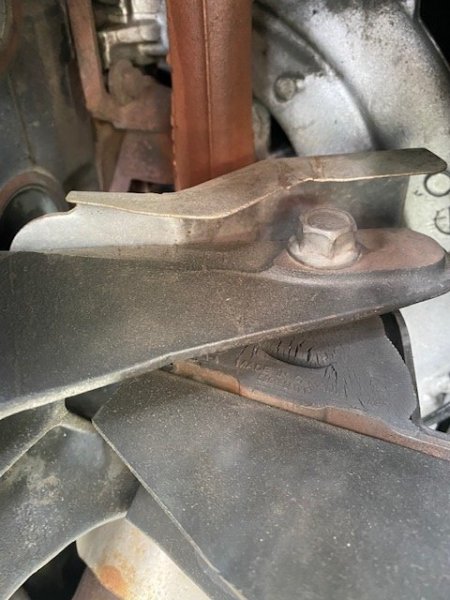
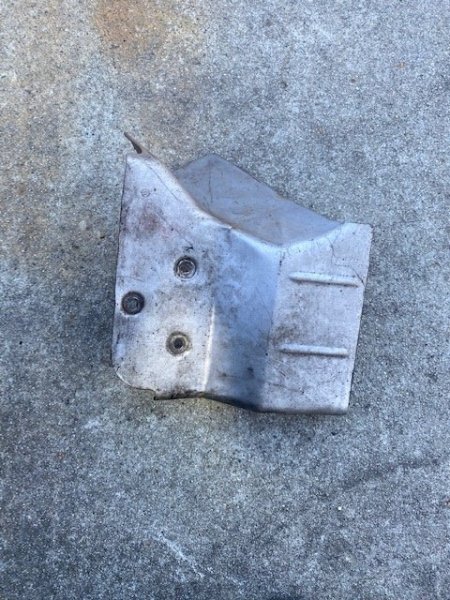
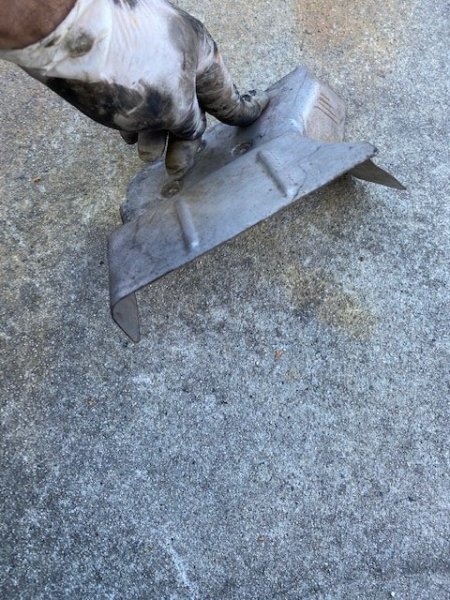
The heat shield is riveted to the engine mount that attaches to the engine block. -
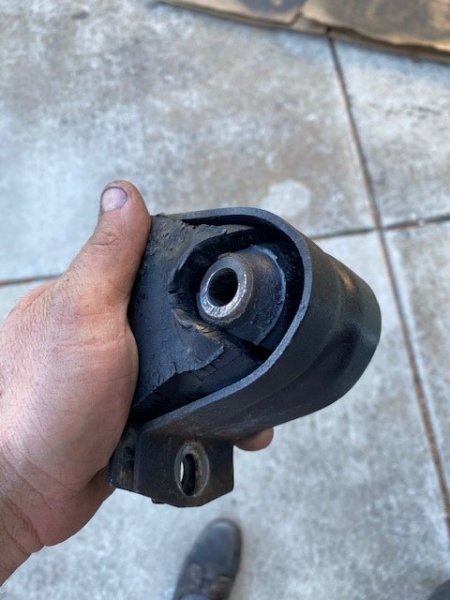
My eldest will be driving soon so I found her a low mileage (160K) 98 XJ I’ve been fixing up over the past month. She had no choice, was getting a Jeep. Like all the MJs / XJs I’ve had the drivers side motor mount needs replacing. At least on my Jeeps that’s the side that shows wear — passenger side like new. I assume the heat from the header is a cause of its shortened life span. Then I remembered I’ve never changed the motor mounts on my 01 XJ with over 500k (daily driver, had it since new)...so I popped the hood and found a heat shield on the drivers side motor mount that specifically protects it from the headers heat. Guessing since the header on the 00/01 XJ is cast it gets it hotter than the aluminum of the past. Also, I’m a California emissions truck so that means I have dual cats high up on the header also. Not sure if other state emissions vehicles have the same. Snapped a pic from the underside of the Jeep up at the underside of the engine. You can see the shield. Then I ran out to a local yard that had an 00 XJ available... and I cut the three rivets that hold the headshield on off and am going to put it on the 98 XJ which will be getting new driver and passenger motor mounts to see how it does... Sure I have to wait about 150K (15-20 years), but looking forward to the results.
-
15k for a hole in the block?
Gjeep replied to Torq_Shep's topic in Craigslist/eBay... i.e. Not Your Stuff
And the engine blew at 30-40 mph... -
Sorry for the missed question @fiatslug87 ... I painted two hoods -- Will run the solid hood assuming the Stroker stays cool (which it seems to) and the hood with holes was painted in case I end up needing to run the Mustang vents. Matching silver metallic isn't easy, so I decided to do it while I had all the same batch of paint. Update -- Finally getting back to the MJ after a couple months – I needed to finish up some home projects at the start of the new year so I could focus on the MJ for a good long while. Even though I masked like crazy, I still managed to get a few spots of overspray underside rocker/ floorboard area and a couple other small spots. While I had the satin black out, I like to black-out the recessed area of the taillight and tailgate handle. I know it’s something never seen, but it makes those areas look finished and matches the underbelly of the bed/ rest of the chassis. Interior sound-deadening is next and then on to exterior re-assembly.
-
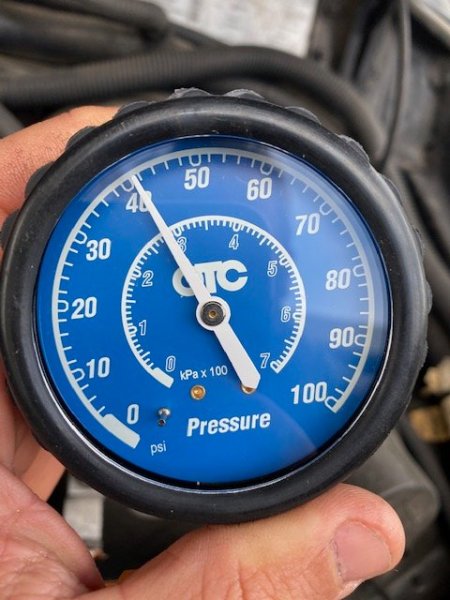
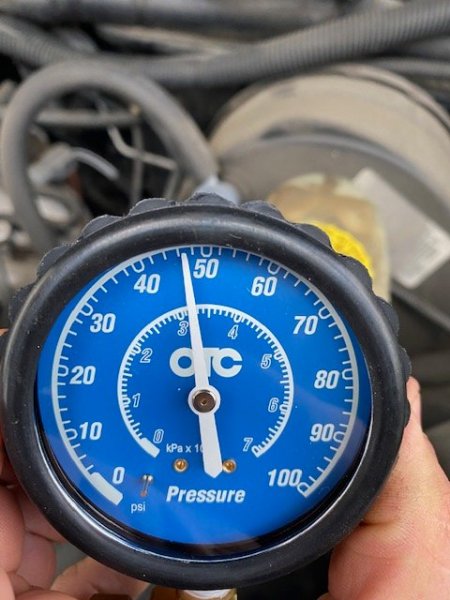
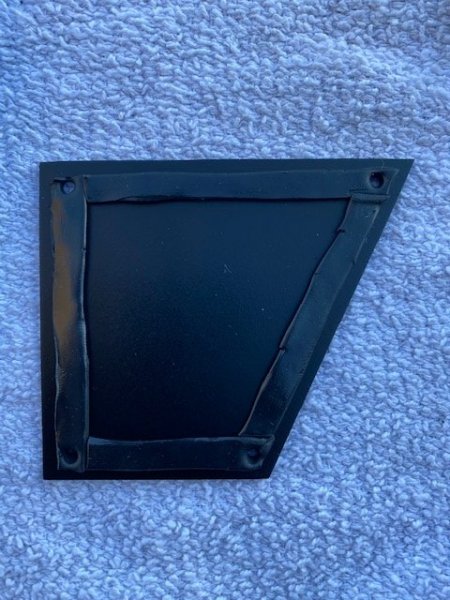
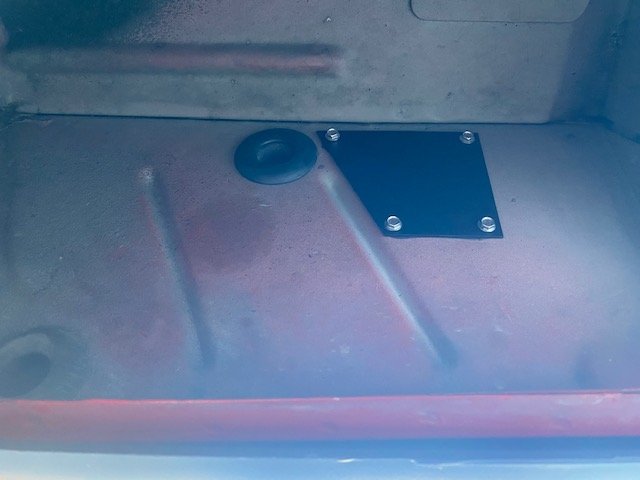
Swapped the pump/ sender in the tank which got my 49lbs at the fuel rail back and miraculously found a damaged pin on injector# 4 not allowing full contact with injector side so added to the horrible idle/ CEL. Life is good with the XJ finally.
-
Success!! Figured out the idle issue/ CEL... It was a combination of things. 4-5 lbs lacking in fuel pressure (causing the initial cylinder 5 & 6 misfire issue)... Replaced sender/ pump in tank with new Bosch -- now proper fuel pressure (but sender isn't sending... doesn't read anything on gauge -- need to swap to yet another new unit). Also found a damaged fuel injector female connector. It was only touching on 2 of the 4 sides. Bent it back into shape and drove the Jeep hard. No issues. Runs as it should. I'll be replacing that bent fuel injector connector with a new one and once again will be dropping the tank to replace the POS pump assembly tomorrow morning.
-
The filter, regulator, sender/ pump is all together...in the tank for it. Going to bite the bullet this weekend. Thanks
-
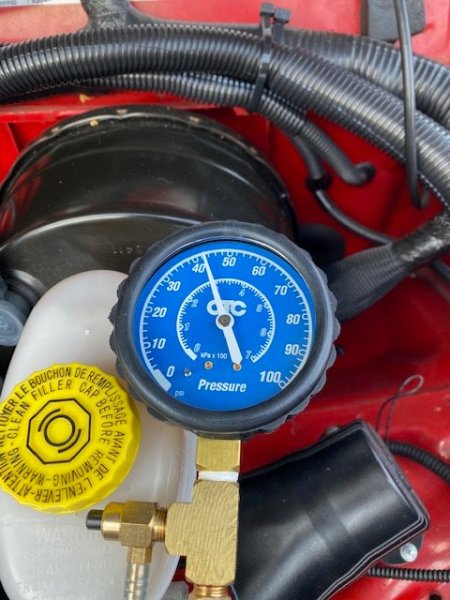
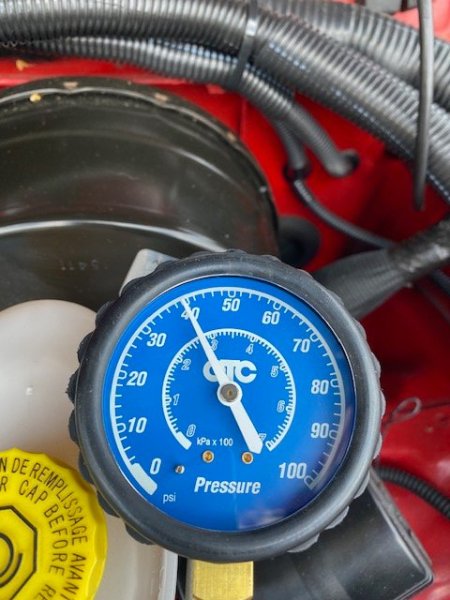
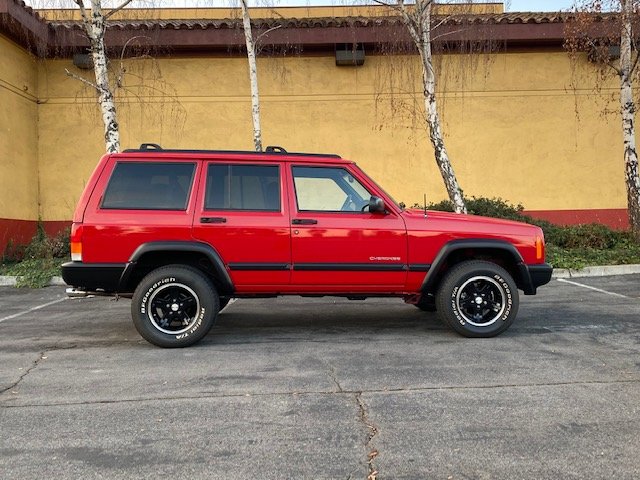
This is probably a no-brainer, but I want to confirm with those of you who have experience with 97+ XJ's 4.0L's. As posted in my 'other projects' page, my '97 has been having idle, acceleration, bogging issues. Runs rough and doesn't move as quickly as XJ's typically do. Just to cover the everything -- this is a low 37K 4.0L, AW4, 2WD. One owner, super clean. I installed a Borla header, magnaflow CA appropriate cat, and Borla cat-back exhaust. U-shape intake manifold, all new sensors (read every single under the hood sensor), new Champion spark plugs, Bosch 12-hole injectors, K&N intake, waterpump, thermostat, belt...and new Bosch fuel pump/ sender I got off ebay that was new. I've only recently driven the car, but has idled crappy since I've upgraded things which is frustrating. Project took some time and basically sat for over a year... fuel went bad, and caused issues with the first set of 12-holes, but I've replaced them since and drained all the old fuel. At first the CEL had 105 (MAP) and 5 and 6 cylinder misfire. I had what I thought was a Mopar idle speed controller I purchased off ebay in Mopar box but upon closer inspection was a knock off. Replaced that with a true Mopar one and the former CEL codes went away. Once I replaced the injectors, fuel and sensors, if I don't push the jeep (meaning barely touch the gas pedal) it runs more or less ok with only an occasional CEL (now that either doesn't have a code or will register as a 104 (MAF) which doesn't make sense because the 4.0L doesn't have one). However, the second I mash the pedal...instant no power/ choking. Really feels like it not getting fuel. So I attached a fuel rail gauge to my '97 XJ and '01 XJ which is identically equipped except for 4-hole injectors and a coil-pack vs distributor. I’ve been hoping like hell it is/ was something else because dropping the hitch, fuel tank and all the other $h!t isn’t fun. I took 3 reads on the 97 XJ. About at 42 lbs to start at prime every time and after 25 mins pressure dropped to 40 lbs. I took 3 reads on my 01 XJ and it had about 48lbs and 40lbs after the same 25 mins. This pump has around 275k on it since it was replaced with another Bosch way back when. These truck are supposed to be at 49lbs plus or minus a couple pounds. What experience have those with this year XJ had with problems similar to mine. Looking for feedback. Pretty clear I needed to drop the tank but want to make sure I didn't overlook something simple. Thanks!
-
Hell no. They'll be getting the 01 XJ or an MJ... Sold my SnugTop camper shell to a local guy with a 130K renix era MJ Eliminator 5-speed 2WD. Really clean. He's in the army and it's looking like in the upcoming year he'll be going overseas and will need to sell the Jeep. Wants to sell it to Jeeper as he bought it from the original owner. Good chance the daughter will be getting that.
-
Drive it a couple times a week. My 01 XJ is the daily driver.
-
Just about done with the '97 XJ... Only thing I'm waiting on is the recovered sun visors. I have an annoying CEL/ rough running issue I've been battling on and off. I need to test the fuel rail pressure because my gut feeling at this point after testing that's got to be the FPR in the flipping tank not functioning properly despite being a new Bosch unit. There are times it seems like its starving for fuel when I hit the accelerator. Easy driving most of the time no issue. When I get on it...CEL and stumbles all over the place.
-
Looks good, but I agree seems too high in the back. Either lift the front 3” or swap shackles to bring the rear down a little.
-
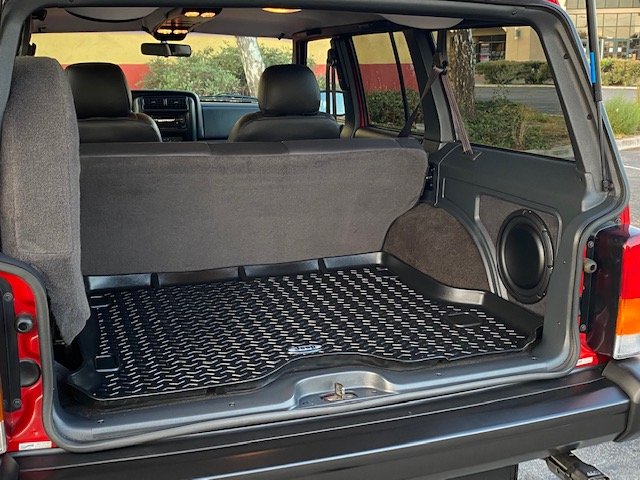
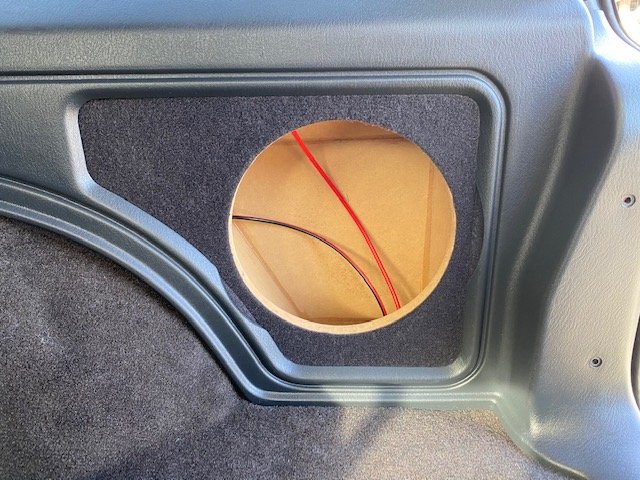
Final touches to the subwoofer install... Once I got the box in and all the interior panels installed, of course first pass at listening to the sub and nada. At first I thought the woofer may have been bad so I tried another sub I had laying around. Still nada. I had a feeling under side of the sub box one of the wires must have come loose from the spring tension connector...Thanks to peek inside space through the lower mounting point of the passenger taillight (removed rubber grommet) I could see in fact BOTH wires came out. I wasn't going to take a part the interior and thankfully the XJ has room to cut back side pocket of the lower quarter panel. So I drilled a 1" hole for my left fingers and a cut-out right side for the right fingers to guide the wiring. Good times. It turns out the way the sub box tension connector was set up it was near impossible NOT to release those wires when fitting the snug box into place. (don't' think flipping it would have helped either -- cutting a notch at the 1/4" raised seam where the cargo floorpan meets the quarter panel sheet metal would have though.) Any way, cut a sheet metal patch, a bit of butyl tape and stainless steel self-tappers and life is good again. Also took some time to cut away the under hood insulation area where the K&N intake setup was rubbing against and leaving a mark. I'm guessing majority of XJ's don't have that insulation, so that reduced height wasn't taken into consideration.
-
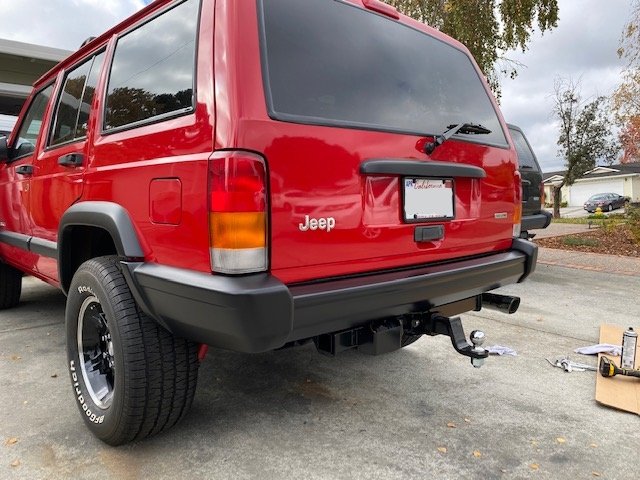
Getting down to it -- rear bumper is on and center dash stack in place. Couple more to-do's and the XJ will be good to go!
-
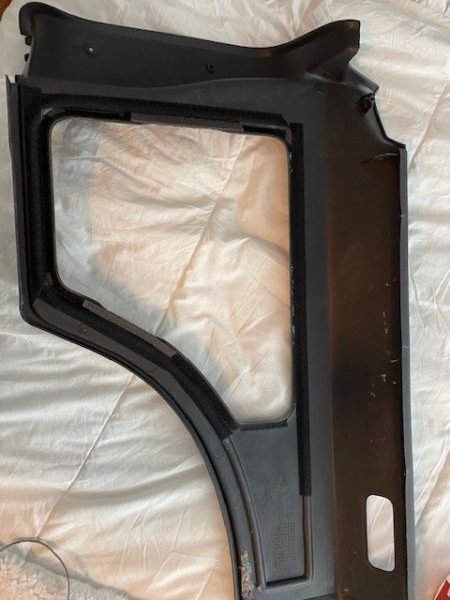
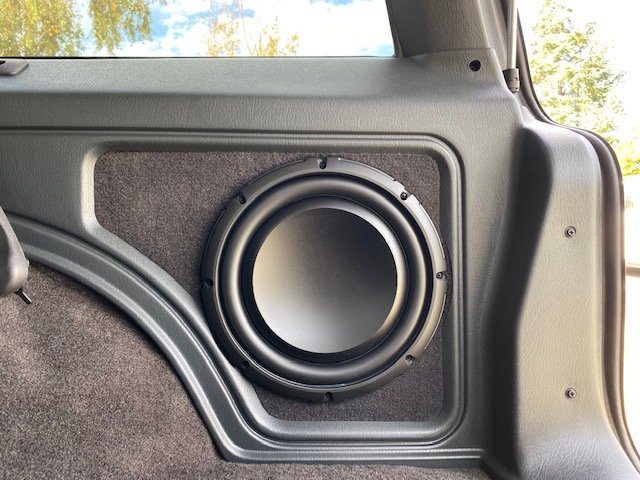
It's amazing how long things take when you obsess. Finally got the sub setup in place...After carving up the interior panel for fitment, I noticed there was close to 1/2" inch open space that wouldn't look good even with the woofer installed, so I laid down lots of carefully placed rough side velcro I cut strips of the factory agate scraps and placed them fuzzy side up out over the gaps. The rest of the velcro was put in place to stick to the sub box so when the interior panel was re-installed. I wanted the fit to be tight against the enclosure. Finished pics of final installation. Some miscellaneous interior trim still to install, but just about buttoned up.
-
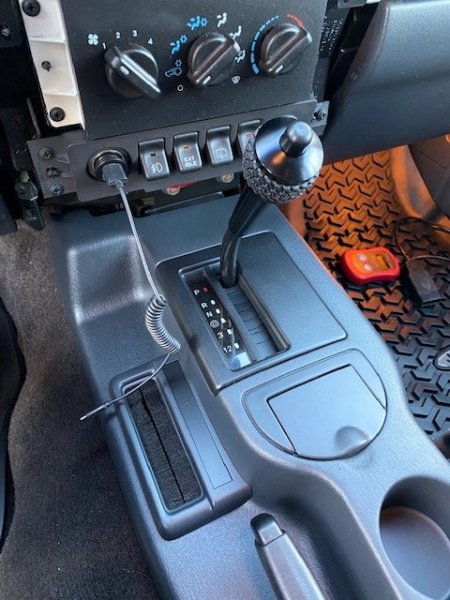
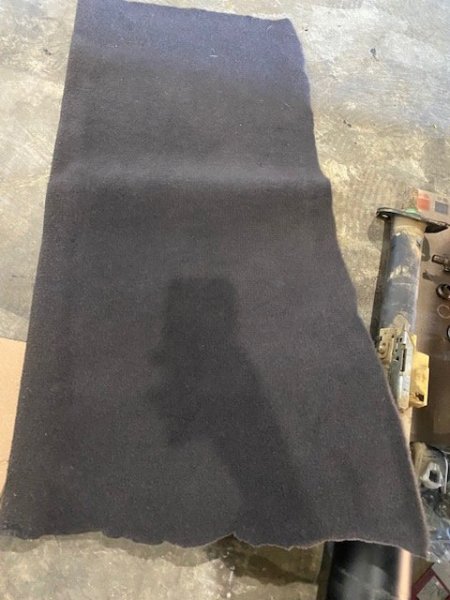
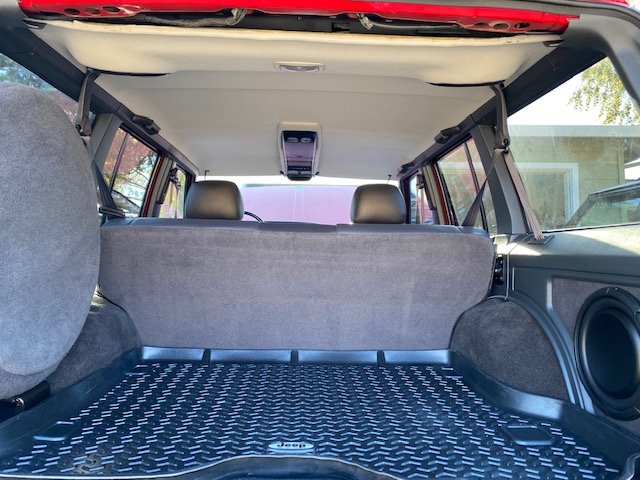
Still chipping away at the XJ -- I went with a TJ aftermarket shifter for the AW4. Also put the Jeep agate carpet surface on the sub box so all matches and refinished the quarter panel interior trim that surrounds the box... The hope is I get this corner of the interior finished this weekend.