


gogmorgo
-
Posts
5984 -
Joined
-
Last visited
-
Days Won
4
Content Type
Profiles
Forums
Gallery
Everything posted by gogmorgo
-
Sway Bar or No Sway Bar?
gogmorgo replied to Bomberjeep's topic in MJ Tech: Modification and Repairs
I don’t know that that’s necessarily the absolute best source of info on the swap, but yes. The answer is they do bolt in. There’s a few different sizes so in order to make sure you’re actually getting an upgrade, measure it first to make sure the one you’re getting is actually a larger diameter. Calipers are the best way to measure. And also, given the sway bar is a torsion spring, they do wear out with use. If you’ve got options don’t go for the bar in a vehicle that looks like it’s been driven hard, try for lower miles if you can see the odometer reading. To do the swap properly you also need the bushings holding the bar to the frame. They may or may not be in serviceable condition. If not they can be had new fairly cheaply. The metal brackets should be the same size but may as well grab those as well if you’re taking the bushings. You only need the ZJ end links if yours aren’t worth reusing, they’re the same size. Honestly for what they cost new I wouldn’t even bother with them. If you’re grabbing from a junkyard anywhere they use road salt you’ll likely snap the tops of the end links off when you try to undo the nut anyhow, and unless they’re brand spanking new they’re probably seized to the lower bolt as well. Also, don’t bother trying to turn the torx head on the lower bolt, it’s pressed into the bracket so just treat it like a nut on a stud unless it starts spinning on you. -
Sway Bar or No Sway Bar?
gogmorgo replied to Bomberjeep's topic in MJ Tech: Modification and Repairs
New links are cheap. You can buy the bushing kit as well if you really want, but best to take the sway bar end of the links off first just to make sure they’ll come apart without breaking the link off. -
Canadian daytime running lights questions
gogmorgo replied to GirsMJ86's topic in MJ Tech: Modification and Repairs
Shouldn’t be too difficult to find junk DRL modules to pirate for a connector, but that’s a messy way to do it. I can go check the park brake wiring tomorrow. Not too sure where it taps into the circuit either. My understanding was the switch just connected to ground to turn the lightbulb on, but it might be grounding through the DRL module. I wouldn’t really think you’d need it though, other than slightly less draw with the key on I don’t know what the real advantage is to shutting off the DRL when the park brake is set. But GM vehicles from the early Oughts also shut the automatic headlights off with the park brake set so it’s definitely a thing. If I were doing it on an MJ I’d use a relay switched by key hot to turn on the parking light circuits. My Lada with DRL added at the port uses two relays to turn on some function of the headlights (not sure if high or low but it’s dimmer than low beams) and the park/marker lights. Headlights shut off with handbrake but markers stay on. I’ve also had to mess with early DRLs on some medium duty trucks that just use relays. I think it was a ‘91 International that used a pair of relays to run the high beams in series. Took me a little bit to figure that one out. -
Intermittent wiper module repaired
gogmorgo replied to The86manche's topic in MJ Tech: Modification and Repairs
I’ve mostly done it on clusters, yeah, and typically only on ‘90’s era stuff. Something about larger components hung off a vertical board, don’t seem to like bouncing around. Could likely make a modern wiper module happen easily enough with arduino or raspberry pi, or whatever is being used today. It’s what we used back in the day for our cluster and shift control on our FSAE cars, although that was ten years ago. But it’s not exactly a cost effective production solution. -
Canadian daytime running lights questions
gogmorgo replied to GirsMJ86's topic in MJ Tech: Modification and Repairs
Yeah it’s definitely a weird one. The four outer pins are bigger than the inner six. I don’t even know what to call it. Cursory searches didn’t even turn up the harness side of it. -
Intermittent wiper module repaired
gogmorgo replied to The86manche's topic in MJ Tech: Modification and Repairs
Nice. I’ve found a few cuircuit boards that failed due to cracked solder joints, and the fix is as simple as poking the crack with a soldering iron to reflow. It’s nice saving an original component and sometimes a few hundred dollars. -
Sway bar end link too close to coil spring
gogmorgo replied to Duncan Moody's topic in MJ Tech: Modification and Repairs
X2 on making sure your control arms are set up correctly. I also had my sway bar contacting my spring with all stock components, but not too severely, just the occasional twong if I hit a big enough bump while going around a tight enough corner at certain speeds. My issue was the sway bar was bent. My guess is someone used it as a recovery point at some point. I noticed this while upgrading to a 28mm ZJ sway bar, that the ZJ bar was straight between the bushings, but mine had a curve to it. Didn’t have it contact after that. Failing everything else you can buy sway bar relocation brackets, or build them yourself, to move the sway bar away from the axle. It’s similar in concept to what you already have, but the holes for the sway bar are offset horizontally more than they are vertically. Often they’re a solid block rather than C-channel, with the frame bolts countersunk and the bracket holes tapped. Just a couple examples pulled from Google. As a P/S, if you’re uploading from an iPhone and you notice your pics are upside down, edit the picture and rotate it four times, so it ends up back the way it was and save it, then reupload. Something about how iOS records the orientation doesn’t agree with the forum every time, but they always work out after spinning them around.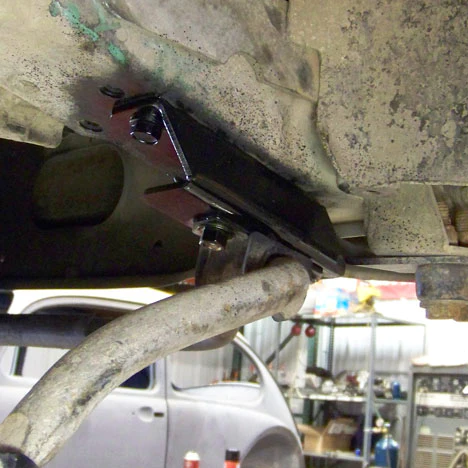
-
Canadian daytime running lights questions
gogmorgo replied to GirsMJ86's topic in MJ Tech: Modification and Repairs
I was thinking of a T at the DRL module more than at the header panel connector. The standard relay harness taps into the factory wiring essentially just by pushing spade connectors into the factory headlight sockets. The commercial relay harnesses go so far as to having a male H4 bulb connector to push into it. Having a T at the header panel 10-pin connector would eliminate needing to source new headlight sockets, but those are cheap and easy to come by, I haven’t dug too deep into new header panel connectors. There’s lots of used connectors out there but not all of them are exactly in reusable condition. The other disadvantage to running stock header harness is the headlight wires aren’t up to the task for higher wattage bulbs. It’s less of a concern with everyone running LEDs, although some of the higher intensity LEDs still pull some heavy wattage. -
Canadian daytime running lights questions
gogmorgo replied to GirsMJ86's topic in MJ Tech: Modification and Repairs
The reduced voltage at the high beams does turn off when you turn on the headlights, either high or low beam. You don’t want both filaments on at the same time. It should shut off the 5V to the high beams when you put power to the module’s low beam wire, although I don’t remember Something that has been run into when installing a relay harness in conjunction with DRL is that while the 5V isn’t typically going to be enough to pull in a relay and turn on full bright high beams, depending on the relay it may make it buzz, but more of a problem is it’s almost always enough to keep the relay held in, which leads to situations where your high beams may not turn off. It should require an up up down down left right left right b a sort of sequence to make it happen, like maybe switching the headlights off while the high beams are selected, which most people wouldn’t do. But it’s still a thing. When I was testing things for the DRL-friendly relay harness I confirmed that the collection of relays I had kicking around all stayed triggered until I dropped voltage down to under 2V. Also, around the time I put the relay harness into my long bed I also unplugged the DRL module... although that was so long ago now I don’t really remember why. But good news is the workaround is simple. You just snip the high beam wire coming off the module (pin 5) and connect it back up to the high beam circuit downstream of the relay. I’d also run the low beam wire (pin 10) down to the low beam circuit the same way. It’s not really necessary on a factory DRL vehicle, but if you need to find somewhere to hook it up anyhow, might as well run it alongside the high beam wire. Doing the high beam like this would also mean you wouldn’t need to tap into the high beam indicator circuit anywhere, but still retain the high beam indicator’s proper function. It won’t backfeed power from the load to switch side of the high beam relay, so your indicator won’t ever see the 5V from the module. This simple workaround is what I was trying to avoid with my DRL-friendly relay harness, cutting into the factory wiring. And now I’m wondering if it’s possible to find male and female DRL module connectors to make a T harness like we do for trailer wiring… because I’m an idiot. -
Canadian daytime running lights questions
gogmorgo replied to GirsMJ86's topic in MJ Tech: Modification and Repairs
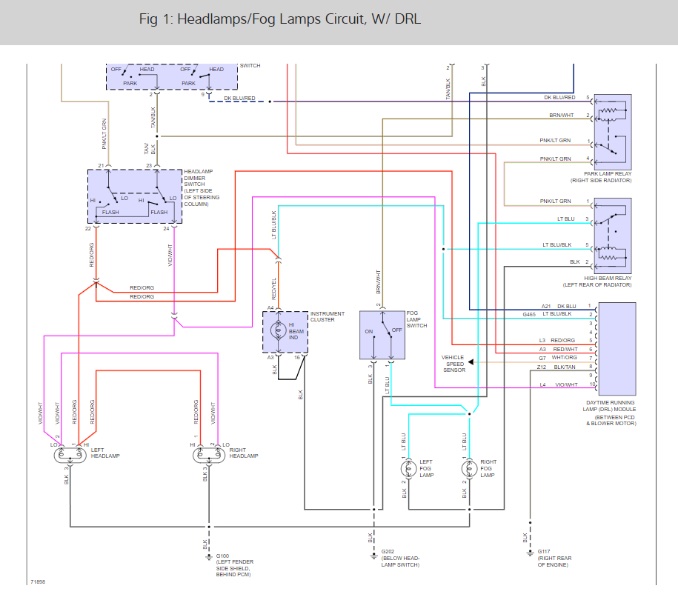
I went out and had a look at my '91 with manual trans, and confirmed the colours are the same as my diagram. I'll need to draw this up better later, but for whatever reason the numbering scheme from my diagram looking into the harness side connector (latch tab up) is: 1 2 3 4 5 10 9 8 7 6 which seems to me like the wrong way to number your connector pins, but the colours match ¯\_(ツ)_/¯ So with your connector first/then my connector, under that silly numbering scheme with the same pin positions 1 - Yel - RUN / DK BLU, RUN 2 - blk/lt blu - high beam indicator / LT BLU/BLK high beam indicator 3 - pink/org - park brake switch / vacant 4 - blk - ground / vacant 5 - white - high beam / RED/ORG high beam circuit 6 - Red - constant hot / RED/WHT constant hot 7 - vacant / WHT/ORG VSS 8 - Black - ground / BLK/TAN ground 9 - Black - ground / vacant 10 - Green - High beam / VIO/WHT low beam circuit Other than pin 10, which you say is a second connection to the high beam circuit (makes me suspicious) this is the same pinout, with our vacant pins overlapping the other's missing features. Looks like mine's triggered by the VSS, yours seems to be triggered by releasing the parking brake. Seeing as the park brake indicator comes on by connecting the indicator to ground, it looks like your module would be in series with that, and pin 4 would be an additional ground for completing that circuit. I'll admit to not looking super hard but I still haven't found another part number for a '90- module other than 5600 4262, which is the same number through to '06 in the TJ, and I've found references to it going as far back as '87. But most are listing for '90-06 and nothing at all for '89, which I guess is consistent with them being mandated on vehicles built after Dec 1, 1989 as actually being for the '90 model year, not '89 I've confirmed through testing that my DRL module sends 5V to the high beam filaments. I'm planning on visiting where the other MJ with auto trans is parked this weekend. If it's not still buried in snow I might try to see if it does anything different with the DRL. Although I don't know that the headlights are currently hooked up... interrupting projects and then not getting back to them for, going on five years now. Not the best time. -
Canadian daytime running lights questions
gogmorgo replied to GirsMJ86's topic in MJ Tech: Modification and Repairs
Wow. You were really digging there for a 15 year old thread. I dug these up somewhere during my quest to create a DRL-friendly relay harness that went nowhere. I can't make promises on wire colours because I was looking for a '91 (memory says that's not actually a '91 diagram but I don't recall which year it is) but the XJ DRL module is supposedly the same from '89 to '01 so that should still give you some hint at where everything is supposed to go. Because quality isn't great after the upload, the DRL module is the bottom right. The numbered pins on it are as follows: 1 DK BLU, goes to run position on ignition switch 2 LT BLU/BLK high beam indicator 3 vacant 4 vacant 5 RED/ORG connects to high beam circuit (between dimmer switch and bulb) 6 RED/WHT constant hot (looks like it connects within the fuse panel to the power that goes to the headlight switch?) 7 WHT/ORG vehicle speed sensor. 8 BLK/TAN ground 9 vacant 10 VIO/WHT low beam circuit (between dimmer switch and bulbs) Unfortunately your wires on that connector don't agree with my diagram. I was sorta thinking the automatic trans turned on the DRLs either as soon as you hit the key or when you put it in drive, but I can't remember and my automatic MJ is not in a place I can confirm operation. The manual trans definitely doesn't turn them on until you're rolling, hence the VSS connection. The diagrams I was looking up would've been for a manual trans I think, but until a few moments ago I was assuming they operated the same way. Once it's light out tomorrow I can go have a gander at the module on my '91, see what the connector on it looks like. Editing to add that it just occurred to me the Renix uses a cable driven speedometer so doesn't have a VSS. Might be one more explanation as to what the wiring differences are. It's possible provisions for both were built into the module... that or the aftermarket lookups I've been using for the '89-01 thing are simply wrong.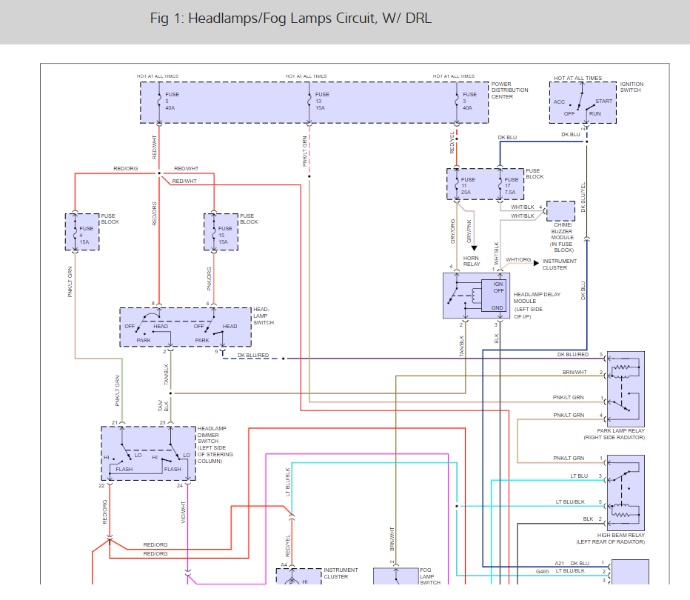
-
Leaf spring shackles flipping forward
gogmorgo replied to CO MJ's topic in MJ Tech: Modification and Repairs
This seems like an incorrect solution to springs that were supposed to bolt on. -
Hopefully releaving soon. Winter’s feeling pretty long this year.

-
X2 on what Cruiser said. Make sure your brakes are working properly at the wheel end before getting fancy. It also sounds to me like there’s nothing urgently wrong with the booster. I try to change all the pads and rotors (or shoes and drums) soon after a new purchase, even if they seem alright. Mostly this is so I know I have reasonable quality parts on the thing but also because it gives me the opportunity to make sure everything’s working. But even if everything is working, drum brakes are never adjusted properly. You have to stop in reverse to work the adjusters, but no one ever drives fast enough or stops hard enough in reverse for them to adjust. Easiest way to adjust them if you’ve got an empty parking lot or somewhere to do it safely is to get up to 15mph or so in reverse and stop firmly. Repeat a few times. If nothing changes you’re going to need to either crawl under and adjust them manually or else pop the drums off to make sure everything is kosher. Something that isn’t specifically unique to the MJ but isn’t super common in the automotive world and does cause confusion is the rear load sensing proportioning valve. From the factory you’ve got a valve in the brake system that increases rear braking as the rear suspension squats, basically as you add weight. It sits on the driver’s side of the rear diff, there’s a flat bar on the valve with a rod that extends down to the diff, ball and socket at each end. The bar should sit just above horizontal, and the rod should be vertical. It’s common for the rod to go missing or for the two to get flipped so the bar is pointing down and the rod is at an angle. You should be able to pop the rod off one of the sockets to put them back, or tie the rod up in roughly the 2-o’clock position. If the truck is lifted, the rod should be extended accordingly. At any rate, if the bar is sitting anywhere below horizontal your brakes will not feel adequate. Something else kinda unique is there’s a bypass line for this valve, that’s supposed to send full brake pressure to the rear brakes if there’s a failure in the front brake circuit. It dictates an extra step in the brake bleeding procedure. You open the bleed screw on one of the front calipers to simulate a front brake failure, and leave it open while you bleed the rear brakes. Then you close the front bleeder and bleed the brakes as you normally would, by bleeding the rear brakes a second time, and then bleeding the fronts. One you’ve got the basics worked out, then we can move on to things like master cylinder and booster.
-
Leaf spring shackles flipping forward
gogmorgo replied to CO MJ's topic in MJ Tech: Modification and Repairs
Reversed springs could put the axle in the wrong place, but it wouldn’t make the overall length of the spring too short. -
Leaf spring shackles flipping forward
gogmorgo replied to CO MJ's topic in MJ Tech: Modification and Repairs
Just a tip, if you’re uploading from an iPhone and your pictures upload upside down, edit the pic from your phone and rotate it a full 360°. Fixes the issue. You need to be beyond perpendicular. Otherwise the weight pushing down on the spring will be forcing the arch tighter. Unless there’s enough arch that you can flatten it out and push the shackle the other way, having weight on it is only going to be detrimental. And those pictures don’t make it look promising. You’ll need to pull that shackle backwards at least two inches, so the angle between shackle and spring is less than 90°. For reference, this is how my shortbed sits, with its weight on the wheels, and this is about the lightest spec MJ you can get. Increasing weight just pushes the shackle further back. Looking at how yours is sitting I don’t know if you’re going to be able to make it work. You absolutely need your lower shackle bolt to sit further rearwards than the upper so the shackle pivots backwards as the spring flattens. Unless you can force the shackle back into that position before you put weight on it, you’re fighting against yourself. And it kinda looks to me like there’s not enough arch in that spring to flatten it out enough to gain two inches.
-
Leaf spring shackles flipping forward
gogmorgo replied to CO MJ's topic in MJ Tech: Modification and Repairs
The issue with the “run until it flattens out” suggestion is that in order for that to happen it has to swing the shackle down before it’ll move back. But the weight on the spring is going to push the shackle up, which is also forward, which moves the leaf spring eyes closer together, exacerbating the issue. If you can droop the axle down far enough, you might be able to hook a ratchet strap between shackle and rear bumper or hitch or something to pull them past centre so they sit properly (swung back) when you get the weight back on the springs. But no guarantees that’ll be a permanent solution, they’re likely to spring back forwards if you hit a big enough bump while driving. -
Leaf spring shackles flipping forward
gogmorgo replied to CO MJ's topic in MJ Tech: Modification and Repairs
After running for six months you’re unlikely to get anything out of Rustys without involving legal action but it’s still worth trying I guess. Returning as defective would’ve been the thing to do but if that wasn’t going to happen that’s that I guess. If you’ve got a local spring/suspension shop around you might try talking to them. They can re-arch springs so in theory they can also be de-arched, although you would lose lift height. They might have some other solution to correct it as well, worse comes to worst they can probably replace the main leaf with a longer one. Otherwise I think you’re looking at redrilling for a different mounting point either front or rear and I think that’s the wrong decision. -
Fuel gauge
gogmorgo replied to Dickinson County Comanche's topic in MJ Tech: Modification and Repairs
I would start by visiting cruiser54.com and do the connector and ground refreshing associated with the fuel pump. But I suspect the sending unit has some sort of issue. There’s a replacement available from MTS. -
If you want a spare, pop the old one apart and clean it out. There’s some screws around the outside edges, pull them and it should split in half. Get all the junk out of it, clean any corrosion off the copper bits, and get a healthy coating of dielectric grease all over everything. There’s a gasket/o-ring around the outer edge, but I ran some RTV around it as well, just make sure not to grease the sealing surfaces. That’s all I did to mine maybe eight years ago and I haven’t had an issue with it since.
-
86 2.5 Heated Intake
gogmorgo replied to TheDirtyJeep401's topic in MJ Tech: Modification and Repairs
Yeah that. Is it not for heating intake air? -
I also typically go through a work wholesaler then mount and balance myself. Generally slightly better even than online, shipping costs less because they’re not shipping an individual set out. Honestly $905 mounted and balanced doesn’t sound that bad. $400 for tires, $200 mount and balance plus whatever shipping ends up as, we’ll say $700 all in buying them online. Sure, you’ll save $200, but if anything happens to the tires you’re on your own trying to track down warranty and paying to get the replacement mounted, vs the local shop that sold them to you probably wanting to make things right for you and taking care of everything. Again, it definitely is less headache on your part to just get whoever is doing the work on your ride to source the parts, because then they’re doing the legwork if something happens, and they’re installing parts they think will last. And also it’s one thing to save $200 on the same tires, but if the tires the shop wants to sell are better quality than the $94 tires, that’s also a factor. You’ve only got four bitty little patches of rubber holding you on the road. Cheap tires aren’t just magical less expensive tires that perform exactly the same, and if that extra traction from the better tires ever becomes necessary, the consequences of not having the better tires are likely going to be higher than the cost savings buying cheap tires. That’s not to say that paying more for the exact same product is going to do you any better, but… https://en.wikipedia.org/wiki/Boots_theory
-
Gonna need more info to be helpful, but here’s a couple threads about horn buttons. Basic function is the horn button grounds the switch circuit for a relay that sends power to the horn(s). If you can hear the relay click when you push the horn button, check for power at the horn (located behind the bumper, ahead of the driver’s side wheel, snail looking thing easily viewed from below, with an optional second horn on the opposite corner). It’s not uncommon for horns to get full of crap/water and quit working. You can also test the horn by jumping power to the connector on it. The factory horns ground through the mount so if you unbolt the horn for testing you’ll also need to ground the horn mount to your power source. If you can’t hear the relay click when you push the horn button, it’s possible the relay is bad or there’s an issue with the button or wiring in the steering column. There’s two styles of horn button, one for two spoke steering wheels and one for three spoke. They function more or less the same way but the steering column parts are different between the two. Just something to be aware of. All the rest of the wiring should be the same.
-
86 2.5 Heated Intake
gogmorgo replied to TheDirtyJeep401's topic in MJ Tech: Modification and Repairs
Is that not what the little dryer duct thing coming off the exhaust manifold was supposed to be for even though none of them were ever hooked up? -
Anywhere that experiences vibrations can jiggle the float around enough to cause this, leaving it with the fuel turned on while it’s riding around in the back of the truck. I wouldn’t be too concerned about ethanol in the gas. Some of us have been running ethanol fuels for decades and it doesn’t do this. It does allow for some water entrainment which can cause corrosion if you leave it sitting, but in some climates having the water stay in the fuel instead of separating out (and freezing) is a good thing. The biggest issue I’ve seen with generators is the tank is always full of nasty ancient gas. Seems like when the power goes out, most people top off the tank from the gas can they haven’t filled since the previous summer, then run it for a couple hours until the power comes back on. Then it sits for a month until it happens again, and they top off from the same can of old gas as last time. My recommendation is to drain the fuel tank during your seasonal maintenance session, refill partway with fresh gas, maybe with a little seafoam or otherwise mixed in. And make sure you’re swapping the spare gas out, try for monthly. Dump it in a truck or something and refill the can.