

mpace6a
-
Posts
806 -
Joined
-
Last visited
Content Type
Profiles
Forums
Gallery
Everything posted by mpace6a
-
IF you can do fiberglass, check out iceland offroad's bumpers. Theyre pretty cool, strong recovery pionts and a winch plate, but the "body" of the bumper is 1/4" fiberglass. Lightweight and still extremely strong.
-
 Itd be easier just to give me the rampage ;)
 -
Ill take it...looks like a good candidate to begin an Armored Urban Assault MJ.
-
:yeah that: Then i could finally get around to swapping out my 2.8 for a 360....or a diesel should i decide to get ballsy with it....
-
It does, thanks! I'm really looking for something more permanent than herculiner...monstaliner so far sounds like the best bet from what i've read here and elsewhere...thanks all for the advice!
-
Jeeps official facebook posted this about 2 hours ago...sounds like a load of $#!& if you ask me, they even say that the jeeps are among the safest in their classes. http://www.chryslergroupllc.com/Investor/PressReleases/ChryslerDocuments/Chrysler%20Group%20and%20NHTSA%20Resolve%20Recall%20Request.pdf?ism=RGJun1813Facebook7
-
x2 whatever you choose, definitely don't get it on your hootus. little brother got some chassis saver on his hands, and a smear on his arm...was there for almost two months! NOTHING would take it off but time!
-
Awesome, thanks for the info. Seems like everythings in the prep work, do you think sandblasting the bed/rockers would be adequate, or should i go a step furthar and get an acid metal etcher as well? Chassis saver (the rust inhibitor i used on my floors) recommends using it, but i think it may be overkill after a heavy grit blast?
-
Planning on picking up a gallon of herculiner soon with a buddy, to do the rockers on my mj and his zj. Just wondering how satisfied the guys who have done it before are, and if they would recommend it or give any tips. Also, alot of guys i work with recommend bedlining the toes of work boots, to make them last longer. My previous pair lasted about 3 months before the toe was completely gone (I work in a structural steel shop, btw), and was wondering if anyone else had done that before with herculiner? Tried it on my old boots with the duplicolor bed armor, which is pretty crappy as a bedliner, but great for bumpers and such, and just didnt like it, looked more like paint than anything on boots. Hoping it will make my new pair last a bit longer.
-
Best Way To Replace Floor Pans
mpace6a replied to ComancheJon's topic in MJ Tech: Modification and Repairs
Aside from the cost, how did they fit? interested as well. ive heard they don't fit perfect, but work well? -
There was a thread on here for the double wide jk a while back....
-
PM on the way :thumbsup:
-
Wife Wanted A Headboard... Six Years Ago
mpace6a replied to neohic's topic in Member Projects: Other Cool Stuff
Yeah... it works okay. Every once in a while I have to tell myself to keep the hammer strikes to one side when I notice it starting to lean. Threw some paint at it last night... update! Why not add some vertical bracing inside? Weld a plate in between the flanges, up against the web? -
Truck needs a fuel pump...just burnt up my 4th mr gasket electric pump...this one actually lasted me 5 months. Tired of dealing with crappy ones, looking at getting a holly and a fuel pressure regulator. Anyone have any experience with them?
-
My manches down for the moment...driving a 2nd gen dodge...I miss my jeep. Nothings near as fun as dd'ing a jeep!
-
Wife Wanted A Headboard... Six Years Ago
mpace6a replied to neohic's topic in Member Projects: Other Cool Stuff
Digging your anvil...I'm gonna have to snag a peice of wide flange drop from work now! -
It's kinda like the feeling you get when you remove a transmission crossmember without snapping any of the bolts. Wait...you can remove one WITHOUT breaking bolts???
-
Sounds like a carb issue to me...theres a bolt in the front of the carb that allows you to adjust how it runs, but its sealed from the factory with epoxy. You can drill out the epoxy and adjust it, theres info online about it. Takes a special tool to adjust, but it may solve your problem
-
Thanks neohic...was looking for that quote of mine :thumbsup:
-
New Guy Here Needing Some Help
mpace6a replied to Tommygun's topic in MJ Tech: Modification and Repairs
Definately! Found a guy in NE KC with a gray 88+, shortbed, 4.0, 4x4, factory swb roll bar. Trying to get ahold of him now...maybe try to acquire the truck :brows: -
New Guy Here Needing Some Help
mpace6a replied to Tommygun's topic in MJ Tech: Modification and Repairs
Pretty close to me too! Had a buddy in lee's summit with an xj i helped build. Like everyone has said, 4x4 swaps really arent too complex. Pull parts at the JY, learn what it takes, and then you can do yours right and know what your getting into. Plus, alot of us local MO guys are always willing to stop by and lend a hand :thumbsup: -
x2 Tried the ground today...still no lights. Tested lights, new switch, still nothing.
-
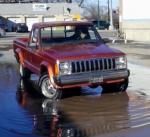
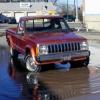
This is my current one..,.my MJ after its first off road trip. Thought it was a cool pic My favorite previous one was this J10 i found...somewhere :hmm:
-
Pics time Drilled on the pass side where i planned on putting the bolts, to stay away from tank and see how it would fit up...looked underneath, relocaked the holes to right above the frame rails. So i had 2 extra holes that needed to be dealt with...here's the solution. Plug welded them using my little 90amp flux core welder...not the prettiest, but they cleaned up nice. Work in a structural steel shop, they use ceramic strips with foil tape to back a hole theyre going to plug..flat chip off of a brick worked pretty well for me! Cleaned up the holes with the grinder...intentionally over-filled the holes, makes blending lines a bit easier. Cleaned up and primed...not perfect, but overall I'm happy with how well i was able to keep the bed rises intact. Not going to do too much more with it, bed liner (when i finally get around to it) should fill up any uneven spots nicely. Plus, its hidden by the tool box. How she looks, headache rack is painted, need to put some rubber between the racks feet and the bed rail to keep it from rubbing and promoting rust. Box is bolted in, rubber spacers underneath. Oh and the rubber I'm using is just cut sections from an old semi truck mudflap. Dad picked one up for me from one of his customers. Pretty happy with how the truck looks!
-
Ended up doing lots of measuring, marking, more measuring, and ended up with the bolts right above the frame rail. Worked out really well, drilled 2 extra holes that i plug welded and smoothed back down...pics later when i get back to my laptop