

AnotherOldJeepGuy
-
Posts
817 -
Joined
-
Last visited
Content Type
Profiles
Forums
Gallery
Everything posted by AnotherOldJeepGuy
-
 It's not obvious [to me] that there is anything special about the old nut, but it was very hard to remove and seemed to remain tight all the way until it was within a turn or two of coming off. Any nutty experts here that can say for certain just by looking if this is or is not a lock nut? And the plot thickens, I do know for a fact that the new top nuts that came with the new Mevotech links were lock nuts, the nylon insert type.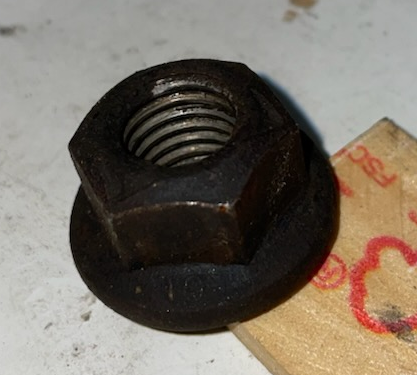
-
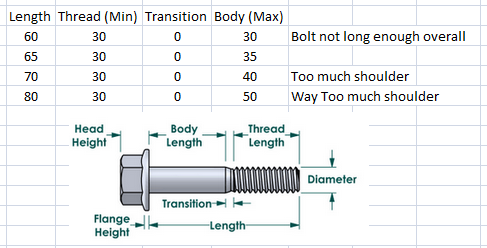
Well the more I look the farther down the rabbit hole I go! I would have never dreamed how much of a research project this would turn into for a stinkin bolt! Rabbit Hole #1 I put my digital caliper to work trying to measure how much thread I need to make sure the threaded part goes at least partially into the hole so that the nut can be tightened / torqued. It looks like any bolt with an un-threaded part (shoulder) longer than about 37mm would expose some of the shoulder, meaning you could not tighten it. The original bolt measures 70mm, but it was fully threaded so this rabbit hole doesn't come in to play for the original or any other fully threaded bolt. The full thread class 8.8 bolt I put in before knowing about this rabbit hole is 65mm long and that total length looks good, but 5mm less than that starts to look too short. Meaning I need something 65mm or longer. A bit further down the rabbit hole on bolt specs and it seems that any length from 65mm up has a MIN thread LENGTH spec of 30mm (based on Bolt Depot and Bolt Barn info), so that means the MAX length of the shoulder is [spec-ed length] - 30mm (MIN length). There is also a transition area identified between the non-threaded area and the threaded area but I don't see numbers spec-ed for that so I have to allow for that in the answer. So rabbit hole 1 of 2 concludes that the only size of a shouldered bolt that works is a 65mm. Rabbit Hole #2 The M12-1.75 bolts I see online seem to be paired with lock nuts, although the don't look like lock nuts to me because I am used to seeing a filler of some type in the nut, nylon I think, to turn the nut into a lock nut. The nut I took off had no such filling, so are there lock nuts that don't have this filling, and, do I need a lock nut?
-
Mine were also fully threaded originals but too damaged to reuse. I like your opinion that a non-threaded part inside the sleeve is less destructive. I looked at boxy jeep link but I didn't find a listing just for these bolts, but I'll try a direct contact and see what happens.
-
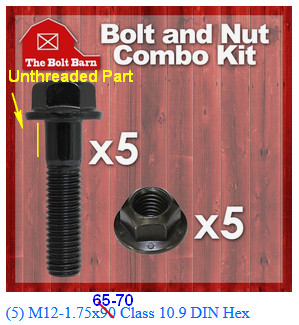
Anyone used this online bolt seller? Looks legit. I am assuming that a certain amount of unthreaded length is OK as long as it is fully inside the link body?
-
headlight switch connector
AnotherOldJeepGuy replied to ratrapp's topic in MJ Tech: Modification and Repairs
Thanks for the update. Sounds like the PITA description may be pretty accurate . Makes a successful repair all that more rewarding though! -
Headlights work on "high beam" setting only.
AnotherOldJeepGuy replied to reubj's topic in MJ Tech: Modification and Repairs
Good luck! -
Headlights work on "high beam" setting only.
AnotherOldJeepGuy replied to reubj's topic in MJ Tech: Modification and Repairs
Definitely the first test! I didn't realize the relays were socketed. -
Headlights work on "high beam" setting only.
AnotherOldJeepGuy replied to reubj's topic in MJ Tech: Modification and Repairs
If you have a volt meter you can check the voltage at the bulb connector with the bulb removed. On my harness there are blue, white and black wires at the bulb connector. The black is ground. I don't remember if white is high and blue is low, or the other way around. But with high beam selected (the setting that is working) one of these will be 12V and the other be less than 1 volt. Switch to low beam and which every was 12V at high will drop, and the other should read 12V. If you don't find 12V at the other wire when low is selected you know that the problem is in the wiring or the switch or the relay that has that same color wire. If on the other hand you do get 12V on the other color when you switch into low beam position, that would suggest the bulb itself has failed and you need a new bulb. If you are lucky that is the problem and the fix, it will take more debug to figure out if the problem is the relay or the switch or the wiring itself if it is not the bulb. -
Dealer installed AC harnesses info
AnotherOldJeepGuy replied to pizzaman09's topic in MJ Tech: Modification and Repairs
Sounds like quite a challenge, good luck! Will be interesting to see how it turns out. I may have to try my hand at tindercad... -
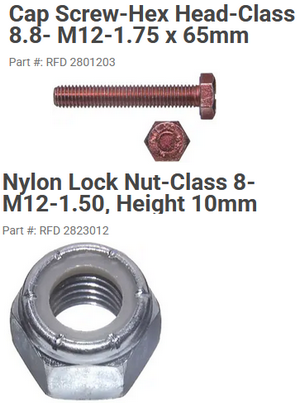
Based on the part numbers on the receipt these are what I got. It looks like the part number on the receipt is not correct for the nut because I know it was also M12-1.75 and it fit the bolt. The nut that matched the bolt, of course they only had one, that's why I went with the lock nut version because that is what they had.
-
The bolts I got were pricy Napa back room stock for what that's worth. I had already headed out to do the work before I saw this, so I'll double check for a grade. They seemed heavy duty, not the economical home depot stock. They felt as heavy as what I took out. If I can't verify a grade, I'll look for replacements that are graded and swap them in.
-
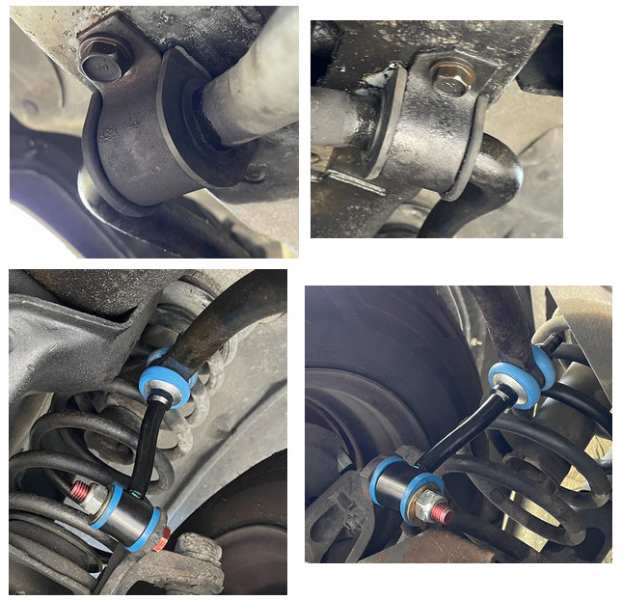
Yep, metric. The bolts holding the sway bar to the frame came out in good shape. I did work them back/forth along the way being mindful of the force and soaked them good with penetrating oil. The other two bolts fastening the link to the frame were completely trashed, as were the threads at the top of the old link, sure glad I got the suggestions to just replace these! I managed to get them out, it took breaking loose force the entire way for all 4 of them, no way I wanted to put them back in. For the ones at the bottom of the link, which did not come with the new links, I matched it up at Napa to M12-1.75 bolts. Added washers since the original nut was a nut/washer combo. The washers they had were not optimal but they will work. I managed to get get 27Ft-Lb on new link top nut, but I stopped short of 75 for the bottom link bolts, at under 50 they seemed to already be 500-lb gorilla tight so I stopped. (I never used a torque wrench from the 70s or so until a couple years ago and the target numbers always seem to take a lot more force than I am comfortable with anyway to click, so I'm calling my intuition good enough). The smaller bolts on the bottom I tightened them until the seemed plenty tight, tighter than they were when I removed them and called it good. The result seems good. Test drive good. I don't know how much effect this has on actual sway, but several of the loud "clunks" I was hearing when I went over a bump now sound like a new truck, I'll take that!
-
Today's the day. I have soaked what I can get to. Doesn't seem to be any way to aim at the threaded side beforehand [for the bolts to the frame]. I'll plan to take these out slowly and working back/forth, and when I get them part of the way out I'll soak them again and put the back in to get the oil up in the threads. Are these a standard thread I could get replacements for at the hardware store if I wanted to go back in with new ones?
-
headlight switch connector
AnotherOldJeepGuy replied to ratrapp's topic in MJ Tech: Modification and Repairs
@ratrapp, I would like to swap in a new light switch but I have heard this swap is "a PITA". Having just done it, what is your opinion? Any tricks or gotchas you would like to share for someone before they tackle the swap? Any good pics of the process you would like to add? TIA -
@hgeranium was generous enough to share his supply of o-rings with me and he gave me 2 each of the smaller o-rings for the job just in case. Since I managed to get new ones in without damaging them, I have 1 each left. If you want them, just PM your address and I'll mail them to you. You would still need to get the large one, but the 2 small ones are up for grabs to the first one to claim them!
-
Got 3 new washers in. The old ones were totally flattened. I don't know that mine bolt was tightened by a 900 pounder, but 700 at least. I did not put it back as tight, maybe 450. Breaking that loose was for sure the single most difficult part, but I think I must have socks that are somehow more difficult to put on that the ones @watchamakalit apparently has. The other hard part for me was not physically hard, but with the tools I had anyway I had to do somewhere around 500 micro-wrench-movements to slowly get the bolt out, and a similar number getting in back in. But in the end I don't see any leaking at the first startup and it was almost gushing before, so this has to be an improvement. Since I monitor my oil once a week and mark it on the calendar, I should be able to tell how much of my overall leak this was, and with a little luck it was a big part of it that is now fixed! . Moving on to the next job, suspension parts....
-
So you jacked the engine up to make more maneuvering room between the engine and things that live below the pan? I generally put my jack stands at the front axle, does that count as body in this case?
-
headlight switch connector
AnotherOldJeepGuy replied to ratrapp's topic in MJ Tech: Modification and Repairs
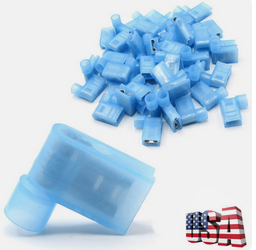
I guess if you cannot get a replacement you could get some of these and attach the wires one at a time. Clearly not a preferred solution, but in a pinch. I see some 90 degree ones on ebay too that would probably work better in this case. Just a thought, hopefully someone can identify the actual connector. or https://www.ebay.com/itm/127679278912?_skw=crimp+one+wire+end+female+blade+connector&itmmeta=01KMTSW5C8YATP8X0HVYCH7YHV&hash=item1dba472f40:g:vV8AAeSwbmhpjFnh&itmprp=enc%3AAQALAAABAGfYFPkwiKCW4ZNSs2u11xB2%2FlyiKsG7kSgCKJHLqhIWNgXL8AHcxnYz4BdMxUldxxLwvFO955orUvxnLZlGw5aSXrfh6TwMmIa3LCBvzTwkV%2BxDCYdHP9cAiRW8Dy1bKeRhr%2BkrRQfF3JclKwVLL4s5FdDei%2F6%2B4%2FCjwMMlB412R%2B7N%2Bx4lr%2B6%2BEJAYvP7UsL9gVkC%2BMY7445xE%2FSXcn%2FSO6SGl7jQo%2F4mhVCEkjGzN6xCWxOpPpyAW8HSXWKbPAKC6rwEPWGmm0mAlV5aQy%2BBpUYmRMnz%2BRi0rvwMrU1ugi6Y2gOIY%2FqHpumUtxFSSYlcr0O7IvXm91S9uug6V3Y0%3D|tkp%3ABk9SR7DW8NmmZw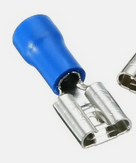
-
headlight switch connector
AnotherOldJeepGuy replied to ratrapp's topic in MJ Tech: Modification and Repairs
Can't answer but as a related comment, you might want to install the headlight rewire harness to make sure it doesn't melt again or worse. See this thread for some additional details. -
Ah I did not know this would have that effect. Well I'll still do the OFA rings first and get a new status. I suppose I can always remove the bolts and try to wiggle the pan out, and if I fail I can put it back together and take it to the shop. Of course this experiment is likely to result in a bigger leak but if the plan is the shop right after a re-bolt, maybe that will not be a show stopper.
-
Gotcha. Thanks. I don't have that same good fortune, so this is a repair I will probably pass on to the local jeep repair shop. But I'll go ahead and put new o-rings in my oil filter adapter first and see how much leak I have left before moving forward with the RMS and Pan seals.
-
I have been putting off trying this because of the anticipated difficulty getting the pan out/in (and also concern that I won't get the new RMS in place correctly as well). @pizzaman09, It sounds like you are planning to redo this without actually removing the pan, so just lowering it. Sounds like it's gonna be difficult to clean the pan and the mating surface. Also, basically, how do you "lower the axle"? If you were also replacing the RMS would you still try to do this without fully removing the pan? To the group, how do each of you do the gasket and RMS with regards to the pan, pan out or pan just unbolted and lowered?
-
The option to have your vehicle drive itself seems like a controversial option to me.
-
For what it's worth, I replaced my valve cover gasket a while back with FelPro and a bit of blue shows in lots of places. Back when I did it I seem to remember asking here if that was a concern and IIRC someone told me it was not. That was in Nov 2024 and it seems to be holding. I don't know how much apples to apples this comparison is, but, again, for what it's worth... There's a few pics in that thread.
-
Got my new headlights in from RockAuto today and put them in. I went with SYLVANIA H6054XV because of the manufacturer description "SYLVANIA XtraVision® sealed beam headlight bulbs provide brighter light on the roadway to improve your visibility without impacting oncoming drivers, when compared to SYLVANIA Basic bulbs". I like the "improve without blinding oncoming drivers part", since I get aggravated at all the new vehicles out there that use lights that seem [to me] to be high beams in my face all the time! The harness improved the existing light even with my damaged H6054 bulbs, and the garage test looks like the new H6054XV bulbs are putting out a lot more light. These may not be the absolute brightest option but I think I'll be more than satisfied with the improvement. Update next morning: Tried out the new harness/lights and the results are great. Combination highly recommended!