


Big_Mark
-
Posts
324 -
Joined
-
Last visited
Content Type
Profiles
Forums
Gallery
Everything posted by Big_Mark
-
-
 Prius ...so I can afford my Jeep habit Also the family weekend ride is a 2015 Silverado, you know to buy groceries in
 -
1999 Unit bearing / Hub offset questions
Big_Mark replied to Big_Mark's topic in MJ Tech: Modification and Repairs
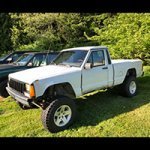
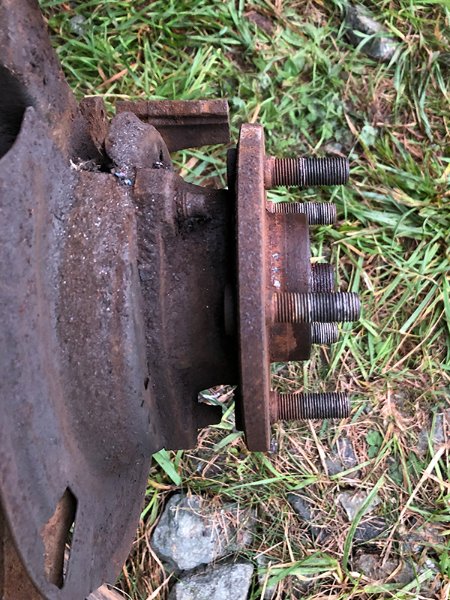
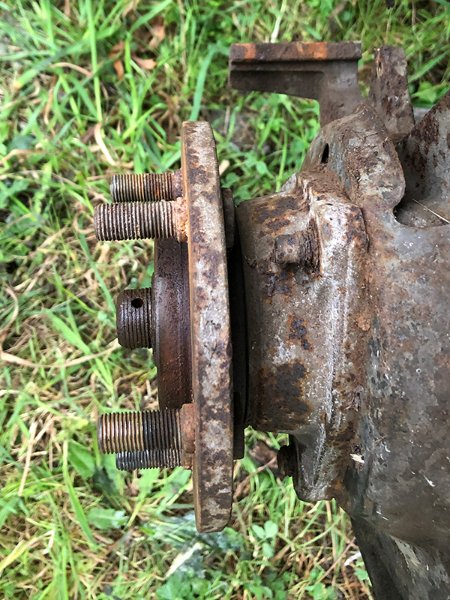
O.k. I went and checked, sure enough the overall depth of the unit bearings are the same (as is the depth of the stub shaft), the only difference between the unit bearing is the flange offset. My rotors are 2 7/8" deep (both) so it seems I need the 2.133" unit bearings, and to be sure the rotors are the right depth! Thanks again!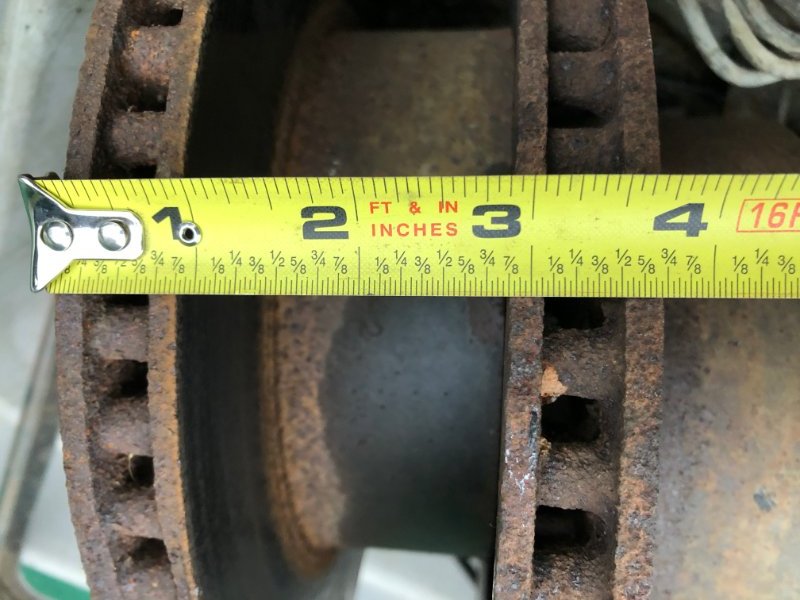
-
1999 Unit bearing / Hub offset questions
Big_Mark replied to Big_Mark's topic in MJ Tech: Modification and Repairs
Thanks OldSck88L that makes sense, I'll check the depth of the rotors, BTW on the Drivers side (short hub) the inner pad was gone all together so I suspect you are on to something here. -
I'm trying to get my brakes done before the weather turns to crap, rears are handled but the front is leaving my scratching my head. #1 The Axles in my Jeep were transplants from a 1999 Cherokee that's all I know about them Front Dana 30 no vacuum business Rear Chrysler 8.25 I got the calipers off and rotors off, both sides are in need of new parts, since I have it apart I decided to look into replacing the Unit bearings. Looking on Oreilys I discovered there are 2 varieties, one with a 1.91" flange offset and one with a 2.133" offset easy enough since it's all apart I went and measured and discovered the Drivers side has a 1.91" offset while the passenger side has a 2.133" offset. WTF I am considering replacing both with 1.91 offset flanges since I have 1" spacers to help with wheel offset, my question is are the axle stub shafts for the 1.91" offset flange the same as the ones that go into the 2.133" offset flanged Unit bearings? Are the caliper brackets for the 1.91 the same as the 2.133 set up? I'd pull the bearings but the only giant sized socket that I don't (yet) own is a 36mm" any info is appreciated, thanks!
-
From the woods - 1989 Basket Case
Big_Mark replied to Big_Mark's topic in Member Projects: Your Comanches
O.k. since we are about to start with actual cold weather I did a massive ADD workfest on the Jeep today. 1. I got the broken temp sending unit out of the head (well pushed in, will fish it out later) and installed a new one, viola my gauge is working! ALL OF MY GAUGES WORK >>>>>>MILESTONE<<<<<< 2. Screwed the filler hose bracket to the body of the bed, it was just flopping around before 3. Put my WA state plate on, hung the Montana one in the garage cause that's where old plates go! 4. Fixed the leak in my new washer bottle, had to swap out one of the pumps from my old bottle. 5. got my drivers kick panel light working, the connectors were in need of a cleaning. 6. popped in my ashtray from the junkyard run last week. Then I actually drove the Jeep on the road, it tracks well but is still in need of a brake job, that the thing I'm procrastinating but I kind of blew through the piddly things so I guess that's up next. I know it's going to be some work and $$ the drivers rotor has visible groves in it so yeah..... Anyways I'm glad to have all the creature comfort and street legal stuff out of the way and functioning. BTW after driving the Jeep on the road my Oil pressure leveled off at 20-22 PSI, more of what I expect from a straight 6, the engine temp got to around 190-200, will continue to monitor that as I drive the thing around more..after the brakes are working properly All around feeling like a happy Jeephead again! -
From the woods - 1989 Basket Case
Big_Mark replied to Big_Mark's topic in Member Projects: Your Comanches
So I swapped out the oil pressure gauge today and now the gauge is working, not sure if it's accurate but it is indicating 40Lbs pressure, I sure hope is accurate, I'll take that! Also for whatever reason my buzzer has decided to start working as well evidently instead of having new electrical issues existing ones are fixing themselves I'll take it -
Rear passenger-side lights not flashing
Big_Mark replied to AaronBaugher's topic in MJ Tech: Modification and Repairs
While fighting my rear lights I did the Cruiser54 ground refresh http://cruiser54.com/?p=19 for the rear, in this case. Ultimately I ended up doing the fuel pump reground http://cruiser54.com/?p=249 in addition to that I cut the ground wire to about 10" from the cab side of the rear harness connector and grounded that the the rear "frame". Once I did that my rear harness ground issues went away. -
1989 dual pump washer fluid plumbing
Big_Mark replied to Big_Mark's topic in MJ Tech: Modification and Repairs
Yep the single pump with the blocked off hose works perfectly, on to other tasks! -
oooooooooooo.... repop tails might be close!
Big_Mark replied to Pete M's topic in MJ Tech: Modification and Repairs
I hope they make the bulb housing, mine are in shabby condition (as are the lenses) -
1989 dual pump washer fluid plumbing
Big_Mark replied to Big_Mark's topic in MJ Tech: Modification and Repairs
Thanks all, I guess I'll just run it as it then, which is fine with me, one less trip to the local hardware store and I can just bolt it down and go -
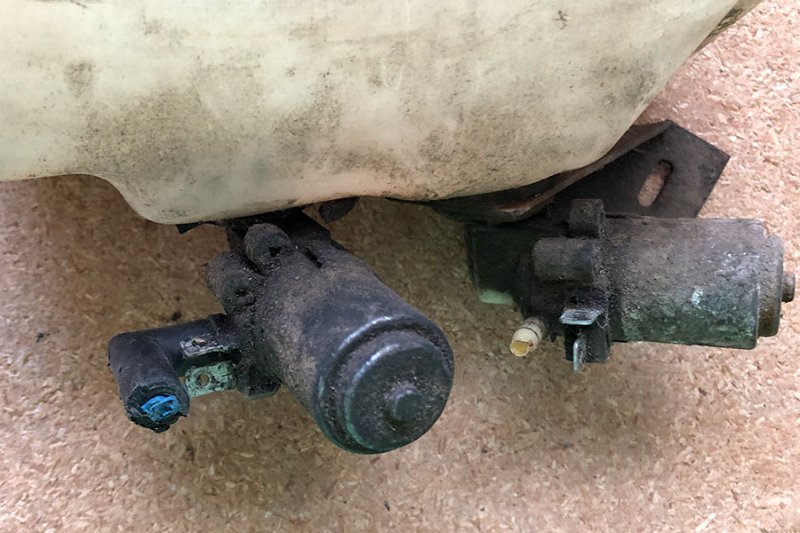
Hi Gang, I have a question about how these pumps are supposed to be plumbed into the washer fluid line that goes to the nozzles. Here's how the PO did it. I suspect this is not the answer. In my truck I have two electrical connectors, one for each pump, and the low fluid connector (glad I installed the bulb :-D )and one rubber hose that passes up through the firewall into the wiper motor/mechanism compartment where it Tee's off to each nozzle. What it the correct way to plumb this system? I'm thinking a hose off each pump to a Tee then from the T to the firewall hose but wonder what the factory did and what others with this bottle have done. Thanks in advance
-
I know it's a weird tip but it works. Vaseline, yup good old petroleum jelly, it's great for holding marts together, things like needle bearings in a transmission, weird little plastic parts that move against each other (high beam switch slider in wiper switch). Super handy plus it's fun to say!
-
From the woods - 1989 Basket Case
Big_Mark replied to Big_Mark's topic in Member Projects: Your Comanches
More headway and just in time for the endless gray season! I installed a rebuilt wiper motor and a new wiper delay switch and lever (to git rid of the last visual vestiges of Cruise Control ) also a wiper control module from Deadjeep.com I now have fully functioning wipers! I followed the wiper mechanism rebuild guide found on this site and all went well! I did go through 2 wiper control modules before getting one that worked but the gang and deadjeep.com sent out the 2nd of free of charge and no questions asked, super awesome! Last part of that system is on the way from Ebay a used, not broken wiper fluid bottle. I have one and the pumps are good but it has a smashed in top. Not sure how that happens but I guess it does in the bushes lolz. I still have some work to do on the cab lighting but overall I'd say I'm done working on electrical and will move onto the brakes next, then the engine itself. Thanks to everybody here, this site has been a goldmine of info and support, can't wait until I get the old Heep on the road! -
Best Remanufactured 4.0L Supplier
Big_Mark replied to hakukamana's topic in MJ Tech: Modification and Repairs
I've gone the route of having a 302 balanced and blue printed, then did the assembly myself, however I was younger then and now I like the comfort of having some things done by folks who do it all the time. Since you're options seem limited I'd have Shop #1 do the rebuild so you can drop it off then pick it up when it's ready. No matter the route you take you will need to break it in properly as mentioned. Alternately you could get a junk yard engine (maybe? not sure what th junk yard status is like over there) -
Nice build thread, thanks for the part numbers and links makes life easier! Can't wait to see pics and video of you HAMMERING DOWN on the trail
-
From the woods - 1989 Basket Case
Big_Mark replied to Big_Mark's topic in Member Projects: Your Comanches
Ha ha Thanks guys. O.k. I made some more progress yesterday, pulled the old fuel pump and discovered why the fuel gauge didn't do anything: Evidently you need a sending unit and a float or something Thanks to mtscompany.com for having new, in stock sender/pumps shipped for $159. model # JPSU-6P4.0 shown in photo above. Then I spliced in a new fuel pump sender pigtail into the harness to unf*** the POs mess, and discovered I was out of gas as the low fuel ight came on (yea!) I added 3 gallons (what I had laying around) and the fuel level indicator rose and the light went out. Super stoked to have a working fuel gauge again. My Scrambler fuel gauge only ever "worked" when it was my daily driver I ran out of gas more that once, I got good at adding fuel on the 520 floating bridge, ha ha ha. At any rate my "last" electrical project of Summer (now fall) will be replacing the wiper motor so I can have all the speeds, not just slow. I've learned a lot about this truck and have squared away lots of gigs along the way. Thanks for all the help gang, I'm sure to need more during the next phases as they come along.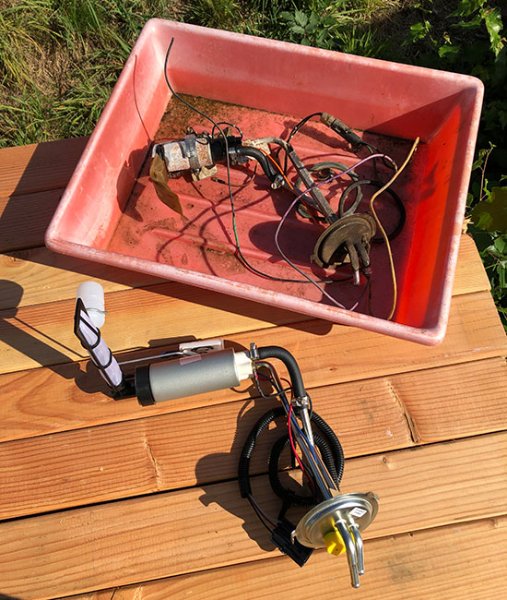
-
That's a good thing , double checked with SSL ping

-
From the woods - 1989 Basket Case
Big_Mark replied to Big_Mark's topic in Member Projects: Your Comanches
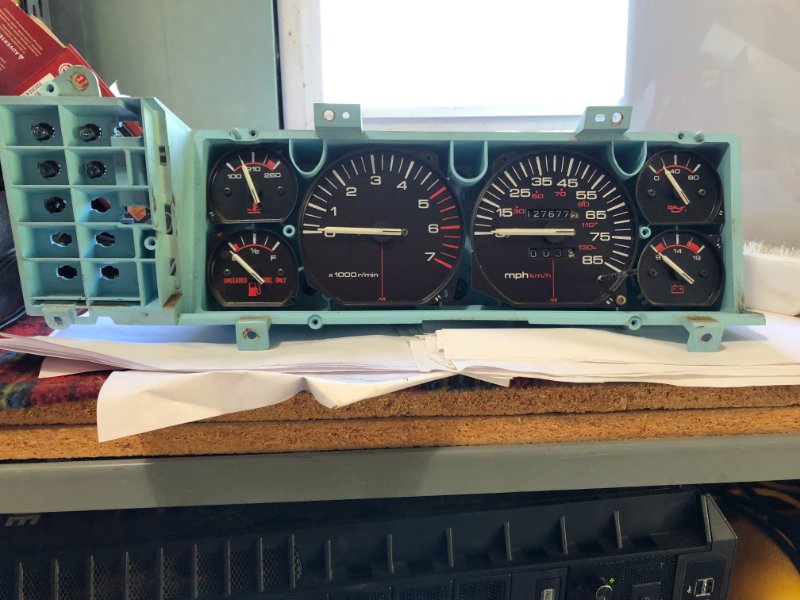
So which cluster do I appear to have here? I think if I knew that it might help me figure out how to fix it, if I can't fix it then I'll be sending you some $$ -
From the woods - 1989 Basket Case
Big_Mark replied to Big_Mark's topic in Member Projects: Your Comanches
Thanks guys, I'll try posting up tech questions in the tech zone. As for the reverse lights I found the disconnected wire, it was the black and yellow one hanging out of the harness near the ECU. Once I plugged it in the reverse lights came back on. Regarding the oil pressure gauge, when I had the cluster out I moved the indicator to zero and it moved back to it's current position, even out of the truck. So perhaps it's broken. EagleScout you got any of these laying around? (do you want more of my $ ? haw haw haw...) I have a blue cluster, with all the gauges. When it was out I cleaned up all the contacts, unscrewed each gauge screw, cleaned and replaced it and it's contacts, then replaced all the bulbs in an attempt to not have to take the cluster out again anytime soon. I'f I can't get new gauges or get these ones to work I may opt for some mechanical after market ones since I like to know what my oil pressure and engine temperatures are!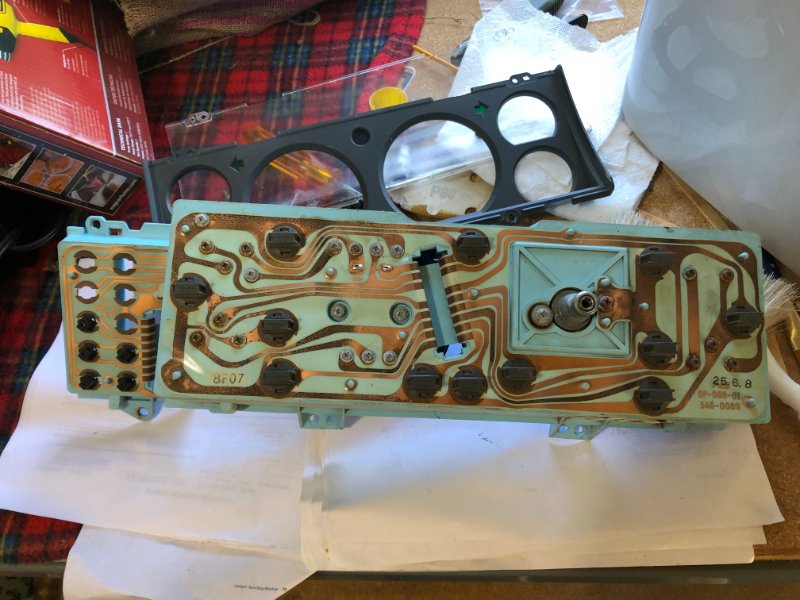
-
From the woods - 1989 Basket Case
Big_Mark replied to Big_Mark's topic in Member Projects: Your Comanches
Well i now have all 4 hazards, brake and running lights as well as turn signals! The reverse lights were working but stopped for some reason, that's up next. What I've learned with this electrical system is, GROUND EVERYTHING, THEN GROUND THE GROUNDS WITH ANOTHER GROUND THAT IS GROUNDED My guess on the reverse lights is a ... (wait for it) GROUND ha ha ha ha!! I am losing my mind over here in smoke city. Glad I have Jeep to keep me grounded... O.k. enough jokes, seriously it's been a fun thing to work on in these crazy times and I'm making progress! A few odd things to iron out before I start on the drivetrain, brakes, cooling etc are: 1. Do gauges "go bad" or is it typically just a bad connection somewhere? a. My Oil pressure gauge just sticks around 15 psi, even if I disconnect the sending unit wire, where my temp gauge moves then goes to zero when it's unplugged (sending unit it broken off in block) b. Can I replace the gauges with after market ones or from other model Jeeps of the same vintage? if so anyone have tips there seems to be lots of discussion but Ihaven't found any answers that relate to my problems. 2. The lights in the B pillar, are they supposed to turn on with the under dash lights (turning the headlight switch all the way to the right, or left, can't remember the direction, remember I'm losing my mind) That's all for now I think I'll go dig into the reverse lights some more -
Bleeding your closed cooling system
Big_Mark replied to BLHTAZ's topic in MJ Tech: DIY Projects and Write-Ups
On my Jeep it appears that the temp sending unit has been broken off Is there another way to bleed the cooling system that does not require removing that sensor? I just changed the heater core but did not drain the whole system, I think I can get by with just filling the heater core I understand I should replace all the coolant but it is still bright green and seems to be in good shape. I intend to replace the radiator "soon" with one that has a filler neck on it and likely drill the hole in the t-stat and will refresh the coolant at that time. I don't want to try to get the sensor base out with a bolt extractor at this time because it is keeping a seal and i need to move the Jeep. I suspect I'll need to remove the head to properly remove the sensor but don't have the time to do that right now. Any guidance is appreciated, thanks all EDIT: I was able to burp the Heater core due to the "Prestone" flush fitting in the top heater hose, I simply un screwed the cap, then pushed the hose down (so it's lower than the level of coolant in the reservoir) I did that a few times, added more coolant and viola, she's topped off! At least it's good enough for now. -
From the woods - 1989 Basket Case
Big_Mark replied to Big_Mark's topic in Member Projects: Your Comanches
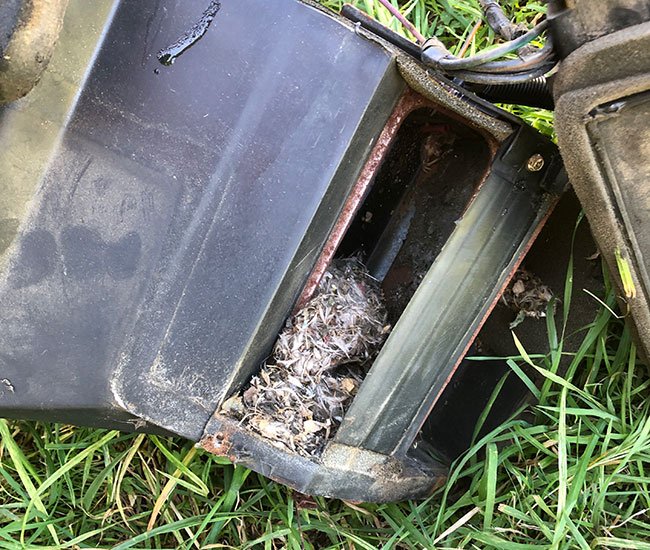
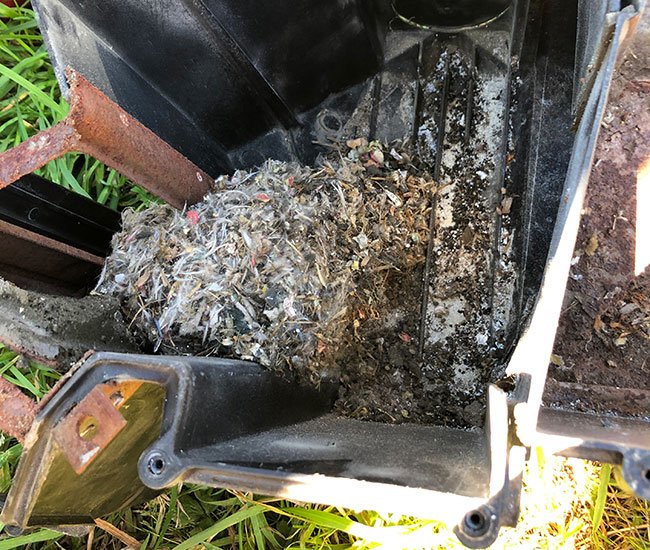
O.k. some progress has been made, Still working out my turn signals and hazards, which let to the steering column and removing the guage cluster. Since I was in so deep and the weather is nice I decided to pull out the dash and get on the de-mouse-pee smell task. Here's what I found in oder (ha ha pun intended) The initial find from behind the blower motor: Then I pulled the whole heater box assemble out and found more evidence (this is where the mouse nest dust cloud came from when I turned on the blower..ugh) After pulling the top off of the case I saw the full monty notice on the right half of the last photo the "dirt" that's my actual smell, it was a brick of mouse poop and pee baked into the heater core and is why the smell started about 2-5 minutes after running the truck. So I rinsed all the crap out, pulled the AC exchanger out (I eliminated my AC as well since is was already discharged and BEAT UP), then I washed all of the heater box compnents with "Rocco and Roxie" Pet stain eliminator, it's and enzyme spray we use to clean up after our cats, it works great and after washing these part twice with it I didn't rise the soap from the foam %100 to help continue breaking down any residual odors. Now the heater box is back in, with a new heater core (I don't want to pull that box again) and this afternoon I hope to have my steering wheel put back together and possibly get the dash back in the truck. MY goal is to be able to drive the truck around the yard by Sunday, we've got more black berries to move!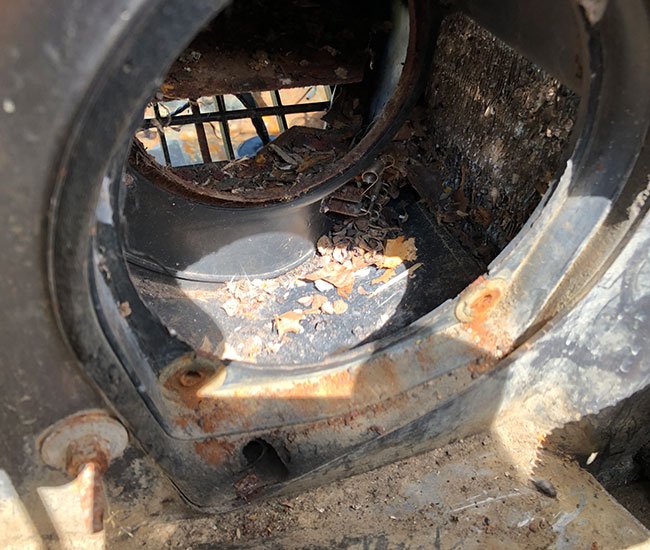
-
Upgrades to make a true 1-ton
Big_Mark replied to EUREKA's topic in MJ Tech: Modification and Repairs
Dana 80s have huge pumpkins, 60's can be ground down a bit and are more "compact" to start with, plus more gear ratio variety :-D Dana 300 T-case is the work horse of the CJ, and with a fairly easy mod can allow for twin stick gear selection, mostly useful for front dig -
Upgrades to make a true 1-ton
Big_Mark replied to EUREKA's topic in MJ Tech: Modification and Repairs
Dana 60s front and rear, Dana 300 T-case, T-18 transmission go big if your going to go big