

AZJeff
-
Posts
1312 -
Joined
-
Last visited
-
Days Won
1
Content Type
Profiles
Forums
Gallery
Everything posted by AZJeff
-
Experiences with restoring stock taillights
AZJeff replied to hgeranium's topic in MJ Tech: Modification and Repairs
Here is what one of the Oracle lights looks like installed on my MJ.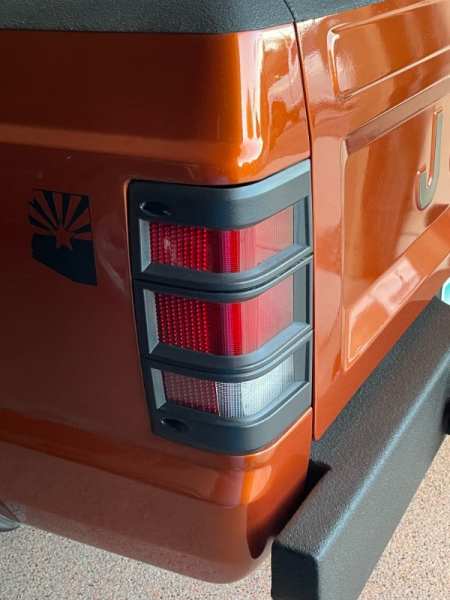
-
Experiences with restoring stock taillights
AZJeff replied to hgeranium's topic in MJ Tech: Modification and Repairs
I did a set of Key Parts lenses, and they are HUGE improvement over chalky 40 year old OEM ones. However, the original taillights on the MJ are pretty lame in terms of brightness, especially in daylight conditions. I have this overwhelming fear of some idiot here in AZ not paying attention and running into the back of my truck. With that in mind, I forked out the coin for the Oracle lights, and could not be happier, as they are markedly brighter than the OEM ones. -
I have only seen pictures of a pre-1997 heater box disassembled, as the only ones I have ever torn apart came from 97+ XJ's. From what I remember, the actual heater box on the later design is physically different than the earlier design, which means the heater core and evaporator cores probably are different as well. Renix heater/evaporator cores should be the same as the later (pre-97) ones, as they did not change the heater box, to the best of my knowledge, and that would make the suggestion of@eaglescout526 viable.
-
Are you trying to use the evaporator from a 97+ XJ in your MJ? If so, doesn’t that require the use of the corresponding heater box?
-
With factory ride height suspension, you will need to undo the lower front shock attaching points to allow the axle to drop further and allow the oil pan to come free. Once you have 3 inches or more of suspension lift, dropping the front shock mounts is not needed to get the pan out, but it makes it easier the more axle compliance you can get
-
Does anyone have a line on a source for a Crank Pos. Sensor for a 2000XJ with a 4.0 (that's the engine I have in my MJ). The scuzzy aftermarket one I put in a few years ago has croaked, and I want to buy a "REAL" one this time. I am hoping some Mopar on-line store has them. If anyone knows the current Chrysler part number for that item as well, it would be appreciated.
-
It is NOT a brake fluid level switch. It is a brake pressure IMBALANCE switch. The factory brake system is divided into two subsystems—one for the front wheels, and one for the rear wheels. Basically the switch closes when either of these subsystems have lower brake pressure than the other, which can happen if either system develops a leak. The switch is very basic, being just a plunger that is activated by a spool valve that shuttles one way or the other when pressure on both sides of the spool is not equal. the switch is common to many vehicles of the era of the MJ. I would bet ALL Jeeps of that era share a common part here, along with the Fords that were mentioned.
-
Why is my eagle overheating?
AZJeff replied to eaglescout526's topic in MJ Tech: Modification and Repairs
I am skeptical of the effectiveness of radiator flush on a rad that has built up crud over years of neglected coolant. It’s been my experience that the relatively small long coolant passages in a rad are a bit like advanced arteriosclerosis, where the crud grows upon itself and cements itself in layers, plugging the passages such that nothing short of mechanical cleaning of the tubes will remove the crud. I am old, so I remember when radiator shops would do what was called “rodding out” of an all metal radiator. This involved unsoldering the tops of the end caps (back when they had metal tanks) and then pushing metal rods through the tubes to remove the crud, and then resoldering the tanks ends back together. This worked well on all brass/copper radiators, but these modern rads with aluminum core/plastic tank don’t allow this type of treatment, and replacement is the cure for plugged passages. -
Why is my eagle overheating?
AZJeff replied to eaglescout526's topic in MJ Tech: Modification and Repairs
Some thoughts: If the heater core is plugged up, there is a good chance the radiator is in similar condition Use an infrared thermometer to check thermostat elbow temps against guage reported temps. Run a pressure test on the cooling system to make sure it will hold the required pressure (16lbs?). If it won’t hold pressure, boiling is likely to happen. Antifreeze raises boiling point as well as depressing freezing point. Be sure to run a proper mix, because a typical modern engine with plain water and a non-functioning pressure cap will almost certainly boil over. -
If you have an engine with older (worn) bearings, a high volume pump “might” be beneficial over a standard pump. Regardless of pump type, I would recommend using one made my Melling.
-
Major oil leak from the rear passenger side
AZJeff replied to hgeranium's topic in MJ Tech: Modification and Repairs
Yeah, I have heard that some RENIX engines had a plain hex head bolt. Those are easier to remove since the clearance issues using a Torx or Allen socket are not a factor. -
Major oil leak from the rear passenger side
AZJeff replied to hgeranium's topic in MJ Tech: Modification and Repairs
Just a big special hollow bolt must be removed to dismount the adapter from the block. They are also VERY TIGHT, typically. The head style changed over the years. Some were Torx, and some were Allen head. Don’t use the wrong socket type, or you will probably mess up the bolt and makes its removal doubly hard. -
As someone who has deleted the load valve assembly, I will make an important comment about the current state of the brake tubing in the OP’s first photo: There is a LONG section of tubing that hangs out, unsupported, from where it is clipped to the “frame” rail until it joins the flexible hose the goes down to the axle housing. Leaving this tubing to flop around unsupported is inviting a fatigue failure cracking off the tube at some point. Ideally, some sort of bracket should be employed to attach the tube to the chassis right at the junction Of the flex hose and the tube. This is way the factory did it.
-
I don't think that's piston slap. (shiny oil)
AZJeff replied to brucecooner's topic in MJ Tech: Modification and Repairs
A timing chain is easy to pinpoint with a stethoscope, as that noise is very localized. A valve train noise rocker arm or lifter can also be narrowed down by stethoscope. A 4.0 can be run without a valve cover for short intervals at low engine speeds to also narrow down valve train noises. -
I don't think that's piston slap. (shiny oil)
AZJeff replied to brucecooner's topic in MJ Tech: Modification and Repairs
My 4.0 was a transplant from a 2001XJ with the infamous “0331” head. Unfortunately, sometime in its past, one of the owners allowed it to overheat badly, popping the head gasket under the manifold side if the engine. And not knowing about the vulnerability of that generation of head casting, they just slapped a head gasket on it, fixed the overheating cause, and called it good. (They apparently didn’t know those heads can crack in a subtle way during an overheating episode.🙁) Not knowing it’s history, when I got the MJ, the engine still sounded good, and had clean oil….until I drove it about 1500 miles with the (unknown) crack in the head that allowed the oil to convert itself into a brown milkshake. 😳 After putting on a new head from Clearwater Cylinder Head, and replacing all the bearing shells and polishing the crank, I thought all was well. (The bearings really did not look too bad, but I wasn’t taking any chances.) 5000 miles later, I was getting this weird ticking sound that was VERY noticeable on a hot restart and stayed present to some degree whenever the engine was hot. Compression testing showed #6 cylinder was getting progressively lower as time went on over a period of 6 months. the problem wound up being a cracked piston skirt, probably caused during the severe overheating episode. I pulled the engine and sent it to a machine shop in Prescott, AZ, and had him put in a new cam, new oversized pistons, and polished the crank and put in new standard sized bearings. Then I had a small 6 month interruption while they replaced to valves in my heart due to a mysterious blood infection I contracted.🥴 After I recovered, I put the engine back in, and it’s as quiet and smooth as ever. I have about 2000 miles on it now, and am ready to switch to synthetic oil to deal with the high temperatures here in the PHX area. -
OEM style tail lights are available on eBay from Key Parts. Aftermarket tail lights with integral LEDs that match OEM appearance are available from Oracle Lighting. I have these in my MJ, and they are brighter than the OEM style that have incandescent bulbs.
-
BBK throttle body leaking shaft seals
AZJeff replied to knever3's topic in MJ Tech: Modification and Repairs
That’s more sophisticated than the damned Weber I had. Just a straight (plated) steel shaft thru an aluminum die cast carb housing. -
If the OP is in the Atlanta area as his sig line says, a quick internet search will show plenty of shops that cater to the auto body repair industry that sell custom paint and similar supplies in the metro area.
-
BBK throttle body leaking shaft seals
AZJeff replied to knever3's topic in MJ Tech: Modification and Repairs
If you have erratic idle, I assume the throttle plate shaft is loose in the bores of the throttle body housing. This causes the throttle plates to have varying degrees of clearance around the Venturi each time the throttle plates ope/close. I had this happen on Weber carb on a 2.0L Ford engine back in the 1970’s. There are only two ways to fix this: get a new throttle body assy or get a machine ship to bore out and install brass bushings into the wallowed out holes in the existing throttle body. neither way is terribly cheap, unfortunately 🥴 -
Drivers side wiper arm sloppy
AZJeff replied to knever3's topic in MJ Tech: Modification and Repairs
The fix there is a new (used, good condition) wiper arm shaft assy. from a junkyard -
Drivers side wiper arm sloppy
AZJeff replied to knever3's topic in MJ Tech: Modification and Repairs
If the bushings are new, then the only other possible source of slop is the arm shaft itself being loose inside its body mount. On an 87 vehicle, that quite feasible. -
Rookie Water Pump Replacement
AZJeff replied to AnotherOldJeepGuy's topic in MJ Tech: Modification and Repairs
Yup. Although it’s not a critical measurement, as long as it’s above MIN and below MAX -
Why not just make a hard line from some pieces of copper plumbing soldered together, and the use regular pieces of heater hose and clamps to join it to the existing fittings? that’s what I did with my wife’s Liberty
-
Rookie Water Pump Replacement
AZJeff replied to AnotherOldJeepGuy's topic in MJ Tech: Modification and Repairs
I have broken several fan shrouds on the 4.0 mechanical fan over the years, trying to wrestle them out with the fan still bolted to its pulley. Then I got smart: I studied where the shroud interferes with the viscous clutch hub and used a Dremel tool to grind a clearance cut in the lower parts of the shroud, and sanded the corners of the cut to prevent cracking from sharp corners. Now I can remove the shroud by taking out the two top bolts and carefully working the shroud up around the blades and past the clutch. It’s a snug fit, as I wanted to keep the shroud as functional as possible, but I have not broken one since I did this mod. (Something Jeep should have done to begin with🙄) -
Rookie Water Pump Replacement
AZJeff replied to AnotherOldJeepGuy's topic in MJ Tech: Modification and Repairs
That sounds about right, but to be honest, I never torque “non-critical” fasteners like that. I use my “calibrated wrist” acquired from 50+ years of wrenching on stuff. The t’stat bolts need to tight enough to keep the parts sealed, and to keep the bolts from loosening. Beyond that, there are no critical factors. Stuff like head bolts is another issue, so because the gasket must be compressed a certain amount to achieve a seal against the pressures and temperature of combustion. Likewise, lug nuts must be tight enough to create sufficient friction between the wheel surface and the brake rotor (or drum). THOSE types of fasteners I always torque.