

eaglescout526
-
Posts
12089 -
Joined
-
Last visited
-
Days Won
13
Content Type
Profiles
Forums
Gallery
Everything posted by eaglescout526
-
Adding low washer fluid warning to an MJ
eaglescout526 replied to Anthi4078's topic in MJ Tech: Modification and Repairs
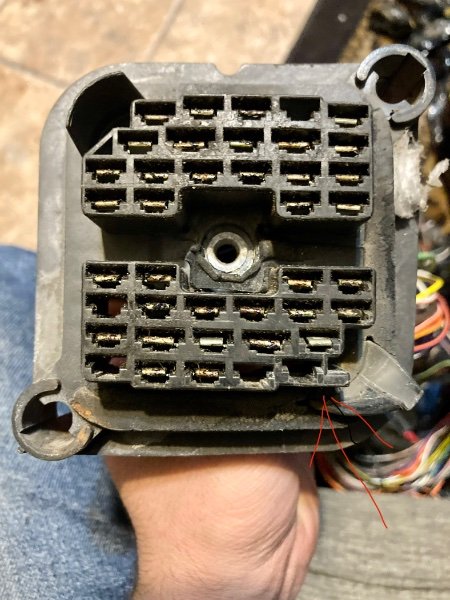
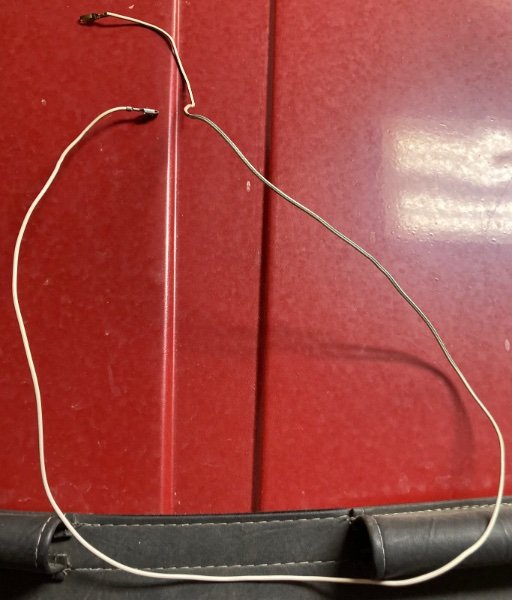
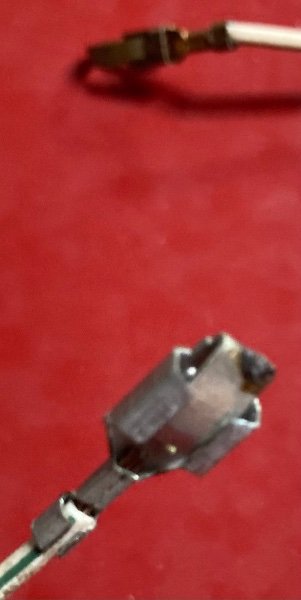
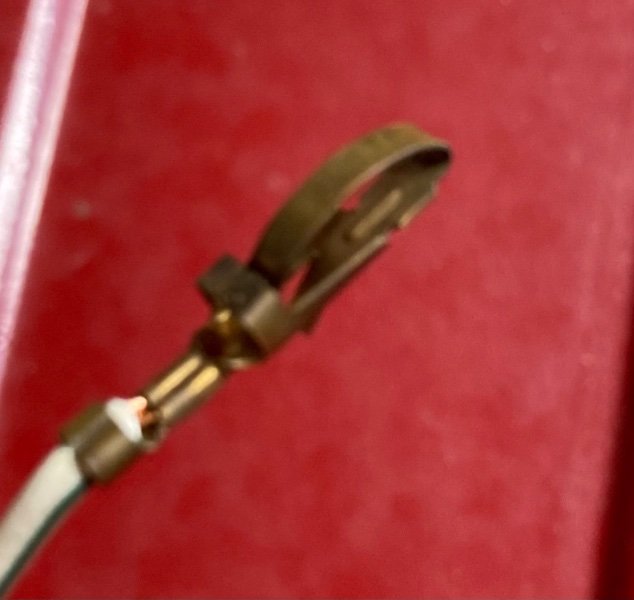
Ok so luckily I got a full XJ dash harness recently and I went and thought, oh hey! I can pull the one wire from the harness to put into my MJ and holy fricken crap is this gonna be easy. So here’s pin 15 in the info center connector: (I already started removing it before taking the pic) here’s the wiring for it: Here’s where it was in C100: (red arrow pointing to the empty spot is where I found it. Could be different in other model years.) here's both connectors. I don't know what the cluster pin is as I haven’t tried to locate one on mouser but I know the female pins are packard 56 or series 56 connectors.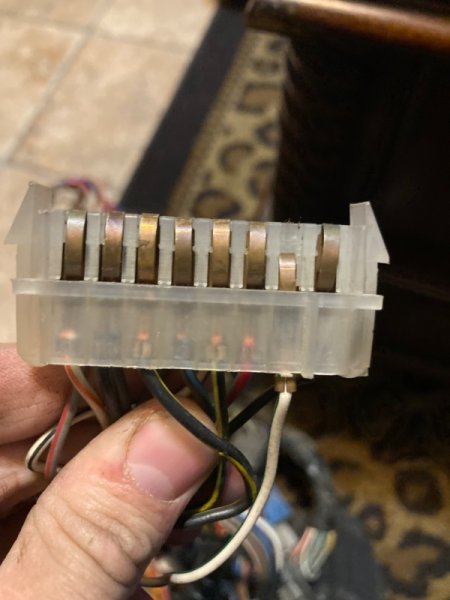
-
*X4 -SA Charcoal 3LX AGJ APA MONOTONE PAINT PACKAGE CBA BENCH SEAT - STRAIGHT BK CGX Head Restraints-Outboard Seating, RR CKA CARPETS - CLASS I SHORT PILE 8 - 12 OZ DCB Transmission - 4-Speed Manual EPD ENGINE - 2.5L I4 TBI GAS GAC ALL WINDOWS - TINTED GLASS GFD SLIDING RR WINDOW GSC MIRROR - RIGHT BLACK JHA WINDSHIELD WIPERS - DELUXE JJA CIGAR LIGHTER - FRT COMP K60 BODY SIDE MOLDINGS - VINYL LAP FUEL ECONOMY SHIFT INDICATOR LIGHT LMA HALOGEN HEADLAMPS MBJ Bumper - Front, Black MDA FRT LICENSE PLATE ATTACH REQUIRED NAA ESA W/CATALYST (EXC CALIF SYSTEM) PE4 Colorado Red QE4 Colorado Red RAB Radio - AM/FM SBA POWER STEERING SCE STRG WHL - EURO/SPORT TYPE TBG SPARE TIRE - COMPACT WJD WHEELS - 15 X 7.0 STYLED STEEL Build date 3/16/88 Body code TM61 Sold by PERRY THOMAS JEEP-EAGLE, DECATUR IL
-
*X3 -YY AGC APA MONOTONE PAINT PACKAGE CBA BENCH SEAT - STRAIGHT BK CGX Head Restraints-Outboard Seating, RR DGW Transmission - 4-Spd. Automatic ERB ENGINE - 4.0L I6 MPI GAS GAC ALL WINDOWS - TINTED GLASS GTZ MIRRORS - MANUAL REMOTE JJA CIGAR LIGHTER - FRT COMP LMA HALOGEN HEADLAMPS NAA ESA W/CATALYST (EXC CALIF SYSTEM) NFA TANK - 23 GAL FUEL PX6 QX6 RAC RADIO - AM/MTR SBA POWER STEERING TBG SPARE TIRE - COMPACT WJD WHEELS - 15 X 7.0 STYLED STEEL Build date 1/18/88 Body code JL62 Sold by WILMINGTON A-J-R INC, WILMINGTON MA
-
I appreciate that. Chrysler made it a tad bit harder to access dealerconnect from home which requires me to log into my work email. Not so much harder but more time consuming.
-
Crap. I’ll get it done today. Been busy.
-
Adding low washer fluid warning to an MJ
eaglescout526 replied to Anthi4078's topic in MJ Tech: Modification and Repairs
They’re pretty easy. You need a small flat head strong enough to push the terminal out. I’ll take a pic of what the terminal looks like this evening. -
No problem. Now if it was a 4.0L that would be a whole ‘nother story.
-
Yes you can. 83-02 is the same block with no changes. And 86 doesn’t have a carb. It has throttle body injection. Carb was 84-85 only for the 2.5L.
-
4.0l renix not starting
eaglescout526 replied to speeding_infraction's topic in MJ Tech: Modification and Repairs
That’s good voltage. -
4.0l renix not starting
eaglescout526 replied to speeding_infraction's topic in MJ Tech: Modification and Repairs
Define good. Like more than .2VAC good? Or its putting out voltage good? -
4.0l renix not starting
eaglescout526 replied to speeding_infraction's topic in MJ Tech: Modification and Repairs
Test the CPS and make sure it’s outputting then right voltage first, then go to the coil. -
Adding low washer fluid warning to an MJ
eaglescout526 replied to Anthi4078's topic in MJ Tech: Modification and Repairs
Ok so here’s what I found: According to the XJ wiring diagram, pins 10 and 16 are populated as seen here. What’s not is the power side, pin 15. Regardless it might be an easy add. It’s just a matter of figuring out where the sensor wire runs to in the C100 block and running a new wire from the interior side. I will still attempt this on my week off when I have the interior torn apart for insulation.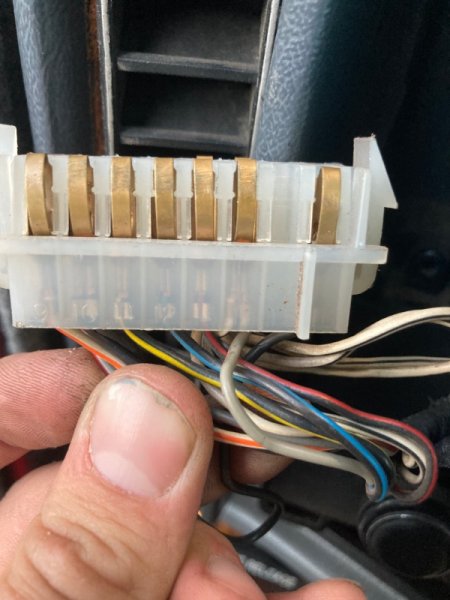
-
84XJ column in a 87MJ
eaglescout526 replied to Anthi4078's topic in MJ Tech: Modification and Repairs
Ahhh ok. I’m curious what all it has. I can only think of the A-pillars being worth a grab right now, depending on how loaded it is I might tack on more. -
84XJ column in a 87MJ
eaglescout526 replied to Anthi4078's topic in MJ Tech: Modification and Repairs
I can’t think of anything. Should just be mostly 15mm stuff. But sockets will do. Anything else special about this 84? Also the A-pillars are a grab as they are special for that year. -
84XJ column in a 87MJ
eaglescout526 replied to Anthi4078's topic in MJ Tech: Modification and Repairs
Just the whole engine bay really. I’ve always wanted to know how AMC and or dealers added cruise to the 2.5L and I know where I have the servo on my truck isn’t where they mounted it at the factory. -
84XJ column in a 87MJ
eaglescout526 replied to Anthi4078's topic in MJ Tech: Modification and Repairs
The column will drop in just fine. It is recommended that it gets rebuilt especially since it’s almost 40 years old. As for cruise, most will work except the servo. I have some 4.0 servos if you want to do a trade. Oh and can I get a pic of the engine bay before you rip out the cruise. I want to know how they added it in 1984. -
Two steps forward, 5 steps back. I went over with the intentions to work on the electronics in the doors. So I got the drivers side window moving up and down and I decided to try to get the lock solenoid to activate, it does not and luckily Jeep uses the same solenoids but this one looks rebuildable so I will have to drill out the damn rivets….and see what’s going on with it. So I replaced the door handle and that’s a damn chore and a half right there. I took out the entire glass as I couldn’t see what I was doing with the nuts holding the handle in place on top of the bottom portion of the glass being dirty. So I took this as an opportunity to clean the dirty portion of the glass and lube up the guides and put grease in the rails and all the moveable parts I could find. For power windows from 79’ these or at least the drivers side works pretty damn well for it’s time. Goes up at a good speed and down fast thanks to gravity. So new door handle in place, power window operating I say I got something accomplished. Next I tackled an issue I’ve been having with the carb assembly. It hasn’t been feeding fuel right since I did an adjustment a little while back to the power piston and of course it bent one of the metering rods. So I straightened it and put it back together. Tried to start it and boy did it not want to run at all. Ugh. Took the top off the carb again and found the rod bent again and this time it broke when I straightened it. So I replaced it with a new one I had idle by and I found my issue for this problem, i don't have the retainer that is supposed to hold the power piston in place. I think once I rectify this issue, we should be good to go again. Hopefully once that’s fixed I’ll get the passenger side power windows operating and I’ll tackle the lock solenoids. I think I know why they don’t operate, I’m sure I vacuumed out a pound of dirt and glass, yeah glass, not sure what that’s about, out of the bottom of the door and I suspect the solenoids are contaminated. At least this car also has electrical that’s unmolested like my MJ.
-
Adding low washer fluid warning to an MJ
eaglescout526 replied to Anthi4078's topic in MJ Tech: Modification and Repairs
Two references I found from HOrnbrod saying all he had to do was add the socket for the indicator on his cluster for the low washer. -
Adding low washer fluid warning to an MJ
eaglescout526 replied to Anthi4078's topic in MJ Tech: Modification and Repairs
I think the MJ dash harness is what separates and XJ dash harness in the Renix era. Chrysler probably added everything an XJ gets to the HO MJ harness and made it simple and cheap. So Renix is probably simple as adding the ground to C204_10 and 16. It’s much like how the HO guys can add cruise control with the stalk and servo(maybe the vac canister too, not sure). -
Adding low washer fluid warning to an MJ
eaglescout526 replied to Anthi4078's topic in MJ Tech: Modification and Repairs
I tried this when HOrnbrod mentioned how easy it was to add this. I added the bulb, made sure the bulb wasn’t burnt, jumped the wire to get it to light and nothing. If you look the wiring harness for the MJ shows nothing going to the indicator. On the XJ, it shows it. But it looks like it’s a ground as the engine side is mostly power. I’ll try this tomorrow when I’m working on the XJ -
Adding low washer fluid warning to an MJ
eaglescout526 replied to Anthi4078's topic in MJ Tech: Modification and Repairs
As long as the sensor connector has continuity on both ends then it’ll simply be a ground. If you ever look at the plug to the “info center” it’s pretty skimpy on what’s available and I wouldn’t be surprised to find it missing the ground to the low washer lamp. -
You probably should make your own build thread as hardly anyone is going to read the registry for updates. That being said the 2.5L TBI is really easy to work with. A lot of it is simply going to be probing sensors to ensure they’re within spec of input and output voltage and cleaning the grounds as they are notorious for making the readings to the ECU screwy.
-
Adding low washer fluid warning to an MJ
eaglescout526 replied to Anthi4078's topic in MJ Tech: Modification and Repairs
Actually. It might be more simple than we think. If we have the plug on the engine side, verify that all the wiring lines up, it looks like we just might have to add a ground wire to the indicator itself to get the lamp to light up…..I might attempt this sooner.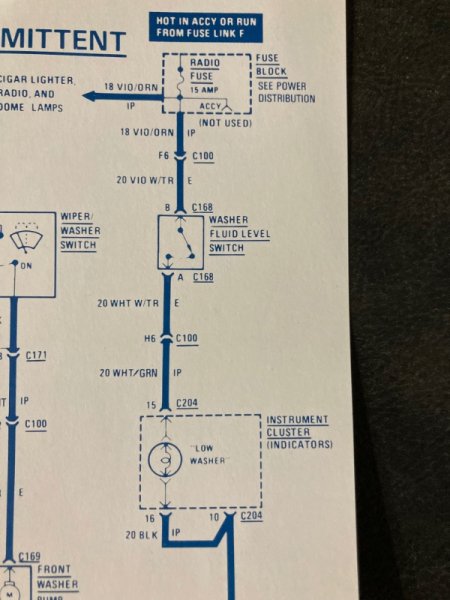
-
Adding low washer fluid warning to an MJ
eaglescout526 replied to Anthi4078's topic in MJ Tech: Modification and Repairs
It’s not. I plan to dive into this but I can tell you right now, adding it is a little more on the advanced side. I believe you need to find the wire on the bulk head connector engine side that goes to the sensor plug and then find the slot on the cab side and put in the wiring with the right connector and should go up to the light itself. Ok I’m gonna go look at the electrical manual.