
Airborne Janitor
-
Posts
481 -
Joined
-
Last visited
-
Days Won
1
Content Type
Profiles
Forums
Gallery
Everything posted by Airborne Janitor
-

Tail light clear coat or not
Airborne Janitor replied to ghetdjc320's topic in MJ Tech: Modification and Repairs
Why not just a high quality wax to protect against the elements? -
1986 full cluster into 1989 Idiot cluster
Airborne Janitor replied to CODriver's topic in MJ Tech: Modification and Repairs
Hey man check out this post I wrote up a few years back. The first part of it discusses some differences between the different year clusters with pictures as well. May prove beneficial to your swap. -
Husky I'll take that file if you can find it. If not I can build one off the blueprint in an earlier post.
-

-
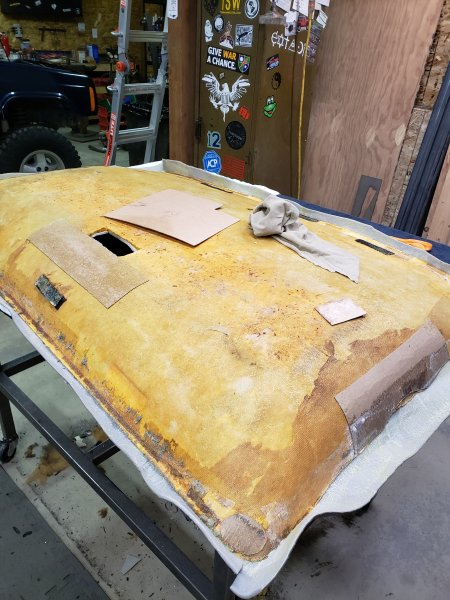
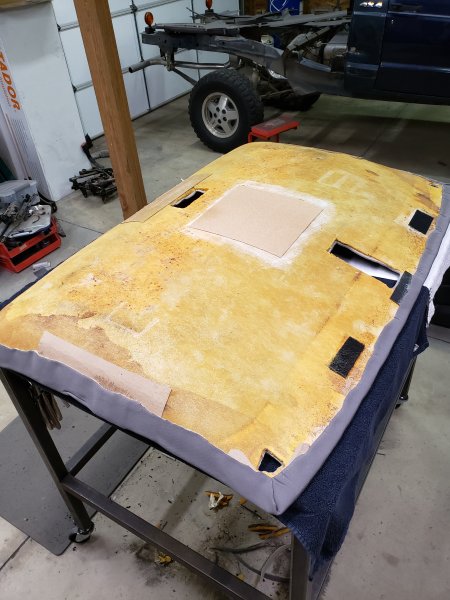
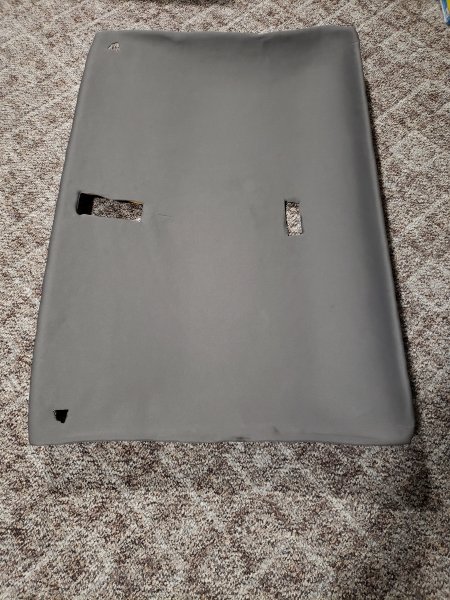
Thanks guys. I'm very pleased with how it's all turning out. HEADLINER REPAIR So my headliner was in decent shape, but had a few splits and cracks. The upholstery shop I went to used basically chipboard and upholstery glue to reinforce those areas. Although the upholster was adamant that it wasnt chipboard because it was "oil and moisture resistant", I used chipboard I had on hand to reinforce a few more areas. I used Permatex headliner spray glue. Next weekend I hope to be back at it. Waiting for some sound deadening material and LED bulbs to come in to wrap up the job.
-
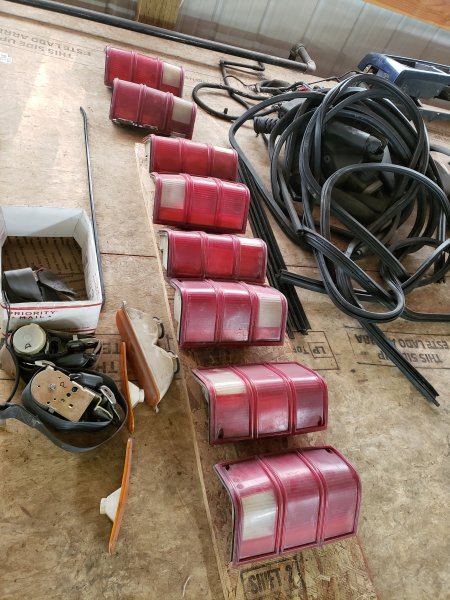
I know but I was up in my Jeep parts loft and never took a pic of all the lights I got. Honestly only 1 set out of that I would rate as excellent, the rest have broken corners, tabs, etc.
-
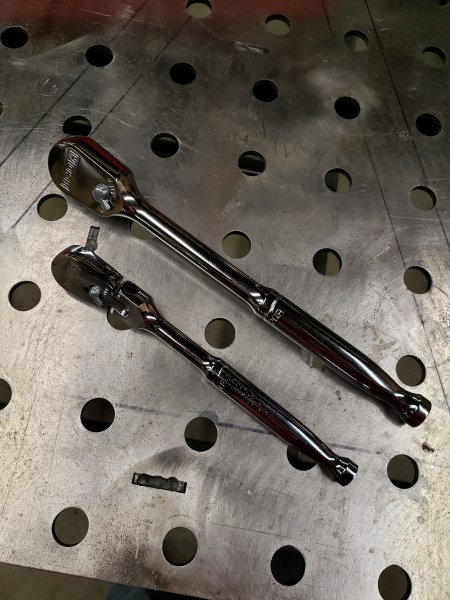
I took advantage of their deal and got myself a 1/4" and 3/8" ratchet. I wanted to try them out when I pull the tranny to replace the rear freeze plug on my MJ. I had been using US made Craftsman for 20 years but their stuff is junk now. We will see how the Icon stuff holds up.
-
I know this makes me an a$$hole, but I had to share....
-
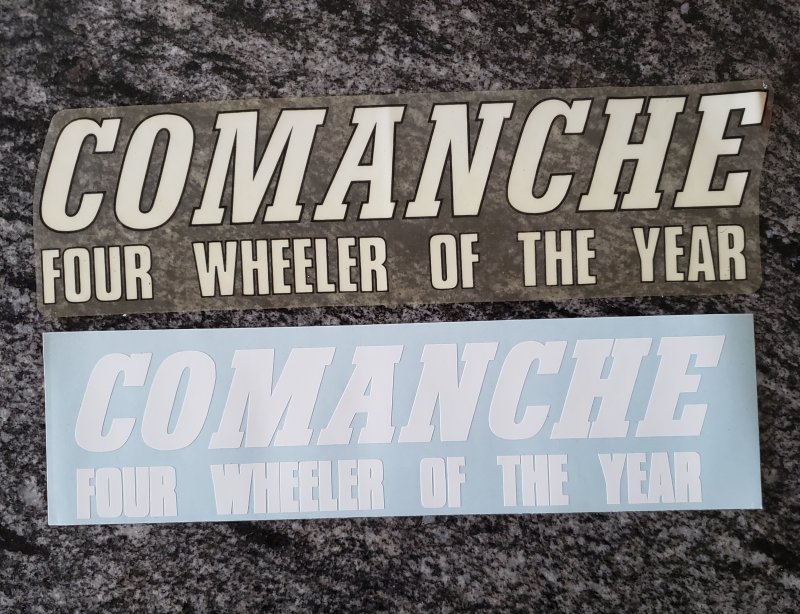
Added a poll to the top to gauge interest. Will update with a completed sticker soon.
-
So comparing the above photos to my extra tailgate handle, the "ears" of the repo handle don't seem to have the bends the oem one does. It looks to me like the repo one would work either way but it would be a bit narrower than the oem handle. If that's not a deal breaker I could take the above blueprint and try cutting one on a plasma table. The thickness of the OEM handle looks to be 14ga which is perfect because I have that on hand and a small metal brake to make the bends. Does anyone know what the hole diameter size is?
-
Not sure about pricing yet, but I'm thinking somewhere between $5-10 shipped maybe? The ones I make will be a little more narrow than the original one, they would be approx 12" wide to save on vinyl and envelope costs. Not really trying to make money but want to cover the material & shipping costs. That's funny eaglescout, I had planned on doing this a couple years back, started the project then it fell off my radar until I found the sticker I made while cleaning up around the house. Doesnt matter to me who gets them made, either way I'll make a couple just to see what the end result looks like. I have all the materials and equipment already so my only costs right now are time. If whoever you're going thru is gonna charge you a bit of money then I would say just wait until you see what I can make before you go spending your own cash.
-
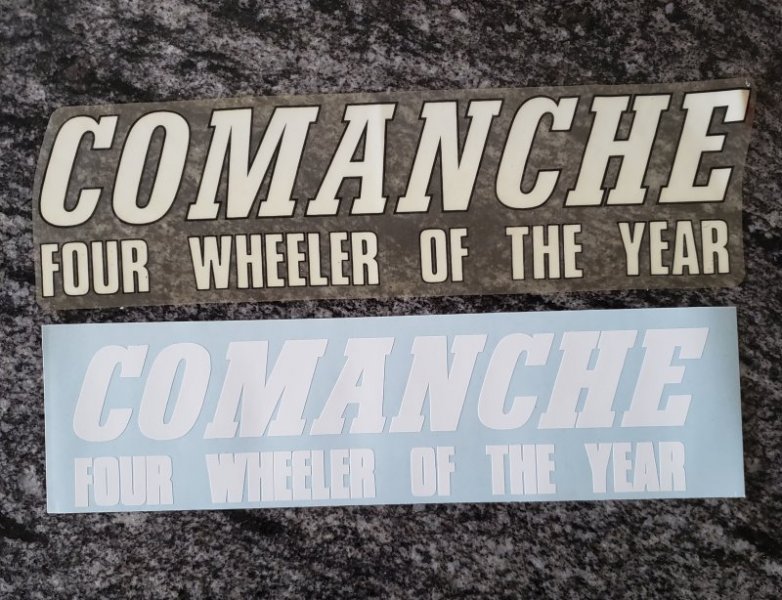
A few years back I acquired this Comanche Fourwheeler of the Year static cling decal. The decal's days of clinging to anything are long over, but I thought it was a cool item to have. I have access to a vinyl cutter so I started the process of cutting a vinyl version of the decal. Is there are interest if I made some "reproduction" vinyl versions? I was going to try for a 2 color white text/black border and black text/white border, but could cut them to any color you would want. Trying to gauge interest so let me know.
-
Interior colors/paint
Airborne Janitor replied to eaglescout526's topic in MJ Tech: DIY Projects and Write-Ups
I tried the Rustoleum Dark Gray and I liked the color, but didnt care for the gloss. I am planning on painting all my plastic trim one color so I don't want a super glossy finish. Did you try either of these SEM paints? Closest I could find to a match for the mopar dark charcoal.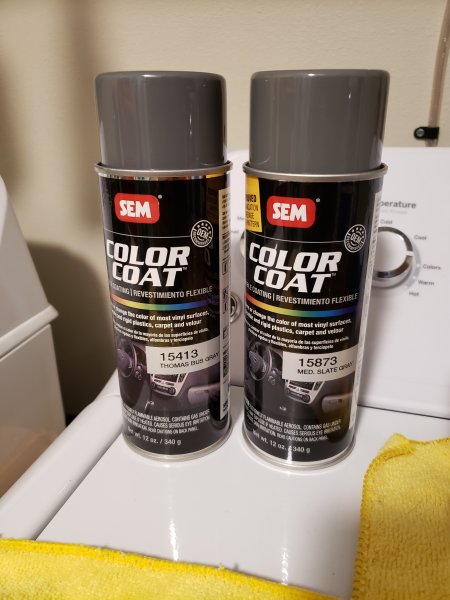
-
A little sneak preview because I'm impatient.
-
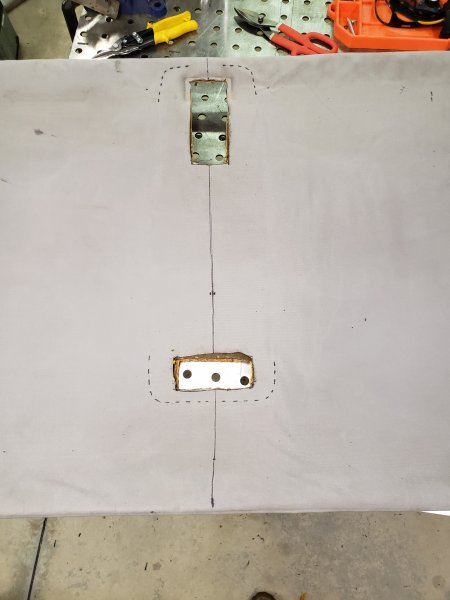
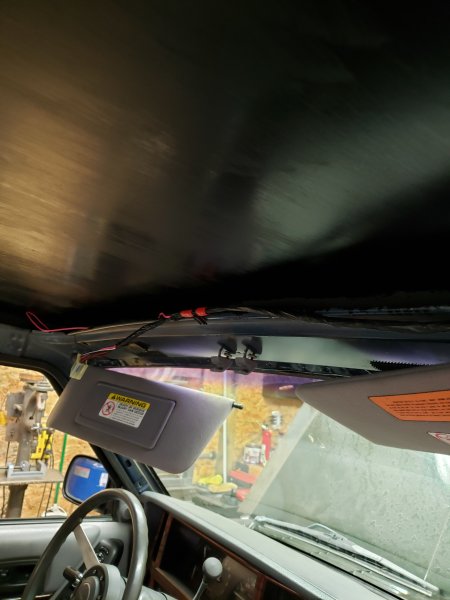
MODIFYING THE HEADLINER Of course your new OHC won't fit unless you're willing to cut some holes in your headliner. I drew as straight of a line I could down the middle of the headliner to use as a reference. I used tin snips and metal cutting shears to cut the holes. Thankfully everything looks good and the MJ OHC is a tight fit. Now to get the MJ OHC and headliner reupholstered. Hope to drop them off at the upholstery shop tomorrow.
-
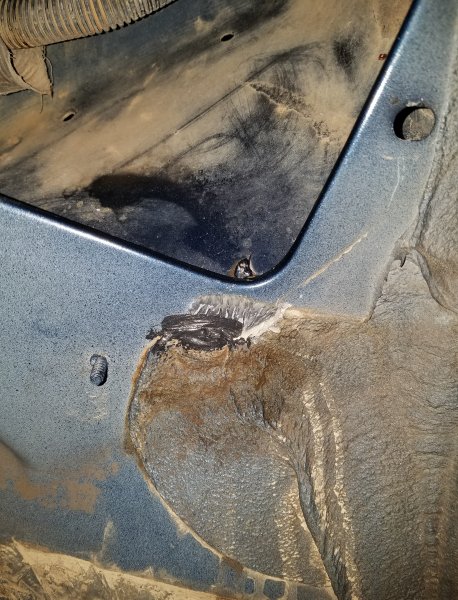
here's some better pics of the repair.
-
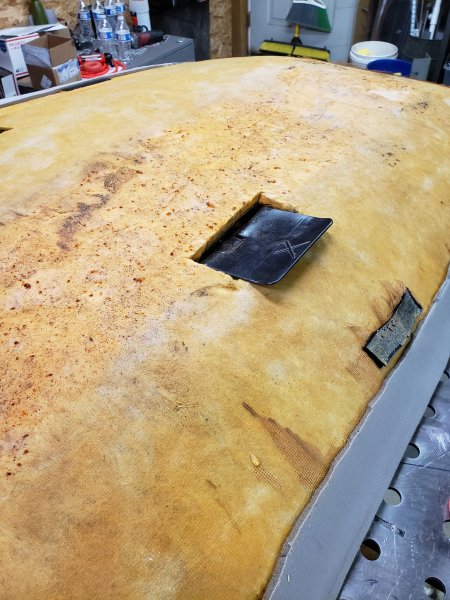
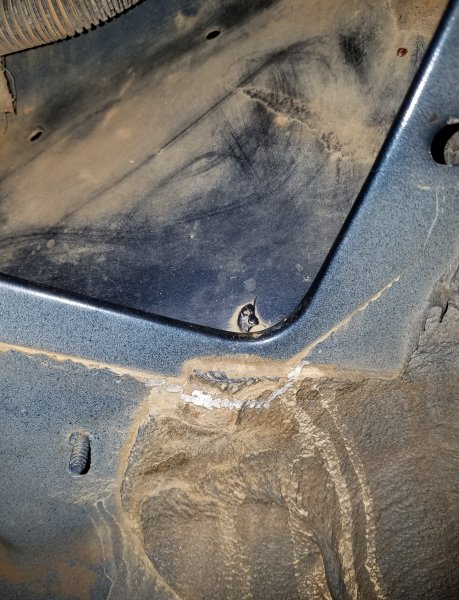
Correct. The picture shows the problem, not the solution. If you look in the picture you can see a faint white horizontal line where the bottom of the blower motor sat/sealed. In the bottom right you can see some of the brownish seam sealer where it would interfere with the blower motor seal. You can see traces of muddy water below it. I used a grinding stone on a dremel to dig it out, which revealed there is a section of overlapping sheet metal that will have to be "resealed". You're basically grinding out the protrusion of seam sealer, then resealing it as flat as possible with the rest of the firewall to have a clean fit of the blower motor seal.
-
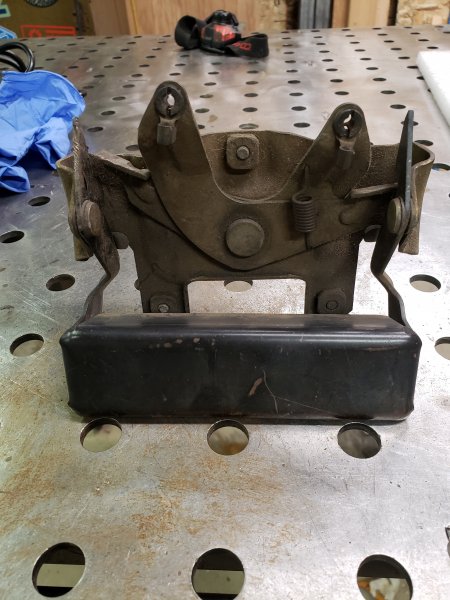
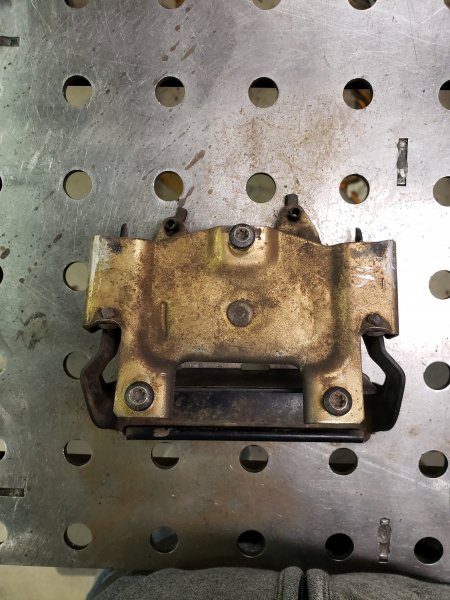
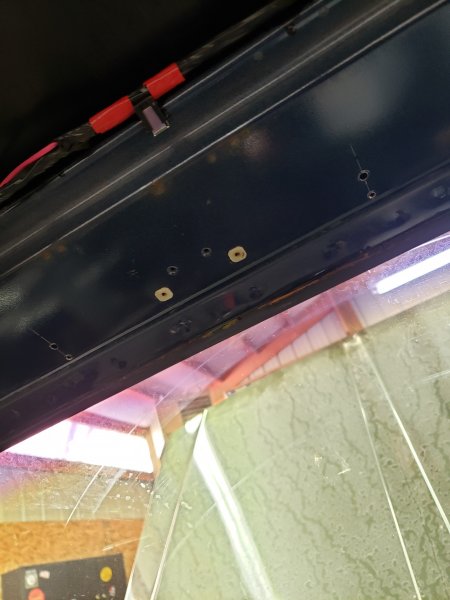
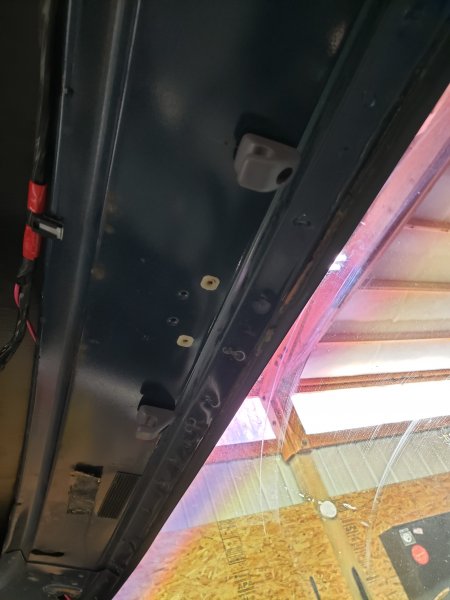
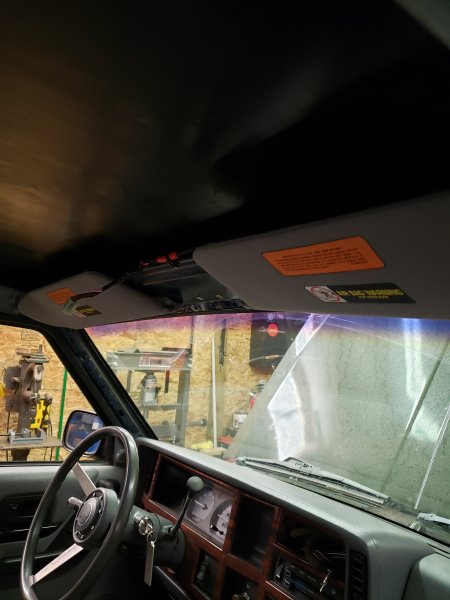
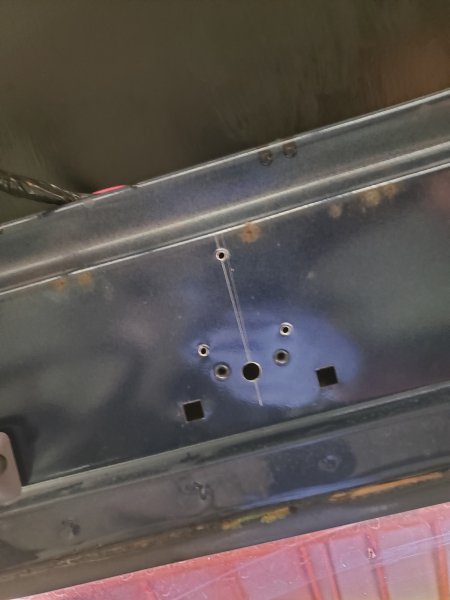
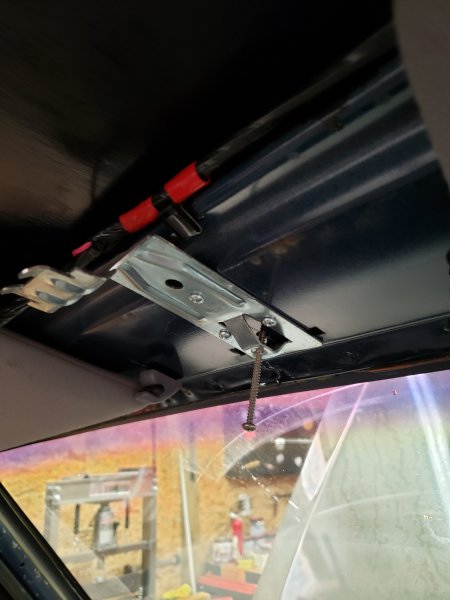
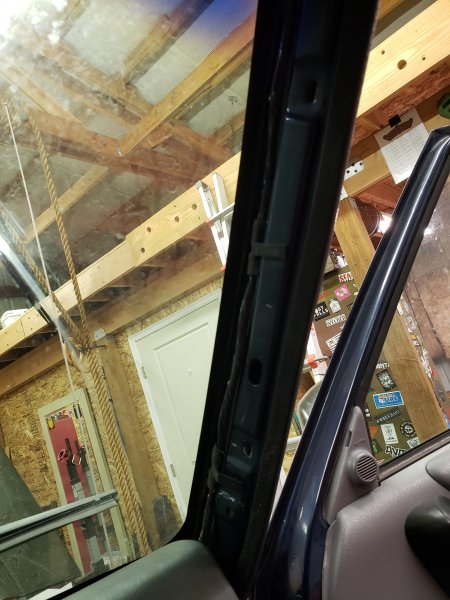
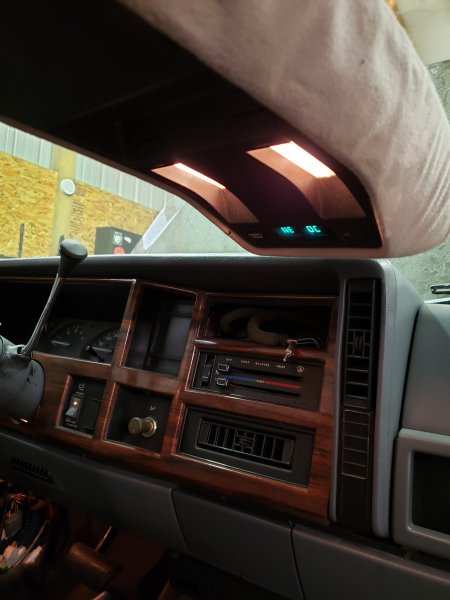
INSTALLING XJ SUNVISORS The MJ sunvisors are longer than the XJ ones, and will interfere with the installation of the OHC. However you will need to drill some holes to mount the XJ sunvisor retainer clips. I reinstalled the headliner and the XJ sunvisors, then snapped the retainer clips onto the sunvisors to mock up their place on the headliner. I used a hammer and punch to center punch all holes for accuracy. Removed the headliner then used a stencil, square, and scribe to mark the holes. INSTALLING THE OHC BRACKET I took the following pic from the donor XJ I pulled the OHC out of. Proved to be a good reference for mounting the bracket. You did grab the mounting bracket for the OHC right? Using the bracket itself as a template, I was able to mark all the hole locations. I basically eyeballed it with the above photo.
-
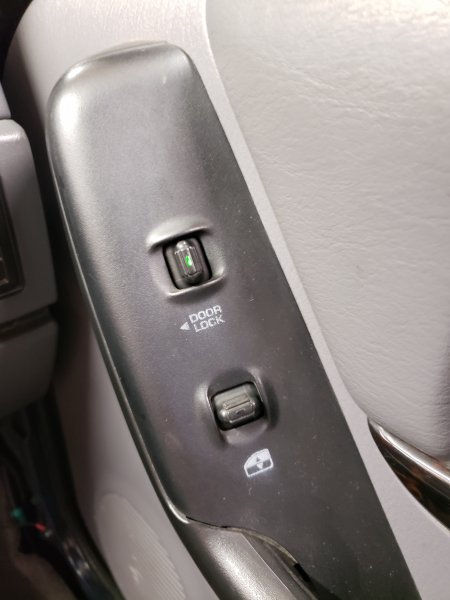
'97+ Power Door Swap
Airborne Janitor replied to CatfishJoe's topic in MJ Tech: DIY Projects and Write-Ups
I mean it makes sense that the passenger door lock needs constant power. But I wonder what makes a 97+ XJ switch/light turn off? Maybe theres something in the XJ fuse block/PDC that halts power to the switch/light, until the switch is activated? -
I'm curious to see what they looked like.
-
Chrome door handles
Airborne Janitor replied to Dammerung's topic in MJ Tech: Modification and Repairs
I know the 97+ handles are a little different than the pre97s, but are they interchangeable? Could you put chrome handles on 97+ XJ doors? -
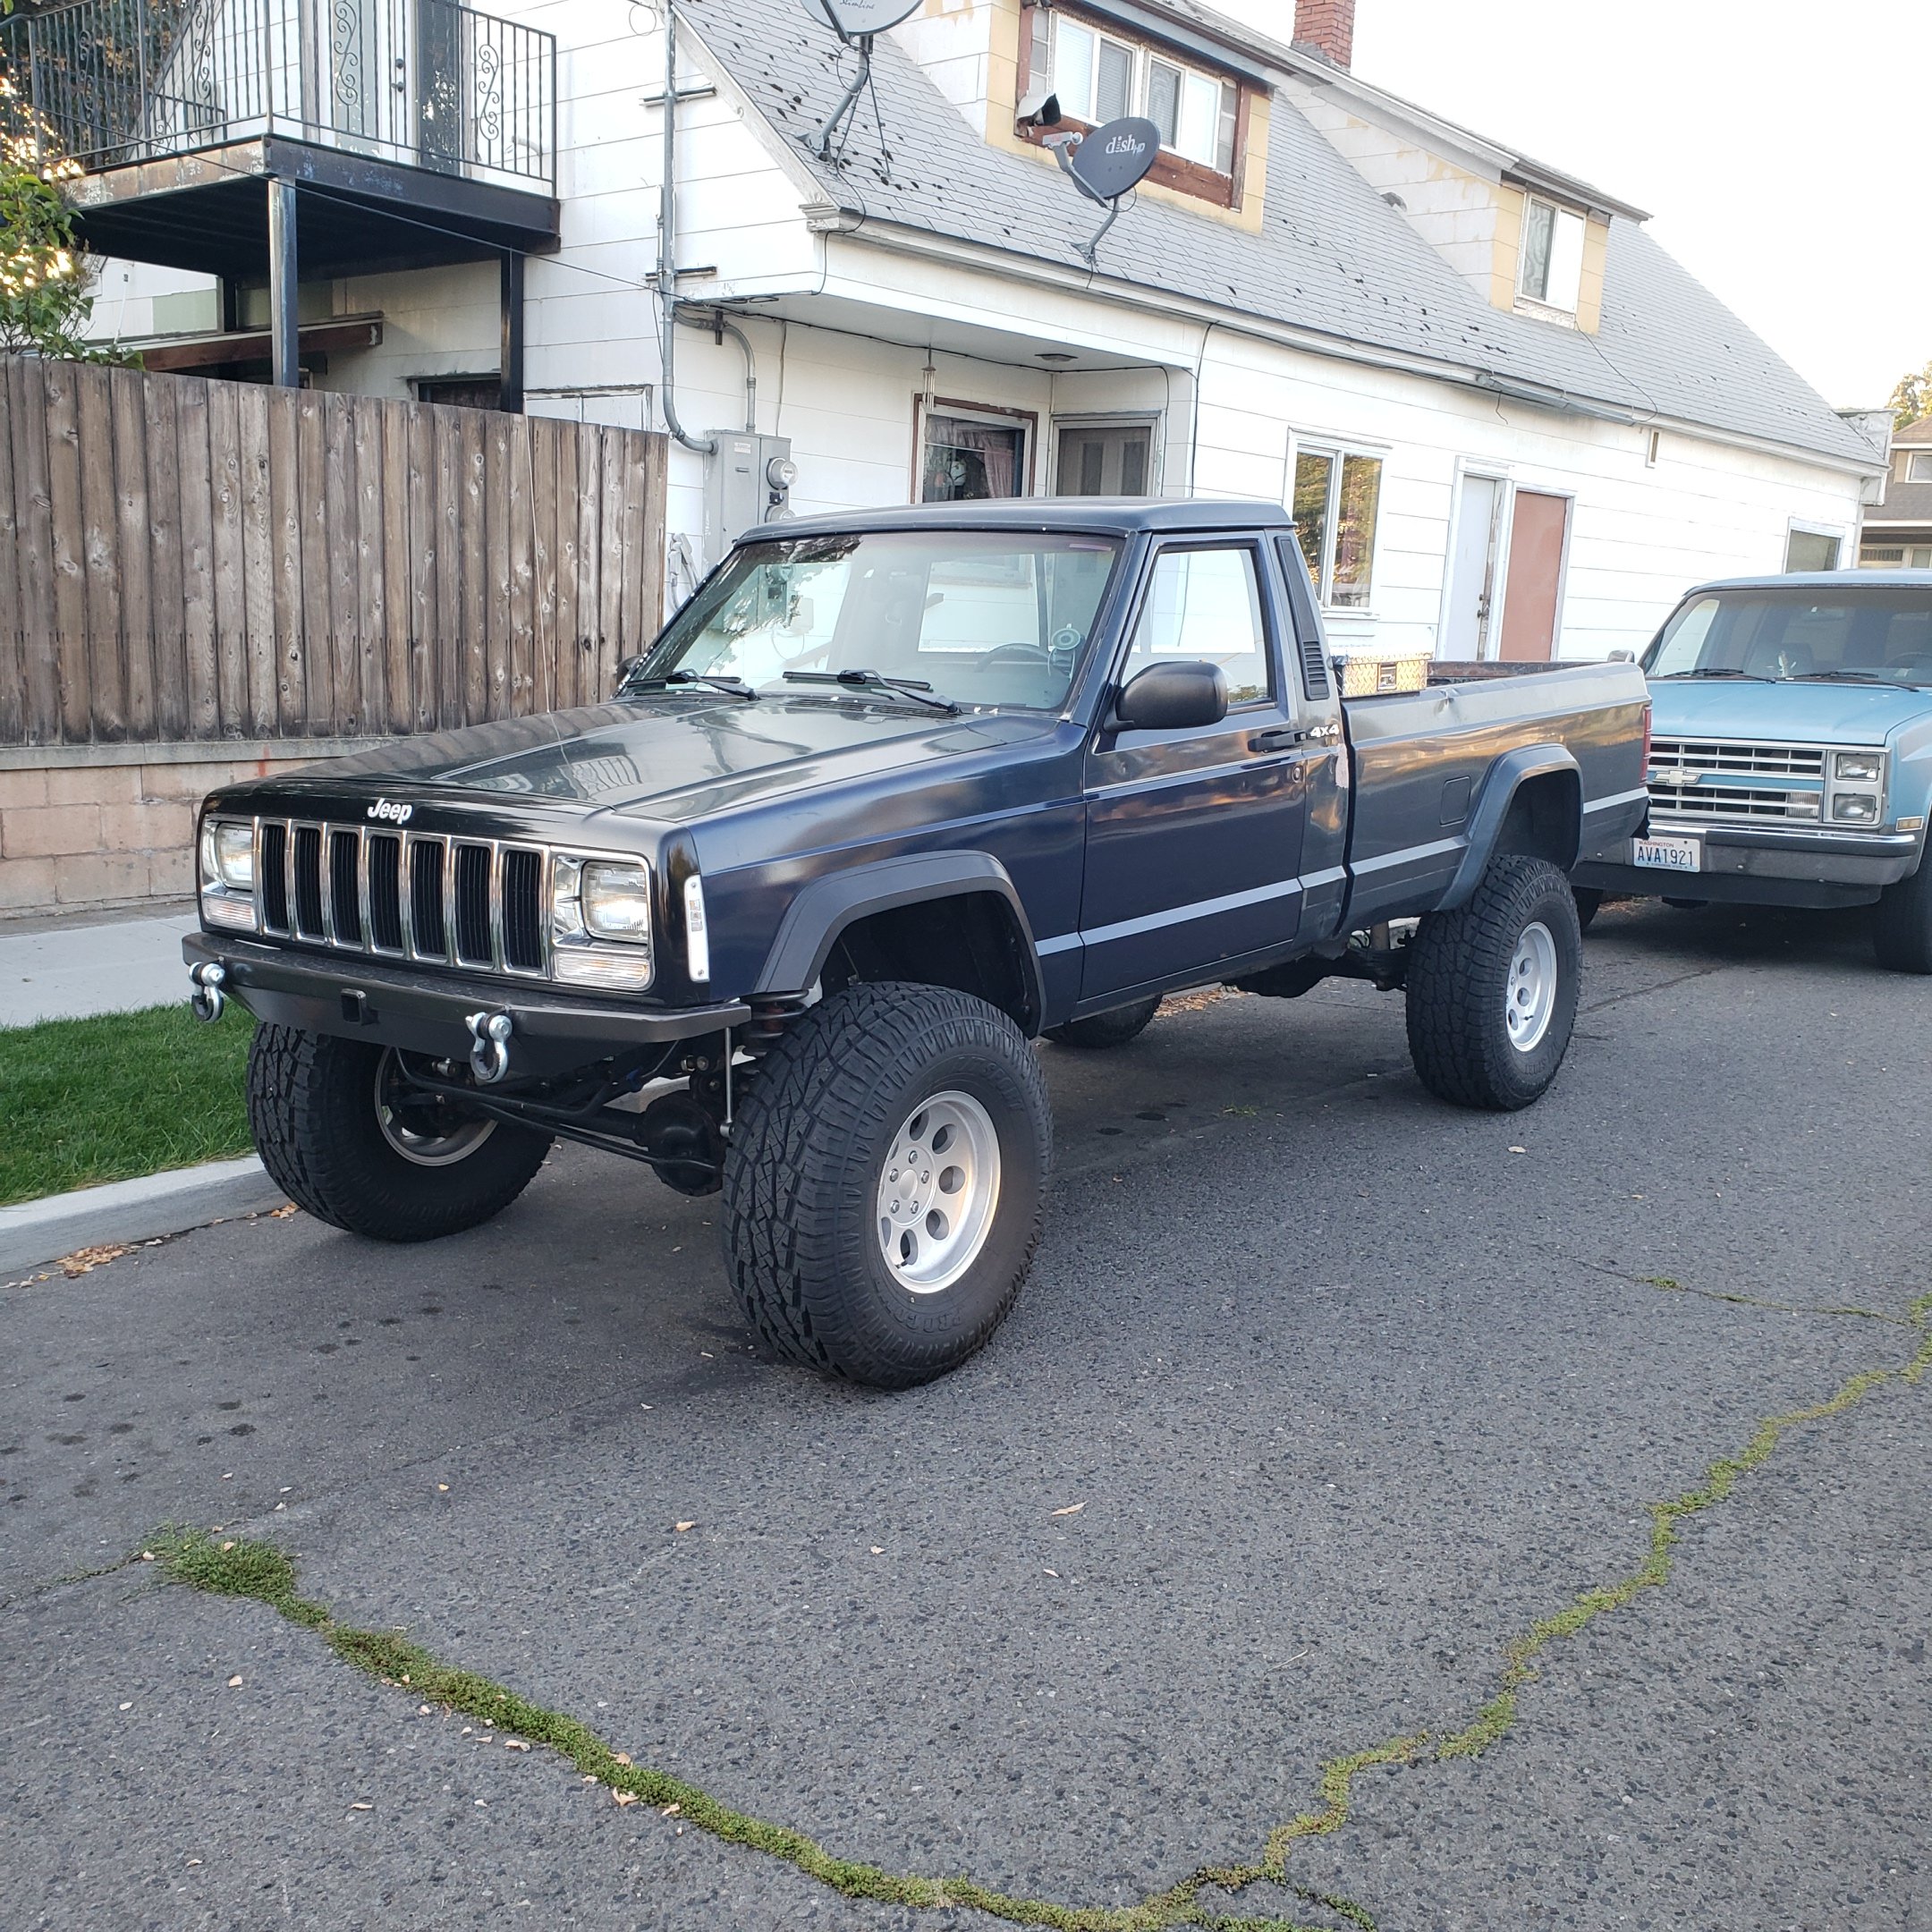
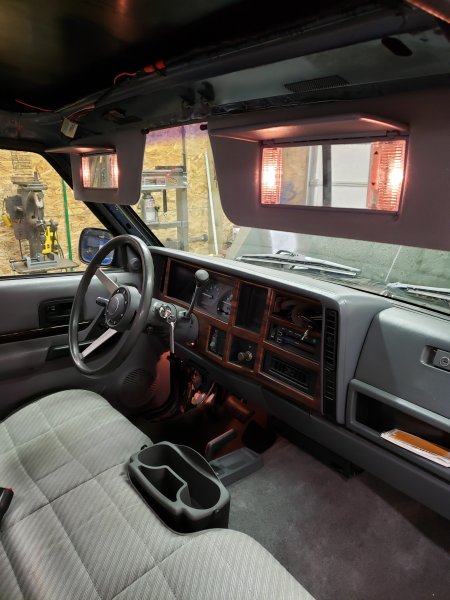
Got the power doors completely wired up and functional. I used this thread as a reference and added some details and images as well: I also installed the overhead console wiring harness, and I am currently documenting my OHC install and build in this thread: And one of my favorite mods, the Rubbermaid cupholder for bench seats: Short term goals are to wrap up all the interior projects, including rebuild and reupholster of the OHC, reupholster headliner, repaint all plastic trim and reinstall. Still working on finding the right shade of gray to use...

-
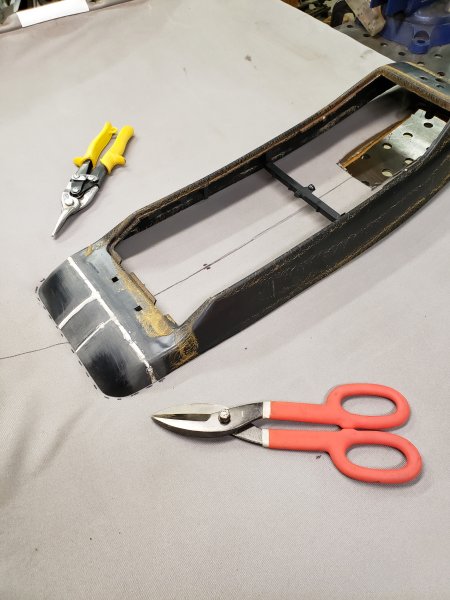
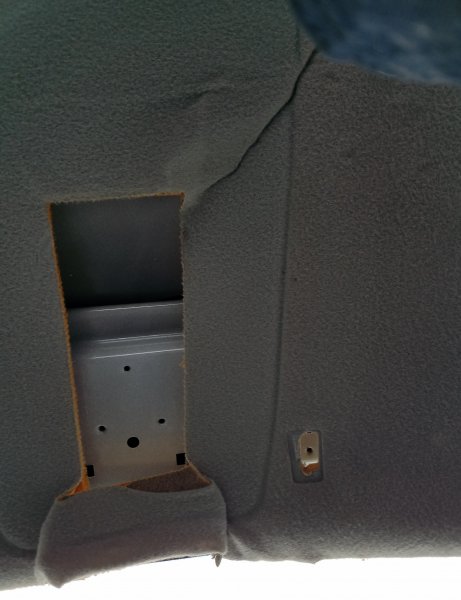
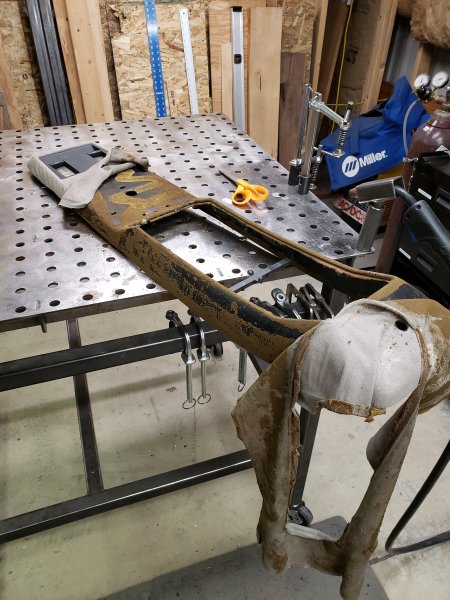
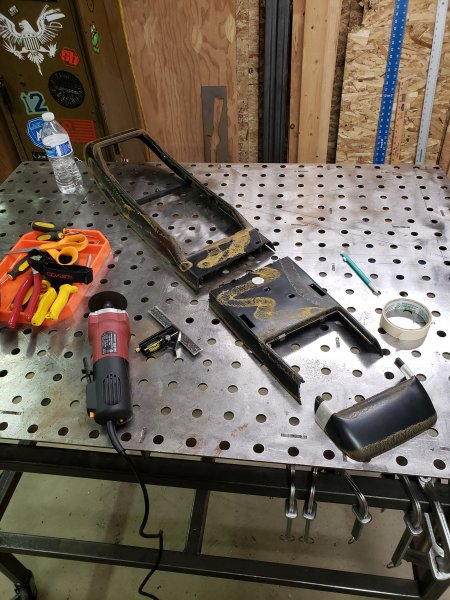
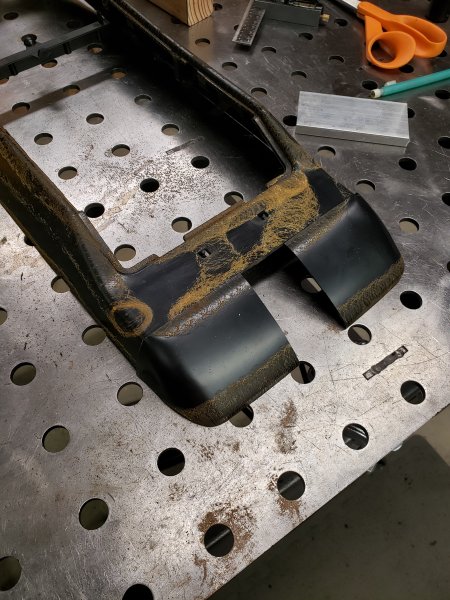
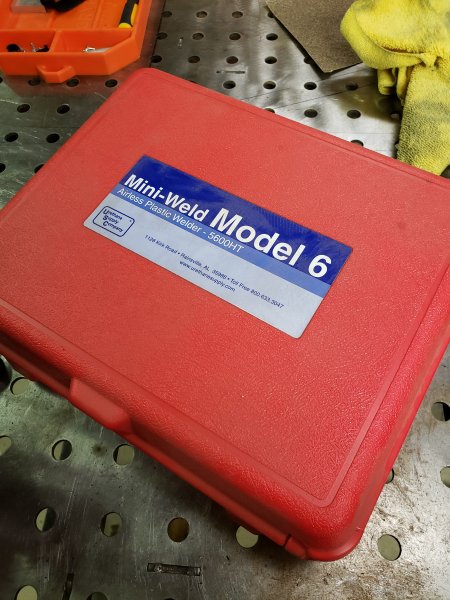
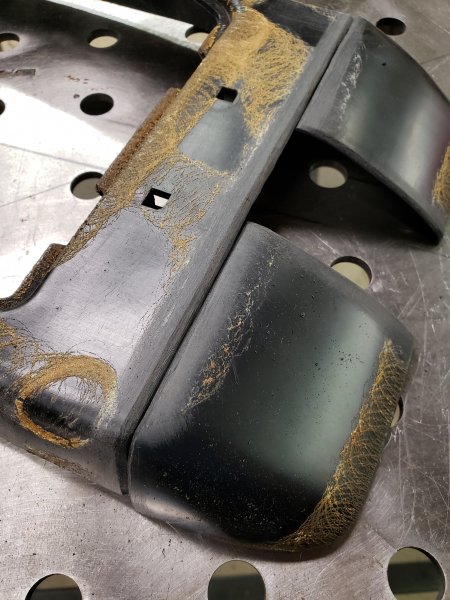
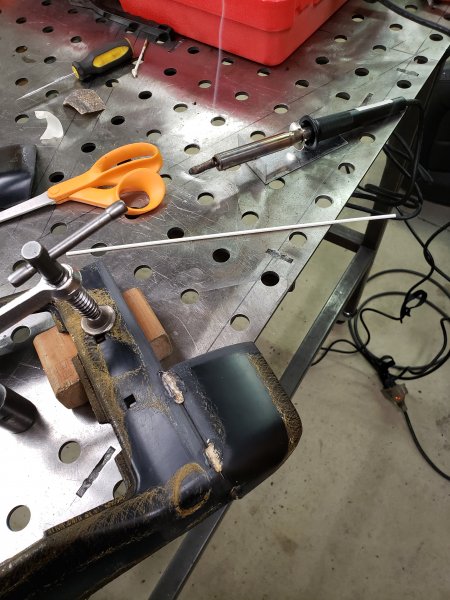
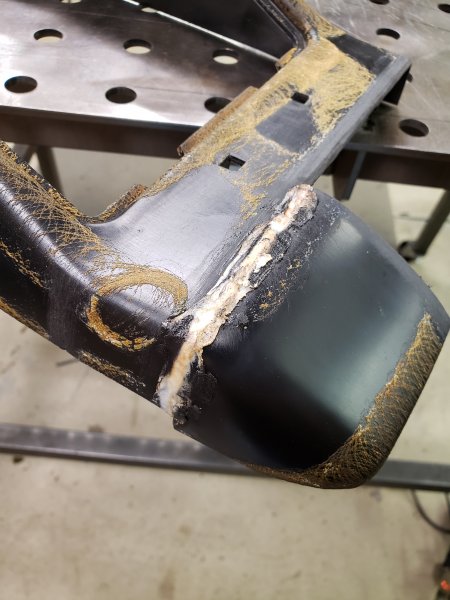
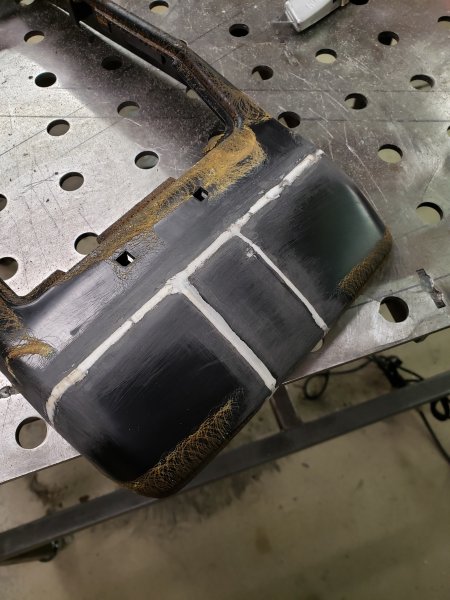
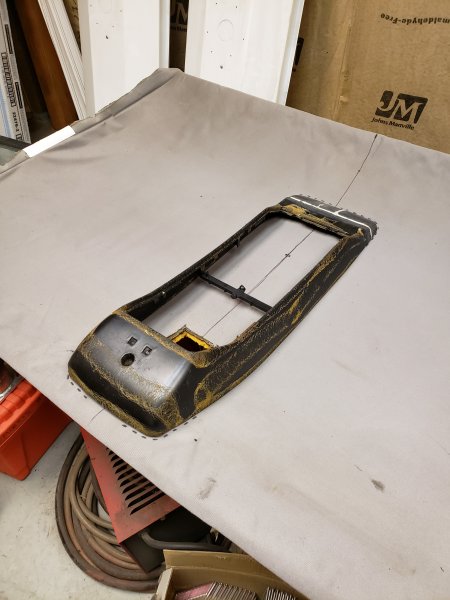
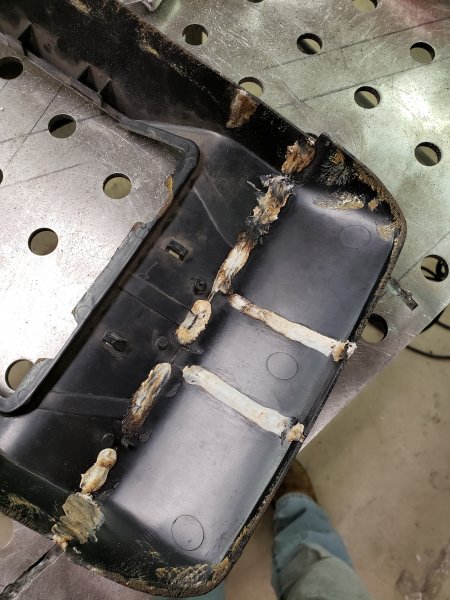
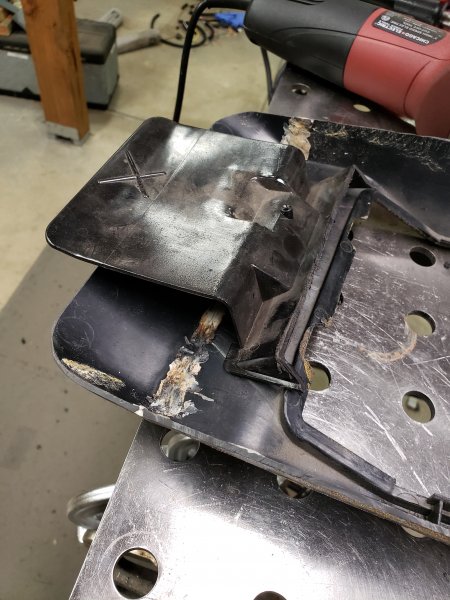
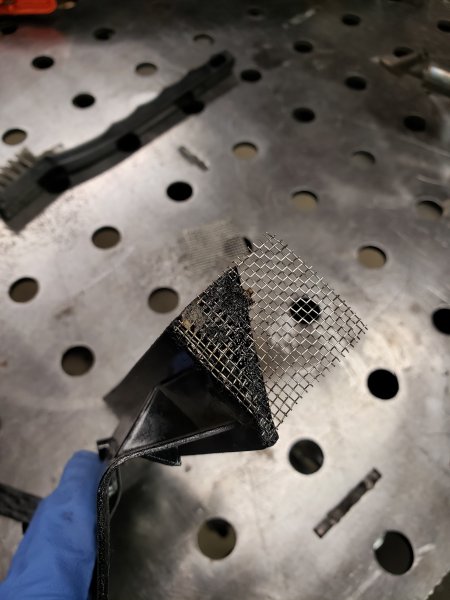
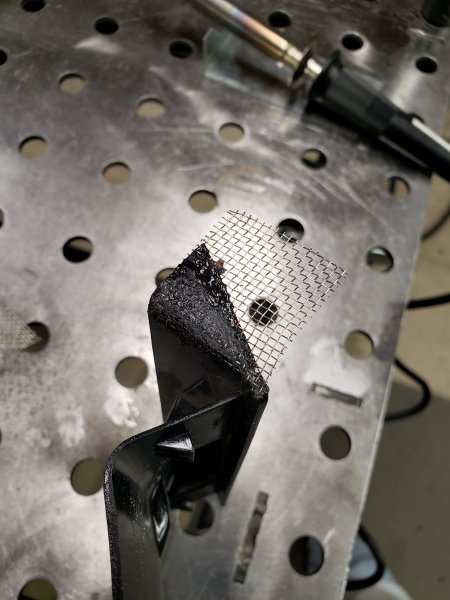
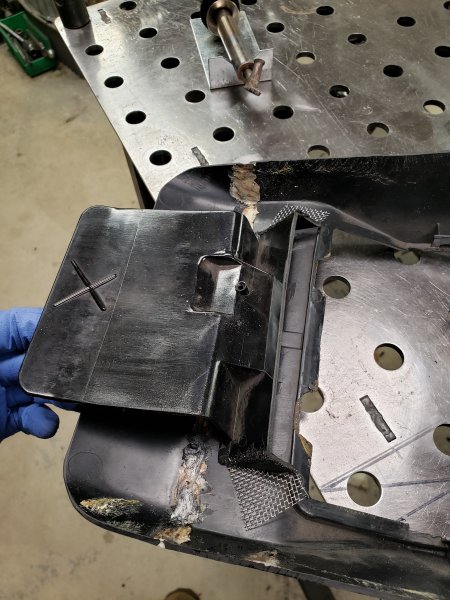
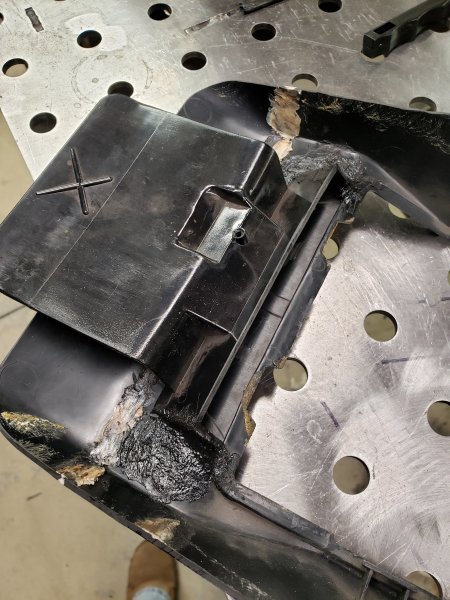
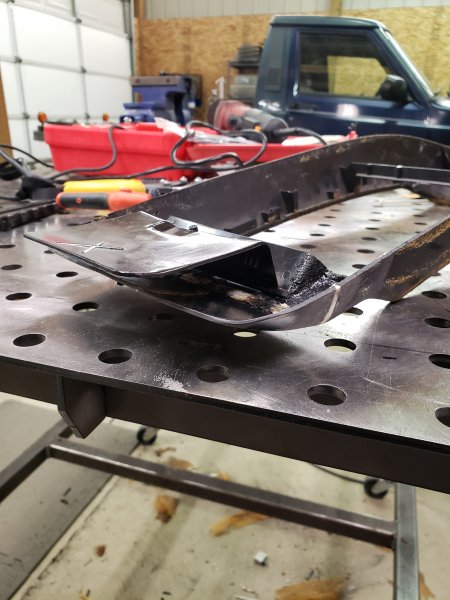
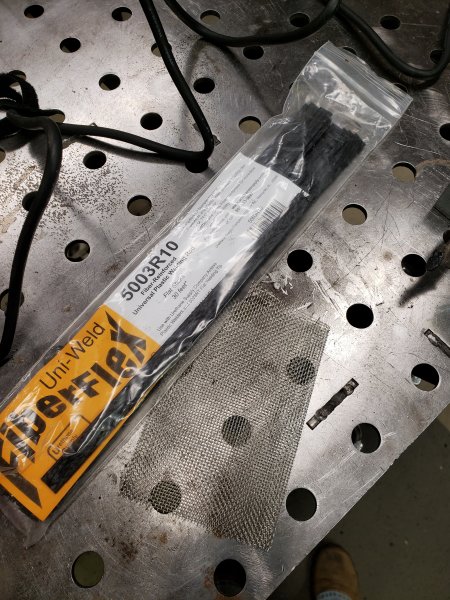
If you're pulling one of these from a junkyard rig chances are it's probably in rough shape, at least the upholstery probably is. You will also have to cut the OHC down to fit in the cab of the MJ, and rebuild/reshape it. So if you want an OHC done right you'll need the right tools and skills to make it work. Disassembly requires 3 tools really, a Philip's screwdriver for the dome light housing screws, and a flathead screwdriver and a small pick to undo the little plastic clips that hold the OHC together. But you'll need something to cut the console with precision, and something to rework/shape the console. I am using an electric cutoff tool (dremel could work too) and a plastic welder, I know some have used resin/fiberglass. OHC DISASSEMBLY There are 3 Philip's head screws for each dome light housing that needs to be removed. 1 small Philip's head screw to remove the keyless entry circuit board. After that its careful prying and manipulation with a flathead and pick to remove the OHC into multiple pieces: the shell, the sunglasses/garageopener/computer housing, the front computer/dome light assembly, rear dome light assembly. Take your time and be careful, the plastic may be brittle and not flex without cracking. Be especially careful when removing the main housing from the shell, start with freeing the rear housing tabs then working your way forward to computer. Then pull it down and away from the shell. don't try to force the computer parts out. Once you remove the housing it's easy to see how the computer assembly attaches and removes. Theres also a small plastic plug that sits where the front OHC screw goes through. I found using a pick and gently prying it out was the best way for removal without damage. Once the parts are free you should just have a shell and the upholstery should peel off easy. Scissors help too. OHC CUT AND REWELD Now for the fun part. Since the XJ OHC is too long for the cab of the MJ, it has to be cut down to fit. If you don't want to have a hacked off piece of plastic for the rear of your console, you'll need a way to shape it. If you're skilled with fiberglass that's an option. I'm not, but I do have a plastic welder... My wife got it for me as a gift from amazon a few years back. I wanted it to repair the torn mounting tabs on the flares on my XJ. Since then I've used this kit for all types of projects, even fixing broken battery doors on remote controls. First, I cut my OHC into 3 pieces using an electric cutoff tool. Then cut the rear piece down the middle since it was too narrow to fit properly. I treated all the pieces as if I were dealing with welding steel, which meant beveling all the joints to allow a place for the filler to fuse. I used a dremel with a grinding wheel. Tacking the pieces together... Running beads... Welding it all together then sanding it smooth. Note I did cut up 2 OHCs to do this. I planned on keeping one of them as a "parts donor". Then more cutting with the cutoff tool to fit the contour of the headliner. Picture of the inside of the console to show off the ugly (but strong) welds. After welding the outside (but before sanding) I used a dremel to quickly groove the inside joint then ran a plastic bead. I decided I wanted to reuse the rear "paddle" portion of the XJ OHC so that the fit of the modified MJ OHC would be tight against the headliner. The plastic welder is generally used for butt joints, but a cool feature of this particular model is the use of a flexible steel mesh and a universal fiber flex plastic that can make all types of unconventional plastic repairs. You basically melt the mesh into the base plastic, then melt the fiber flex on top of the mesh, essentially sandwiching the mesh. The repairs are very strong, as strong if not in some cases stronger than the base plastic. I used this method to essentially fillet weld the paddle mount to the MJ OHC. I just had hernia surgery (hence the free time to pursue this project) and I felt like the surgeon made a similar repair to me...
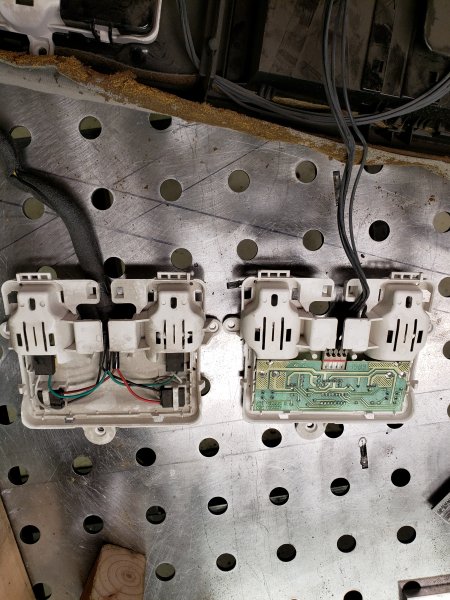
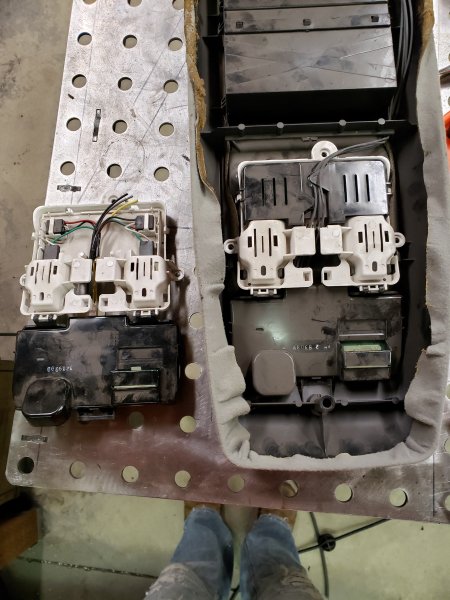
-
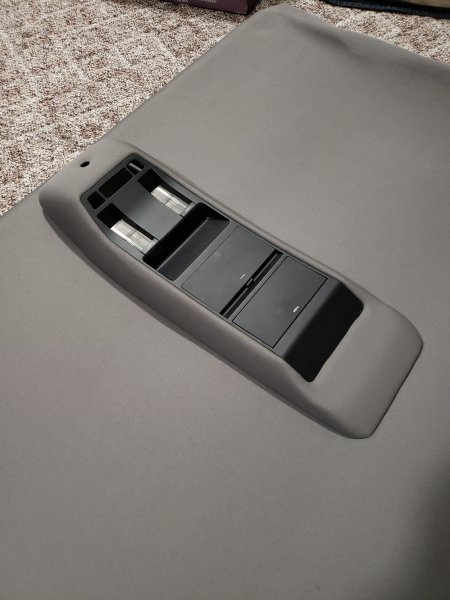
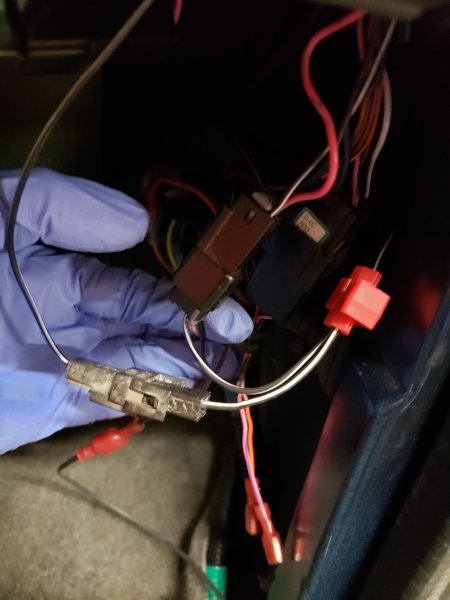
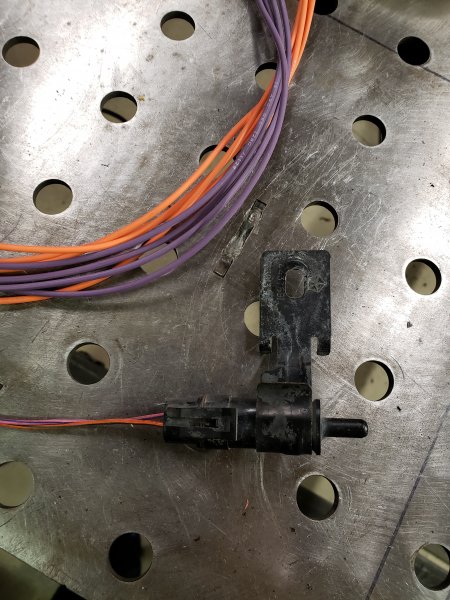
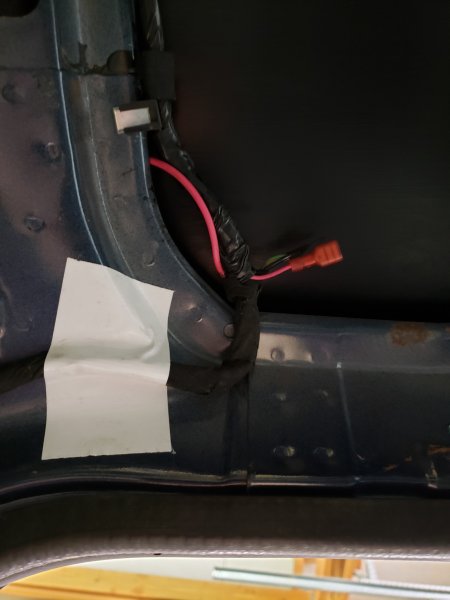
Parts required from donor XJ: Overhead console (OHC) Sunvisors & clips (optional) OHC wiring harness (runs along passenger A-pillar) OHC mounting bracket & screw (only front most bracket required) Temperature sensor (located behind front bumper, in front of "frame") ________ After scoring a couple of pre97 XJ overhead consoles (OHC) from the parts yard, I decided that one could be modified to work in the cab of an MJ. Figuring this project had been done before, I spent hours reading through threads on here and NAXJA. Some of the info and even FSM wiring diagrams didnt match what I had, and theres even different versions of the OHCs to make it even more confusing. So I started this thread to compile my notes and document my process. This is a long one so grab a beer and take a seat. To start, I believe the pre97 XJ OHC was offered from 90-96. There are updated 97-01 OHCs that require OBD II to utilize all the extra computer features such as "average gas mileage" and "miles to empty". My documentation will deal with the older pre97 models. OHC IDENTIFICATION There are (at least) 2 different styles, and I do not know what year the break between them is. I had a 92 XJ Laredo years ago that had a "newer" style OHC for what its worth. The differences are the wiring for the lights. The "older" style OHC has 4 black wires that run from the front dome lights to the rear dome lights. The "newer" style OHC has 3 colored wires between the dome lights: black, yellow, and gray. The older style OHC is wired so that the rear dome lights would come on when the doors to the XJ were open, NOT the front lights. The newer style OHC has both front and rear dome lights come on with the doors open. Why does this matter? Because the OHC is too long to fit inside the cab of the MJ without being cut down, which means you have to get rid of the rear dome lights. If you have the older style OHC you will have to either rewire or swap the dome light fixtures if you want them to come on with the doors open. The newer style OHC you can simply cut the wiring to the rear domes and be done with it. Other minor differences between the 2 styles are that the older style has black covers over the bulb wiring, and removal of the covers shows a circuit board instead of the colored wires of the newer style OHC. Pics for reference, newer style on the left, older style on the right. For simplicity purposes I chose to use the newer style OHC for my install. WIRING HARNESS Let's switch gears for a moment and talk about the wiring harness for the OHC. In order to successfully do this swap you'll want to have the wiring harness that runs along the passenger side A-pillar. There are quick disconnects at the kick panel and the wiring extends all the way to the roof and to the sunvisors. Also be sure to snag the temperature sensor behind the bumper. Theres a couple different styles of sensors but mine looks like this: If you're planning on adding an OHC then swapping over to sunvisors with lighted vanity mirrors is an easy upgrade. From what I've seen the pigtails for the sunvisors are a single pink wire with a single thin, black connector, and never changed throughout all years of XJs. I have a nice set from a 98 XJ I am using, complete with airbag warnings. Whatever. Since I wired up 97 XJ power doors on my MJ, I wasnt going to make any attempt to wire up the keyless entry sensor/module, not to mention I didnt really want to open that can of worms. So I cut off the pigtails for the harness, which had black, green, tan, wires and a pink one on the OHC/keyless sensor end. The pink wire is spliced into the larger pink wire that powers the vanity mirrors so it has constant 12V power. I decided to crimp on an insulated quick disconnect to it in case I need easy access to power from the roof in the future. I'm thinking maybe wiring switches in the OHC eventually... WIRING DIAGRAM Here's where it gets confusing. There were (at least) 2 styles of wiring harnesses with completely different colored wires. I have seen several early 90s FSMs state the wiring for the harness is as follows: Pink A - dome lamps (12v?) Pink B - reading lamps (what's the difference?) Black/blue - temperature sensor Violet/green - temperature sensor Orange/black - illumination (connects to the dimmer) Blue/red - head lamps on (dims the display when the headlamps are on) Black/blue - compass ground White/pink - 12V Some individuals have stated they had a yellow wire that went to the doorjamb switch ground to activate the dome lights. My wiring harness was different. here's how I wired mine: CONNECTOR 1 Pink - constant 12V Black - ground Black/white - ground to doorjamb switch. The existing wire to the doorjamb switch was the same color, I simply spliced into it CONNECTOR 2 Orange/green - temp sensor Pink/blue - temp sensor Black/orange - ground White/black - ignition on 12V Orange/black - illumination. I left this unplugged. Blue - left unplugged. May be for headlights on If you did it right you should be able to plug in your OHC and sunvisors and have power.

-
'97+ Power Door Swap
Airborne Janitor replied to CatfishJoe's topic in MJ Tech: DIY Projects and Write-Ups
Also wanted to note that wiring the passenger lock circuit directly to constant 12v leaves the passenger door lock switch energized and glowing. I got curious and checked my 98 XJ but the door lock switch does not illuminate with the vehicle off despite having power? It's not a big deal but I did wonder about the constant power draw, as well as having the light on all the time...