cruiser54
-
Posts
9413 -
Joined
-
Last visited
-
Days Won
14
Content Type
Profiles
Forums
Gallery
Everything posted by cruiser54
-

Still bucking and dieing
cruiser54 replied to comanche32's topic in MJ Tech: Modification and Repairs
This^^ -
Is this new noise a lifter?
cruiser54 replied to brucecooner's topic in MJ Tech: Modification and Repairs
when does it do this? On start-up? If so, shut it off, count to 10, and restart it. Noise gone? -
Still bucking and dieing
cruiser54 replied to comanche32's topic in MJ Tech: Modification and Repairs
You could have a failing fuel pump. -
99+ intake on renix head 4.0
cruiser54 replied to Manche90's topic in MJ Tech: Modification and Repairs
Too much work for next to nothing horsepower wise. You must use the gasket for the intake manifold you are using. Not for the head you're using. -
Or the gauge could be inaccurate. Pull the vacuum line off the fuel pressure regulator and see if there's fuel in it. Also, the line from the throttle body to MAP sensor will cause rich problems if it has any vacuum leaks.
-
No Power to Blower Motor
cruiser54 replied to Gary from Texas's topic in MJ Tech: Modification and Repairs
Anything else not working? Like radio and turn signals? -
Upgrade mechanical fan clutch is NAPA 272310. They tend to be louder than stock and sometimes fit rather close to the radiator.
-
Need new computer for 87 Comanche long bed
cruiser54 replied to Kesswic's topic in MJ Tech: Modification and Repairs
THIS^^. CRUISER'S MOSTLY RENIX TIPS THROTTLE BODY AND IAC CLEANING OCTOBER 30, 2015 SALAD 24 COMMENTS Originally by TJWalker of CherokeeForum & JeepForum The Idle Air Control (IAC) is mounted on the back of the throttle body (front for ’87-’90). The valve controls the idle speed of the engine by controlling the amount of air flowing through the air control passage. It consists of a stepper motor that moves a pintle shaped plunger in and out of the air control passage. When the valve plunger is retracted, the air control passage flows more air which raises the idle speed. When the valve plunger is extended, the air control passage flows less air which lowers the idle speed. Over time and miles, the IAC can get carboned up which can have an adverse affect on idle quality. Cleaning the IAC may restore proper function and is an easy procedure to perform and good preventive maintenance so it is never a bad idea. This should be part of a normal tune-up procedure and whenever idle/stalling issues are present. CLEANING THE JEEP 4.0 IDLE AIR CONTROL Remove the air filter cover, associated hoses and the rubber boot that goes from the air filter cover to the throttle body. Remove the IAC with a Torx driver (2 bolts; one can be kind of hard to get to). On ’91 and later, it may be easier to just remove the whole throttle body. Be sure to use a new throttle body to manifold gasket when reinstalling. “Gently” wiggle out the IAC from the throttle body. Gasket/O-ring on the IAC can be re-used if it is not damaged Clean the IAC with a spray can of throttle body cleaner; inexpensive and available at any place that sells auto parts. Throttle body cleaner is recommended rather than carburetor cleaner as it is less harsh, safe for throttle body coatings and oxygen sensors. Use cleaner, a rag and a toothbrush and or Q-Tips. Be gentle; don’t twist or pull on the pintle that protrudes from the IAC as it is fragile and you could damage it. Thoroughly spray clean and flush where the IAC seats in the throttle body with the same spray cleaner. It is also a good idea to clean the entire throttle body bore itself, the butterfly valve inside of the throttle body and it’s edges, and all associated linkage as long as you have things disassembled. Revised 1-31-2016 -
THE HISTORY OF THE 4.0 BEST INJECTORS FOR RENIX AUGUST 6, 2016 CRUISER54 182 COMMENTS The original Renix injectors made by Siemens-Deka were only “one holers”. That means the fuel was discharged through only one hole. Not the most efficient design by today’s standards. Modern injectors have at least 4 spray holes for better fuel atomization. Another issue is the original injectors were prone to leaking fuel at a seam and spraying gas all over hot manifolds. Not good!! A nice upgrade is to use Volvo injectors. The use of these injectors was pioneered by Programbo from Cherokee Forum when he suggested them to DFlintstone there. Flintstone was the guinea pig and reported excellent results. I have experienced the same results as have many others. The 746s, as they’re called, have the 4 hole design and the complete Bosch part number is 0 280 155 746. These injectors can be purchased refurbished for not much money and are a direct bolt-in. WARNING: AVOID THE CHICOM KNOCKOFF INJECTORS!!! BUY ORIGINAL BOSCH/VOLVO REFURBISHED INJECTORS HERE IN THE USA. Trevor.skankfootracing@gmail.com You will experience smoother idle and better throttle response. Perhaps some MPG improvement also.
-
Need new computer for 87 Comanche long bed
cruiser54 replied to Kesswic's topic in MJ Tech: Modification and Repairs
Tips 1 through 5 COMPLETELY. Do it yourself. www.cruiser54.com -
Need new computer for 87 Comanche long bed
cruiser54 replied to Kesswic's topic in MJ Tech: Modification and Repairs
I'm not convinced it's the ECU. How much diagnostic time did the mechanic invest in this? I have an 87 ECU. -
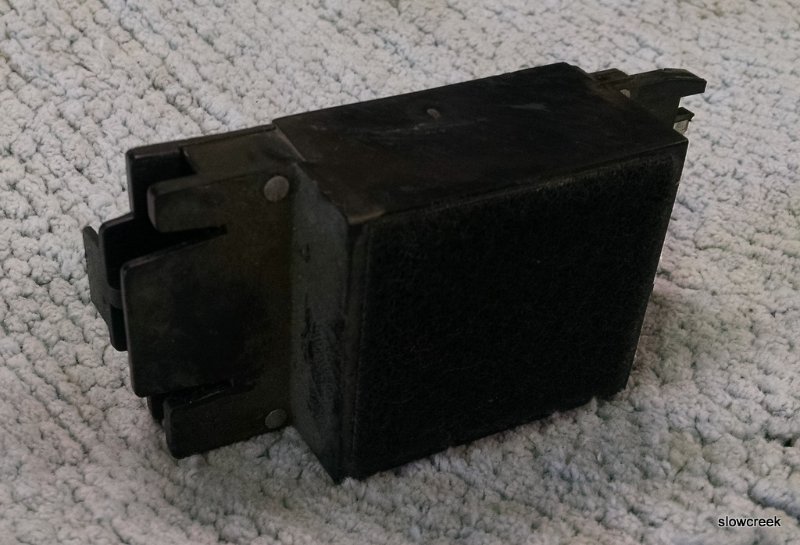
Wipers won’t turn off need help
cruiser54 replied to Manche90's topic in MJ Tech: Modification and Repairs
Is your Jeep equipped with intermittent wipers? If so, MAYBE the delay module up under the knee bar near the steering column, attached by velcro, might be bad. You can remove it and plug the 2 harnesses together and see what happens.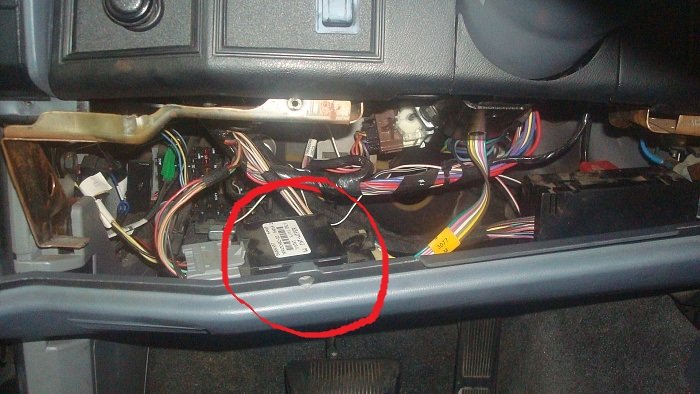
-
-
Replacing Brake Distribution block
cruiser54 replied to dinghyboy's topic in MJ Tech: Modification and Repairs
The NPT threads are used so you can get adapters from NPT to what ever brake line fitting you need. -
Replacing Brake Distribution block
cruiser54 replied to dinghyboy's topic in MJ Tech: Modification and Repairs
I could do that. Take a picture. Don't let me forget. -
Post 1 says "easily".
-
Replacing Brake Distribution block
cruiser54 replied to dinghyboy's topic in MJ Tech: Modification and Repairs
There's plenty of room for the standard sized adjustable prop valve. -
Could This Cracked Head be Fixed?
cruiser54 replied to howeitsdone's topic in MJ Tech: Modification and Repairs
-
CRUISER'S MOSTLY RENIX TIPS HO INTO RENIX SWAP OCTOBER 31, 2015 SALAD 76 COMMENTS This swap is easier than some will lead you to believe. And generally Pooh-poohed by those who have never done it. Those of us who have done it, like myself, will share with you the things that need to be done for a successful swap. Just think of it as swapping in a long block. XJ Cherokee and ZJ Grand Cherokee 4.0L engine blocks interchange. 2000+ TJ Wrangler and WJ Grand Cherokee 4.0L engine blocks interchange. YJ and 1997-1999 4.0L TJ blocks will interchange in XJ/ZJ XJ/ZJ blocks, and the 2000+ TJ/WJ blocks do not interchange without significant modifications. TJ/WJ 4.0L Engine blocks underwent clean sheet design changes effective in the 1999 WJ Grand and 2000 TJ Wrangler. These blocks are not interchangeable with XJ/ZJ engine blocks. The reason is motor mount bolt holes and belt driven accessory mounting bolt holes are in different locations, or not present at all, TJ/WJ vs. XJ/ZJ. Now that we know which engines we can use, let’s get down to business. The HO and Renix have some differences but none that can’t be overcome very easily. One running change was that the rear of the head was no longer drilled and tapped for the temperature gauge sender beginning in the 96 model year. The sender can be relocated to the threaded hole in the thermostat housing taken from an HO engine. You’ll have to extend the wire to that location. Some brave souls even drill and tap the HO head at the rear for the sender. You will be using the intake and exhaust manifolds from your Renix, along with all your sensors and wiring. Since the intake ports of the HO are slightly different, you use a new Renix gasket. Exhaust ports are identical. An alternative on exhaust manifolds: As far as exhaust, you can use the Renix exhaust manifold and be fine. If you want to use the HO exhaust manifold, you must go with an HO headpipe and screw your O2 sensor into that headpipe. Standard Renix harness is plenty long to do so. A bung can be welded into the HO manifold to accept the EGR tube. You will need to use your Renix distributor as it is different than the HO design. See Tips #12 – Setting Your 4.0 to #1 TDC and #13 – Distributor Indexing to be sure you get the distributor installed correctly. The flywheel or flexplate from the Renix must be used so your CPS gets the correct signals. The valve cover from the Renix allows you to keep your CCV system intact and requires no modifications. The HO block will have a plug in the coolant galley on the driver’s side of the block, closest to the front, which needs to be removed so your Coolant Temp Sensor can be installed in it’s place just as it is on the Renix. It requires a 5/16” square drive or a modified 3/8” drive that has been ground down to fit. Do this before installing the engine. As for the knock sensor, which is located just above the oil pan on the driver’s side of the engine about mid way, all the blocks I’ve seen are threaded for it. If not, I’ve heard they may be drilled but not tapped. Tap the hole if that’s the case. XJ: “Regular” (not Grand) Cherokees ’84-’01 ZJ: Grand Cherokee ’93-’98 (Gen1) WJ: Grand Cherokee ’99-’04 (Gen2) YJ: Wrangler ’87-’95 (Gen1) TJ: Wrangler ’97-’06 (Gen2)
-
2.5 Stumbles under load
cruiser54 replied to jgoodman1988's topic in MJ Tech: Modification and Repairs
.jpg.339374395f71f4b860d5a0a827c79fe0.jpg)
-
86 2.5l 4 cylinder distributor
cruiser54 replied to harleysMJ's topic in MJ Tech: Modification and Repairs
CRUISER'S MOSTLY RENIX TIPS RENIX CPS TESTING AND ADJUSTING OCTOBER 30, 2015 SALAD 131 COMMENTS Renix CPSs have to put out a strong enough signal to the ECU so that it will provide spark. Most tests for the CPS suggest checking it for an ohms value. This is unreliable and can cause some wasted time and aggravation in your diagnosis of a no-start issue as the CPS will test good when in fact it is bad. The problem with the ohms test is you can have the correct amount of resistance through the CPS but it isn’t generating enough voltage to trigger the ECU to provide spark. Unplug the harness connector from the CPS. Using your voltmeter set on AC volts and probing both wires in the connector going to the CPS itself as shown in Figure 2 as Connector A, crank the engine over. It won’t start with the CPS disconnected. You should get a reading of .5 AC volts. If you are down in the .35 AC volts range or lower on your meter reading, you can have intermittent crank/no-start conditions from your Renix Jeep. Some NEW CPSs (from the big box parts stores) have registered only .2 AC volts while reading the proper resistance!! That’s a definite no-start condition. Best to buy your CPS from NAPA or the dealer. Sometimes on a manual transmission equipped Renix Jeep there is an accumulation of debris on the tip of the CPS. It’s worn off clutch material and since the CPS is a magnet, the metal sticks to the tip of the CPS causing a reduced voltage signal. You MAY get by with cleaning the tip of the CPS off. A little trick for increasing the output of your CPS is to drill out the upper mounting hole to 3/8″ from the stock 5/16″, or slot it so the CPS bracket rests on the bell housing when pushed down. Then, when mounting it, hold the CPS down as close to the flywheel as you can while tightening the bolts. Another little tip to save tons of aggravation is to stick a bit of electrical tape to your 11mm socket and then shove the bolt in after it. This reduces the chances of dropping that special bolt into the bell housing. -
NOS 89 4.0 195 Thermostat
cruiser54 replied to oleskool's topic in MJ Tech: Modification and Repairs
The aftermarket MotoRad stats are not the same as the MOPAR MotoRad stats. I believe the suffix on the part number, the AC, the AD, only indicates the gasket selection included. Any 83501426XX will have the stat you're looking for. -
brake reservoir sediment (red mud, rust, ???)
cruiser54 replied to brucecooner's topic in MJ Tech: Modification and Repairs
The loop is not necessary and the fittings are standard. -
www.cruiser54.com. complete Tips 1 through 5.