


cruiser54
-
Posts
9413 -
Joined
-
Last visited
-
Days Won
14
Content Type
Profiles
Forums
Gallery
Everything posted by cruiser54
-

No Start after fuel injector install
cruiser54 replied to NC Tom's topic in MJ Tech: Modification and Repairs
does it even TRY to start? Unplug and plug back in your CPS. Make sure the line from the throttle body to MAP sensor isn't messed up. -
Here ya go. CRUISER'S MOSTLY RENIX TIPS HO INTO RENIX SWAP OCTOBER 31, 2015 SALAD 76 COMMENTS This swap is easier than some will lead you to believe. And generally Pooh-poohed by those who have never done it. Those of us who have done it, like myself, will share with you the things that need to be done for a successful swap. Just think of it as swapping in a long block. XJ Cherokee and ZJ Grand Cherokee 4.0L engine blocks interchange. 2000+ TJ Wrangler and WJ Grand Cherokee 4.0L engine blocks interchange. YJ and 1997-1999 4.0L TJ blocks will interchange in XJ/ZJ XJ/ZJ blocks, and the 2000+ TJ/WJ blocks do not interchange without significant modifications. TJ/WJ 4.0L Engine blocks underwent clean sheet design changes effective in the 1999 WJ Grand and 2000 TJ Wrangler. These blocks are not interchangeable with XJ/ZJ engine blocks. The reason is motor mount bolt holes and belt driven accessory mounting bolt holes are in different locations, or not present at all, TJ/WJ vs. XJ/ZJ. Now that we know which engines we can use, let’s get down to business. The HO and Renix have some differences but none that can’t be overcome very easily. One running change was that the rear of the head was no longer drilled and tapped for the temperature gauge sender beginning in the 96 model year. The sender can be relocated to the threaded hole in the thermostat housing taken from an HO engine. You’ll have to extend the wire to that location. Some brave souls even drill and tap the HO head at the rear for the sender. You will be using the intake and exhaust manifolds from your Renix, along with all your sensors and wiring. Since the intake ports of the HO are slightly different, you use a new Renix gasket. Exhaust ports are identical. An alternative on exhaust manifolds: As far as exhaust, you can use the Renix exhaust manifold and be fine. If you want to use the HO exhaust manifold, you must go with an HO headpipe and screw your O2 sensor into that headpipe. Standard Renix harness is plenty long to do so. A bung can be welded into the HO manifold to accept the EGR tube. You will need to use your Renix distributor as it is different than the HO design. See Tips #12 – Setting Your 4.0 to #1 TDC and #13 – Distributor Indexing to be sure you get the distributor installed correctly. The flywheel or flexplate from the Renix must be used so your CPS gets the correct signals. The valve cover from the Renix allows you to keep your CCV system intact and requires no modifications. The HO block will have a plug in the coolant galley on the driver’s side of the block, closest to the front, which needs to be removed so your Coolant Temp Sensor can be installed in it’s place just as it is on the Renix. It requires a 5/16” square drive or a modified 3/8” drive that has been ground down to fit. Do this before installing the engine. As for the knock sensor, which is located just above the oil pan on the driver’s side of the engine about mid way, all the blocks I’ve seen are threaded for it. If not, I’ve heard they may be drilled but not tapped. Tap the hole if that’s the case. XJ: “Regular” (not Grand) Cherokees ’84-’01 ZJ: Grand Cherokee ’93-’98 (Gen1) WJ: Grand Cherokee ’99-’04 (Gen2) YJ: Wrangler ’87-’95 (Gen1) TJ: Wrangler ’97-’06 (Gen2)
-
No Start after fuel injector install
cruiser54 replied to NC Tom's topic in MJ Tech: Modification and Repairs
See if you knocked a wire or 2 off the fuel pump ballast resistor.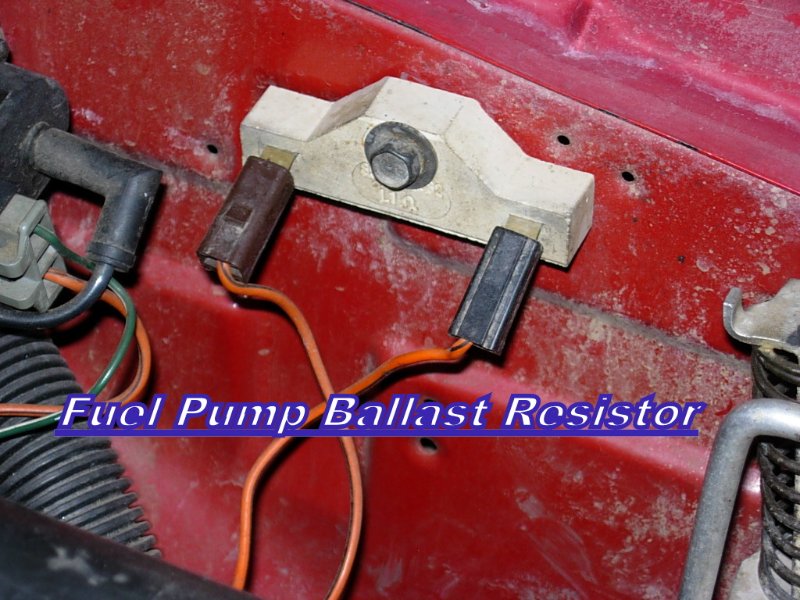
-
MJ barely goes forward
cruiser54 replied to Southernmanche's topic in MJ Tech: Modification and Repairs
CRUISER'S MOSTLY RENIX TIPS TRANSMISSION CONNECTOR REFRESHING OCTOBER 30, 2015 SALAD 24 COMMENTS Over near the transmission dipstick tube are 2 rather large connectors. One is black and goes to the NSS and the gray connector goes to the transmission itself . These 2 connectors carry all the info between TPS, TCU, NSS, speed sensor, and transmission solenoids. Unplug each one, visually inspect for corrosion or bent pins, spray them out with electrical contact cleaner and plug them back in. Additionally, if your Jeep is an ’87 to ’90 Renix, it’s always a good idea to reach up under the glovebox area and unplug the connector to the TCU and spray it out along with the receptacle of the TCU. While you’re there, find the fuse right in that area for the TCU. Remove it and spray out it’s receptacle and clean any corrosion from the fuse. -
How is the fluid level and condition? Some of those Chryco transmissions have adjustments inside also.
-
Struggling to bleed internal slave
cruiser54 replied to CrustyBoy's topic in MJ Tech: Modification and Repairs
Did you try the 50 pump suggestion? I'm trying to walk you through something here. -
Struggling to bleed internal slave
cruiser54 replied to CrustyBoy's topic in MJ Tech: Modification and Repairs
New clutch disc by chance? Try this. Bleed it as best you can. Pump the clutch pedal about 50 times without pushing it all the way to the floor. Just shy of that. walk away for 20 minutes and see how the pedal feels. -
CRC's Freeze-Off is one of my favorites.
-
Use this and have an open system. https://www.napaonline.com/en/p/RNRNR1193A?impressionRank=1
-
Renix misfire under load
cruiser54 replied to speeding_infraction's topic in MJ Tech: Modification and Repairs
Cap, rotor and wires are maintenance items. I would try a different compression gauge. -
Comanche reving high suddenly
cruiser54 replied to trogdune's topic in MJ Tech: Modification and Repairs
We need the proper info first. -
Comanche reving high suddenly
cruiser54 replied to trogdune's topic in MJ Tech: Modification and Repairs
-
Coolant Leak from the transmission.
cruiser54 replied to DesertComanche86's topic in MJ Tech: Modification and Repairs
-
HO exhaust manifold on a Renix
cruiser54 replied to JMO413's topic in MJ Tech: Modification and Repairs
Fuel disconnects Quick disconnect part numbers The Napa part numbers for just o-rings *is: Napa 730-5018 3/8 Viton individual o-rings Napa 730-5017 5/16 Viton individual o-rings *Remember to re-use your old spacer between the 2 new o-rings!! Napa CRB 212305 fuel line repair kit 5/16 Dorman 800-750 trans line repair kit 3/8 Mopar repair kits: 83502745 fuel line repair kit 5/16 83504447 fuel line/Trans line repair kit 3/8 -
HO exhaust manifold on a Renix
cruiser54 replied to JMO413's topic in MJ Tech: Modification and Repairs
Plug the fittings on the intake manifold and proceed. -
The internal slave was one of THE stupidest things ever designed. Couple that with the poor quality of aftermarket off-shore parts and you have a recipe for disaster.
-
These things ^^^^^
-
Found during valve cover gasket install
cruiser54 replied to NC Tom's topic in MJ Tech: Modification and Repairs
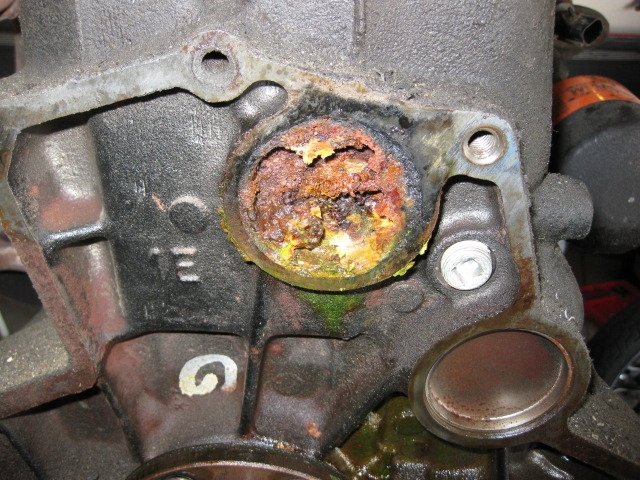
That heater valve, likely made offshore, will work great. Until it explodes unexpectedly one day, emptying the cooling system in seconds. Or maybe you'll be lucky like me and bump the HCV with your elbow removing the oil filter from a totally warmed up XJ. Have it explode and shower yourself in the face and upper body with boiling hot coolant. Something to look forward to down the road I guess. -
I know 2 people who stroked their 4 cylinder engines. Both very disappointed and spent tons of money. I think an aftermarket "performance" cam would be nice. The one in the Jeep now is for emissions anyway.
-
Found during valve cover gasket install
cruiser54 replied to NC Tom's topic in MJ Tech: Modification and Repairs
send it back. -
Still bucking and dieing
cruiser54 replied to comanche32's topic in MJ Tech: Modification and Repairs
In this case, might not be a bad idea. There are some crappy pumps out there. Try to stick with Bosch or Delphi. The issue could be as simple as the split/boogered internal fuel pump hose though. They weren't engineered for our ethanol fuel. I would suggest you do my fuel pump ground upgrade no matter what. Injectors? Here: trevor.skankfootracing@gmail.com CRUISER'S MOSTLY RENIX TIPS IMPROVING THE FUEL PUMP GROUND JANUARY 3, 2016 CRUISER54 54 COMMENTS The fuel pump and fuel tank sending unit ground at a sheet metal screw up behind the spare tire on an XJ, and behind the driver’s taillamp on an MJ. Not only is a sheet metal screw a lousy way to ground things, this ground path is long and travels through some connectors that are prone to corrosion and moisture. Locate the black wire on the HARNESS side of the fuel pump/sender 3 wire connector. Remove a 6″ length of the split loom covering. Strip back about 1/2″ of insulation from the BLACK wire. Take your new ground wire, preferably at least 14 gauge and 12 to 18 inches long as needed, strip it about 3/4″, and wrap it around the exposed part of the harness plug wire.Solder the connection. Tape it up and reinstall the split loom covering. At the other end of your new ground wire, add a crimp on eyelet. Attach the eyelet under a bolt that goes directly into the chassis. Be sure to clean the attaching point til shiny and apply OxGard to the contact surfaces. -
Still bucking and dieing
cruiser54 replied to comanche32's topic in MJ Tech: Modification and Repairs
$#!&ty dealer -
Still bucking and dieing
cruiser54 replied to comanche32's topic in MJ Tech: Modification and Repairs
Shoulda gotten a check engine light for the oxygen sensor on a 97. -
Still bucking and dieing
cruiser54 replied to comanche32's topic in MJ Tech: Modification and Repairs
More likely the fuel pump or its short hose inside the fuel tank.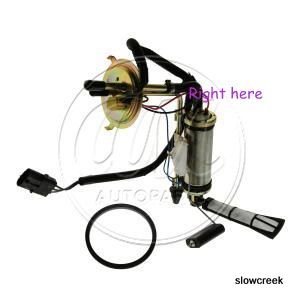
-
Found during valve cover gasket install
cruiser54 replied to NC Tom's topic in MJ Tech: Modification and Repairs
This^^^^ And you live in a way hotter place in Arizona than I do.....