


cruiser54
-
Posts
9413 -
Joined
-
Last visited
-
Days Won
14
Content Type
Profiles
Forums
Gallery
Everything posted by cruiser54
-
They're the correct length for your lift?
-

Missing Front Drive Shaft
cruiser54 replied to Drahcir495's topic in MJ Tech: Modification and Repairs
and you would be correct. -
Missing Front Drive Shaft
cruiser54 replied to Drahcir495's topic in MJ Tech: Modification and Repairs
Okay. IIRC, CJ driveshaft is small diameter and pretty long. XJ is big diameter like the rear. Does that help? -
Missing Front Drive Shaft
cruiser54 replied to Drahcir495's topic in MJ Tech: Modification and Repairs
Got a tape measure? -
All my Tips are at www.cruiser54.com.
-
Failed ignition control modules
cruiser54 replied to Htchevyii's topic in MJ Tech: Modification and Repairs
This Tip has the potential to repair bad connections which result in excess heat. CRUISER'S MOSTLY RENIX TIPS RENIX ICU/COIL CONTACT REFRESHING OCTOBER 30, 2015 SALAD 33 COMMENTS EDIT The contacts between the coil and the ICU on your Renix Jeep can become corroded and loose causing a complete or intermittent no-start condition. I recommend the following procedure as a maintenance precaution to insure this is eliminated as a possible cause now and in the future. The coil is attached to the ICU by two T20 Torx bolts. Remove these two bolts and lift the coil up off the ICU. You will see 2 pins and 2 sets of contacts. Clean both the pins and springy contact pieces with a good electronics cleaner and some fine sandpaper. Squeeze the springy contacts closer together with some needle nose pliers. Apply some OxGard to the contacts. Bolt the coil back on to the ICU. While you’re right there, unplug the connectors from the ICU and inspect the pins in the harness connector. Make sure the pins are not retracted into the connector. Spray out the connector and the receptacle of the ICU with the same good electronics cleaner you used earlier. I feel this procedure should be performed at least once in the lifetime of a Renix Jeep. -
Failed ignition control modules
cruiser54 replied to Htchevyii's topic in MJ Tech: Modification and Repairs
ICM/coil failures are extremely rare. -
Tips 1,3,4 and 5 are the most important at this point.
-
warped air cleaner housings quick fix
cruiser54 replied to Htchevyii's topic in MJ Tech: Modification and Repairs
The rods are made to hold heavy electric fans to hot radiators. I bet this fix works great!! I like it. -
Intermittent wiper module repaired
cruiser54 replied to The86manche's topic in MJ Tech: Modification and Repairs
LOL. Me too. -
Intermittent wiper module repaired
cruiser54 replied to The86manche's topic in MJ Tech: Modification and Repairs
Wow!! -
Is my fan overcooling?
cruiser54 replied to Airsuperiority's topic in MJ Tech: Modification and Repairs
Engine temp SENDER is at the back of the head. Coolant temp SENSOR is located on the driver's side of the block. Fan SWITCH is located in the bottom of the radiator on the driver's side. -
Weekend project then. Will the 97 dash fit without the 97 and later doors?
-
That it might not be worth all the work?
-
Most likely the TPS is bad or has a bad connection on the engine side.
-
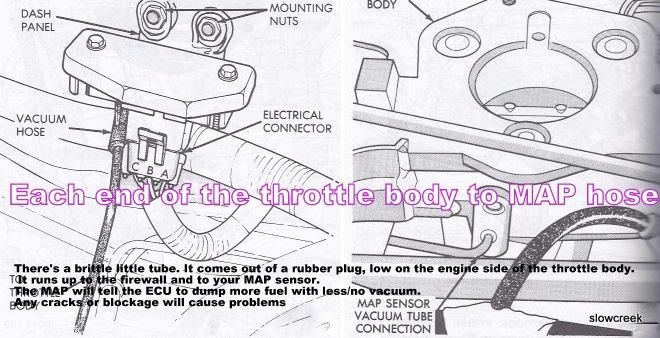
That CCV system needs to be plumbed properly. New EGR valves are not available. Leave the vacuum blocked to it for now. Coupla things for you to look at. CRUISER'S MOSTLY RENIX TIPS RENIX VACUUM HARNESSES NOVEMBER 17, 2015 SALAD 29 COMMENTS EDIT The vacuum harness that attaches to the front of the valve cover and includes the grommet/fitting, and is called the front harness, is Napa part number BK 715-1367 or is a Dorman 46003. The vacuum harness that is closest to the air cleaner, EGR etc, and is called the rear harness, is Napa part number BK 715-1366 or is a Dorman 46004. The tube from the rear of the valve cover to the intake manifold is part number BK 715-1365 or Dorman 46005 and comes with the valve cover grommet. The Throttle Body to MAP hose is no longer available. Click HERE to access a fix for that. CRUISER'S MOSTLY RENIX TIPS CRUISER’S VALVE COVER MOD NOVEMBER 17, 2015 SALAD 55 COMMENTS EDIT Most early and even later Renix 4.0s could be bothered by excessive oil in the air cleaner box. A fix from my old days as Service Manager at a Jeep dealership follows. Information was provided to me from a buddy at JeepTech during those days. I don’t believe it ever came out in a Technical Service Bulletin. Remove the valve cover and turn it over. Next, remove the fluted tubes that are now facing you by removing three screws on each. Chop 1 inch off each of them. Then, drill a half inch hole as shown in the photo. The flat side of the flute that’s closest to the edge of the valve cover. Clean and de-burr/sand all rough edges nicely, clean with solvent, and reinstall. Don’t be concerned about the chintzy gaskets that will probably crumble into oblivion when you remove the fluted tubes. They can go back together without gaskets. Here’s a handy video from my friend Brendan showing more detail.
-
Intermittent wiper module repaired
cruiser54 replied to The86manche's topic in MJ Tech: Modification and Repairs
There wasn't enough room to write NFG. -
Intermittent wiper module repaired
cruiser54 replied to The86manche's topic in MJ Tech: Modification and Repairs
B means bad. LOL. -
.jpg.9ee7fb858942d626126c03950341fab3.jpg)
-
What Pete said^^. Also, the resistance test on the CPS is inaccurate. You want AC millivolt output. Chances are your original CPS is a better one than the replacement. Tips 1, 3, 4 and 5 first and foremost. Here's how to check the CPS correctly and even increase its signal output. CRUISER'S MOSTLY RENIX TIPS RENIX CPS TESTING AND ADJUSTING OCTOBER 30, 2015 SALAD 131 COMMENTS EDIT Renix CPSs have to put out a strong enough signal to the ECU so that it will provide spark. Most tests for the CPS suggest checking it for an ohms value. This is unreliable and can cause some wasted time and aggravation in your diagnosis of a no-start issue as the CPS will test good when in fact it is bad. The problem with the ohms test is you can have the correct amount of resistance through the CPS but it isn’t generating enough voltage to trigger the ECU to provide spark. Unplug the harness connector from the CPS. Using your voltmeter set on AC volts and probing both wires in the connector going to the CPS itself as shown in Figure 2 as Connector A, crank the engine over. It won’t start with the CPS disconnected. You should get a reading of .5 AC volts. If you are down in the .35 AC volts range or lower on your meter reading, you can have intermittent crank/no-start conditions from your Renix Jeep. Some NEW CPSs (from the big box parts stores) have registered only .2 AC volts while reading the proper resistance!! That’s a definite no-start condition. Best to buy your CPS from NAPA or the dealer. Sometimes on a manual transmission equipped Renix Jeep there is an accumulation of debris on the tip of the CPS. It’s worn off clutch material and since the CPS is a magnet, the metal sticks to the tip of the CPS causing a reduced voltage signal. You MAY get by with cleaning the tip of the CPS off. A little trick for increasing the output of your CPS is to drill out the upper mounting hole to 3/8″ from the stock 5/16″, or slot it so the CPS bracket rests on the bell housing when pushed down. Then, when mounting it, hold the CPS down as close to the flywheel as you can while tightening the bolts. Another little tip to save tons of aggravation is to stick a bit of electrical tape to your 11mm socket and then shove the bolt in after it. This reduces the chances of dropping that special bolt into the bell housing.
-
Is my fan overcooling?
cruiser54 replied to Airsuperiority's topic in MJ Tech: Modification and Repairs
Use only Mopar thermostats. They're not cheap, but worth the money for sure. -
Intermittent wiper module repaired
cruiser54 replied to The86manche's topic in MJ Tech: Modification and Repairs
I kept one for myself and the rest will be shipped out in the next day or so. The86manche will have 3 to repair for you guys. -
88 comanche 2.5l 5 speed
cruiser54 replied to LowerEnder's topic in MJ Tech: Modification and Repairs
www.cruiser54.com Tips 1 through 5 first. -
Intermittent wiper module repaired
cruiser54 replied to The86manche's topic in MJ Tech: Modification and Repairs
I thought someone else wanted a good one. Once the last one is sold, I'll take them all to the Post Office to ship. Mark 39? -
Comanche window trim needed
cruiser54 replied to NSWelding's topic in MJ Tech: Modification and Repairs
Same as a 4 door Cherokee.