

Blue XJ
-
Posts
859 -
Joined
-
Last visited
Content Type
Profiles
Forums
Gallery
Everything posted by Blue XJ
-
attaching the gas tank straps
Blue XJ replied to man of la manche's topic in MJ Tech: Modification and Repairs
yup, there is a j bolt that goes into the frame. I think they are about 4-5" long, 3/8" diameter. any parts store should have j bolts in the 'help' department. -
From his original post, I think he is replacing them all with mechanical gauges, which would have to be aftermarket. An aftermarket speedo can be connected by using the cable driven setup from an older XJ/MJ.
-
What is EGR and do I need it?
Blue XJ replied to 1990 Pioneer 4x4's topic in MJ Tech: Modification and Repairs
When I built my stroker motor I removed the EGR system, I have had no adverse affects. Seems to run fine and gets better mileage than I did with the old motor. -
I like my 2 1/16" Autometer Ultra Lites. I think the temp gauges were about $40 each and an extra sender is like $15 I think. I originally had them mounted in an a-pillar pod as well, they make one for the XJ now.
-
aftermarket tach suggestions?
Blue XJ replied to lostissues's topic in MJ Tech: Modification and Repairs
I think you have to switch the oil pressure sender as well to get the full gauge cluster to work. :thumbsup: -
aftermarket tach suggestions?
Blue XJ replied to lostissues's topic in MJ Tech: Modification and Repairs
I haven't hooked it up yet, but I picked up an Autometer Ultra Lite 3 3/8" tach. It goes to 10k rpm, but its pretty plain looking. http://www.autometer.com/cat_gaugedetai ... 139&sid=11 I actually, bought the whole series, tach, speedo, water temp, oil pressure, trans temp, volts, fuel level. I'll be making a custom dash in the near future. -
I'd say if you were closer, bring it buy and we'll do it on a Saturday for a 12 pack of beer. Shouldn't be too bad to get to it, once the head is slightly warmed up, it should come out fairly easy too, once you get an asy out in it. Its amazing what the dealerships charge isn't it? I just took my new car in for a broken cruise control switch, they replaced the air bag, engine controller and cruise switch. Turns out it was just the cruise switch that was bad, imagine the bill they sent to Chrysler for all the parts. WTF would the airbag keep cruise control from working? :mad:
-
It does look good without that body line along the top. You gonna be around Saturday morning? I might swing out to your place and grab a silver one. :thumbsup:
-
I took the tcase out to rebuold it. Took the exhaust off to finish welding all the joints. Pulled the rear axle off to rotate the perches to eliminate my shims and to put a set of Yukon allys and all new bearings and seals in it.
-
Well, I talked to Pete and I talked to my buddy, looks like we should be all set to start making some of these. My buddy is going to register on the site so he can get the orders directly. I'll let him know to post in this thread as well so he can start taking orders. :thumbsup:
-
Raw wouldn't be a problem, he cuts them out of 14 gage sheet metal. Like I mentioned above, he made me one about twice that size as well, it slightly warped from the heat cutting out the upper body line, thts why there is a tack weld near the back of the cab on the body line. I'm not sure what shipping would cost on the larger ones, but I'll get a hold of him tomorrow and see what he has in mind for costs. I'm sending a PM to Pete right now to ask as well.
-
I'll shoot Pete a PM in the next couple days and see what it would take from the site side. My buddy can make more, he was saying around $35 for one powerdercoated. What do you guys think about that price?
-
I was over at my buddies yesterday checking out his new CNC plasma table and we figured what better way to try it out than cut out a Comanche Club sign. This one measures about 18" wide and 8" tall, he also cut me out one that is almost 4' wide to hang in the garage. Don't mind the crappy paint, he didn't have enough stuff to throw in his powder coat oven, so I sprayed it in the gagare today with some frozen spray paint. :D What do you think of it? Image Not Found
-
Project JDMJ... tube flares and new paint
Blue XJ replied to Blue XJ's topic in MJ Hardcore Tech: Epic Journeys to Greatness
Once it gets a few trips on it I plan on doing some more work to it. I want to bob the bed about 15" and possibly dovetail it too. Eventually this thing is going to be my 1 ton buggy. Not for another 4 or 5 years though, but eventually the plans are minimal body, lots of tube and some 40's. -
Project JDMJ... tube flares and new paint
Blue XJ replied to Blue XJ's topic in MJ Hardcore Tech: Epic Journeys to Greatness
Just have a few small things left to do, but I never got around to doing them. Got the tank plumbed, the rear bumper built, and all the nuts and bolts tightened down and a coat of rattle can paint on it. Image Not Found Image Not Found and an overall picture.. Image Not Found When the weather is warm again, I am going to buy a gallon of the same color green paint and a spray gun and lay down a nice coat or two of paint on it. Everything seems to be working, I have about 30 miles on it so far, going to get the tires balanced after work tomorrow and then start driving it everyday to get some miles on it before the first trip offroad -
Project JDMJ... tube flares and new paint
Blue XJ replied to Blue XJ's topic in MJ Hardcore Tech: Epic Journeys to Greatness
Made the control arm mounts to push the axle forward from where it used to be by about 2". Looks pretty good to me. When you working by yourself and need to move the body when the steering is not attached to line up the trackbar its amazing what you come up with. :D just a couple more pics And a piece inside my floor jack cracked off, so I am currently without a way to raise up the jeep, so the stock cprings stay in it for another week. I measured the new ones to compare, the rear will sit about 6.5" higher than it currently does, so it shoul dhave a nice rake to it. and even picked up a tail gate in good shape. Got a little done today, got the rear axle and springs taken out of the XJ. Had to hack up the frame to get the seized bolts out. Got the new springs in the MJ along with the XJ axle. And I got the drivers door aligned properly and installed. Also made it so its easy to remove, just have to lift it up while its open. Got the gas tank installed, all new lines ran, brake lines bent up and installed, brakes are bled, pedal feels 10 times better than it did in the XJ. Bought another set of tires too, didn't like the way the BFG's looked, they had a couple small cracks in them. -
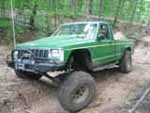
I started this a while ago, but my last job sent me out of town for almost a year, so I haven't had time to work on it. I got a new job that actually keeps me in the area now so I have finally been able to finish up the build. I picked up a bare bones stripped out MJ body for $50 to start with. Inside is fairly solid, needs a little bit of metal replaced, but its mostly surface rust. The plan is: JDMJ - (John Deere MJ, thats the color its getting painted) 88 MJ Long Bed, HP30 with 4.56's, alloys, warn hubs, ARB 29 Spline 8.25, alloys, powertrax noslip and disks Warn XD9000i RK 3 link with 6" coils 6" SUA (due to the torque from the motor) 4.6l stroker aw4 231 with sye Custom cage most of the donor parts will be from my XJ that I will be scrapping. Cleaned up the floor to see what I was working with. Not too bad, but I have a couple patches to weld in. Lots of wiring mess behind the dash to keep track of. Got the dash and center console installed in the MJ and the seats are resting in there. The seat brackets are different, so I need to modify the brackets a bit to get them to work. Got the rest of the front end stuff on the XJ out and transferred everything over but the header panel, gonna wait till the motor is in for that. Which should be next weekend. Got the rest of the wiring swapped over, reconnected and attached it all to the sheet metal. The remainder of the XJ The beginning of the MJ Made some more progress, got the motor/trans/tcase and brake lines swapped over. Had a little issue with the crossmember, apparently the XJ and MJ trans crossmember mount in a different position, so I'll need to make some new mounting points for it. Should be able to get the wiring reconnected and the cooling system plumbed again in the next day or two and have the motor running. Since the crossmember mounted different, I made some frame plates to mount everything too.. Got the interior installed and completed. Gonna have to pull it back out to herculine the floor and install the cage. The "new" door and tail gate.
-
PM Sent, I finally finished the MJ and now I need some stickers for it! :D
-
Email sent, a hoodie and a shirt. :waving:
-
Made a little progress in the last year. Was sent out of the country for work for 8 months, so didn't get too much time to work on it. Its currently dark green, gonna try to do some body work this weekend and put another fresh coat of paint on it.
-
All I did was cut a little notch in the bottom of the shroud about as wide as the clutch. It slid right down past the fan and fan clutch. Took maybe 10 minutes and works great. :cheers:
-
I just bought mine from them, cost me $120 shipped to my door. Nice looking steel tank, even has the 'tray' on the inside that the fuel pump goes into, so when your low on gas it doesn't starve the pump. :D
-
I've been running ove for the last 2 or 3 years now. 4.6l, 258 crank and rods, .030" over pistons 263hp, 321ftlbs at 2100rpm