


joester1908
-
Posts
227 -
Joined
-
Last visited
Content Type
Profiles
Forums
Gallery
Everything posted by joester1908
-
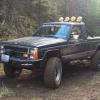
The next morning I picked up a new thermostat, thermostat housing gasket, and I had to drive to my dad's work to pick up the water pump, which he got from 4WP for me. I decided to run a 180 degree thermostat opposed to the factory 195. I pulled a 160 out of it. Anyways, here is the FlowKooler The install went pretty easy, except I couldn't seem to get the bolts to crack loose on the water pump pulley. I pulled out the trusty shop manual and it said to crack the bolts loose then take the tension off the belt. I just left the belt off because I replaced the alternator. I tried and tried to get the bolts loose without reinstalling the belt, but ultimately decided to put the belt on and then the replacement went with ease. I did not have to take off the clutch fan, however, I did remove the power steering pump bracket and the idler pulley so I could access everything. I did have to replace one of the heater hoses, and I also noticed that the threads inside the throttle body that holds the power steering pump on was stripped. Luckily, I was able to get it to thread in after 5 minutes or so of fiddling with it. I then filled the system with coolant, reinstalled the heater hose and burped out as much air as I could. Then I started it up, let it get warm and added more coolant. I found that squeezing the upper radiator hose would cause air bubbles to come out of the radiator cap. Finally, the engine is running cool and the alternator is consistently charging. After I was happy with it, I trimmed the fender to fit now that the slider was installed, however, the bottom side did still need to be welded. By that time, my dad had gotten off work and we finished welding the slider. The next day I painted the slider. Looks like I would be able to drive it to work that next day. I put the front end back together and it was back on the road Third annual birthday run to Walker Valley. There was some land slide danger (This is a few miles from Oso, Washington) so about half the group backed out. We hit some snow up top Group shot The guy in the red YJ asked to tag along. We met him on the trail. This Toyota was coming up as we were coming down, and he tried to get out of the way. We ended up having to winch him backwards It was a great trip and it was a ton of fun.
-
Update on the Comanche: My alternator has always been weak. It stops charging for a day then works for a few months. I knew it was time to replace it, but I was putting it off for a while. Well, it has always ran a little on the hot side too. My water pump decided to go out too, and I figured it would be the perfect time to pull the Jeep off the road for a while and do some maintenance along with finally installing the passenger side rock slider. I parked the Jeep on the side of the house so I could work under the eve and stretch a tarp if necessary. My dad and I cut the pinch weld out just like the other side, and we used some body working tools to get the damage out of the cab and bed. My dad continued working on that while i replaced my alternator. I got it from Napa. The one that was on there was just factory, but Napa sold an "upgrade" that was 100 amp. By the time it was all installed, my dad had already started installing the rock slider. I then pulled off my water pump. I decided I was going to upgrade to a FlowKooler water pump, but I had to order it through 4 Wheel Parts and it wouldn't be there until the next morning. But I did get the old one off so I could compare and insure it was the correct one. There was a lot of junk in the way that I had to clean off. It was getting dark and I decided I would call it a night.
-
 Thank you for the great write up! The brakes on my 90 really suck, so i am excited to give this a try. I'm going to be making a couple thousand mile road trip in my Jeep this summer, and good brakes are a must....
 -
They're awesome! I have tried greasing them multiple times but they haven't taken any. I am very impressed
-
I took my Jeep up to the ORV park I always go to. My cousin was staying with us and we decided to take him up to Walker. They had done some serious logging on the first trail, and I didnt even recognize it anymore. There was one spot that I always had to make a 2 point turn in. I made the 2 point turn later than I should have and ended up on a stump...twice.....I think it's time to install that other slider. Every weekend where I have both days available it starts pouring down rain
-
So it ends up my "good enough" welds weren't quite good enough. The track bar mount welds broke. I was towed home from school just to be safe. Next, I bought a new power steering pump, steering box, a non drop pitman, and a steering box spacer from Jeep Armory. First I drilled out the stock pitman arm to 7/8 and reused the insert. Here's the spacer Here's the new box Now the steering angles aren't perfect with the non drop pitman. But I will fix that when I go to a double shear track bar. I also noticed that the fuel filter line had a split in it and was leaking a little bit. I replaced the filter and the line Here's the new power steering pump I got it all installed and took it for a test drive. The low pressure line shot off the power steering pump.... It made a huge mess! I I was trying to see if there was any possible way I got the 2 lines crossed. But the high pressure threads are bigger than the low pressure ones. On the pump side, one threads on, the other is a hose. It's impossible. My dad came out and put his hand over the pump while it was running. There was a TON of pressure under the cap. I returned the pump and got another one and the issue went away. I assume that the pump was defective? Anyways, back when I lost that U joint going to Walker Valley, I destroyed my Ten axle seal. I finally bought another My dad, brother, and I took a trip to eastern Washington (Naches/Lions Rock) for father's day. Here's my brother and my dog, Cooper. Airing down Moon Rocks It was windy on that side of the mountain, so we decided to see if it was calmer on the other side There was a tight squeeze between 2 trees. The fender took the difference Camping spot Cooper was tired. He's old and doesn't like being tossed around in the back of the TJ heading over to Lion's Rock Got pretty hot coming up the trail. This is the road my friend's parents took because it's paved. Ended up popping the hose to the air horn Lunch at Lion's Rock The view is absolutely breathtaking
-
Then I started working on the drag link. Turning the wheels, I noticed that the linkage still hit the coil buckets. I did a little more trimming. Then I took the measurements and cut the drag link to the correct size Now that I was happy with the drag link, I started working on my track bar. I ordered a universal track bar bracket. It was the correct size for the bushing type joint but the outside diameter was the same as the outside diameter of the heim joint. Easy fix. I cut the track bar to the length I liked and took them to my buddy Spencer's house so he could weld them up for me Then I brought them home and painted them up As you can see, I also painted the track bar bracket so it wouldnt rust. I had to grind that off. I took some steel square washers and drilled them out to the size hole I needed. Then I cut the bracket so the hiem would slide in and installed the washers. Then I took it apart and welded up the washers A As you can see by that last photo, the bracket wasn't the strongest. I needed to drive my truck again so I welded it on "good enough" planning to beef it up the next weekend. It was also the first time it had been started in about a week so I was letting it idle and noticed something... The lines that originally went to the air box just went back in to the intake. That explains the weird idles. time for a whole new intake system. For now, I just replaced the tube and redrilled holes. Not sure what I'm gonna do with this yet.
-
So here is my old steering: Very old and worn out. First I unbolted the drag link, tie rod, and track bar Then I cut off the old track bar mount Then I unbolted the old knuckle... and bolted on the new one I had to cut off the track bar mount because the tie rod was going to hit it even with the wheels straight. You also have to relocate the track bar to the top side of the axle when you go OTK. Here are the new Chevy TREs They hit the backing plate for the rotor when there wasn't any pressure on it. Angle grinder fixed that... The Teraflex knuckle is already drilled out to a 7/8 inch, non tapered hole. The knuckle includes metal tapered inserts for the 7/8 inch hole so you could use stock size steering (Or the Teraflex aluminum steering). My local 4x4 shop sells the 7/8 inserts with the Chevy TRE taper. That is what I installed in my Teraflex knuckle and the factory driver's side knuckle, but first I had to drill out the driver's side knuckle with a 7/8 drill bit ($40, for those of you wondering) Then you tap in the inserts I also reamed out the pitman arm and installed in insert Driver's side hit just like the other. Did the same grinding. Here is the steering linkage I used. 3/4 inch inside diameter, 1/4 inch wall. With the linkage on, I could go lock to lock and adjust the steering stops.
-
Wow, it's been a while! Here's an update.... My Fox flag headliner was just stapled on to the foam and was falling down. I decided to just glue it. Kind of redneck but I like it :laughin: Our friend Louis had some family in town and they wanted to go four wheeling, so we took them up to our stomping grounds. Here's a shot of the Jeeps And this is one he took of me. Great shot
-
Ok so if you own an XJ Wagoneer, or have an XJ Wagoneer grill on your XJ or MJ like I do, you probably know that the top 2 lights are your low beams, and the bottom 2 are your high beams. This will tell you how to make only the top 2 low beams come on with low beams, but all 4 come on with high beams. Low Beams: Factory High Beams: After the Swap's High Beams: You will need: -3 relays -14 gauge wire (I recommend black, red, white, and green, to match the factory wiring) -Spade connectors -Wire crimpers -Wire strippers Here is a wiring diagram that my dad drew up: Start by locating your headlight harness wiring. You have a black plug under the air box on the drivers side. You will need to uninstall this to access the plug. While you are accessing the plug, Cruiser recommends using an electronics cleaner inside. It likes to get green inside, which causes resistance. You can find more information on his Renix Tips Thread Now you need to decide where you want to mount your 3 relays. I mounted mine where the core support bolts to, I don't have the factory air box. There is also room on the drivers side inner fender. Next, you need to decide where you want to splice in to your headlight harness wiring. I did mine on the header panel side of the plug. The only downfall to this is if you uninstall your header panel, you will need to unplug the relays. The upside is that you have more to work with. Here are the relays and their diagrams Ok, on to the wiring: Your low beams are controlled by a solid green wire. There is also a green wire with a black stripe. I believe this goes to your factory fog lights, but I'm not sure on that. Your high beams are controlled by a solid white wire. This part is the exact same as a normal headlight relay swap. You are going to make 2 separate systems. 1- Cut the green wire so you have plenty to work with on both sides. If you're standing at the driver's tire, to your left will be the header panel, and your right will be the cab of the Jeep. The left side will be to the lights, the right side will be from the switch. You will need to extend both these wires so they are long enough to reach your relays. The switch side of the green wire will go to either 85 or 86 on the relay. The other goes to ground. It does not matter which you choose. 2- You need 12v from the battery that goes on 87. I would run 2 separate 14 gauge wires (In red) that are both fused. 3- Now hook the headlight side of the green wire to 30 on the relay. 4- In the spade connector on 3 of the low beam relay (green) you are going to make a jumper to the 3rd relay. You are going to add another piece of green wire that is about 4-6 inches long, and add a spade connector on the end of that. So the headlight side of the green wire will have 2 spade connectors on it. Once you have completed this, leave it, we will come back to it later. Now you will do something similar for the white wire: 5- Cut the white wire so you have plenty to work with on both sides. If you're standing at the driver's tire, to your left will be the header panel, and your right will be the cab of the Jeep. The left side will be to the lights, the right side will be from the switch. You will need to extend both these wires so they are long enough to reach your relays. The switch side of the white wire will go to either 85 or 86 on the relay. The other goes to ground. It does not matter which you choose. 6- Now you will hook the other red 14 gauge wire that you ran to the 87 on your relay. 7- Now hook the headlight side of the white wire to 30 on the relay. You will need to make 2 jumpers out of white wire, just as you did with the green wire. The white wire will have 3 spade connectors, all 4-6 inches apart from each other. If you follow the wire at this point, it will come from the headlights, to 30 on your relay, then 2 more spade connectors. I hope that made sense. Now you will wire your 3rd relay: 8- Hook either 85 or 86 to ground, again, it doesn't matter which you choose, but I would do the same on all 3 for consistency. 9- Connect one of the spades on the white wire jumper (Which comes from 30 on the high beam relay) To 85 or 86 on the 3rd relay (Whatever you didn't pick for ground) 10- Connect the remaining white jumper to 87 on the 3rd relay. 11- Use the green jumper you made in step 4 (Coming from 30 on the low beam relay) and connect it to 30 on your 3rd relay. And here is what my relays look like all mounted: I hope this makes sense to you guys. I know the wiring is a little messy, but pretty much the low beam relay is only going to power the low beams, and the high beam relay will power both the high beams and the low beams. I understand this could be done with a diode, but it would need to be 20 amp, which I could not find. I had relays lying around, so why not.
-
Next up I wired the high beams. Factory the tops are the low beams and the bottoms are the high beams. I wired the high beams so all 4 come on, but the low beams are still only the top. All you need to mimick this is 3 relays. Turned out awesome!
-
Well waiting on nice weather to start the other slider and the steering, and I'm waiting on parts. I uninstalled the compressor box so I can do some more welding on it and paint it. I was also having issues with the headlight switch again. I found a fuse that should have had a 15a with a 25a in it, and it was melted. So I replaced that, and it seems that fixed the issue. I also ran my headlights of relays to take the stress off the system.
-
We took another trip up to Walker Valley. Remember the trail I hit my bed on behind the rear tire? This is the bottom of it It was very wet and that trail was eroded. It was difficult to get up. We went backwards on a trail we have done quite a few times and I hit my cab corner Not a big deal because I will be cutting out for the other slider
-
Finished product:
-
I went wheeling at Walker Valley yesterday, so I got my air compressor box mounted in my truck.
-
So I purchased the Teraflex knuckle from the local swap meet. Ended up getting a killer deal on it. I also purchased 3/4 ton tie rod ends, custom made weld in inserts, and hardware to make an OTK track bar. I haven't taken them out of the packages yet just in case, but when I do I'll post some photos.
-
sr20s are cool. Definitley will be an interesting swap
-
yes, the column is gone. Still have the cluster somewhere...
-
I am using the ARB style carlings
-
Thank you! Thanks for the tip! I was actually thinking about that...
-
Burning up switches...
joester1908 replied to joester1908's topic in MJ Tech: Modification and Repairs
Woohoo. Way to stick with it. thanks! -
Burning up switches...
joester1908 replied to joester1908's topic in MJ Tech: Modification and Repairs
Thank you guys for the help. I believe it was a grounding issue. I made a jumper to a better ground (which, someone kind of already did, but did a very poor job. Also, the grounding cable was loose...) and I also cleaned the headlight harness plug, which was green. Everything is working now. Thanks again! -
Ok, so like I said I had the same exact issue again. I posted a thread asking about a possible common ground. Cruiser directed me to Renix tip 18, and I found that yes, there was in fact a common ground. After school I picked up a can of electronics cleaner and got to work. In the past, someone moved the ground to right above the hood latch. When I pulled the headlight switch out, I did not tighten this down enough (only finger tight). I decided to make a jumper like Cruiser recommended anyways. After that was done, I tightened the ground down, and checked out the plug. When I did my Wagoneer swap, I remember thinking it looks a little corroded in there... Here's what I picked up to clean the contacts. Worked pretty well, but I also used some cotton swabs to get a lot of the debris out. The connector ended up looking a lot better. And here's the harness side. It was hard to clean inside of there, but I just sprayed a lot of cleaner inside of it and did my best. Turned out ok too. Made sure it was dry, flipped on the lights, and everything worked. I let it sit on for a few minutes just to be sure. I also used the dimmer up and down to ensure that it was all working as it should. So far so good! We will see when I start putting miles on it again...
-
Rough Country Long Arm Install
joester1908 replied to joester1908's topic in MJ Tech: Modification and Repairs
http://comancheclub.com/topic/45040-easy-rough-country-long-arm-johnny-joint-upgrade/ -
Rough Country Long Arm Install
joester1908 replied to joester1908's topic in MJ Tech: Modification and Repairs
i have already replaced 3 of the joints. I replaced the upper joints with Currie