
Search the Community
Showing results for tags 'Wagoneer'.
Found 4 results
-
So to cut a long story short I have a old buddy that is a hard core jeep nut who owns some really old and rare jeeps, and it seems like every time I talk to him he has something rarer yet just hiding in one of his many storage lots (he's got a lot of stuff). So after buying my 87 comanche he mentions a diesel Cherokee that he was meaning to pull the drivetrain out of and put in his own comanche at some point, but since he got older he realized he won't get to all of his projects so he has been slowly selling his jeeps and he sold the comanche a year ago, yet still has the diesel Cherokee and was wondering if I would buy it. However I wasn't super excited about it as I have heard that the Renault diesels that jeep sold from the factory weren't the most powerful and I really liked my 4.0. But he talked me into at least looking at it so the sucker I am went out to look at and boy am I glad I did!!! It turned out not only to be a diesel Cherokee, but a diesel Cherokee Woody Wagoneer, that had a factory turbo, and every single option known to man on it, select trac, roof console, A/C, factory AMC mudflaps, floor mats, the works. It even had the original owners manual specific for the diesel, and all the original maintenance records! Its white with the wood paneling, and the grille is the later wagoneer grill without the dual headlights, but rather the thin slats, I've attached a video of it running. So now for my questions, how rare is diesel Cherokee woody wagoneer? I know they didn't make many wagoneers, and I know that they didn't make many diesels, so if any one has any production numbers or someone I could get in contact with to get answers from I would appreciate it! And yes I bought it, I know I'm a sucker, but I've never heard of one or seen one this rarely optioned and this clean... And no I will not gut it for the drivetrain, but I'm stuck on whether I should just clean and polish it and throw it at an auction to make a quick buck. Or should I give it a 2 inch lift, throw on some wheels and tires from a 2019 rubicon wrangler, and maybe throw a nice dark metallic gray vinyl wrap over the wood grain and make it into a bearable two tone modern looking 4x4 mall queen. Give me your thoughts, I'm pretty open to ideas at the moment... It also depends on how rare this bird is and what it might bring at a auction all spiffed up and looking factory stock. And if your wondering, I'm most definitely not going to hack this and make it into a capable 4x4, I think a mall cruiser that looks like it might be capable, (but not really) is what I'm after if I do modify it.
-
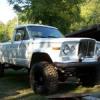 This is a writeup that can be used with any MJ front clip, but should only be used on MJs that have gone through the Cherokee (XJ) Wagoneer front clip conversion. As some of you may already know, while rare, this is a pretty popular front clip swap for us and cherokee owners alike. This is my 1990 with the factory front clip. This is her after the swap. This is a 100% direct bolt on conversion for 87-92 MJs, the 1986 year model may look the same as all the rest, but it is NOT. While it is possible to put later front clips onto an 86, including the wagoneer, it is much more involved. I know this because i gave my original front clip to a friend of mine with an 86 (SpectorMJ). It was a royal PITA trying to figure out a way to make it work. Anyway. . . . The reason why I suggest to limit this to only Wagoneers is because of their separate High and Low beam lenses. Bottom are low beams, top are high. Because they are physically separated it prevents dangerous temperature levels inside the unit. Unlike on a traditional front clip where both filaments are enclosed in the same sealed unit and have the potential to generate damagingly high levels of heat. Shortining the life span of the light and in the very worst case senerio, start an electrical fire. YOU HAVE BEEN WARNED. Onto the instrutional! You will need: 2 relays with matching relay buckets and pig tails Wire Wire crimpers/cutters Butt connectors Electrical tape Corrugated electrical tubing Heat shrink Lighter This is my relay bank on the drivers side fender. The two in the middle are responsible for the Headlights. The really nice thing about these relays is that they interlock and have mounting taps. So, the wiring. It took me several days to come up with a solution, but once I did it was acutally quite easy to implement. #1 Locate your Headlight connector and unplug it. #2 On the Engine/Body harness section of the connector, locate the solid GREEN and WHITE wires. #3 Trace them back a good distance. A good 10" away from the connector #4 Cut the WHITE wire. #5 Locate the wires on both relays that correspond to the 85 slot and splice them into the section of the WHITE wire that goes to the fire wall, NOT the section that goes to the connector. This is the "signal wire" that will trip the relay. I cannot tell you what color wire because nearly all relays are different. Something you need to be thinking of in the meantime is where you are going to draw your power from and where you are going to ground these two relays. Your "incoming power" (30) and "ground" (86) slots are located here. . . . The part about finding ground and power was easy for me because i have installed a marine grade auxillary fuse box which has both direct battery positive and negative terminals using 4 gauge audio wire. #6 Using one of the relays, find and splice in the "outgoing power" wire into the remaining cut portion of the white wire. If you have done right so far, this portion of the white wire will be going TO the headlight connector. #7 At this point you should have all wires ( 2 incoming power, 2 ground, 2 signal, and 1 outgoing) connected. All that should be left is one outgoing power wire. #8 Now you can splice this wire into the GREEN wire you located at the very beginning. Cut and crimp all three wire ends together. The remaining outgoing power, and the two cut ends of the green wire. In the picture above you can see my connection just above the text box. If you have done everything right, your high and low beams should now come on together when you pull the lever on the steering column to engage "high" beams. Your lows beams will still fuction normally as well. Best of luck, :thumbsup: Ftpiercecracker.
 -
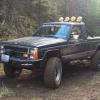 Ok so if you own an XJ Wagoneer, or have an XJ Wagoneer grill on your XJ or MJ like I do, you probably know that the top 2 lights are your low beams, and the bottom 2 are your high beams. This will tell you how to make only the top 2 low beams come on with low beams, but all 4 come on with high beams. Low Beams: Factory High Beams: After the Swap's High Beams: You will need: -3 relays -14 gauge wire (I recommend black, red, white, and green, to match the factory wiring) -Spade connectors -Wire crimpers -Wire strippers Here is a wiring diagram that my dad drew up: Start by locating your headlight harness wiring. You have a black plug under the air box on the drivers side. You will need to uninstall this to access the plug. While you are accessing the plug, Cruiser recommends using an electronics cleaner inside. It likes to get green inside, which causes resistance. You can find more information on his Renix Tips Thread Now you need to decide where you want to mount your 3 relays. I mounted mine where the core support bolts to, I don't have the factory air box. There is also room on the drivers side inner fender. Next, you need to decide where you want to splice in to your headlight harness wiring. I did mine on the header panel side of the plug. The only downfall to this is if you uninstall your header panel, you will need to unplug the relays. The upside is that you have more to work with. Here are the relays and their diagrams Ok, on to the wiring: Your low beams are controlled by a solid green wire. There is also a green wire with a black stripe. I believe this goes to your factory fog lights, but I'm not sure on that. Your high beams are controlled by a solid white wire. This part is the exact same as a normal headlight relay swap. You are going to make 2 separate systems. 1- Cut the green wire so you have plenty to work with on both sides. If you're standing at the driver's tire, to your left will be the header panel, and your right will be the cab of the Jeep. The left side will be to the lights, the right side will be from the switch. You will need to extend both these wires so they are long enough to reach your relays. The switch side of the green wire will go to either 85 or 86 on the relay. The other goes to ground. It does not matter which you choose. 2- You need 12v from the battery that goes on 87. I would run 2 separate 14 gauge wires (In red) that are both fused. 3- Now hook the headlight side of the green wire to 30 on the relay. 4- In the spade connector on 3 of the low beam relay (green) you are going to make a jumper to the 3rd relay. You are going to add another piece of green wire that is about 4-6 inches long, and add a spade connector on the end of that. So the headlight side of the green wire will have 2 spade connectors on it. Once you have completed this, leave it, we will come back to it later. Now you will do something similar for the white wire: 5- Cut the white wire so you have plenty to work with on both sides. If you're standing at the driver's tire, to your left will be the header panel, and your right will be the cab of the Jeep. The left side will be to the lights, the right side will be from the switch. You will need to extend both these wires so they are long enough to reach your relays. The switch side of the white wire will go to either 85 or 86 on the relay. The other goes to ground. It does not matter which you choose. 6- Now you will hook the other red 14 gauge wire that you ran to the 87 on your relay. 7- Now hook the headlight side of the white wire to 30 on the relay. You will need to make 2 jumpers out of white wire, just as you did with the green wire. The white wire will have 3 spade connectors, all 4-6 inches apart from each other. If you follow the wire at this point, it will come from the headlights, to 30 on your relay, then 2 more spade connectors. I hope that made sense. Now you will wire your 3rd relay: 8- Hook either 85 or 86 to ground, again, it doesn't matter which you choose, but I would do the same on all 3 for consistency. 9- Connect one of the spades on the white wire jumper (Which comes from 30 on the high beam relay) To 85 or 86 on the 3rd relay (Whatever you didn't pick for ground) 10- Connect the remaining white jumper to 87 on the 3rd relay. 11- Use the green jumper you made in step 4 (Coming from 30 on the low beam relay) and connect it to 30 on your 3rd relay. And here is what my relays look like all mounted: I hope this makes sense to you guys. I know the wiring is a little messy, but pretty much the low beam relay is only going to power the low beams, and the high beam relay will power both the high beams and the low beams. I understand this could be done with a diode, but it would need to be 20 amp, which I could not find. I had relays lying around, so why not.
 -
Can anyone tell me the dimensions of this type of grill? http://www.ebay.com/itm/74-78-Jeep-aluminium-Rasor-grille-J10-J20-Cherokee-Wagoneer-75-76-77-/200905617566?pt=Motors_Car_Truck_Parts_Accessories&hash=item2ec6e8709e&vxp=mtr Only this, the round headlight type. 1975 Cherokees seemed to have them as well.

