


joester1908
-
Posts
227 -
Joined
-
Last visited
Content Type
Profiles
Forums
Gallery
Everything posted by joester1908
-
November 2016 ● joester1908's '90
joester1908 replied to neohic's topic in Comanche of the Month (MJOTM)
Thanks everyone! I love the old school look. Wasn't my plan originally, but I'm extremely happy with the way it has gone -
i hope you tightened this waaaaaay more. looks good yes of course! My dad threaded the tie rod end on and stuck it in the pitman so i wouldnt get lost lol
-
So I pulled the switches out of my Comanche and got the factory vent back in Unspooled the winch cable Took off my 8274 Definitely makes the bumper look funny I had to work but he pulled the Dana 44 out of the front of my Comanche and got the Wrangler's D30 under the front for me to install. Picked up a stock front bumper Pulled off the winch bumper Painted the stock bumper Here is the slight damage to the unibody. Broke a steering box bolt when i was reinstalling it. Ends up I was over tightening them by quite a lot. Anyways, new bumper turned out great Used the TJ's steering. Had to replace the pitman arm and the tie rod on it Got it on its own weight again and able to drive I took the lift pucks off and it sits pretty level without the weight of the bumper Luckily, I saved my RE adjustable track bar Now that my TJ is done, I need to take the internals from the rear axle and swap them in the rear of my TJ. My plan is to drive the TJ in to work with the Comanche's D44. Then I'll have the tech rebuild the Comanche axle and then throw it in. I'll keep you guys posted
-
Intermittent hesitation
joester1908 replied to joester1908's topic in MJ Tech: Modification and Repairs
i was thinking if the exhaust is leaking at the manifold, the intake could be leaking too? havent had a chance to look at the EGR yet but i plan on replacing the vacuum line from the TB to the MAP not yet, i havent had a chance to do anything more on it -
Intermittent hesitation
joester1908 replied to joester1908's topic in MJ Tech: Modification and Repairs
Yes! Like I said, the previous owner went down your list and claimed he did everything. which i thought was strange. and he didnt do it right obviously because it drove like crap. I used your method to adjust his TPS and it was way off. But he had over tightened the sensor so much that it cracked the slots it moved in. After adjusting it it ran awesome and finally shifted, but it would loosen up due to the cracks. However, it wasnt until I adjusted the TPS that this stall with light throttle started happening. I then inspected the throttle body to be sure it was clean and the butterfly valve was moving properly. Satisfied, we replaced the TPS due to it being damaged, adjusted it again following your procedure, and it still stalls. That is when we went down your list and cross checked the work he had done. We did find some minor vacuum problems and I found some stuff i didn't exactly like. I threw my MAP sensor on his Cherokee and we drove it around for about 10 minutes without it stalling. I thought we had solved the issue. He purchased a new one and I installed it, only to have it stall immediately. My theory is that the engine cooling must have had something to do with it?? It happened every time its cold, but then very intermittently. I pulled off the intake tube again. I swapped my IAC on his Jeep and cleaned in the TB as much as I could. With my IAC, it still stalled. I will most definitely check the resistance from the flat 3 connector to the battery terminal. Do you think a leak at the manifold would cause this type of issue? My theory is if exhaust is leaking at the head, what's to say intake isnt either? and if its past the IAC and TPS it would be unmonitored and could cause it to lean out? I also just wanted to say thanks for all the help you give the Jeep community. I have had my Comanche since 2012 and I have been down your list with that and the many other XJs ive had -
AW4 Automatic to AX15 Manual Swap
joester1908 replied to joester1908's topic in MJ Tech: DIY Projects and Write-Ups
the automatic one? -
Intermittent hesitation
joester1908 replied to joester1908's topic in MJ Tech: Modification and Repairs
no sometimes it idles down when driving. O2s ok. replaced all the vacuum lines. did find ANOTHER vacuum leak. it is much more powerful and responsive now. put the stock air box in. I did notice an exhaust leak at the manifold. I am only working on it a few times after work so I don't have a lot of time to spend. but i am going to pull off the intake manifold. clean it. replace the exhaust manifold. replace the gasket. and go from there. ill keep you all posted. -
Intermittent hesitation
joester1908 replied to joester1908's topic in MJ Tech: Modification and Repairs
Wow thank you for the information. I will have to do some 02 swapping. We also decided to put a stock air box in it and replace all the vacuum lines and the EGR system. It seems like the best option. Thanks for the info -
So I am working on a friend's XJ (1990, 4.0l, AW4) and I am at the limit of my knowledge. Here's some background: We bought this Cherokee from a guy who said he went down Cruiser's thread on it just because. When you would accelerate, it would build up to 2500 RPM then lag around there for 5-10 seconds before shifting. Other than that it was in great shape and rust free. We got it back home and I adjusted his TPS. It was way off and it had been over tightened, causing the adjustment to not stick because it wanted to go back in that cracked spot. Adjusting his TPS solved the shifting issue, but now there is a hesitation off idle. Say you back out of the driveway, put it in drive, and just lightly give it throttle it will stall. You can start it up again and drive it for a while problem free. Then all the sudden it will act up again, hesitating/stalling from a stop. Sometimes, if you just barely push the pedal, it will idle very very low and seem like it will want to stall out. Other times, not at all. You can power through the hesitation, however. We decided to replace the TPS due to the crack in the housing. I readjusted it. Reset the battery. Still no luck. Swapped my Comanche's IAC on his Jeep. Still nothing. Replaced the MAP sensor. Reset battery. Still nothing. Checked for vacuum leaks. Nothing. PO replaced cap and rotor. Distributor itself looks really clean inside. Maybe that was replaced? Checked fuel pressure. 32 PSI at idle. Checked all the grounds. Like I said, the previous owner went down Cruiser's thread and did most all of the stuff he said to do. Dipstick ground was refreshed. Added aux battery ground. Replaced ribbon ground cable on the back of the block with a normal, thick cable. Went to check the computer. Someone has had it out because it has junk yard grease pen on it and it wasn't installed properly. Checked the connectors anyways. I'm kind of at a loss at this point. I don't think it's a CPS issue because it doesn't have a no start issue. Should I look at 02 sensor next? Could EGR be giving us these issues? Thanks in advance.
-
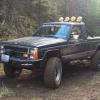
Sooooo I bought a TJ. I've decided I want to build the TJ as a "wheeler"/off road vehicle. My Comanche really does great on the trails, but I'm ready to start taking it easy on the old girl. I feel like the aftermarket support is so much better for the TJ, and I don't want to have to cut the crap out of my bed so it doesnt get trail damage. The plan is to swap the the front axle and internals of the rear on to my TJ and swap the TJ's D30/D44 internals in to my Comanche. Then I'll level it out, put it down to 33s and put the Hooligan Off Road flat fenders on the front. I live so close to work, it will be a good parts runner, daily driver, and work truck. Here is the TJ My dad and I did weld on the passenger sway bar link.
-
No actually it's RC lol
-
Yea I definitely remember those days. I haven't had one since I did my long arm. Where are you at?
-
Yea I definitely remember those days. I haven't had one since I did my long arm. Where are you at?
-
For sure man, I'm down. You have Facebook?
-
Comanche Chief - Aged to Perfection
joester1908 replied to DayriesW's topic in Member Projects: Your Comanches
definitely following this topic! looks really good. I don't think you took too much out of the bed at all -
"The Heap" build thread
joester1908 replied to themilkman's topic in Member Projects: Your Comanches
Looking good! I like the tan -
upload them to Photobucket then copy the link. Theres a little photo of a tree in the comment editor, thats where you paste the link
-
So last night around 12:30 my buddy gave me a call. Said he was up on Tonga Ridge (hour and a half to the trailhead from my house) and was stuck. Apparently he tried turning around in deep snow, broke an axle shaft, then tried to winch himself out and popped a bead. The two other 4x4s with him were't built enough to get to him. My dad, his dad, and I drove up there. He was about 15 miles off the highway in about 4 feet of snow. luckily it was compacted from other 4x4s, so it wasn't too bad getting to him. Here was how his Rover sat when we found them Lots of digging and winching later, we got him out and popped his bead back on. He dug himself a nice hole Then it was 15 miles back down the mountain. On the way down, we encountered a completely stock Chevy Silverado that tried turning around. He was sideways on the road, sitting on his frame and his tires were completely off the ground because they were just spinning. We ended up snatch blocking him backwards while my buddy pulled him sideways with the Rover. We got back on the main roads shortly after and I was back home at around 7:30 AM. I have only done "snow wheeling" a handful of times and never in the middle of the night. I can now cross that off my list..... This trip did tell me some good information about the Jeep though. It definitely handles a lot better on the freeway now. I need to get the sway bar on. I also need to get better air line for my horn under the hood. I have punctured it twice now due to the heat of the TB...
-
Did some more work on the Comanche today. My dad and I tried to drill my pitman arm out to 7/8ths and install the insert, but it is very difficult to get a straight cut in. The problem was I drilled the hole too big. The tie rod end did not sink in to the insert all the way, giving it just a little bit of movement. That translated in to 1/4 turn of the steering wheel of slop. My friend Dave at work has a really good friend with a machine shop. He drilled out my new pitman arm for me. I am really happy with the fitment. After I got that installed, I noticed that all 4 of the rubber boots on the TREs were either cracked or ripped. I called my local 4x4 shop, and they sell "Prothane" TRE boots. I decided to pick those up. Also, notice the drag link is flipped? That is so I can mount the other sway bar link. I replaced all the cotter pins while I was in there and greased everything up. Here it is with the new boots. Last thing I did was adjust my TPS. I've been having issues with it stalling and idling rough. Big shoutout to Cruiser for the guide. That really is helpful. Now that everything is installed, the slop in the steering is gone and so far it is idling a lot better, however I haven't got it hot yet so I'm not sure if its still stalling out.
-
AW4 Automatic to AX15 Manual Swap
joester1908 replied to joester1908's topic in MJ Tech: DIY Projects and Write-Ups
Thank you! -
I know there are a few other threads on this forum regarding this topic, but I did take a lot of photos, and this is how I went about it. This thread is going to be geared toward swapping in an AX15, but the information is relevant for other manual transmissions that came in XJs/MJs. Before we get started: This is going in to a Comanche. It is the same for Cherokees. If you have a long arm kit, some of the information may be a little bit off, but it is the same idea. (see the transmission install) Ignore all the random wiring. I was wiring in switches and stereo equipment while doing this swap What you will need: Transmission Correct spline transfer case Clutch pedal Manual brake pedal Manual steering column Manual cross member Manual floor pan Lower shift boot (I recommend TJ) Upper shift boot Manual front and rear drivelines Master cyl bracket Clutch kit (disk, pressure plate,throw-out bearing, pilot bearing) Manual flywheel - correct one for your year (see flywheel installation) Slave and master assembly The Process: Section one: Start in the interior 1) Pull the lower dash panel off so you have room to work. 2) Uninstall your brake pedal. There is a long bolt (I want to say 15mm or 18mm) that goes in to the bracket on the top side. You also have to uninstall it from the booster. 3) Disconnect your brake light switch 4) Take out the 4 13mm bolts that hold on your brake booster, but keep them threaded on the ends. You aren't uninstalling the whole thing, you just need to get behind it. Now, you should have something that looks like this. There is a rubber mat that you have to pull out of the way. 5) Test fit the master bracket. It bolts to the end of the clutch pedal bracket. 6) Time to drill out the firewall. On the outside of the firewall, there are 3 dimples that guide you where to drill. As you can see, there is plenty of room to get in there even with the booster installed. My drilling was slightly off, but it ended up working out just fine. Next you need a hole saw that is the diameter of the master. 7) Once that is drilled out, install the bracket under the dash, to where the bottom stud comes out of the bottom hole. Installation at this point is very self explanatory. Here it is all installed. 8) Tuck the hydraulic lines behind the brake booster and under the lip of the firewall, letting the slave cylinder (assuming it's all pre bled and assembled) dangle in the engine compartment. This is the reason you needed to uninstall the bolts. 9) Get back under your dash. 10) Install the 4 13mm bolts in the booster, being sure there is plenty of clearance for the hydraulic lines that go to the slave. 11) Swap in your clutch pedal and brake pedal, along with the bolt that goes through both pedals and the bracket. Note* Apparently, there is a difference between the manual accelerator pedal and the automatic accelerator pedal. I am using the automatic one with no issues. 12) Connect your brake pedal to the booster and install the brake light switch. Remember the plastic washer. I know it's not the best picture, but its tight up there. 13) The clutch pedal has an ear on it that will connect to the master. There is a pin and a plastic washer if I remember correctly. A little but of grease may be a good idea. If it gets old and dry your clutch pedal may squeak. And now you're done with the first step! Once that is all installed and all the bolts are tight, move on to the steering column. Steering column: Good luck! The steering column is the least fun part of this whole thing, that's why you should just get it over with. The reason you have to swap the column is that the manual Jeeps have a key lock switch. You have to press the switch to get the key out. In my case, I had a column shifter and it would be useless. So while you have your dash apart, just tackle it. You have to take off the bezel around the instrument cluster, so if your PRND indicator is in your cluster like mine was, this is also the time to swap that out. If you have to swap over a steering wheel, remove that before you remove the column for ease. Sorry I didn't take a whole lot of pictures of this process. 1) Remove the exposed plugs on the column. There are a couple that seem impossible to get to, but they give you enough slack to disconnect them once the column drops out. Just get the ones on the side of the column for now. 2) Remove the bolts from the firewall. There are a couple of bolts that hold the bottom of the column to the firewall. 3) Remove the 13mm steering shaft bolt from the steering box 4) Remove the 2 vertical bolts on the bottom side of the console that hold it in place. There is bracketry that comes from the trans tunnel and the kick panel that supports the column. I remember having to wrestle it free a little bit. 5) Now, your column should be hanging down, exposing the remaining connectors. Now your column should be free. Go out to your steering box and use a screw driver to give the steering shaft a nudge towards the cab of the vehicle. It may be a little tight on the steering input shaft of your box. 6) Put your new column through the hole in the firewall. This may take 2 people, and uninstalling the steering shaft before you complete this task may make it easier if you are by yourself. 7) If I remember correctly, I held the column in place while connecting the plugs. Then I got it back on top off the brackets and just finger tightened the 2 vertical bolts. After that was complete, I installed the steering shaft on the box, allowing the column to slide in to place completely. 8) Tighten the bolts on the firewall 9) Tighten the 2 vertical bolts for the column support 10) Plug in the remaining plugs on the side of the column. 11) Reinstall dash trim and/or cluster if necessary. Note* If you have the column shift MJ, you have a shifter cable that runs behind the dash. Disconnect that and throw it out. Anyways, here's how it looked with the new column. This was my old tach. It was definitely customized. And here's the new, all installed. Now, it's time to reinstall the old steering wheel. If you aren't swapping a steering wheel over, just go down to the next section, center console. 1) If your steering wheel is like the one pictured, remove the 2 rear bolts. exposing the center nut. There are 2 connectors for the horn. Disconnect them. 2) Use a steering wheel puller to uninstall your old wheel 3) Change out the pin for the horn if necessary 4) install new wheel 5) Reinstall the trim. On this style wheel, it just pops on. Center console and shift boots: 1) uninstall your center console completely. There are 2 screws that hold on the black, center piece of the console under the lid. If you have a floor shifter, you need to pop the PRND thing off (it just snaps in) and I'm pretty sure the handle of the shifter has to come off too. Once you uninstall that, there are 2 screws inside the actual console itself. Then, there is 1 screw near the E brake (If it is console mounted, not floor) and one near the automatic trans shifter. Lastly, there is 1 screw under the trim of the 4wd selector. 2) After your entire console is out, you need to swap over the hole in your floor pan. I had a column shift MJ, so it was just a blank pan. If you have a floor shifter, you have to take off that linkage before taking out the cover. When you take off the cover, this is what it will look like. There are around 10 8mm self tappers. 3) Install the manual trans cover. This is what your shift boot will connect to. I used one from a TJ because I couldn't find an XJ one that was in good shape. Don't install it yet. I know there is no transmission in that photo, but that's because this Jeep was pretty much just a shell at this point. 4) Reinstall your center console, leaving the oval shape hole in your floor exposed. Section 2: Uninstall your automatic transmission: Part one: Accessories BEFORE YOU BEGIN, APPLY PARKING BRAKE 1) Disconnect your kick down cable from your throttle body and off the side of the transmission. It is hooked to the throttle body. Don't worry about taking it off the transmission. It's coming out anyways. 2) Uninstall your neutral safety switch wiring. There is a white and a black plug on the harness that runs on the seam of your firewall. This is what they look like. 3) Uninstall the automatic trans lines 4) BLOCK FRONT AND REAR TIRES SO THE VEHICLE WILL NOT ROLL FORWARDS OR BACKWARDS. IN BOLD AND CAPS BECAUSE THIS IS A SAFETY ISSUE THAT I HAVE HEARD OF HAPPENING. YOU WILL BE REMOVING YOUR TRANSMISSION AND DRIVELINES, ONLY LEAVING YOUR PARKING BRAKE TO HOLD THE VEHICLE. PLEASE REMEMBER THIS STEP FOR YOUR OWN SAFETY. 5) Remove both front and rear drivelines. When you are selecting drivelines to replace your stock ones with, you need to take in to account which axles you have. If you have a Dana 35 in the rear, you need to get a manual driveshaft for a Dana 35. If you try using one from an 8.25, the shaft length may not be correct. Removing them now will give you time to figure out exactly what length you will need. 6) Disconnect transfer case linkage 7) Using a floor jack, put pressure on the seam between the transfer case and transmission. you need to take the tension off your cross member. The jack isn't lifting, just holding. 8) CAREFULLY, remove the transmission mount bolts that can be accessed with holes cut inside the cross member. 9) CAREFULLY, remove the 2 bolts on either side of your cross member. The weight of the transmission and T case should be on the jack now, and your cross member should just come right out. 10) Your exhaust hanger bracket is mounted to the side of your transmission. You may have to swap that around too. Pull the bolts out and let it hang off the exhaust. 11) Remove the bolts from the bell housing, including your starter. Because the weight is on the jack, you can lower it down to give you a little bit more room. 12) The top 2 bolts of the bell housing are inverted torx. I recommend using about 3 feet of extensions. 13) Once your bell housing bolts are removed, you can remove the automatic transmission and the transfer case attached to it. This is easiest done with 2 people. Just be careful, communicate, and don't be directly under the transmission, obviously. Swapping in the manual components: 1) Now that your transmission is removed, you will see your old flywheel. Remove the 6 bolts that hold it on. An impact is the easiest way, but it can be done with a dead blow and a breaker bar. 2) Before you can install your new flywheel, you must change out the pilot bearing in your engine. It is a needle type bearing that is pressed in to the rear of the crankshaft. It is a pain to get out, but with a bearing puller it is a breeze. This is a small bearing that should come in your clutch kit. If you do not have access to a puller, you can pack the area behind the bearing with grease, then use a rod that is slightly smaller than the inside diameter of the bearing and tap it in. The pressure should pop the bearing out. You also need to change out the "spacer plate" for one without the inspection cover. 3) Once installed, you must install your manual flywheel. It is very important you get the flywheel for your year of Jeep. They did change throughout the years, and your CPS will not read correctly if you do not get the correct flywheel. I recommend getting a brand new one. They are cheap. 3) Torque the flywheel bolts to the recommended spec. If you do not have a shop manual, I highly recommend getting one. According to the shop manual I keep on my coffee table, the flywheel bolts should be 105 ft/lbs. I installed mine while my engine was out... 4) Next, you need to install the pressure plate to the flywheel. 40 ft/lbs. 5) I won't get in to the installment of the clutch, that can be found many places online, including use of the supplied alignment tool. 6) Now that your transmission is ready to go in, lets take a break and talk about what transmission is actually going in to your vehicle. You have a few options when it comes to transmissions. 1987-1989.5 with the 4.0L used a Peugeot BA10. Its 4 cylinder, little brother is the BA5. I have personally owned a Jeep with this transmission. Many people will tell you that it is a terrible transmission and should be thrown out immediately. If you plan on running large tires, doing any sort of off road use, or hard shifting, I agree. I personally think if you're going through all this trouble you should put a stout transmission in. The AX15 (4.0L) and the AX5 (2.5L) are much better options. They are a good, reliable transmission. They are plentiful and not overly priced. If you get a 1989.5-1994 model, they are internal slave cylinder. I would like to point out that there is nothing wrong with this transmission. All it means is that every time you do a clutch, just replace the slave too! You shouldn't have any issues with the slave if you do it with the clutch. The downside is, if you do have an issue, you have to pull the transmission to replace it. In 1995 until they replaced the AX15 in 2000, they were equipped with an external slave cylinder. This is more favorable to many people, but this transmission will come with a higher price tag. This is the transmission I decided to swap in to my MJ. You do have an option for the later NV. Many people who run this transmission say it is better than the AX15. My 2002 TJ (with 246k miles) has this transmission. It does have a reverse syncro. I like it and it seems durable, but I don't know if the swap is exactly the same as the AX15 which I put in my MJ. Now, lets get back to the swap! 7) Replace your hydraulic throw out bearing. On both internal and external models, it is mounted on the input shaft of the transmission. It should come with your clutch kit, but if for some off reason it doesn't, replace it!! Once installed, this is where your slave cylinder comes in to place. If it is internal, replace it! If it is external, it mounts to the outside of the transmission and pushes on a fork. That is the process I will describe since that is what I did. 8) Install your transfer case to your manual trans. The transfer case that was bolted behind your automatic is more than likely 21 spline. The AX15s are (almost always) 23 spline. It is best to purchase the transfer case that was with your transmission if at all possible. I would also like to point out that this would be a perfect time to rebuild said transfer case if you plan on it. You can purchase a rebuild get for around $150, and in an afternoon it can be installed. I recommend installing the T case to the transmission before installing it for your own ease, but it isn't necessary. 9) Remove the gear shifter from the transmission. I say this because it is 100x easier to install the transmission in to the Jeep if it is disconnected. There should be rubber gasket on the top of the transmission, around the gear shifter. Pop that off, and there is a ring that is spring loaded in the top of the transmission. If you press down on it and spin in counter clockwise, it should pop out. 10) Install the transmission in to the Jeep. It is a pain because you have to align the input shaft perfectly with the clutch. If you have never done this before, it is definitely worth picking up a 6 pack and a pizza, and asking a friend or family member who has done it to come over and help. The best way I can describe the process is this: Get your transmission lined up with the flywheel. Slide the input shaft in, and rotate the transmission until you get it to spline. 11) Once splined, replace the bell housing bolts and starter. Be sure to be careful installing your CPS. 12) Install the exhaust hanger bracket. 13) Reinstall your cross member. The manual cross member is slightly different. If memory serves me right, the manual one has a 1/2 inch lower mounting depth. I recommend replacing it, but it is not necessary. Think about long arm kits. They have the same cross member for autos and manuals. If you want to lower driveline angles without losing ground clearance, it may be a good idea. However, do check the condition of your transmission mount. This is the time to replace it. 14) Install your drivelines 15) Install the slave cylinder to the transmission. There are 2 horizontal bolts that mount it to the drivers side of your transmission. 16) Reinstall transfer case linkage. Adjustment may be necessary. Section 3: back in to the interior 1) You can now reinstall your shifter. It just pops back in the opposite it comes out. It takes a little pressure. 2) Install the lower shift boot over the shifter. I just used self tappers. 3) Reinstall console trim 4) Install top shift boot 5) Install shift knob. It should have a lock nut on the bottom 6) There is a computer for the automatic transmission under the dash on the passenger side. It has 2 connectors and can be removed. I just left the harness under there. If you wanted to disconnect them, they run under the drivers side dash up above the accelerator pedal. I don't think that is necessary. I don't even know if you have to remove that automatic trans computer but I did. 7) You can now reinstall all interior components. Section 4: Under the hood Now that you have the main stuff done, you have just a few more things to do under the hood. Remember how I said to unplug the 2 harnesses for the neutral safety switch? Now you need to bypass it. I believe there is harness that plugs in to here on the transmission: It is for the reverse lights You may have to make a custom harness too, I really didn't care so I just left it hanging there. 1) Ground you NSS harness. If you decide you don't want to custom make a harness and live without reverse lights, just like I have done, all you have to do is ground the plug. Here are the plugs in relation to the valve cover. On the black plug, I just shoved a butt connector as shown, simply grounding the circuit. A little redneck? Probably. But it has been like that since I manual swapped my Jeep over a year ago. AND THATS IT! I know it's a long thread, but I hope it makes sense. If I have missed anything or something doesn't make sense, PLEASE, let me know and I will try to clarify to the best of my ability! My dad was a HUGE help through this process, and if you have any questions I may be able to pick his brain to make up the gaps in this write up.
-
Manual to Auto Transmission
joester1908 replied to JeepFanactic's topic in MJ Tech: Modification and Repairs
87MJTIM is correct, I see them all day long in the 300-600 range here on the west coast. Have you tried looking on eBay or other online auto part places like carpartwholesale? But to answer your question, you can swap from automatic to manual pretty easily. You will need an automatic computer, because coming out of it there is another harness that goes to a computer that controls the transmission under the right side of your dash. Your cross member is slightly different, but can be used. You also need to swap out the clutch pedal and skinny brake pedal for the wider, automatic pedal. The brackets on the throttle body for kick down and all that are all there, they just need to be connected. Also, there is an automatic vs manual TPS. I know there is more to do too, and there are countless threads on it, but these are just some examples. If youre planning on doing this, getting a donor is definitely a step in the right direction. When I went auto to manual, I just put the wrecked, donor XJ in the driveway next to the MJ -
Me too. Only 6" width though................. Are they particularly rare or hard to find? I don't know anything about OEM wheel options. I am planning on keeping them as I want this truck to be as near to stock as possible, and I think they are probably the best looking OEM option. I realize that this is one of the least desired variables of this truck, but 20-30 years down the road stock versions of these truck will probably near impossible to find. Tire shop was open today so I had them mount up the tires for the rear. So now she is sitting on a usable rear end for the first time in 10 years. I'll have to wait until the weather dries up before I can work on the front as my yard is the about the same consistency as a marsh. She's started to actually look usable again. Nice looking MJ! Glad to see one saved from rotting and/or going to scrap. Definitely going to follow this thread.
-
1990 Jeep Comanche Pioneer Engine: Renix 4.0L Transmission: AW4 (factory), AX15 external slave (now) Transfer Case: NP231 Front Axle: Vacuum Disconnect High Pinion Dana 30 (factory), Dana 44 low pinion (now) Rear Axle: C Clip Dana 35 (factory), Dana 44 (now) Wheelbase: Short Wheel Base Odometer: 249,500 (as of 12/31/15) Build Date: 11-89 Current Location: Western Washington State, USA Status: Daily Driver / Wheeler Notes: This was originally an automatic with a column shift. It had a cloth bench seat. gray interior. Exterior color is blue with a blue and gray "pioneer" decal. I have swapped the transmission out with an AX15 from a late 90s Cherokee. The transfer case has been swapped from the 21 spline, vacuum NP231 to a 23 spline, non vacuum NP231 with an SYE. I have swapped the bench seat out for 2 door bucket seats so they flip forward, and the matching center console. It did have the "power" and "comfort" switch. Roll bar, front bumper, rear bumper, and XJ Wagoneer header panel are not factory. Current Owner: me (Joey K, joester1908)
-
So we are planning a trip down to the Rubicon in California. From here, that's about a 700 mile drive. I am going to take my Comanche, my dad is going to take his TJ, and we have a couple of other people with Wranglers who are going to go with us. We are planning to meet my uncle who has a JK Rubicon. I am excited for the trip, however, before I go, there is some definite maintenance I need to do on the Jeep. Sway bars Brake Booster Upgrade Finish Steering Upgrade Install Skid Plates Install spare tire mount and spare tire Replace IAC and TPS Currie lower long arm joints Flush all fluids and grease all joints Starting with the sway bars, I haven't ran sway bars since I lifted the Jeep. I bought the TeraFlex sway bar mounts that you weld to your C. The driver's side installed nicely However, the passenger side hits the tie rod. This is because its designed to run with the steering UTK not OTK. I would just flip the tie rod end, but when I drilled out my pitman arm, I made the hole too big, and I had to use washers to space it so the TRE would sink in properly. Well, there is still a little slop in the wheel and it doesn't allow good articulation of the TRE. That leads me to #2 on the list. I purchased a new pitman arm and a new insert that a friend at work is going to drill out for me. Hopefully, that will fix that issue so I can fix the sway bar issues. We are building a new dealership across the street from the dealership I work at, but for now we just store fleet vehicles over there. This 2wd cab and chassis got stuck. One of the salesman asked if I would winch it out with the Jeep :laughin: I am real happy with how the Jeep preforms off road but it does need a little more work to be an awesome DD. Hopefully, the new pitman will fix the slop in the steering. Then I can install the sway bars. After my front end is done I can install the front skid plate from an old Renix Cherokee. After that is done I will work on the brake booster upgrade to make stopping distance a little better. The spare tire and lower long arm joints are lower on the priority list, however the IAC and TPS will be soon. The Jeep has been dying when I push in the clutch at a stop light or stop sign. It also will idle at around 2000 RPM randomly or just barely sputter and not want to idle. It will probably be good to just replace these things anyways before the trip. Fluids and grease will come right before we head out. I did however install the Rough Country transfer case skid plate. That was a pretty easy job.