NorthwestMJ Posted September 20, 2022 Posted September 20, 2022 Been at this a while, coming up on a year so I decided to post my build thread! Better late than never! Anyways, I spent about 7 years looking for the right price right condition MJ to do the ever classic 97+ swap and build into my dream MJ. Long story short, 200 dollars spent and a long lost buddy found on Craigslist I had the perfect Comanche. No engine, crap interior but relatively rust free (the floor pans were toast from the liquid sunshine here in Washington state leaking in the cracked windshield. This video is how my buddy got ahold of the MJ. He is mainly a VW guy who has a nice XJ. He got busy, put it up on CL and that is how I found him again and the got the MJ. Anyways as mentioned in the title, it’s an 87 with 4x4. Originally had the Renix 4.0 which I found in the bed, and what I think is the crap Peugeot M/T and Dana 30/35 axles.I got rid of all that!Luckily for my build, it has the rare 86/87 black interior and the plastic parts were all there and in good shape. The two pictures are before and after being hacked out of blackberry bushes!
NorthwestMJ Posted September 20, 2022 Author Posted September 20, 2022 After getting it, I first took the canopy off. The canopy is in decent shape. Needs new hydraulics and a fresh coat of paint or what may end up being bed liner??? The truck sat in this spot the next couple months while I finished up my stroker XJ build.
NorthwestMJ Posted September 20, 2022 Author Posted September 20, 2022 Finishing up the XJ, I quickly rolled the MJ into the shop. The wife wasn’t too happy about another Jeep build. Getting things started, I began stripping the rig down and getting rid of everything I didn’t need. By getting rid of I mean put most good stuff in the attic. I then replaced the floor pans with Key parts XJ ones. I also picked up a rolled 2001 xj that only had 147000 on the clock! $550!!! Front end is no good but axles, drivetrain and interior are all usable! Immediately scrapped what I didn’t need off of that one too!
NorthwestMJ Posted September 20, 2022 Author Posted September 20, 2022 Got the cab and bed pretty much where they needed to be. Finally able to start digging into the conversion itself. First off was the dash flange. The original flange in the MJ was MUCH different than the XJ and was a no go for installing the newer dash. As I wanted to go for a conversion that was as close to factory as possible, I cut out and welded in the entire flange. Definitely worth it as I would later discover when it was time for the xj dash to go in! I also used a spot weld cutter and took out the other mounts on the XJ dash (steering column and air box).
NorthwestMJ Posted September 20, 2022 Author Posted September 20, 2022 Spent the next few weeks doing minor body work and tying up loose ends. It was a process as I hadn’t done a whole lot before. Took my time and was very happy with the results. Finished up floor pan! One more to go. Fine about a week later! The PO had drilled out some mounts for the canopy into the bed rail and there was some rust around them. Patched them and good as new! Didn’t like the factory hood release as I’ve seen a few fail. These are the aerocatch flush mount hood pins. There is some small fab needed to make these work. Especially on the drivers side due to positioning of the ECU. Tailgate ready for primer! Started spraying primer as soon as I had the truck cleaned up from all of the body work! Turned out great!
NorthwestMJ Posted September 20, 2022 Author Posted September 20, 2022 Color was a rough decision. I was stuck between the JK color anvil, JT color Gobi and the Toyota color lunar rock. I decided to go with Gobi! Next was paint! It was a challenge as I had never painted a car before but did have some experience painting airplane parts at my job at Boeing. I didn’t have any runs and was generally pleased with the results.
NorthwestMJ Posted September 20, 2022 Author Posted September 20, 2022 I had numerous sleepless nights over flares. Since I planned on it as an overland build I didn’t want no flares but my factory flares were a no go with the 97+ swap. I was between the Notch flares and Napier. Ended up going with the Napier as I heard the fit up was somewhat better. Overall I am happy with them.
NorthwestMJ Posted September 20, 2022 Author Posted September 20, 2022 Finally started getting the truck somewhat together. Ended up making some tail lights with the Key lenses available in eBay. Keep in mind for those of you in interested, these are just the lenses…. Not the housing. Took apart my old tail lights (horrifying) with a dremel circular saw blade. I did not use the gorilla glue. I used sikaflex. Next off, I raptor lined the bed and the frame! I love Raptor liner. It is a fantastic product. Also installed the air box. Couldn’t figure out a foam gasket for it so i hot knifed one out of a knee mat from the Dollar store!
89 MJ Posted September 20, 2022 Posted September 20, 2022 Raptor liner is great stuff. Affordable and durable product.
NorthwestMJ Posted September 20, 2022 Author Posted September 20, 2022 Next up, I started working wiring the engine bay. I still had the empty holes from the firewall swap and figured out XJ rubber floor plugs are made perfectly for the task. Pop in tight enough for a great seal and sit nicely. Also got new Jeep letters for the tailgate done! Really looks great. The chrome trim lenses were not by choice. It’s all they had. I’ll fix them…. I promise!
NorthwestMJ Posted September 20, 2022 Author Posted September 20, 2022 Really started to go to town on the interior. It was somewhat challenging running the wiring as I used the holes for the automotive snaps on the xj as guidance. They were almost non existent on the MJ. Also, fixed the taillights as I promised earlier. Very happy with the black! Began putting in the engine a few days later!
NorthwestMJ Posted September 20, 2022 Author Posted September 20, 2022 13 minutes ago, 89 MJ said: Raptor liner is great stuff. Affordable and durable product. Amen!
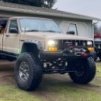
NorthwestMJ Posted September 20, 2022 Author Posted September 20, 2022 Got the engine In and done! Still need to knock the fuel tank out but not sure what route I’m going to go (not that there is really a choice, I just dreaded it). Also got the electrical to go live. The clear turns will be orange led bulbs later, I just didn’t have any and was impatient to try it. Also swapped in the D30 from the Cherokee to get rid of the gross vacuum disconnect. Ended up going with a 4.5” Zone Offroad kit and JL Rubicon wheels and Falken M/T tires off of a JT Rubicon. My wife claimed the BFG for her XJ. Interior is done minus the headliner. Ended up finding a somewhat decent backer in an MJ buried in a junkyard near my house. Found great back wall carpet that matches my interior!!!! Also snagged extra interior lights, cab trim panels and a sliding rear window in case I ever want to switch!
NorthwestMJ Posted September 20, 2022 Author Posted September 20, 2022 Pretty much where I am now as of 9/20/22… picked up an RCI heavy duty rack to mount my Ikamper skycamp 2.0 on the back. Made a hi-lift mount for the bed and mostly installed the gas tank! Ordered up and built a Dirtbound Offroad Manta Ray DIY front bumper. Great product! Also installed a Warn M8000 that my brother in law gave me shortly before he passed of Covid. Excited to have something of his on the truck. He was a great dude.
gvthnks Posted September 20, 2022 Posted September 20, 2022 Awesome build so far. Inspiring. Thanks for doing the work it takes to document all this.
NorthwestMJ Posted September 20, 2022 Author Posted September 20, 2022 3 hours ago, gvthnks said: Awesome build so far. Inspiring. Thanks for doing the work it takes to document all this. Thanks so much! I appreciate it!
NorthwestMJ Posted September 21, 2022 Author Posted September 21, 2022 Today I worked finishing up installing the rear axle. It was a challenge deciding what to use. I ideally wanted a Dana 44 but as we all know they are very hard to come by. I may be acquiring a set of JL Rubicon axles in a couple weeks from my buddy, but it’s a toss up. I have a JK on Rubicon 44’s that really needs to go to 60’s, which makes my sensible side say I’ll use those when the day comes. Not sure if the JL’s are redundant, although I do believe they are 68 inches wide. That end of it would be cool, but I would have to go 35’s to make the truck look right that wide? I plan on hitting the local Pick n Pull this weekend to get the parts needed for the ZJ disc conversion. I’m excited to try it out!
eaglescout526 Posted September 21, 2022 Posted September 21, 2022 On 9/19/2022 at 9:29 PM, NorthwestMJ said: That is a really rare factory 86 only bumper. Just an FYI.
NorthwestMJ Posted September 21, 2022 Author Posted September 21, 2022 15 minutes ago, eaglescout526 said: That is a really rare factory 86 only bumper. Just an FYI. Really! I was very hesitant to use it on the build. I almost threw it out with the scrap! Any idea what it’s called?
eaglescout526 Posted September 21, 2022 Posted September 21, 2022 21 minutes ago, NorthwestMJ said: Really! I was very hesitant to use it on the build. I almost threw it out with the scrap! Any idea what it’s called? I’m pretty sure the catalog just calls it a rear step bumper. It’s very similar to the J-truck rear bumper but made specifically for the MJ. The later bumper was made to fit the style of the front.
NorthwestMJ Posted September 21, 2022 Author Posted September 21, 2022 Interesting! I had no clue. It’s in great shape, I wire brushed it and repainted it and it looks brand new. Any idea of what it’s worth?
eaglescout526 Posted September 21, 2022 Posted September 21, 2022 7 hours ago, NorthwestMJ said: . Any idea of what it’s worth? Nope. They rarely pop up. The only other one I and probably other members have seen was on a junkyard MJ.
NorthwestMJ Posted September 21, 2022 Author Posted September 21, 2022 4 hours ago, eaglescout526 said: Nope. They rarely pop up. The only other one I and probably other members have seen was on a junkyard MJ. Wow! That’s cool though! I’ll keep it, this Comanche had the chrome mirrors on the weird arm instead of being by the vent window area. I heard those are rare too?
eaglescout526 Posted September 21, 2022 Posted September 21, 2022 Yeah that bumper is a nice find and save! Those are the two mirrors. Less common than the vent window set up but desirable to some.

Recommended Posts
Create an account or sign in to comment
You need to be a member in order to leave a comment
Create an account
Sign up for a new account in our community. It's easy!
Register a new accountSign in
Already have an account? Sign in here.
Sign In Now