CactusComanche Posted August 19, 2020 Author Posted August 19, 2020 These should make a big difference Additionally with the turn signals not working, the wand to turn the signals on was loose and floppy so I went ahead and got a turn signal switch cause I am sure that will be needed. Another thing that seems to be missing on every renix is that fuse panel cover, so I tracked down some plastic clips and a cover and got those installed it really gives everything a clean look, fluids are all in and it is running pretty smooth, the idle is still up and down so I’ll need to sort that out. Still needs some work but it’s sort of starting to come together .
Pete M Posted August 19, 2020 Posted August 19, 2020 7 hours ago, CactusComanche said: ew part of me would want to just start fresh with new carpet, but another part of me is curious as to how well I could clean that at the DIY car wash.
Pete M Posted August 19, 2020 Posted August 19, 2020 have you tried talking to a automotive upholstery place for the seat cover material?
eaglescout526 Posted August 19, 2020 Posted August 19, 2020 Lots of detergent on that carpet and let it soak in and then pressure wash it will yield some damn good results on that. Actually might be worth a try to clean it, I know I would try it.
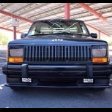
CactusComanche Posted August 24, 2020 Author Posted August 24, 2020 The header panel was removed for cleaning, painting, and installing new headlights and the headlight harness upgrade. The front bumper had taken a small impact on the passenger side so I needed to remove the front spoiler to straighten the bumper back out. while that was off I decided to add a set of bumperettes. I think they give the front end a tough look. I had to shave the bottom edge slightly for clearance of the front spoiler. lots of elbow grease here, sanding and paint prep, the metal trim was painted black at some point, but was blistered and flaking off. Fresh paint and they look good as new. Time to dig deeper and remove the body kit for cleaning. Some pieces are secured by double sided molding tape and metal brackets, while others are double sided tape and screws through the sheet metal. The double sided tape was failing from old age in a lot of places so it all needed to come off, cleaned and reinstalled. i also cleaned the fender liners, you can see before/after, they were pretty dirty from age. I want to clean everything that I remove before it gets reinstalled. Just a lot of elbow grease and hoping for an overall clean final outcome.
CactusComanche Posted August 24, 2020 Author Posted August 24, 2020 On 8/19/2020 at 7:32 AM, Pete M said: have you tried talking to a automotive upholstery place for the seat cover material? I tried a couple smaller shops, they couldn’t find the material and it’s pretty costly to have seats reupholstered so I thought I would try my luck searching for some good seat covers to replace these since they’re just so ripped up.
CactusComanche Posted August 24, 2020 Author Posted August 24, 2020 On 8/19/2020 at 8:32 AM, eaglescout526 said: Lots of detergent on that carpet and let it soak in and then pressure wash it will yield some damn good results on that. Actually might be worth a try to clean it, I know I would try it. I’d like to try eventually, ideally where I want to take the truck, new carpet will be my best option. For now I’m just going to set the carpet off to the side somewhere.
CactusComanche Posted August 24, 2020 Author Posted August 24, 2020 the kit pieces are super thick plastic and have amc part numbers stamped on the backs.
CactusComanche Posted August 24, 2020 Author Posted August 24, 2020 The paint was in poor condition so I started doing some paint correction and it’s been shining up really good! It has a lot of dings and scratches and imperfections up close but it will shine up to be a really nice looking driver. Also got the side skirts installed on the cab. Carpet is here! clean and prep the headliner for new fabric. front end is done and reinstalled. I decided to install some amber marker lenses and went with sylvania headlamps from a 2000xj. Nothing special at all but with the headlight harness and the engine ground kit the headlights are pretty bright, I was pleasantly surprised and don’t feel the need for LED. Covered the headliner, turned out really nice. I then had a friend that does upholstery on the side redo the visors. I wish I took a before picture, they were ripped and falling apart to the touch. He cut a new board and stitched them up to look new again.
CactusComanche Posted August 24, 2020 Author Posted August 24, 2020 so I still don’t have turn signals, hazards, and instrument or dash lights and the blower motor does not turn on, need to sort these things out before putting the interior together. I replaced the turn signal switch, it was pretty burned and melted so I thought that would fix my turn signals. It did not, but it still needed to be replaced, so more work to do. checking the fuses I notice this melted guy, some of the fuses were very loose and almost wanted to fall out to the touch Pulled out all the fuses to find the leak that had rusted the driver floor had corroded all the fuses. ordered some new terminals to rebuild the whole thing.
CactusComanche Posted August 24, 2020 Author Posted August 24, 2020 just going row by row, one at a time, staying organized, and keeping everything clean and tight. i also took the time to clean the c101 connection and the other large harness connection behind the fuse panel during all this to ensure good electrical connections anywhere possible. here is all the shiny new gold. Excited to get this all back together to see if this fixes the issues. success! Well almost, everything works now but the turn signals were still not functioning properly, after investigating the driver side turn signal socket had some corrosion. After replacing the socket all the signals work. I also replaced all the fuses with new as well as the signal, marker, tail, brake and reverse light bulbs.
Pete M Posted August 24, 2020 Posted August 24, 2020 all that hard work was totally worth it good for another 30 years!
CactusComanche Posted August 28, 2020 Author Posted August 28, 2020 new windshield day, the chrome trim around the windshield was not in the best shape so I decided to go for the newer style rubber trim. Notice all the dirt from cleaning out behind the trim. Gives it a nice updated look. Replaced the leaking pinion seal and added some lowering blocks in the rear to get the ride height down. new shocks new tires mounted and balanced, decided on 235/60/15 for a lower profile look and to keep the truck lower. mounted the center caps
CactusComanche Posted August 28, 2020 Author Posted August 28, 2020 i took the broken mirrors off and swapped them for the fixed manual style so no more broken clips. Gave them a fresh coat of paint before install. the fog light covers were going to need refurbished, one was punctured and cracked so that needed repaired, I posted a picture earlier reference. Here is the before. And after.
CactusComanche Posted August 28, 2020 Author Posted August 28, 2020 the fuel pump in the truck was super loud, it was one of the first things I noticed. Well I don’t hear it anymore and truck won’t start now. I had mentioned how the truck was pretty dirty and covered I spiders when I got it, and I was so quick to start working that I didn’t really take any pictures. Anyways here’s just a few spider egg sacks just hanging out. replaced the pump, the screen, and the fuel filter and it’s running again, actually much smoother than before. time to get the interior put together Going to have to get rid of these old things replaced with these, nothing special but they’ll fit in the factory speaker brackets well. cleaning and detailing everything before it gets installed. With truck having the AC deleted and living in Arizona I thought it would be a good idea to insulate the cab before building the interior. new carpet ready to go in install went very well, the heat insulation really helped fill out under the carpet. Just need to trim around/under the doors. center console installed also got the headliner and the sun visors installed.
CactusComanche Posted August 28, 2020 Author Posted August 28, 2020 On 8/24/2020 at 3:45 AM, 500 MJ said: Very nice work so far! Keep it up! Thank you! Just trying to make it all nice again. I appreciate it.
CactusComanche Posted August 28, 2020 Author Posted August 28, 2020 On 8/24/2020 at 6:33 AM, Pete M said: all that hard work was totally worth it good for another 30 years! Thanks Pete, I feel the same way after doing the fuse block, I think it’s good to go another 30 now.
buxmj Posted August 29, 2020 Posted August 29, 2020 Wow, great work and that is awesome you found it and are doing such an awesome job. Pete mentioned about checking with an upholstery shop for the seat material. I have the same material in grey and I found what the supplier said was the last 3 yards in existence. It is the center "webbed" material. The surrounding smooth pleather material can probably be found, my upholsterer had to replace some of that same smooth material because of the type of stitch and you can tell it is a little different but you have to look closely. If you want I can search through my receipts and see if I can find who I bought it from. Please pm me so I do see it sooner rather than later. Keep up the great work and updates coming! Buck.
CactusComanche Posted August 29, 2020 Author Posted August 29, 2020 17 hours ago, buxmj said: Wow, great work and that is awesome you found it and are doing such an awesome job. Pete mentioned about checking with an upholstery shop for the seat material. I have the same material in grey and I found what the supplier said was the last 3 yards in existence. It is the center "webbed" material. The surrounding smooth pleather material can probably be found, my upholsterer had to replace some of that same smooth material because of the type of stitch and you can tell it is a little different but you have to look closely. If you want I can search through my receipts and see if I can find who I bought it from. Please pm me so I do see it sooner rather than later. Keep up the great work and updates coming! Buck. Thank you for the kind words, I am glad you’re enjoying the truck and progress. I will send you a message as I would love to try and track down the original seat material if possible. Thank you!
CactusComanche Posted August 30, 2020 Author Posted August 30, 2020 More elbow grease Making progress, it’s starting to look like new again. i could not get the driver side A pillar trim to fit in place correctly because the upper mounting tab was cracked. i am sure there are other ways to do this but I cut a small piece from an old license plate and got it sitting nice and used some good sealant, drilled a hole and it works great and didn’t take long at all. i was also able to get both interior lights working, I used some contact cleaners and got everything shiny again, new bulbs and they were good. First truck I have had that these lights work, and they’re fairly bright, I was surprised.
CactusComanche Posted August 30, 2020 Author Posted August 30, 2020 lots of tan! I really like this interior color paired with the black exterior paint.
CactusComanche Posted August 30, 2020 Author Posted August 30, 2020 the internet came through again! over the course of this “restoration” I have had to source parts from my personal collection, several local junkyards and a few junk yards a couple hours away, locals parting out jeeps, and people online. I could not have done all of this with out the help of a lot of others to get those hard to find parts. If you are reading this, you know who you are, and I thank you. One of the best finds was these seats from Mr. Jerry in Texas. The final planets aligned when a relative that lived nearby in Texas was coming to visit, so they picked up the seats and delivered them! The driver side upper and lower seat covers have a small tear so I will need to address those to prevent tearing any further, other than that the fabric is soft, the color is vibrant and the headrests are super cool so these will really complete the interior. Freshened up the seat brackets and hardware aside from some small details it’s ready to go for a ride, I have only driven the truck on the trailer when I purchased it at this point. I rolled it off the trailer when I got it home because the battery had died (it had needed to be jumped when I got it loaded up) and immediately began taking it all apart. It runs wonderfully in the driveway so fingers are crossed. making sure it’s ready for it’s first drive in who knows how long i decided to wait til late night for the test drive to avoid any traffic and man what a cool truck, swb 4.0 5spd is fun! It runs and drives very smooth, everything functions correctly aside from the speedometer, it is not working at all, not sure why but I had no idea since I never drove til now. I guess I will have to take some things back apart to investigate that but man am I happy! So Street Comanche #20 is back in 2020, it is a 1987 so it is 33 years old now, which also happens to be the same number on the door that started it all: numbers stick out to me and I thought it was pretty cool how those numbers lined up.
CactusComanche Posted August 30, 2020 Author Posted August 30, 2020 Here are some finished pictures in the daylight! I hope everyone likes the truck and enjoys the photos. Thank you for reading. There are still some details that I would like fixed, the leather steering wheel has some minor damage, I would hope to find a replacement one day. There are also some upgrades and such I would like to continue to do, so I will be adding to this periodically as things come up. But for now, it is a good solid driver again.
500 MJ Posted August 30, 2020 Posted August 30, 2020 Great job! Thanks for sharing all of the story and progress, the truck looks excellent. The rear window louvre is a pretty sought after item, glad to see it used on this truck!

Recommended Posts
Create an account or sign in to comment
You need to be a member in order to leave a comment
Create an account
Sign up for a new account in our community. It's easy!
Register a new accountSign in
Already have an account? Sign in here.
Sign In Now