JeepcoMJ Posted October 21, 2007 Posted October 21, 2007 just to pull u thread off topic one more time, there is a kit you can find to turbo a 2.5, so i wouldn't worry about building a custom turbo system like i was doing I love that colour. can't wait to see it finished. where would one get said turbo kit? :brows: and yes, I love that color too!
ejndssn Posted October 21, 2007 Posted October 21, 2007 keep up thw good work I'll keep tabs on your progress and i may learn a thing or two.
1bolt Posted October 24, 2007 Author Posted October 24, 2007 where did you get that hood? Made is myself out of a spare XJ hood and two peaces of sheet metal for the raised profiles. I'll post a little bit more about it when I get a chance, but a full writeup is on the NAXJA XJ mods forum. Search for "home brew cowl" in titles only. I'm upgrading the XJ's using what I learned making this one, but I didn't want to just toss it.
DirtyComanche Posted October 24, 2007 Posted October 24, 2007 I went and looked at your hood thread ( http://www.naxja.org/forum/showthread.p ... +brew+cowl ) and you're a hell of a better body man than me. Looks good. Your colour choice is different.
1bolt Posted November 8, 2007 Author Posted November 8, 2007 I'm not a very good body man, but I am persistent and willing to re-do things I fawk up the first time. I like doing sheet metal work but I'm still learning a lot. Progress has been slow as a sudden unexpected and welcome increase in work popped up. Progress really ground to a halt when I started nit picking the minor and major goofs in my paint job. I even made a major goof when I repainted the roof and hood because of minor problems. But the clear did not completely cure up before an unexpected cold snap caused frost on my fresh tender clear coat. Which means I ended up wet sanding anyway. That will teach me to nit pick minor problems on a work truck. I have a problem with getting fixated on details and imperfections so I told myself it's a work truck with a driveway paintjob and started putting s**t back on the truck the other day. Details like these sags in the clear (first pic). I cleaned these up using a trick that was recently shown on the TV show Trucks that involves using a razor like a cabinet makers scraper, you burr the razor 90 degrees on a piece of sand paper the finer the sandpaper the smoother the burr. Then drag the razor across the bump just like a scraper in woodworking, it peels off layers of clear without the danger of digging in (you hold it at a 90* angle) it leaves a very smooth repair . Then you sand with 2000 grit and hit it with polish and then fine polish. I worked on my Emblems. Restoring them without getting them re-electro plated means painting them. So it's either blacked out which I've already done to my XJ or Silver... Started by deglossing them with adhesion promotor, (first pic) hit them with some wheel silver metal flake and then on a whim I painted the outside blackened area body color just for the hell of it. (second pic) and cleared them. After looking over jeepsticker.com I really wanted to shift the looks over to modern, with the 97+ style front clip maybe. He has Comanche decals that mimic the Cherokee Classic style I was thinking about stenciling them on either side of the hood like the Dodge Charger HEMI hood graphic (where HEMI is masked out of the black). But again it's a work truck I have to remind myself. So I ordered a tailgate decal set and will put that on. I also worked on blacking out the cowl which I'll update tomorrow as I've hit a lull in work and should be finishing up the paint job, and putting trim back on. Definitely doing a D44 or 8.25 and tow package springs this winter.
1bolt Posted November 8, 2007 Author Posted November 8, 2007 Blacking out the top of the hood was a back and forth thing the solvents in the new paint didn't like some etching primer I used on an earlier repair (where the cowl hood hump flexed as I noted in an earlier post) so I ended up blacking it out even though I didn't originally want to. I have a like/hate thing with Duplicolor. I used a socket to get a pleasing radius. I think if you don't mask the top back at least a quarter inch and make rounded corners it looks too home brew. For instance it looks cheesy to me if you use the exact edge of the hump as a mask line. 3/8's back from the edge gives me room to pin stripe the edge if I want to. The razor trick works for giving the exact edge of the graphic some mechanical adhesion, without messing up the masking tape with sand paper. This blackout graphic will extend down the top of the header and surround the Jeep emblem. This also lets me hide the mounting holes of the old style Jeep emblem that are solid inside the "e" and the "p". I forgot to fill them before I shot color and they would show through my newer style freshly painted emblems. I'll spot putty them closed and then black it out. This should also make the hood graphic look more finished, and intentional. Instead of screaming "I did this to hide some screw ups" :oops:
Tank4L Posted November 8, 2007 Posted November 8, 2007 awesome color what is it? as a professional painter I really like seeing people do professional jobs. are you a pro of just fickle about paint?
1bolt Posted November 9, 2007 Author Posted November 9, 2007 not a pro I just love painting my own stuff and have done just enough driveway paint work that I'm starting to get the hang of it. The color is Ford estate green metallic, and looks like what would happen if you took army OD green and threw some gold metal flake in it and clear coated it. The paint is Dupont chroma system base clear. Best paint I've used yet, easy to get the color right without tiger striping or mottling in the metal flake. The clear was much easier than I anticipated. If not for a freak cold snap that sent a 70 degree day into a 30 degree night and my own bone headed painting in the dark (git-r-done!) it could have been even better. I'm really happy with it but it does have warts but I can live with the ones that are left. The base, clear was way easier to use than I expected, and turned out better than any single stage paint with wet look hardener I've used. I used to do this in a shop, but now I think I prefer a cool crisp fall day... less bugs, and less dust.
mfpdm Posted November 10, 2007 Posted November 10, 2007 Nice job. I wanted to paint ours but the kid wanted a "professional paint job". It's hittin his wallet hard too. You did move the mustang when you painted, right? :eek: That was our first choice on projects, but found the MJ instead. :D
1bolt Posted November 14, 2007 Author Posted November 14, 2007 Well it's almost done, putting the badges back on and the tail gate Jeep decal... Then I came across this: A 97 XJ automatic with heated mirrors power everything except seats, with 144k on the body and a freshly installed remanufactured engine... I got it for $850 bucks :eek: :jump: :driving: So work on the MJ got interrupted while I track down some nice Wife and Baby friendly AT meats, (tires were toast) and shampoo the living crap out of the interior along with a dozen other minor fixes.. Not fond of that Green! I know I just painted my MJ green right? Well this is same exact emerald metallic green as my Wife's Acura I just got rid of. The color was inexplicably popular in the mid 90's. Sooner or later I'll fix the color... maybe Silver or Steel Blue :D It's going to be the Wifes, 4 doors, 4x4 for winter, clean, no lift, lots of creature comforts and some minor mods in the future (leather seats) maybe some Moab rims.
1bolt Posted December 26, 2007 Author Posted December 26, 2007 Well work finally slowed down and the Wifes XJ has finally stopped breaking things left and right ( I didn't get a 97 XJ for $850 bucks without it having some problems...) Mainly every single regular maintainance item except the fresh engine was about to take a dump! Crusty wires, leaky injectors, clogged cat, ORIGINAL PLUGS with 140k miles, original cap and rotor, a dying coil. No wonder it needed a Jasper. I'd be surprised if the PO changed the oil. I finished several details on the comanche. I extended the hood black out down the header, IMO this gives a much more finished look than just abruptly ending it at the front hood line, just like masking the blackout purposefully back from the edges of the cowl hump. Lets face it; it's also an easy way to cover the filler and glaze I used to cover those emblem mounting holes. The last pic shows that the original shapes of the emblems are still faintly visible making aligning the new ones a snap. Here's the after shot. I had already re-painted the grille and headlight bezels to match all the other blackout areas like the lower body lines. Now I'm Debating black pin stripes surrounding the hood blackout. Again another touch that can make things look more finished. Not that anyone likely noticed but those are E-code (European) headlights not sealed beams which let you use H4 bulbs, these kick serious @$$ compared to DOT headlights. I wrote these up on NAXJA a while back and now have 3 sets of them in my XJ's and MJ, and sooner or later I'll get a set for the YJ. Here's the current state including dirt, the truck's been on the job since I finished blacking out the lower belt line. I still haven't gotten around to putting the XJ Icon wheels and BFG AT KO's on. Oh and I have to say the 97-01 style side mirrors... that is the best bolt on low buck mod I've done to any of my Jeeps. These mirrors kick the @$$ out of the tiny pre 97 style. They are 2 1/2" inches further out and that makes a huge difference. From totally useless to better than most other truck mirrors with 6 screws... Can't beat that IMHO. If you like knowing whats in your blind spot do this mod.
1bolt Posted December 26, 2007 Author Posted December 26, 2007 mfpdm: Yeah I covered the Stang, I'd love to make it my first choice too, but I can't afford the things I want to do to it yet. It'll get a mild resto-mod (disc brakes, power steering) and the 289 will get massaged heads, Shelby intake hot cam etc. Eventually I'll even paint it.
1bolt Posted December 28, 2007 Author Posted December 28, 2007 Got the decals on, wouldn't be spam if I heartily endorse Jeepsticker.com would it? Good luck finding tail gate decals for an MJ anywhere else... A hint, the highly reflective stickers don't go on with water... As I figured out... I still got them to stick but only after all the water had dried up (over an hour later). The decals worked just fine using water use a light misting of water which keeps them movable until you get them centered right, then press them down with a plastic bondo paddle and then use it to squeegie the water out. make sure to get all the water out. I mean squeegie the hell out of it... It's amazing how well this trick works it's definitely the easy way to avoid creases, wrinkles and messed up edges. Also got the new wheels and tires put on, but after dark so final paint pics will have to wait. I have fresh 19lb injectors Two of my injectors are leaking at the bodies and tune up bits going in soon. Unfortunately the wifes XJ needs more attention and go figure the Alt went out on my XJ... As if that isn't enough (When it rains it pours?) the MJ's radiator sprung a couple leaks on a long rush hour stop and go torture session... Looks like the open cooling system conversion, a new rad, and an electric fan with mechincal fan delete will be coming up much sooner than I thought.
WahooSteeler Posted December 29, 2007 Posted December 29, 2007 hey 1bolt, can you post some better pics of the side with the blackouts below the beltline? i am thinking of doing the same and want to see a good look of one done. Thanks....
jtdesigns Posted December 29, 2007 Posted December 29, 2007 Work truck.... :laughin: :laughin: :rotfl2: :rotfl2: :rotf: :rotf: :rotf: XLNT Job!! What all did you do to paint the grill and headlight doors?? I was at the paint store the other day and picked up some mar-hide satin black for bumpers I was thinking about using it with some adhesive promoter. Did you sand them or scotch-brit them??
1bolt Posted December 29, 2007 Author Posted December 29, 2007 If I get some sunlight I'll take some true "after" pics today. The lower beltline blackout also extends across the tailgate and I might run it up the tailights (sort of box the tail lights with a black border). Seriously it is a work truck and the pics don't show some of the imperfections... On the grille and headlight trim: I washed the crap out of them, sanded with 320 and a scotch brite for the nooks, then Duplicolor adhesion promotor which deglosses anything I missed. Then hit them first with Krylon Fusion, with a flash coat then after a couple minutes a nice even medium wet coat. Then I let them cure for 24 hours before putting the semi-flat normal krylon (rust tough enamal). Which I did because the Fusion only comes in satin which was too shiney for me. Did the bumper end caps the same way, along with the fender flares basically using the Fusion as a plastic primer. I've used other plastic primers over the years and all of them sucked hard. I don't know how well the fusion will hold over the long term, but I do have a Chevy 2500 with satin black fusion on the flares that has held up for two years now, and sees lots of work.
layback209 Posted December 30, 2007 Posted December 30, 2007 Love it. You have given me a something to shoot for with my mj progect. I like how you sand/media blasted the rust off, i was going to uses a wire rotory brush to buff my rust off but i don't think that will do. I know my nabours will apreciciate the brush over the sand lol. O and the 2 tone hood looks sick
jtdesigns Posted December 31, 2007 Posted December 31, 2007 If I get some sunlight I'll take some true "after" pics today. The lower beltline blackout also extends across the tailgate and I might run it up the tailights (sort of box the tail lights with a black border). Seriously it is a work truck and the pics don't show some of the imperfections... On the grille and headlight trim: I washed the crap out of them, sanded with 320 and a scotch brite for the nooks, then Duplicolor adhesion promotor which deglosses anything I missed. Then hit them first with Krylon Fusion, with a flash coat then after a couple minutes a nice even medium wet coat. Then I let them cure for 24 hours before putting the semi-flat normal krylon (rust tough enamal). Which I did because the Fusion only comes in satin which was too shiney for me. Did the bumper end caps the same way, along with the fender flares basically using the Fusion as a plastic primer. I've used other plastic primers over the years and all of them sucked hard. I don't know how well the fusion will hold over the long term, but I do have a Chevy 2500 with satin black fusion on the flares that has held up for two years now, and sees lots of work. I don't know what I'm going to do about my fender flares. They have been painted (from the factory I think) and theres paint chipped all over them. Every one of them have half the paint still sticking. I don't think I can sand it off without messing up the bare spots.. I hate to use stripper because it might deform or melt them... did your flares have paint on them already? I tried pressure washing them, with no luck. what would you do?
1bolt Posted December 31, 2007 Author Posted December 31, 2007 depends on what level of perfection you're going for :) If getting unpainted (or well painted ones that don't have chiping and flaking) ones is out of the question? Then I would just sand them with two grits, like 220 and 400. Probably wire brush them agressively to get the loose paint edges scaled off, then the 220 to knock the edges of the chips down where the old paint is still sticking. Follow with the 400 to get rid of the 220 sanding marks. That'd work for flat and semi-flat paint... if you wanted semi gloss or worse body color then clear coated, I would recomend totally sanding them smooth. Unfortunately rear MJ flares aren't as easy to find as XJ's otherwise I would just start with a fresh unpainted set or like I said, a factory painted set that still had paint adhesion. Mine are in terrible shape, but it's a work truck, I have the PO's drippy paint, gouges, chips etc. I just scuffed them and painted over it all... drips included. Can still see some of the PO's paint mistakes... which makes me which I had spent a week sanding everything... Until once again it hits home that it's a work truck :thwak: BTW no sun for the glory shots yet... I really like the Icons on it, Can't wait to get good pics.
jtdesigns Posted December 31, 2007 Posted December 31, 2007 I just don't want the plastic to get fuzzy ( you know what I mean?) in the spots where the paint is missing...I really don't want to take the those suckers off, so I may just get some striper and test it in a small spot to see results. How hard was it to take the bumper ends off? ( if you did) I need to do those with the grill and flares. I'm in the same boat as you with the "work" truck. I bought mine for 250 just to haul the trash (told my wife that at least,lol) and I think I have passed that price on parts and whatever 3 times. http://www.comancheclub.com/forums/viewtopic.php?t=7579&postdays=0&postorder=asc&start=0 here's a link to my trash truck ^^^ I need to up date the pics but dog ate digicam,, My truck is black and all the clear on the top side is burnt off and flaking. (at least that makes sanding scratches easier, but feather edging sucks where the clear is ) I'll get it painted one day. Its been raining eveyday here for the passed week, the only thing I have got done is new clear corners and driving lights... :roll:
beaterjeep Posted December 31, 2007 Posted December 31, 2007 1bolt, I'm loving what you did with them emblems. Glad to see they went to a good home. Truck looks great, even if it is as you claim "a work truck." Loving the cowl and blackout on the hood and header panel too. Keep up the good work, if there's any left. :cheers:
1bolt Posted December 31, 2007 Author Posted December 31, 2007 Lots of stuff to come, the paint and cosmetics are mostly done. I'll probably be adding to this as long as I have the truck anyway. Here's the current to do list in no order: Interior makeoverHeadlinerNew injectorsTuneupKnock SensorOpen cooling systemRe-install AC system (deleted by PO)Full gauge clusterMinor custom treatment for the grilleIntake sealed to Cowl openingTow package Springs front and rearNew Rear (44 or 8.25)Detriot Truetrac LSD's front and rearBorla headerHigher Flow exhaustRear disc upgrade dependant on what rear I put inFront Speakers, rear 6X9's, rear small sub + amp That's just the stuff I'm pretty certain on for the next 3 to 6 months, some stuff I'm still mulling over are porting an HO head and 99+ intake for a swap.
1bolt Posted January 2, 2008 Author Posted January 2, 2008 To answer one question: the bumper end caps are a b*@$£ to get off because of how the upper bolt is situated, i tore mine off (one already was). If I did it again I would either take them off properly or paint them on the truck (easy enough). As now one of them is crooked and will be until I pull it back off.. Plastic won't get fuzzy if you sand with something moderate to fine grit, they are hard enough plastic to sand. Wire brush for rust is better than nothing but it will leave tiny rust spots in the deepest pitting that will eventually bubble, so at least use a neutralizer (rust converter spray) and follow the instructions explicitly as rust converter is corosive and will "pickle" through the top coat if you don't let it fully cure (24 hours usually) and then prime it with multiple layers and a primer sealer before body color and clear. Even better would be POR15 then top coat it. I had a 65 Fast back Mustang when I was a teen So I learned all sorts of stuff about rust :D main thing I learned is that only sand blasting is a truly permanent 100% fix every time. As rust repairs with converters and rust primers and wire brushing etc. usually eventually will bubble back up i might take years but it comes back.
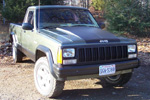
1bolt Posted January 2, 2008 Author Posted January 2, 2008 Pics: How does everyone like the Icons and BFG's? In the sun that color jumps right out at you Here's a series of thumbs going around the truck showing the metal flake pop: The tailgate Jeep decals are matt black and are so close to the Krylon Semi-flat it's hard to tell I didn't paint them.

Recommended Posts
Create an account or sign in to comment
You need to be a member in order to leave a comment
Create an account
Sign up for a new account in our community. It's easy!
Register a new accountSign in
Already have an account? Sign in here.
Sign In Now