UNL1MTD Posted September 9, 2010 Author Posted September 9, 2010 A while ago I scored some Herculiner from Napa for $45 buck after rebate, it was too good to pass up, but sat in my basement until today. I got a late start and set the pop up on the concrete and pulled the truck under. This is how I've been operating, with the BigMat in the back. Its kept the bed rust and relatively damage free for 23 years. Thats pretty darn good in my book, but its time for an upgrade. Everyone knows the drill by now on how to install herc, but I'll try to point out my successes and failures so others might benefit. I used the supplied scuffing pad for about 10 seconds. Then put on an 80 grit pad onto my orbital sander. In about an hour I had the bed well sanded and all the rust removed. I did have to use a scuffing pad on hard to reach spots, but I got some 3m pads that worked better. I was prepared to use my angle grinder with wire brush, but it wasn't needed. Next was the tailgate. Here you can see the only three bolts I had to tape off. I backed them out 3 turns then put the tape under and around them, leaving a decent 'tail' on it to help pull it off later. I used 3m automotive masking tape. I had bad results with the blue tape sticking to the paint and not making clean lines. So I figured to give this a whirl. Then it got some Herc. I used the brush in a tapping motion to do 75% of the tailgate. The brush just made the herc stick a lot better and could get into the nooks/seams of the tailgate better. Then the bed. I managed to not paint myself in the corner, but by this time I was really starting to sweat and because the gloves I was wearing weren't breathable it was pouring out of my gloves. Kinda sick. The roller was a lot more useful here, but still used the brush on all the edging, even on the inner ribs of the bed. Here is a close up of the texture after the first coat. I only waited an hour before applying the second coat. It was still tacky and fit my schedule. I could have definitely gave it more time. The brushed used for the first coat was thrown out and a new one was used for the second coat. However the roller worked a lot better getting the second coat on, so the brushed was used just for seams. I had some trouble accessing the center of the bed while applying the second coat. I would recommend not going over the rail untill the second coat in the bed is done, this i will allow you to lean on the bed a lot more than I could, making it easier. Getting in the bed to do the seond coat isn't an option due to the tackiness of the first coat. I tried, it resulted in an epic fail. The second coat covered a lot better and the finish was what you would expect the end result to look like. I used the entire gallon, but I had about a pint or more which was left over after the second coat. I loaded up the top of the tailgate and the first 3 ft of the bed. Texture after the second coat. Here is my tape line on the side of the truck. It came off great, the yellow tape was stronger and didn't tear or break while pulling it off, it also left a decently clean edge. My only complaint is that at joints of two pieces of tape a bit of product was able to get it, but I will chalk that up to user error. I feel like I should have pressed the tape harder to seat it. Biggest advice, cover way more than you think you are going to need to cover. The rubber splatters everywhere. My bumper got hit hard, along with my legs and forearms. I wish I did this with long sleeves and pants. I also wish I put down paper on the rear bumper and tapped up more. I should have ran tape on the rail between the cab, but didn't. Its ugly in there, but I don't have to see it everyday. Ohwell. The acetone did a great job removing the over splatter on the paint. Having a large can was a good call for this project, I used over half of it. I would have lots of gloves on hand so you can change them frequently. Overall though, it looks darn good and dresses the truck up a good bit.
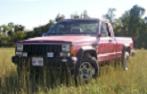
91MJdude Posted September 9, 2010 Posted September 9, 2010 liner looks great! do you have a side shot now that the bed liner is rolled over the top?
Comanche County Posted September 24, 2010 Posted September 24, 2010 Lookin good brother, I love the black interior. I definitely need to do that herculiner on my bed. Keep up the good work!
UNL1MTD Posted November 20, 2010 Author Posted November 20, 2010 Had been driving the MJ a good bit, but the apparent exhaust leak had put it parked in the driveway for the past two weeks. I knew the gasket was blown at the front, but ordered a new manifold just to play it safe as I didn't want to have to do this twice. Also ordered a new manifold gasket and down pipe gasket. Removal went pretty easy. I just followed the Haynes manual and it went smooth. Pulled the fuel rail, one hold down bolt was very grumpy, PB got it out, but it looks like I may need to chase out the threads. Dirty Injectors - going to order up a new set. Almost out. To my surprise all of the bolts came out of the block with little effort. Using the correct amount of extension to get the ratchet in a place you can actually use it was the biggest trick. Smacked my head on the lower control arm mount when getting out after removing the two nuts on the down pipe. Everything out. Now here is the big red stop sign for today's work. That front hole shouldn't have a stud broken off inside it. You can see how the gasket got blown out at that point because there wasn't any clamping pressure. Not sure how to fix this yet. I did take a razor blade to the block to clean off the old gasket material. Then I cleaned up my tools and left it as it was.
91MJdude Posted November 20, 2010 Posted November 20, 2010 get your hands on an extractor set, will come with a few different size drill bits and extractors, drill in the center of the broken stud almost all the way through, farther you go the more tension it will relieve, lightly tap the extractor in the hole and turn it out. the extractor will tell you what size bit you use. i suggest using a the extractor slightly smaller than the bolt itself, not the smallest one in the kit. also hammering on the broken stud will help loosen it with vibration. good luck! if that don't work drill it the same size as the bolt and re tap it, but you have to make sure your right in the center of the bolt.
UNL1MTD Posted November 27, 2010 Author Posted November 27, 2010 Progress, I went down the HeliCoil route and was able to replace the stud today. The gasket fits, so thats a good sign I was holding the drill straight and level. I'll start putting everything back together next week some time. I also took advantage of the empty driver's side engine bay and replaced the motor mount. Access was darn near perfect and this was a simple job. Old: New: Hit the yard last week and picked up a newer factory aux fan. This is a curved 8 blade, which replaces the straight 6 blade. This fan is in better shape, it doesn't whine at all like the old one did. Great upgrade for 15 bones at the yard.
UNL1MTD Posted December 10, 2010 Author Posted December 10, 2010 Took the day off to finish up the MJ. I had tried to finish up the install last week and was rushing. In the process of installing the new injectors I ripped two O-rings when pushing them into the fuel rail. So that halted me until I got the new o-rings yesterday. I popped them in no problem and installed the fuel rail. I cleaned the inside of the air box which was filtly installed it, put on the vaccum lines, clipped together all the wiring. Clamped the down pipe to the manifold (had to use 3/8 16 nuts as the factory metric size didn't match the new manifold) and installed the O2 sensor. I had to zip tie the warm up air tube to the lower rad hose to get it out of the new fan's way. I had things 'done' and cranked her over. Cranked and Cranked, no start. Got out, found a fuel leak at the return line. Depressurized the fuel rail. Uninstalled the fuel rail. Got frustrated ... raked leaves. Went back to it, reinstalled the fuel rail, cranked and START. I think that I just didn't let it crank long enough. I counted and it took 11 seconds for it to turn over. I've started it about 10 times now and each time its been very smooth since the first and at a reasonable time about 4-6 seconds, which is normal for the Renix. Put about 10 miles on it, got to 65 mph. She pulls a lot better, didn't backfire once, and no longer sounds like a diesel. No fuel leaks after the test drive either. Here is the engine bay all put back together. I am looking to quiet things down more though and will likely add a full muffler and a tail pipe vs the glass pack and turn down I have currently. But honestly the BA10 is freaking loud as hell, so until that is ditched its going to be a loud ride. Also my coolant pressure bottle is leaking at the cap. Little dissapointed as I replaced that within the last 2 years. The new fan is super quiet compared to the old and really effects the underhood temps. When I let the MJ idle I heard some whining in the engine bay coming from one of the idler pulleys. Something new to keep my eye on.

Recommended Posts
Create an account or sign in to comment
You need to be a member in order to leave a comment
Create an account
Sign up for a new account in our community. It's easy!
Register a new accountSign in
Already have an account? Sign in here.
Sign In Now