JeepcoMJ Posted April 14, 2007 Posted April 14, 2007 so did you leave it 2wd or convert it to 4wd? what's the plan there?
UNL1MTD Posted April 15, 2007 Author Posted April 15, 2007 so did you leave it 2wd or convert it to 4wd? what's the plan there? Its a 2wd :cry: But the plan is still to convert it when cash is more plentiful. I have a lot going on in the next 2 months, so I figured that I wouldn't rush the conversion and just take the time to build up funds and parts. Probably start the grunt work of the conversion in July. Currently all I have is the front axle in my possession, need to grab tcase, trans, driveshafts, linkages, and whatever else. It'll be used though, probably split DD duties with it and the LJ. Make it a dump runner and wood hauler. I am figuring I can carry 1000 lbs in the back of it pretty easy. I am going to get a set of 31 MTs to throw on it here soon, the gearing is too deep to run at 65 comfortably. I got about 200 dollars left in the budget, so that should come close to scoring me a set of tires. I'll be a complete poser ... tow hooks, mud tires and 2wd!
JeepcoMJ Posted April 15, 2007 Posted April 15, 2007 shoulda just put the 4wd front axle in right now...that way all you do when you actually convert it is bolt in the trans, shift linkages, tcase, and driveshafts AND you wouldn't look like a poser then...unless they look close
UNL1MTD Posted April 15, 2007 Author Posted April 15, 2007 shoulda just put the 4wd front axle in right now...that way all you do when you actually convert it is bolt in the trans, shift linkages, tcase, and driveshafts AND you wouldn't look like a poser then...unless they look close I tried to make it happen last week and the stars weren't aligned. Going to have to get the grinder and cut off wheel out for taking the 4wd front out of the parts jeep. It'll happen, just need that magical free weekend.
DansGreyMj Posted April 15, 2007 Posted April 15, 2007 in what shape are the leafs are you gonna sell them?
UNL1MTD Posted April 16, 2007 Author Posted April 16, 2007 in what shape are the leafs are you gonna sell them? The 2wd leafs? Yea sure they are for sale as is the rest of the truck. If you're local you can come over and snag them for cheap. Shoot me a pm.
UNL1MTD Posted April 16, 2007 Author Posted April 16, 2007 just passed VA inspection! :chillin: still needs : -30 or 31 inch tires -new speedo gear for 2wd tranny (any tips here?) -cupholders for bench seat void area ... -4wd
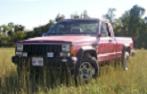
UNL1MTD Posted April 24, 2007 Author Posted April 24, 2007 Added some 31x10.50R15 Bridgestone Dueler MTS wrapped around stock Ravine Jeep wheels 15x8 with 5.5 inch backspacing. No rubbing so far with turning. I do have a sway bar link smacking my coils when I hit holes or bumps on one side and not the other. Current Shot:
87manche Posted April 24, 2007 Posted April 24, 2007 that looks nice. I can't wait to find a deal on some road tires.
UNL1MTD Posted May 23, 2007 Author Posted May 23, 2007 Haven't updated this in awhile. Figured I get some pictures up and get motivated to add story later. This is a shot of her all loaded up ... what you can't see are about 15 cinder blocks and 6 dozen on so bricks stacked in the bed. She came down a good bit. She was riding on the overloads, but the springs still had some arch left. I guess it was in the neighborhood of 600-700 lbs, just about all that I felt comfortable loading in. Had a random day off and decided to fix a valve cover leak. Inside of the cover looked like this and at first I didn't think it was that bad. That is until I started cleaning it up and realized how much sludge was built up on it. The truck has 146k on it and was running Fram filters, thats all the history I know. Fixing the valve cover leak has its own thread on the tech side. It took me a couple tries. Anyways, this is a shot before I cleaned up the top end. At first I wasn't going to touch this. Figured 500 dollar truck aint worth getting that dirty over. But since I had to pop the cover a second time and I had all day, might aswell. I didnt have a lot on hand to do the project and just used seafoam and a stiff brush. Method consisted of removal of one rocker/lifter/bridge, soak, clean, get the other rocker/lifter, soak, clean, while both out clean most of the block as possible with brush. Then reassemble that cylinder and start to repeat on the next. Took all morning and into the afternoon. The before and after are striking and I think well worth it. The radio that came in the truck never worked right, but always worked enough for me not to care. I decided to put in a cig lighter from the parts truck and found this waiting for me in my truck. The PO robbed power from the cig lighter. Both switched and unswitched were tired into the cig power wire and he bypassed the fuse, which makes no sense. All connections had a crimp connector then were cut, then twisted together with no nut or anything, then wrapped halfarsed in electrical tape. I ended up getting another clarion cd player that my landlord had out of his old car for free and installing it. I used crimp on spade connectors and got all the wiring right on the third try (no diagrams for the clarion component). Also found out I have no rear speakers. Its nice to have a cd player, clock, and preset radio stations. I've done some other projects that I don't have any pics of. -I installed new interior lights using the ones at Advanced Auto. The install was cake thanks to the write up. I think the lights are adequate for the most part and a 100% improvement on the stock ones, mainly in looks and function. I think brightness is about even. -added the cig lighter as previously mentioned. -Added a set of cupholders behind the mini console. -I rigged up a like-stock spare tire holder too. Using the stock winch thing, 6x6 piece of scrap, 2 rubber isolators, bunch of washer, threaded eyelet, and double hook. I disassembled all the stock components, ran them through the glass beader, painted with rustoleum and got to work putting it together. Works good and holds my 30" spare nicely out of the way, doesn't make any noise either. -I have been working on removing the SporTruck decals too. I have the pass side off and just starting the driver's side. -Another project was painting the 2wd hubs with a similar paint. I lucked out on Dupli-colors silver metal flake. It matched almost 100% and looks good. You can see it below and compare it to the above shot. So this is her all flexed out. The future projects will include new weather stripping on the doors and who knows what else.
UNL1MTD Posted May 23, 2007 Author Posted May 23, 2007 What did you use to clean this? A couple stiff detailing brushes and seafoam as a solvent inside a tubberware basin. It was kinda sorta a pain in the butt, but well worth it in the end. Its just manual labor, scrub scrub scrub. If I had more seafoam or whatever else(I hear kerosene works well) I could have had multiple presoak basins, which would have helped. But I didn't so most items only soaked for 5-10 minutes before scrubbin. See I didnt want to mix up rockers/lifters, so I took something off, soaked, scrubbed, then put it back on the engine. That way I didn't mix up its location or orientation. It worked, not fun ... but it worked.
Mitch Posted May 23, 2007 Posted May 23, 2007 would it clean up if you just sprayed carb cleaner all over it? Would that damage anything? Or would it just not work?
mjeff87 Posted May 23, 2007 Posted May 23, 2007 I did the same to my 2.5 a couple years ago, and used some kind of bio-degradable purple stuff I got from an Agri supply store. Pulled everything, including the lifters, out and put it in a shallow pan (in order) and covered it all with the stuff and let it sit for half a day. Then hit it all with a toothbrush, and they cleaned up all purty...looked brand new. Jeff
JeepcoMJ Posted May 23, 2007 Posted May 23, 2007 would it clean up if you just sprayed carb cleaner all over it? Would that damage anything? Or would it just not work? 1st, carb cleaner wouldn't cut through that by spraying...it would have to be concentrate in a bucket. second, don't EVER spray something like that in the engine. you'd have to drain the crap outta it before you could ever run it again...carb cleaner or other things like that are un-forgiving on oil and engine
Mitch Posted May 23, 2007 Posted May 23, 2007 Thats why I ask! :) then should I even spray carb/throttle body cleaner in the throttle body while attached to the motor?
JeepcoMJ Posted May 23, 2007 Posted May 23, 2007 lmao, nope. take the 3 bolts and connectors holding it on off of it...it's easy enough to be worth the extra effort. at least in the intake though it will burn out on the first couple strokes...but it's probably not good on rings or your cylinder walls
mudrunt Posted May 23, 2007 Posted May 23, 2007 spraying the carb cleaner in the intake will not hurt your engine while it is attached. Go to any local dealer and ask how they do it. I watched them pull the vehicle in take the air intake off and spray away. I have sprayed the stuff directly into my throttle body and never had a problem. Only thing it does is make your engine rev a little higher at idle.
UNL1MTD Posted May 23, 2007 Author Posted May 23, 2007 can you say backfire? :brows: backfire ... what do I win? ;) I just updated the pics with some text. Thought I would bump it.
UNL1MTD Posted June 8, 2007 Author Posted June 8, 2007 I've unofficially started my 4wd swap. Last night a buddy came over and we took out the D30 from the Parts MJ. That truck really has been stripped now and is off to the yard. All thats left is the engine, radiator, rear axle, and a rusted out body. I still can't believe I originally thought I could save that truck. Regardless it took us near 3 hours and a 12pk to get it out. Didn't even need to plug in a power tool, granted it would have been faster, but I get a certain satisfication doing this with hand tools and with out cutting everything to pieces. Most of the time was spent fishing the 15mm socket out of the unibody, which dropped in from the upper control arm mount. Glad I had a long magnet and a rusted out body which a hammer could make access holes into. The gears looked to be in great shape. Biggest concern is the driver's sprinig perch, which is a bit rusted. Going to be taking my time stripping the D30 and wire wheeling it. Definitely need to replace the axle side bushings and all brake components. This 4wd swap is going to be one of those long drawn out, no hurry swaps, that very well may never get done. But I figured since I had this D30 with the right gears, I might as well start there. Even if I get it all dressed up and decide not to do the swap, I'll be able to sell it for a decent price.
twojeeps Posted June 9, 2007 Posted June 9, 2007 looks like you started to take some of the stickers off..... how did you do this??? Thanks!
feerocknok Posted June 9, 2007 Posted June 9, 2007 can you say backfire? :brows: Not trying to be rude, but I've never had an issue and have done this to many vehicles. Haven't tried it on a MPI motor though.

Recommended Posts
Create an account or sign in to comment
You need to be a member in order to leave a comment
Create an account
Sign up for a new account in our community. It's easy!
Register a new accountSign in
Already have an account? Sign in here.
Sign In Now