


neohic
-
Posts
5256 -
Joined
-
Last visited
-
Days Won
2
Content Type
Profiles
Forums
Gallery
Everything posted by neohic
-

'88 Eliminator... Feb. 2009 - June 2026
neohic replied to neohic's topic in Member Projects: Your Comanches
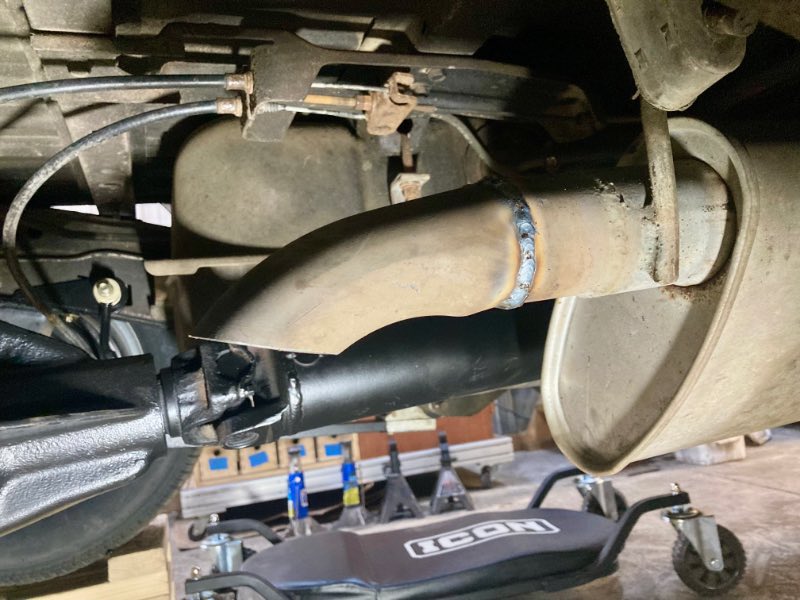
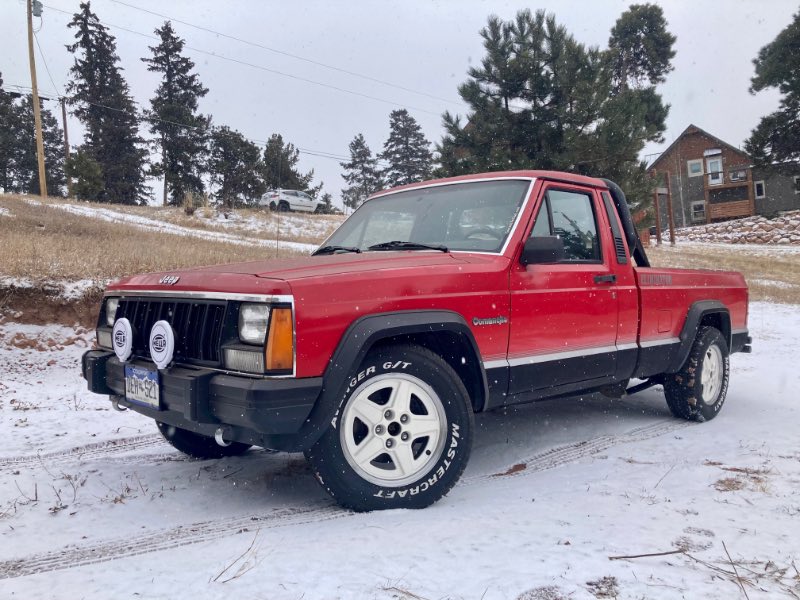
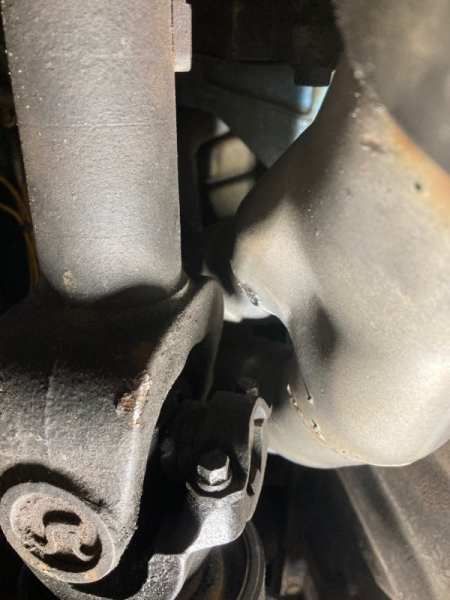
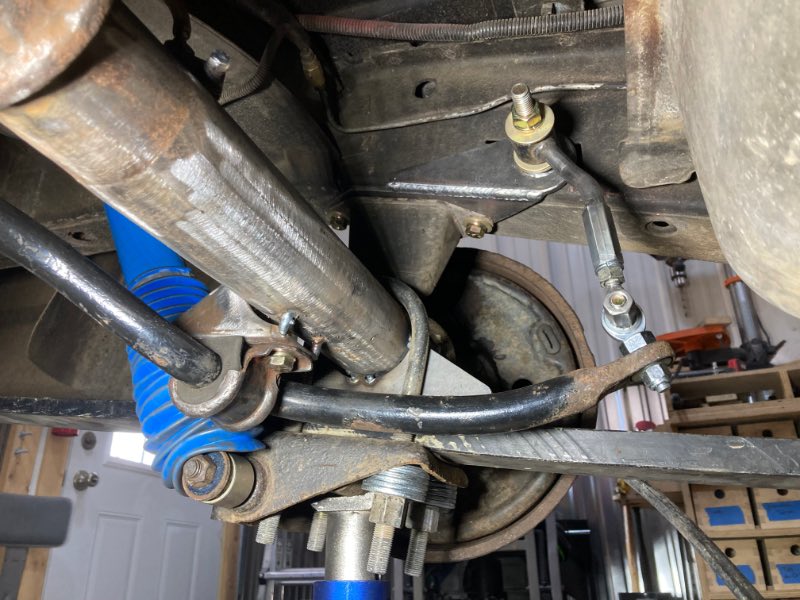
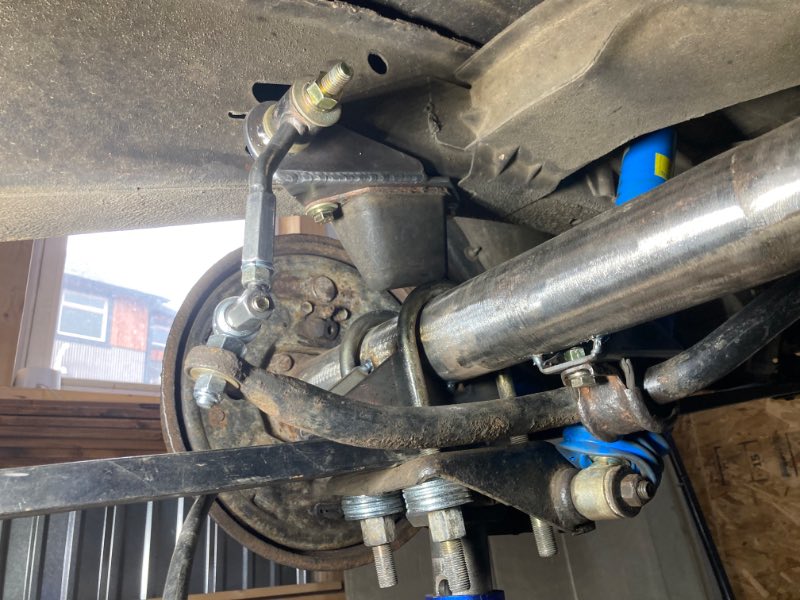
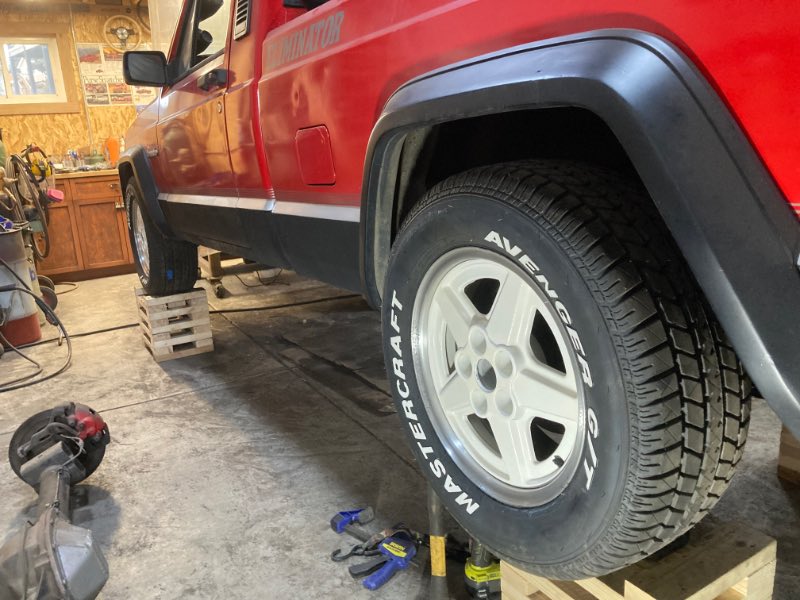
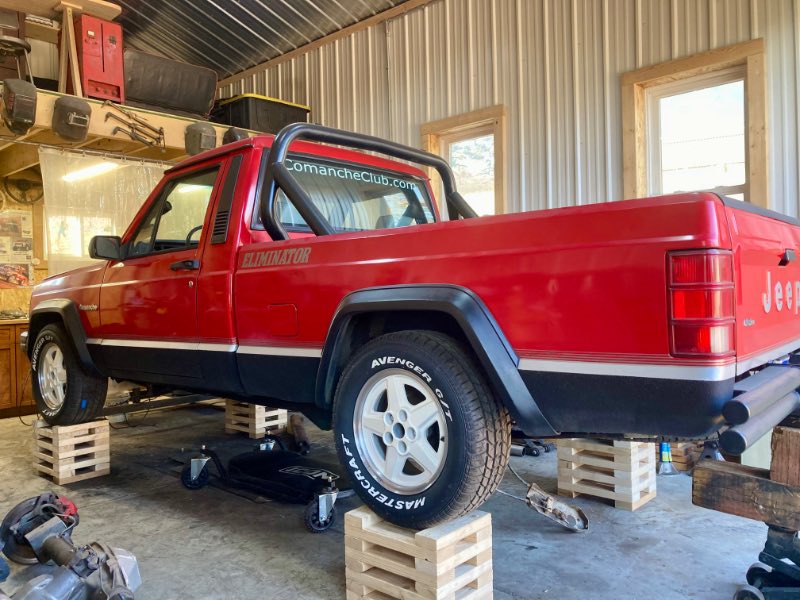
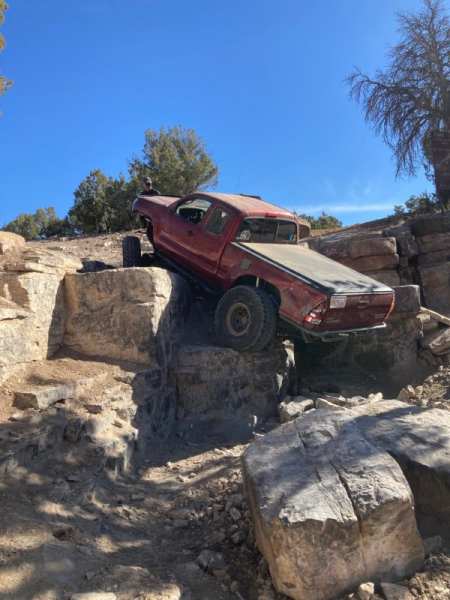
Big day in the shop! The old axles made their way outside. Jury is still out on what to do with those. Everything got reassembled and gone through again. Then the exhaust got tuned up. We’ll put this one on the “I’ll return to this in the future” list. For the past week I’ve been so sick of my dirty shop but the truck needed to get out before I could take a clean up cut. First time on the ground! With giving the shop a quick sweep, the truck also got a quick trip to the car wash… and of course it started to snow! There was another guy there that had a super nice fox body Mustang. We were looking at each other and shaking our heads like, “why bother!” Unfortunately, but not very surprising, I’ve got some issues to sort out. First off is the front driveshaft and exhaust header trying to share the same space. Turns out I didn’t have enough clearance. Can’t say I’m super happy with that, but I’ll also put that on the “I’ll return to this in the future” list. A quick heat and beat made for what I think is enough space. I need to droop the front axle out to get in and do a nicer job. In the meantime it’ll stay as-is until I know that it’s for sure fine. Otherwise… … I dig it! Question for everyone: what are your thoughts on a silver front bumper?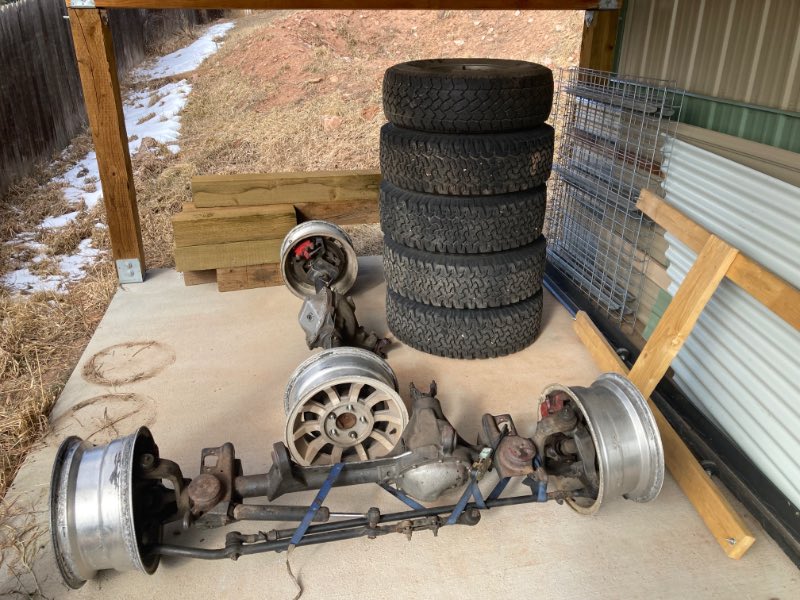
-
Apple CarPlay Head Unit - Power Acoustik CP-71WA
neohic replied to Huntr's topic in MJ Tech: Modification and Repairs
I’ve had two issues with connection. Both times were fairly early on after the install. Each time I just reset and reconnected. Hasn’t happened in a number of months. -
Apple CarPlay Head Unit - Power Acoustik CP-71WA
neohic replied to Huntr's topic in MJ Tech: Modification and Repairs
I really like mine and it’s been in there for a little more than a year. No complaints!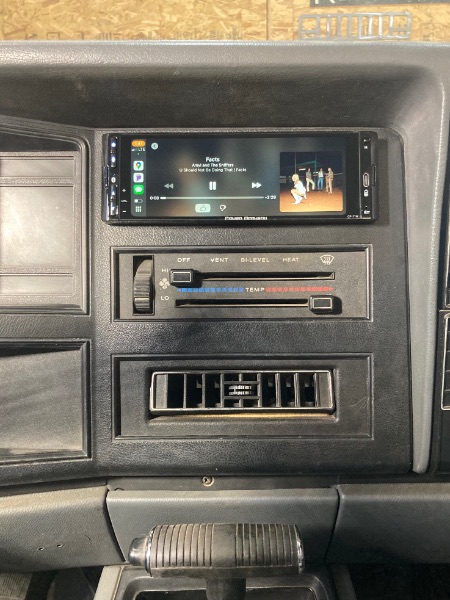
-
'88 Eliminator... Feb. 2009 - June 2026
neohic replied to neohic's topic in Member Projects: Your Comanches
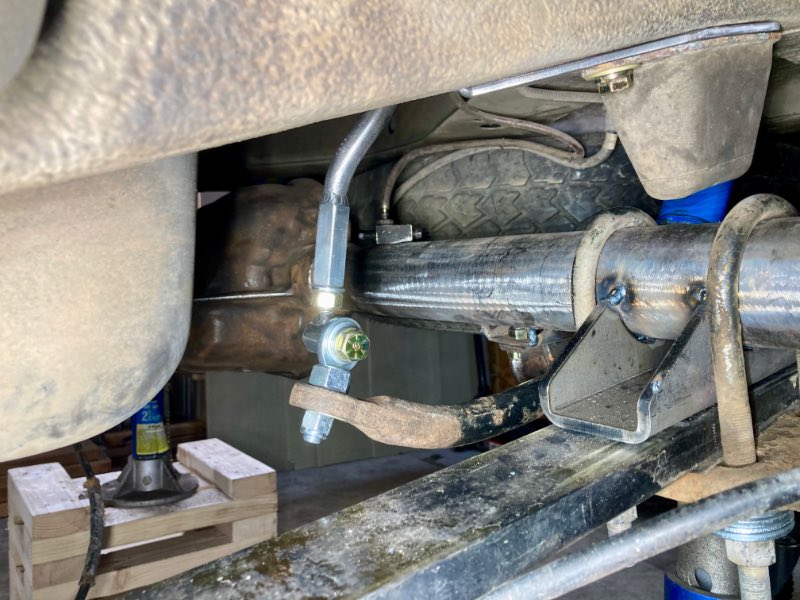
Lots of painting little parts today. I pulled the axle to make up the brake lines but moved it back one hole in the spring perches before completely removing it. It’s maybe a shade too far towards the rear of the truck, but I’m going to run it. Unfortunately, the sway bar wants to now live in a shared space as the spare tire. Really, I should replace it with an appropriate sized tire instead of the very old 30” that’s been living there since 2005… and it was an old, used tire then. Otherwise I’m happy with the brake line routing although I should’ve gotten an 18” instead of a 20” for the left side. I added a small woopdie-doo around the u bolts to make up for the added length. Maybe assembling tomorrow?
-
A little while back there was a Hemi swapped MJ build on NAXJA that the builder used a Vintage Air unit. Obviously there’s tons of fab, but the air unit seems pretty straight forward, but tedious. https://naxja.org/threads/rock-solid-fab-5-7-hemi-comanche.1148528/
-
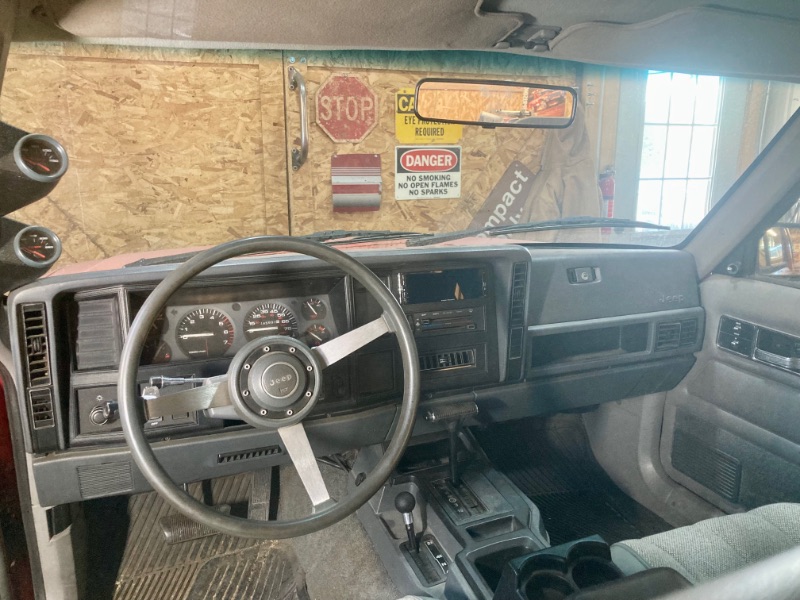
Looks like controls for a Vintage Air unit.
-
I dig that interior!
-

-
'88 Eliminator... Feb. 2009 - June 2026
neohic replied to neohic's topic in Member Projects: Your Comanches
Yup. The perches I used have some adjustability but I think the hole spacing might be too far apart. If I need to weld up a couple holes and redrill between them, then so be it. Probably pull the axle tomorrow. -
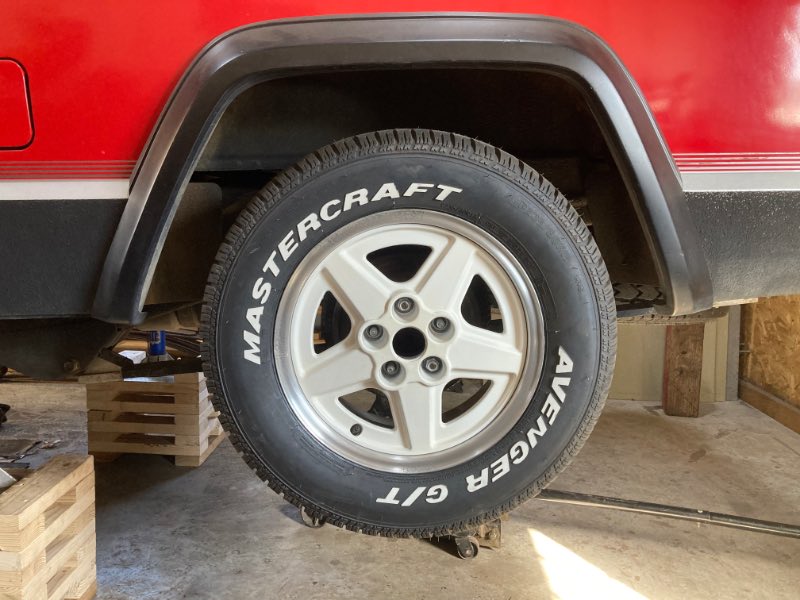
'88 Eliminator... Feb. 2009 - June 2026
neohic replied to neohic's topic in Member Projects: Your Comanches
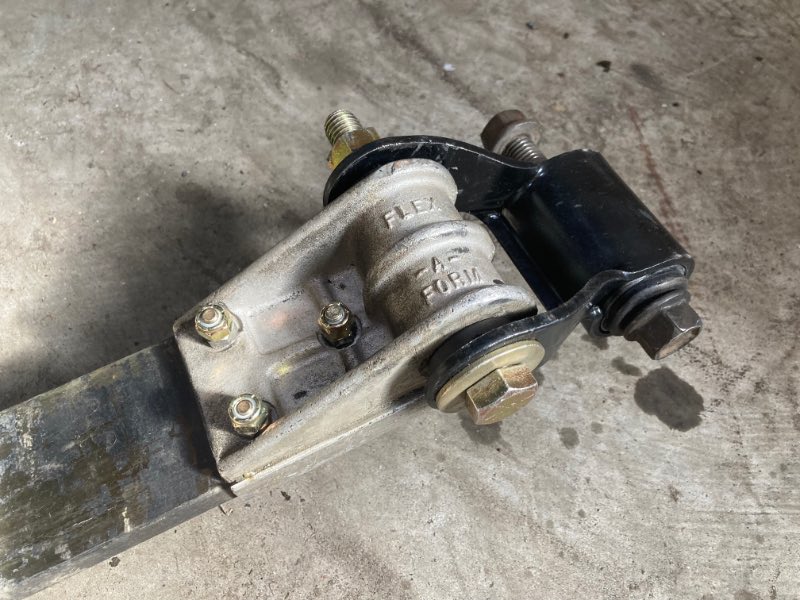
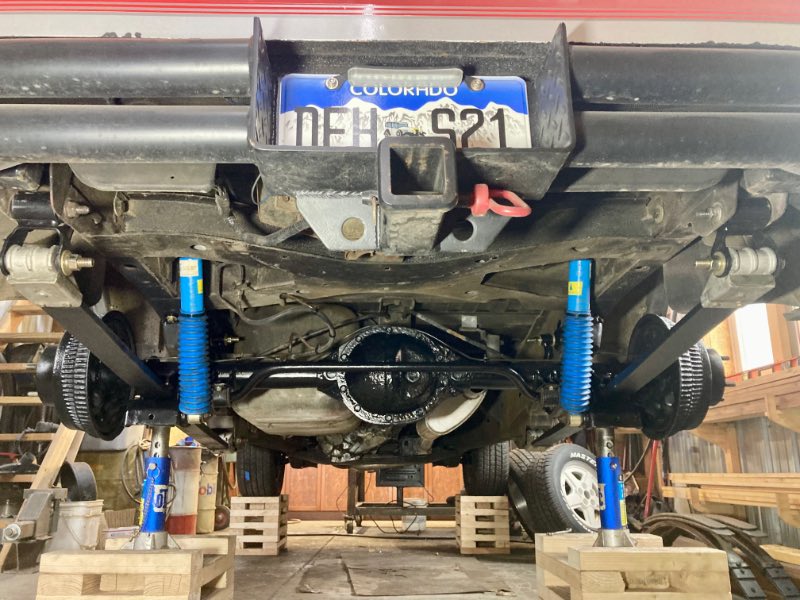
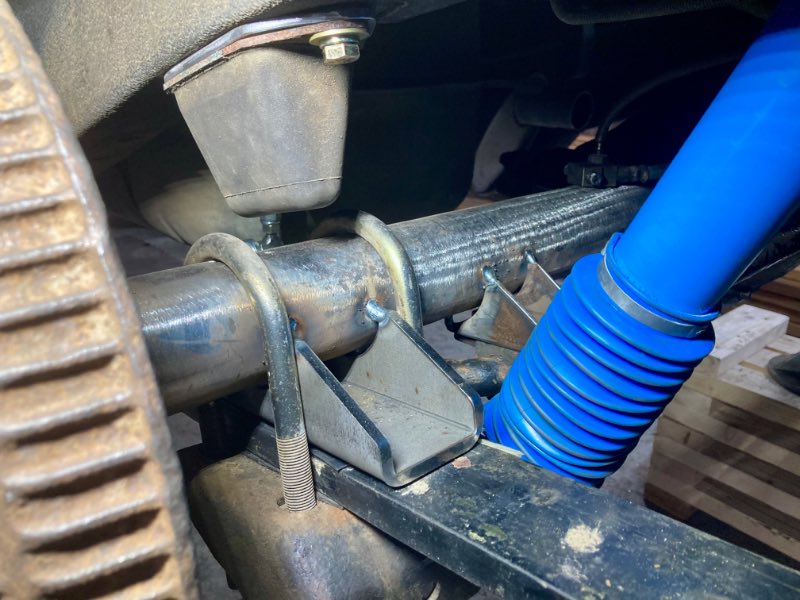
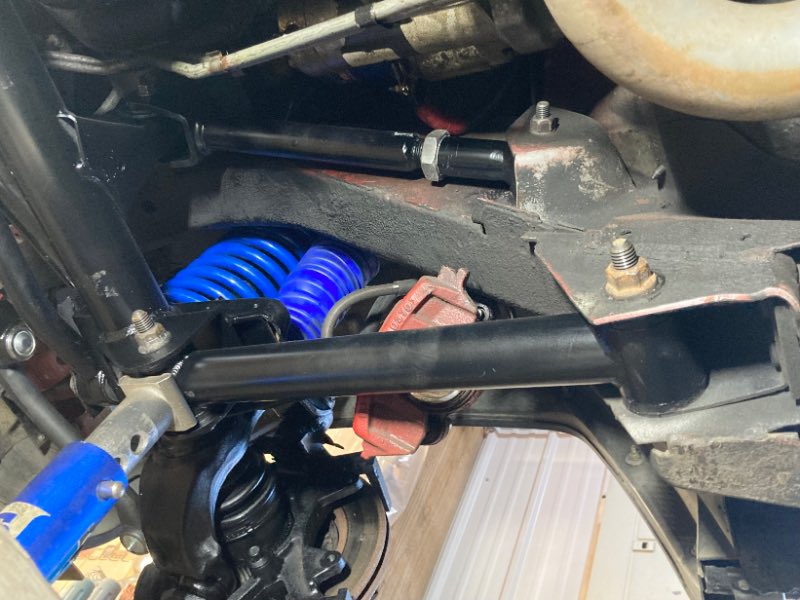
Thanks, gang! The rear (old front) sway bar was next. With the brackets I made to sandwich to the frame with the bump stops, the next step was to add the axle side brackets and connect the dots. A keen eye will notice that the bar was flipped upside down. Everything was initially mocked up with the bar mounted as it was up front (however flipped with the arms facing forward) but I didn’t like how the arms swung downwards. The bend in the end links made sense when the bar was mounted that way. What I mainly didn’t like was the length of the links so the bar was turned upside down. I might straighten the links… I might not. I don’t think there’s any benefit one way or the other. I did see a benefit to having them adjustable though. Should the truck ever change ride height in the future (because of my track record with this truck) I’ve got room to work with it and keep the sway bar. There’s plenty of space between the sway bar and the differential cover and spare tire. Granted, that’s a 30” tire stuffed under there too. I might clearance the cover once I’ve got the axle out for final welding to be on the safe side. Otherwise, I like how everything tucks up there! Just for kicks, I also put on a 2” spacer to see if I could flush out the rear tire to match the front. Nice. I noticed that the wheel isn’t quite where I want it in the wheel well though. This will get addressed once the axle is out also. The rear driveshaft length is fine, but moving the axle back couldn’t hurt that either. Should be able to pull it all part again for welding and paint.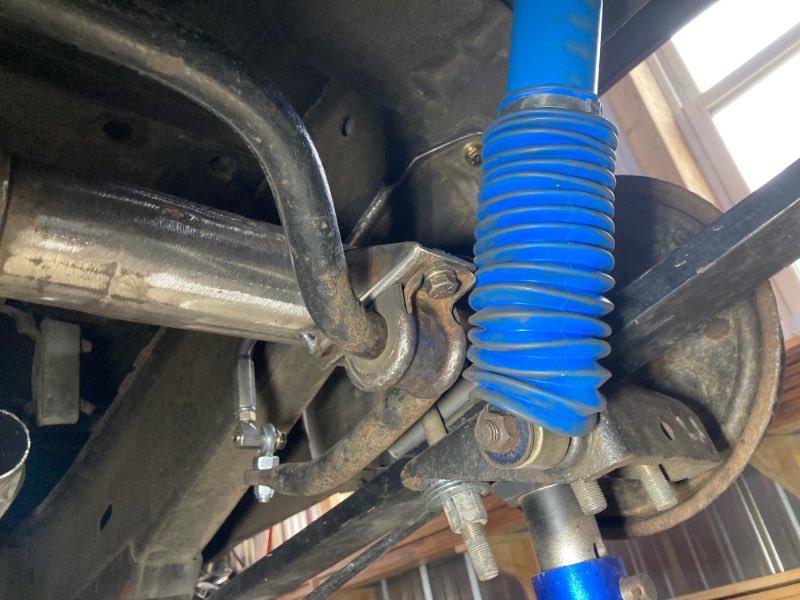

-
Looks great! That’s a ton of work.
-
1986 - The Jim Oshel Edition
neohic replied to neohic's topic in MJ Hardcore Tech: Epic Journeys to Greatness
Hope you didn’t just junk those axles! Are you linking the rear or keeping the leafs? -
This place is nothing without the folks in it. Cheers, all. Thanks for being rad.
-
'88 Eliminator... Feb. 2009 - June 2026
neohic replied to neohic's topic in Member Projects: Your Comanches
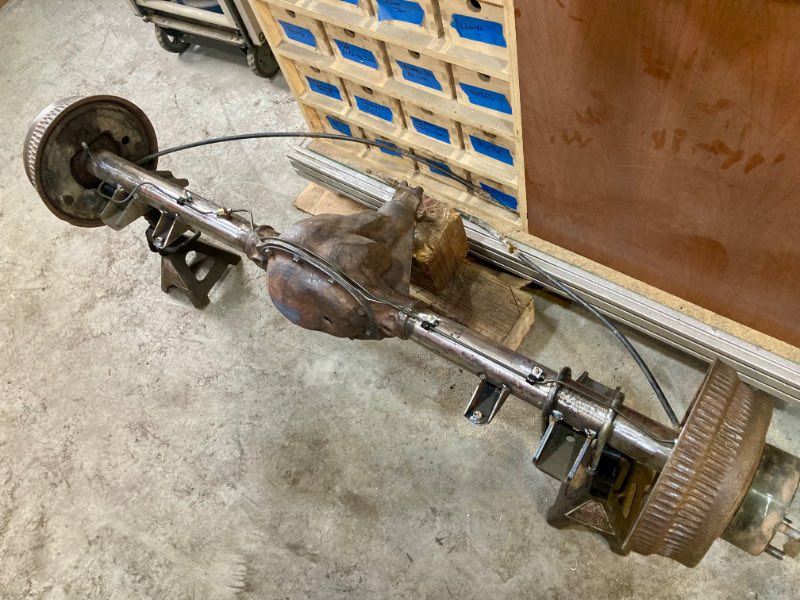
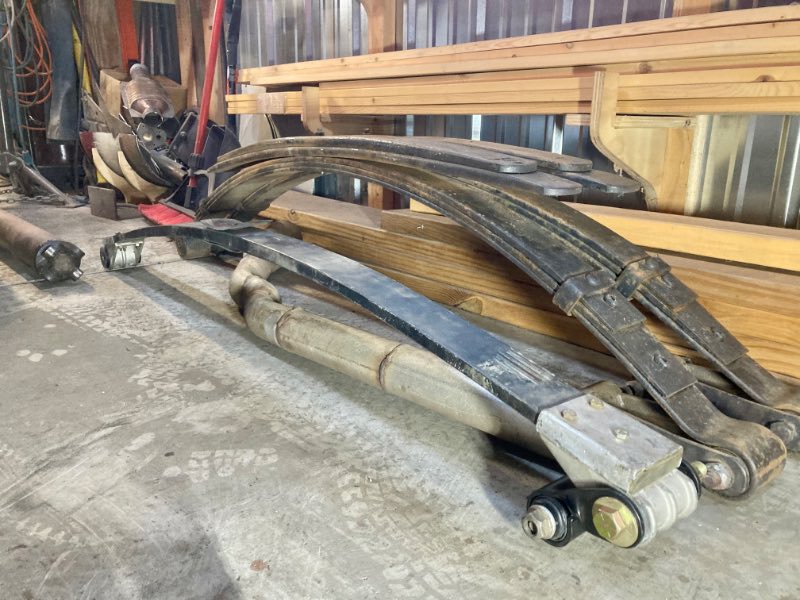
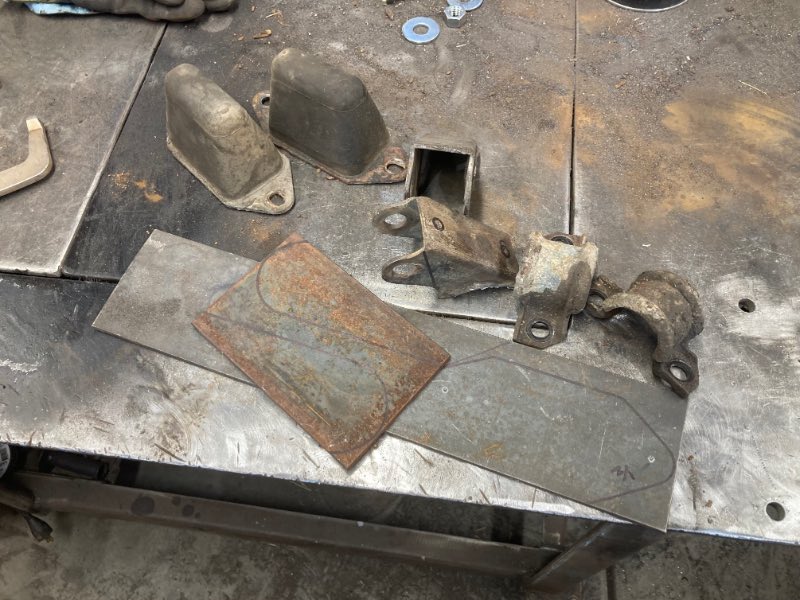
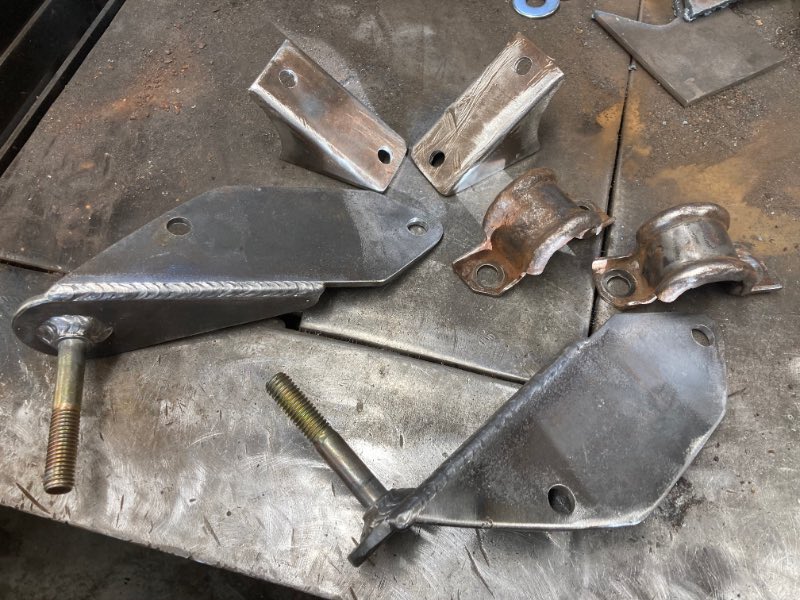
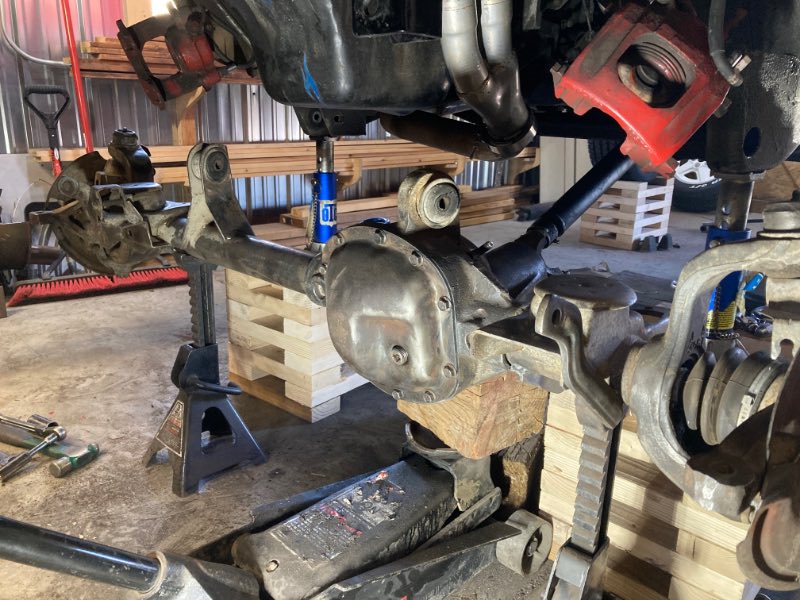
Time for the rear. With everything out of the way it’s nice to see a quick turn around being there’s a third or so less moving parts. 4.10 axles out. I’ll probably hold on to these for at least a year… we’ll see. On to those nifty fiberglass leaf springs. The bushings that were at the frame side were just glued in and fell out with a little wiggle. Keep in mind that these were never mounted on anything from the late ‘80s until I briefly mocked them up in an ‘89 I used to have and then taken back out. I’m sure the glue was just fine in their prime but I didn’t trust it after this long. Luckily the I.D. was 1.5” so a standard poly bushing went in the old bushing’s place. I never had a shackle side bushing as long as I’ve had the springs. A while back I had some bronze sleeves made up but I was never crazy about how they turned out. A friend of mine purchased a lathe and was itchy to use it. He spun some delrin for me. Little bit of a difference between these and the metric ton springs coming out. Shackles are just plain ol’ stock XJ. Next on the list was figuring the rear sway bar. My material scraps are getting low but I managed to find enough to make it work. The axle side mount was an old set of shock mounts I kept from a while back and the frame side bolts on with the bump stops. Made for a good landing spot. I need to get the bar where I want it to live and then I’ll figure out end links. The axle pinion angle got measured up and some good tacks got put on the spring perches. Of course I had to throw the wheels on to see where we’re at now. Mmmmmm…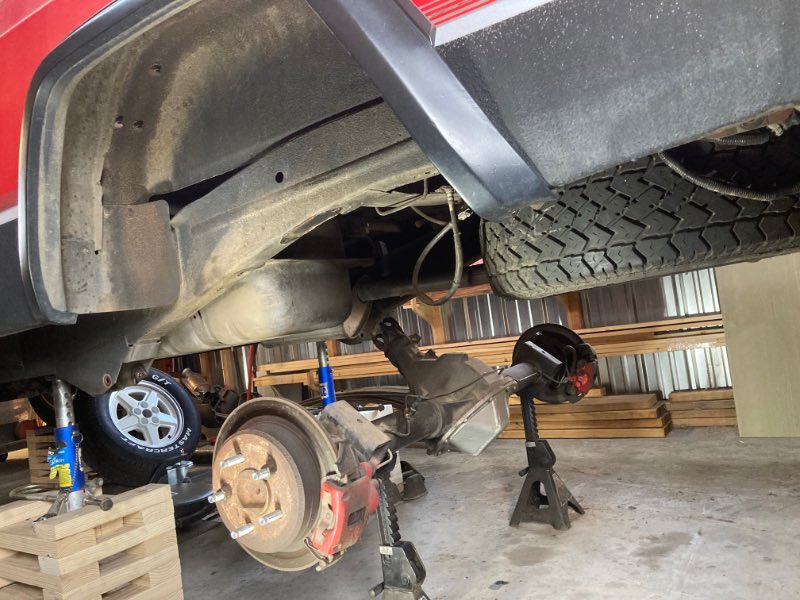
-
Awesome! Welcome aboard!
-
'88 Eliminator... Feb. 2009 - June 2026
neohic replied to neohic's topic in Member Projects: Your Comanches
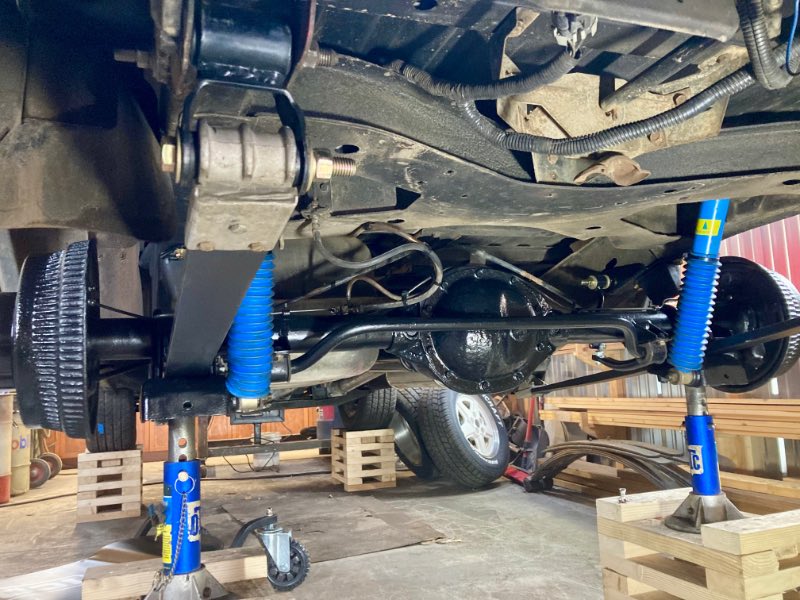
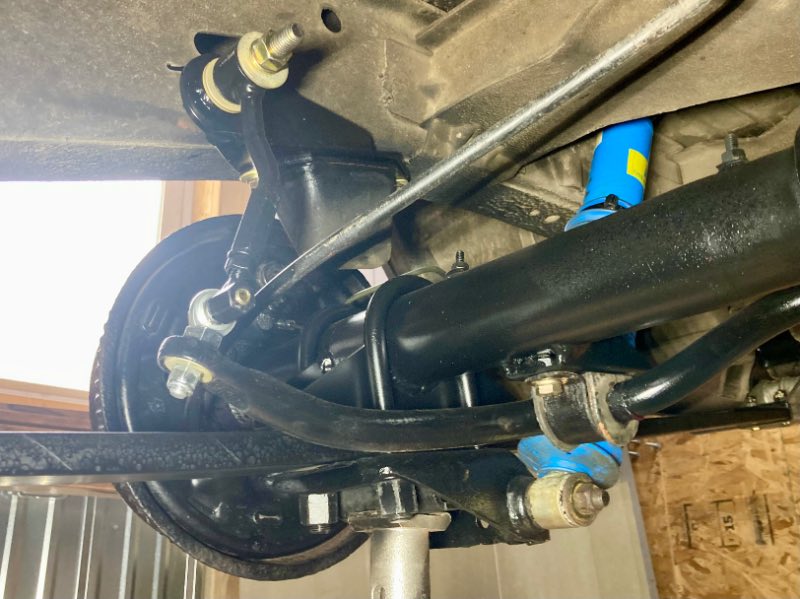
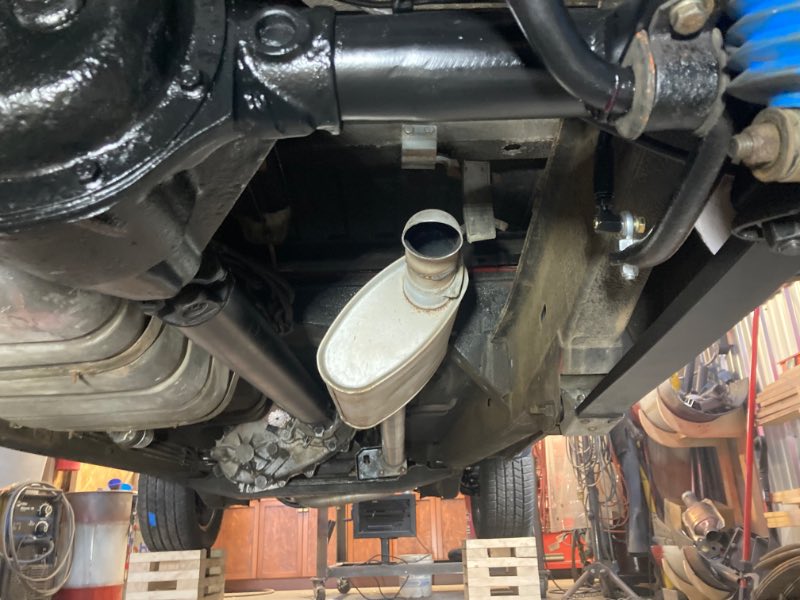
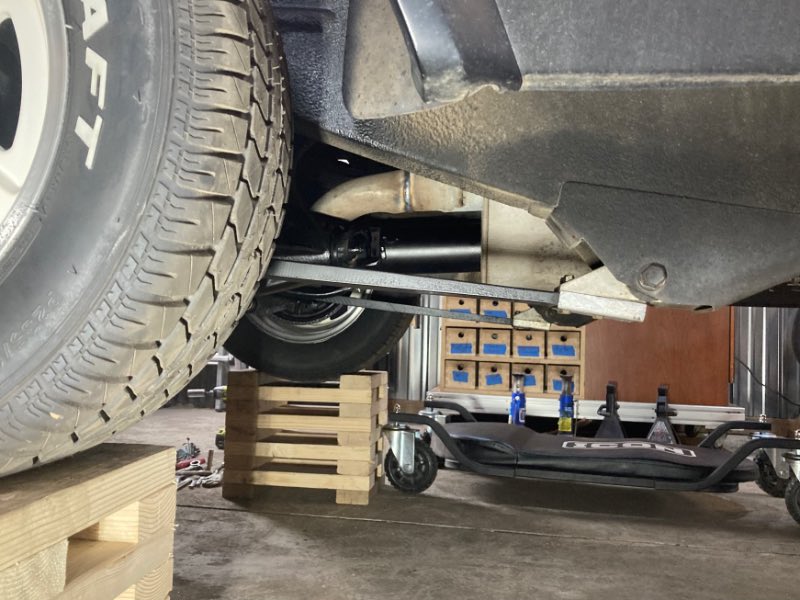
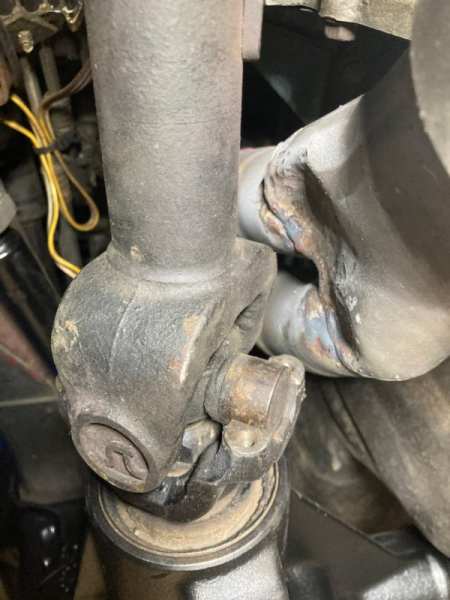
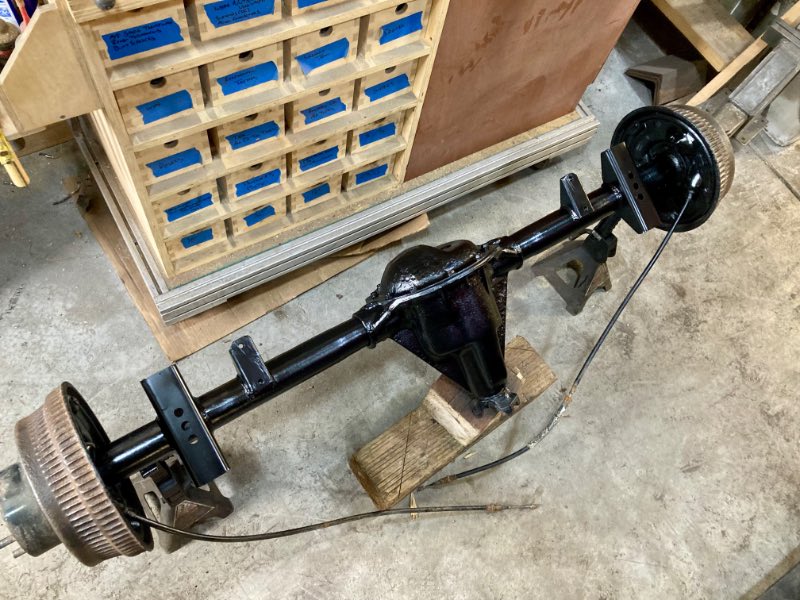
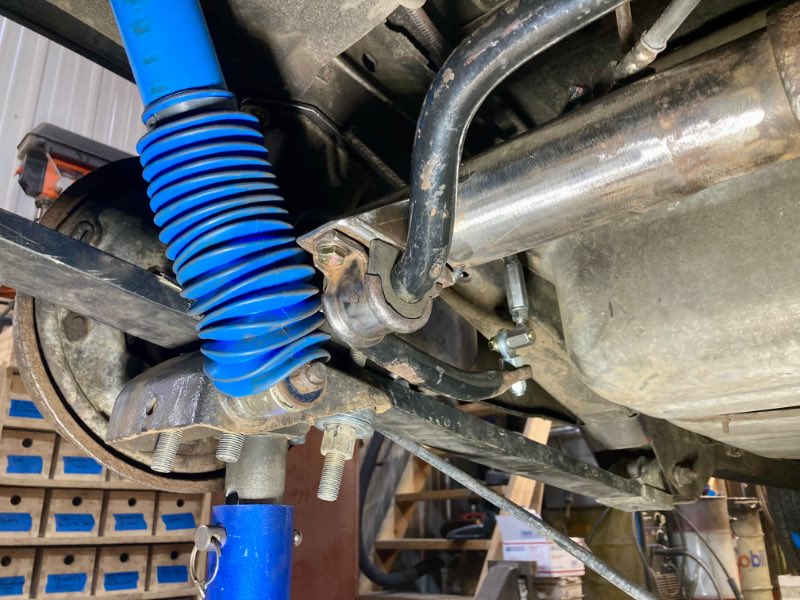
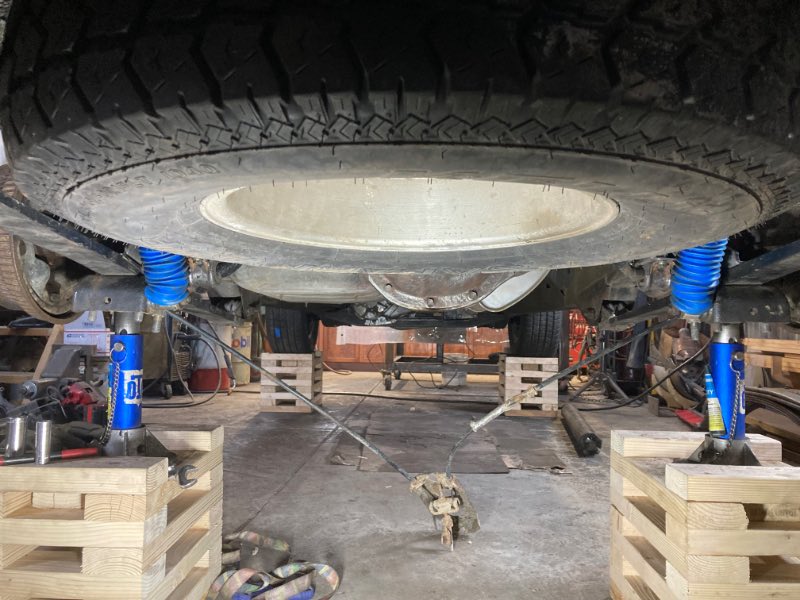
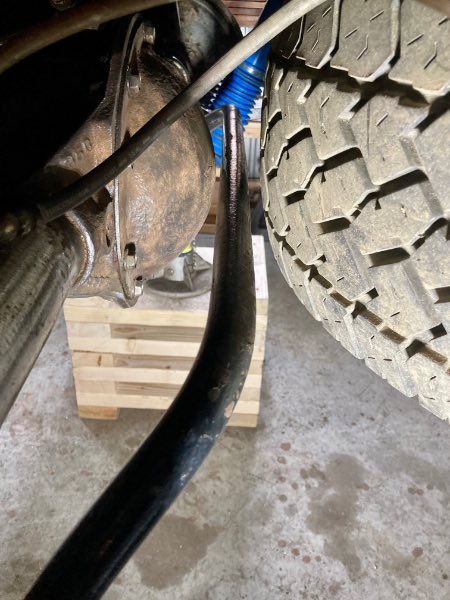
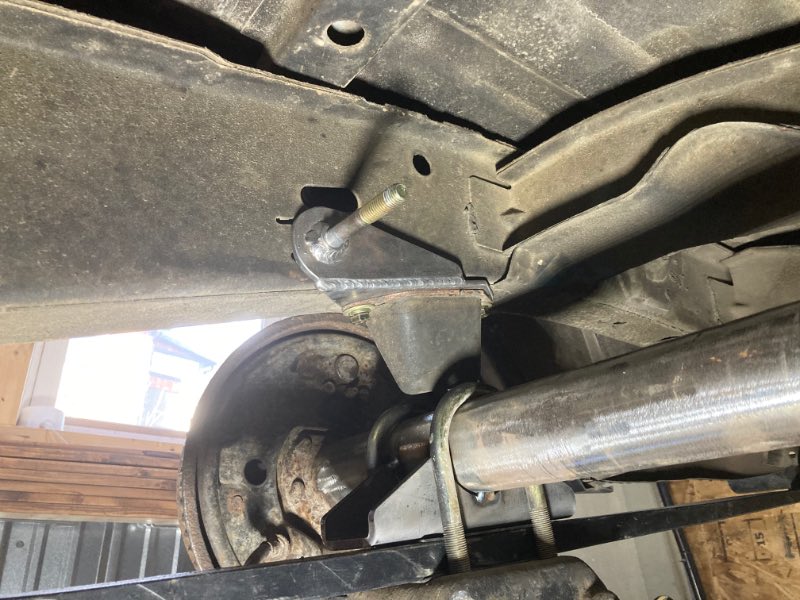
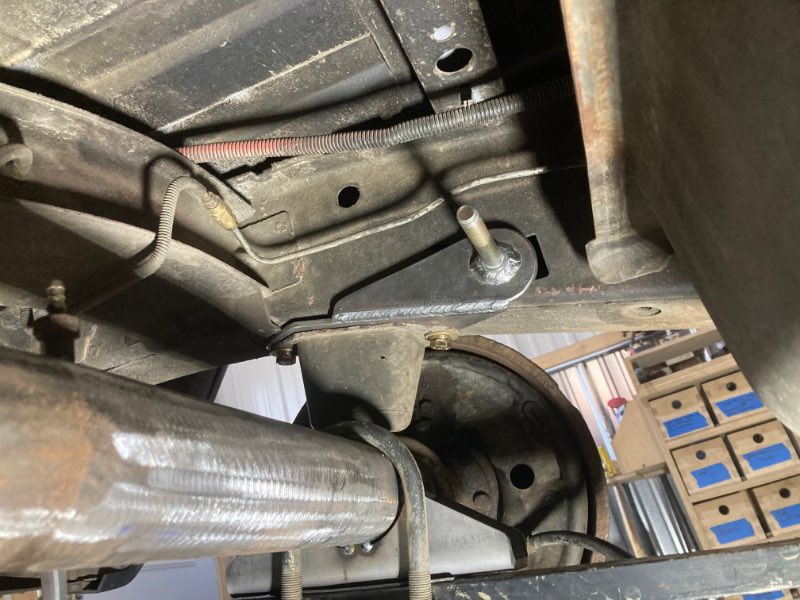
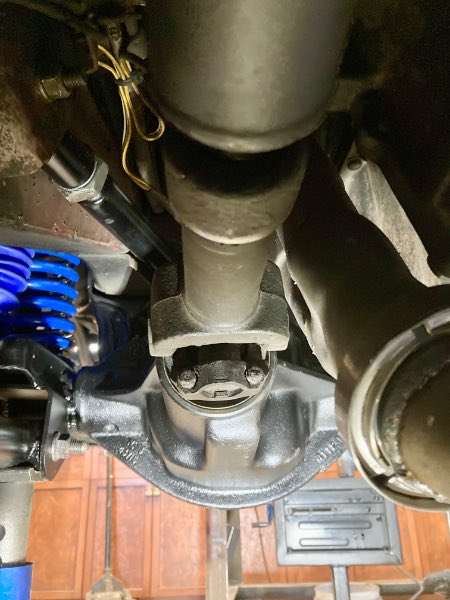
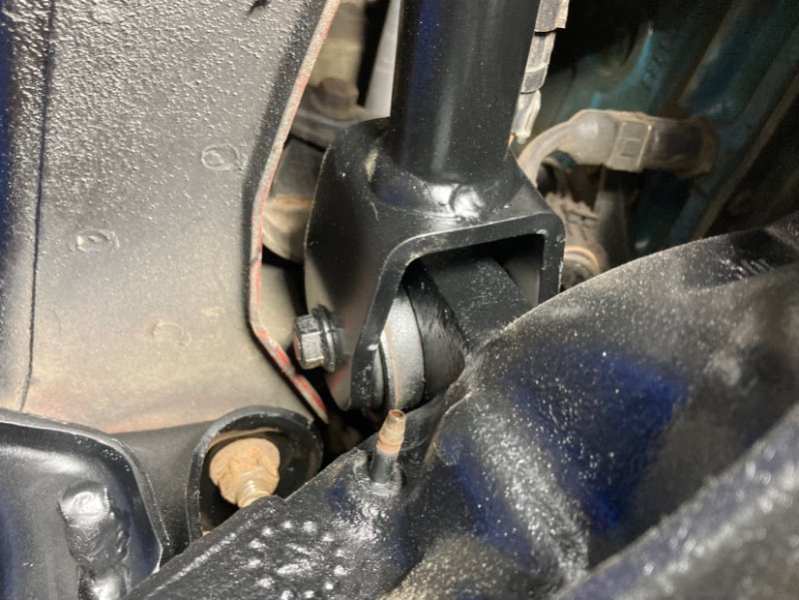
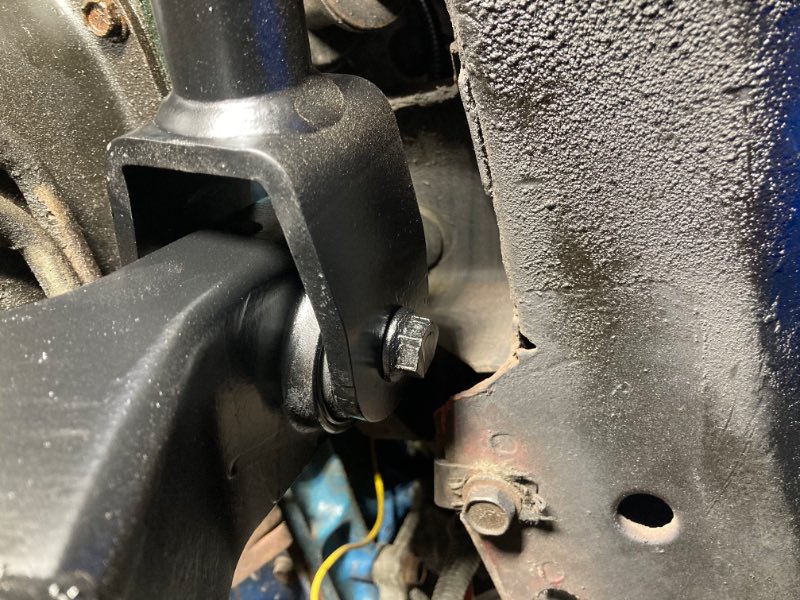
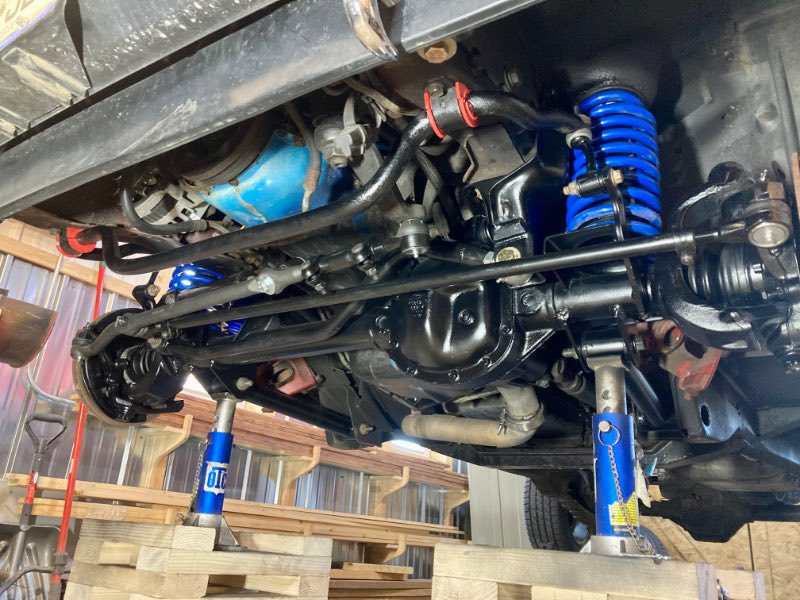
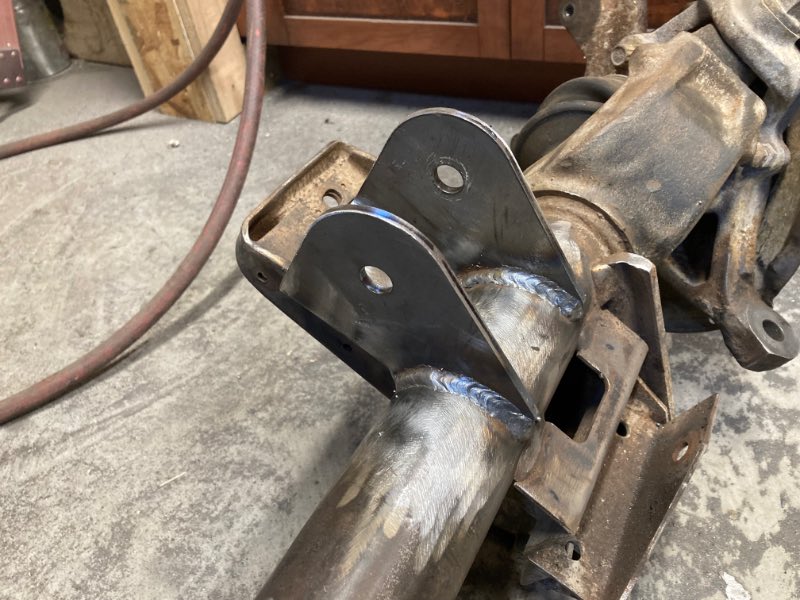
Kind of a big day for the Eliminator! The axle and parts got painted and installed for the last time. Black… everything black this time. Last time the truck got a birthday the control arms got painted hammered silver and the axles were hammered gray but the diff covers were also silver… IT WAS TOO MUCH!! Younger me clearly wasn’t thinking about tasteful choices that older me might not like. Looks like 1/4” is the magic number. There’s 1/4” of clearance between the bump stops, upper control arm hardware to the frame, and from the driveshaft to the exhaust. The floor patch got painted and undercoated also. I touched up the undercoating around the rest of the truck too. All that’s left is to swap over the brake calipers, nut and bolt everything again, and double check the alignment once it’s back on the road. Then on to the rear!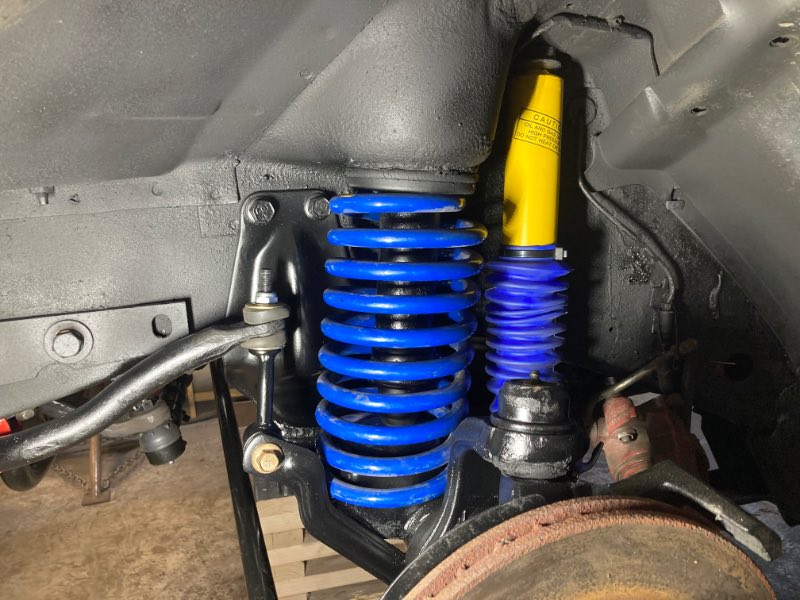
-
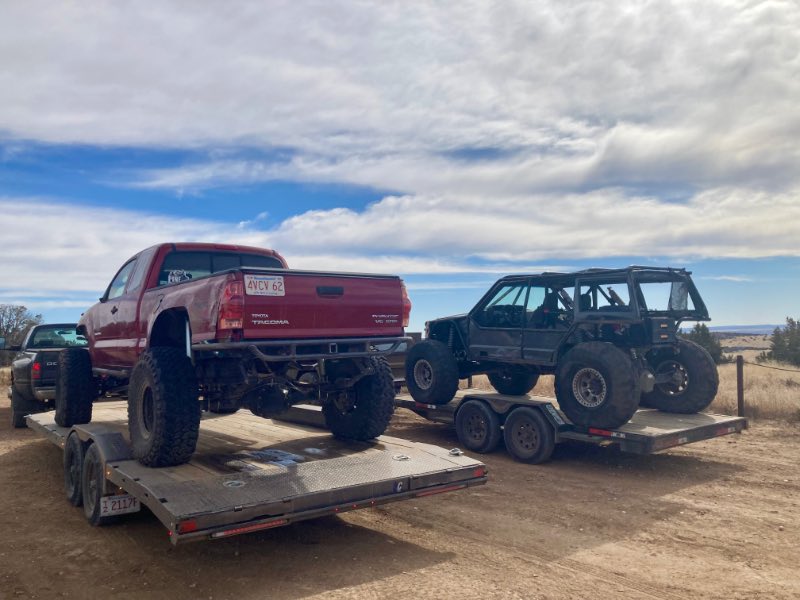
1975 Brutally Simple Daily Driver
neohic replied to neohic's topic in Member Projects: Other Cool Stuff
On that note, I was invited by my new wheeling buddies to Easter Jeep Safari. It’d be a last minute decision for a bunch of reasons, but we’ll see what happens. -
'88 Eliminator... Feb. 2009 - June 2026
neohic replied to neohic's topic in Member Projects: Your Comanches
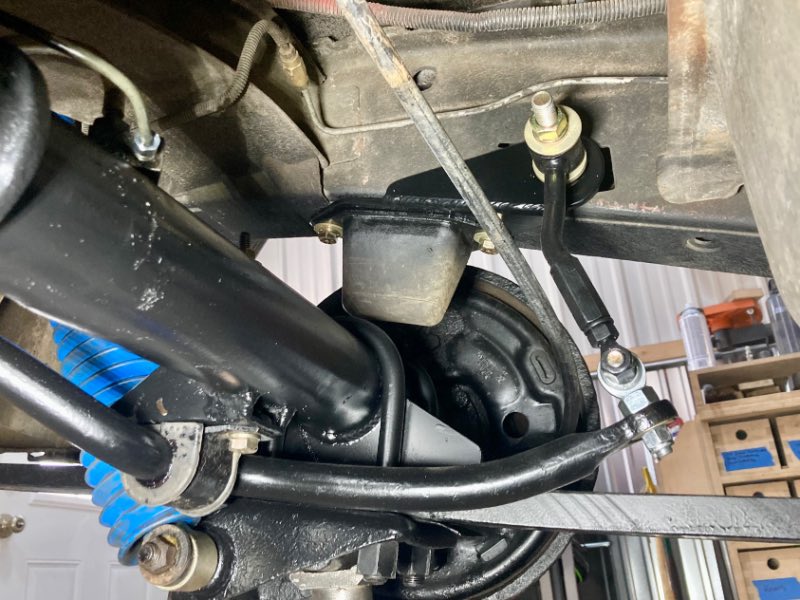
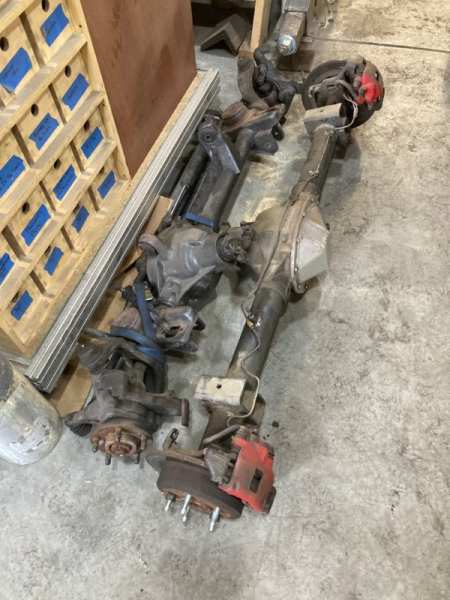
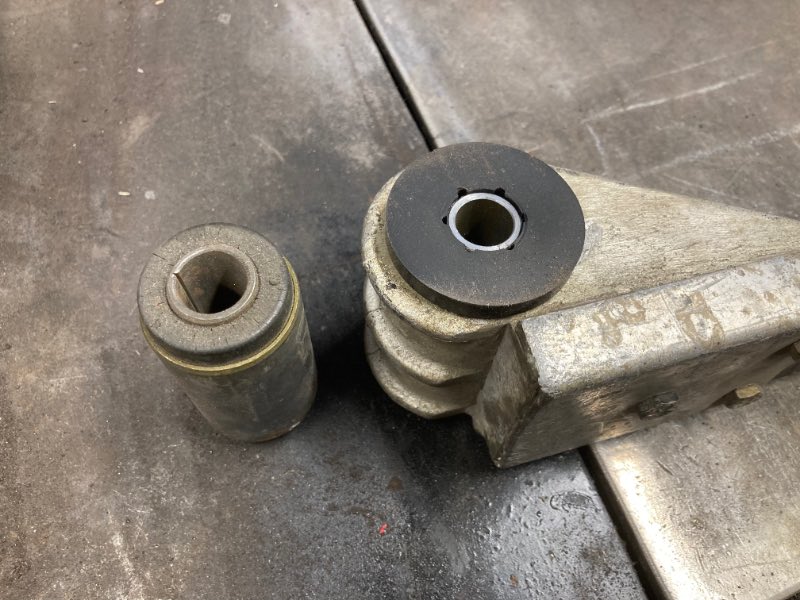
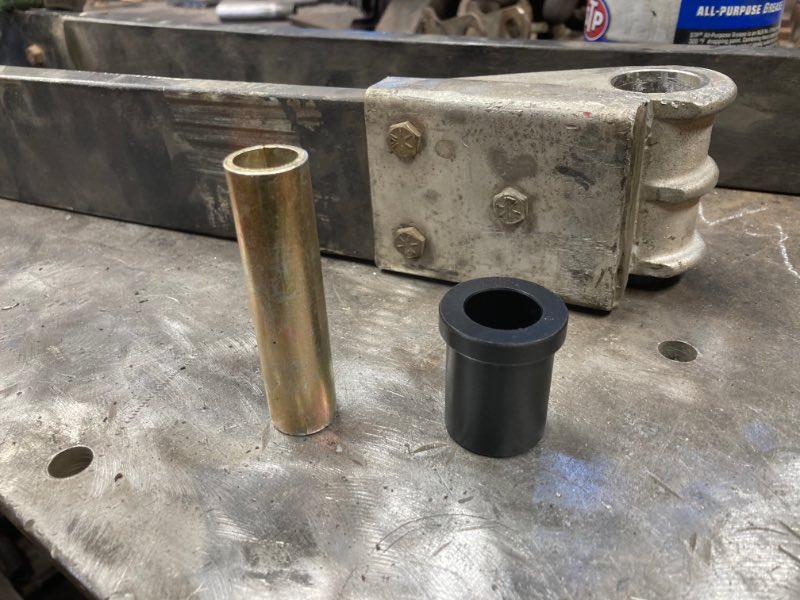
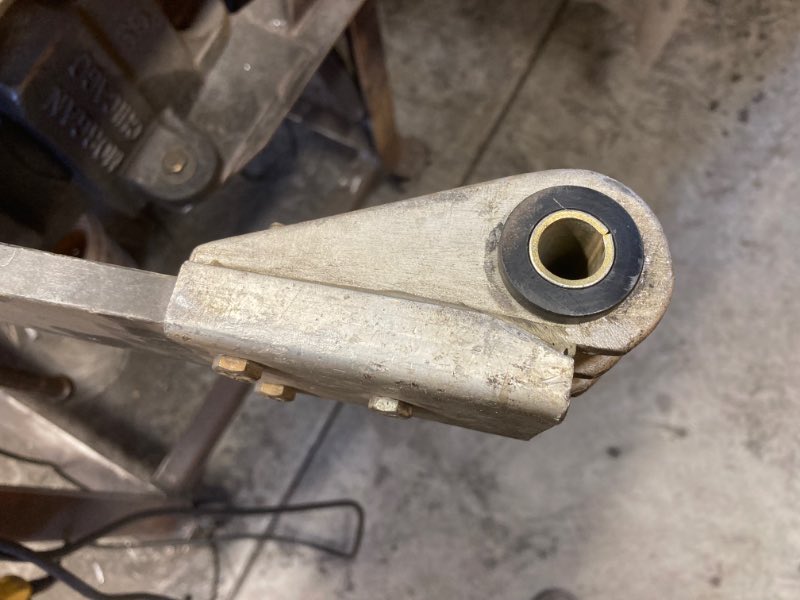
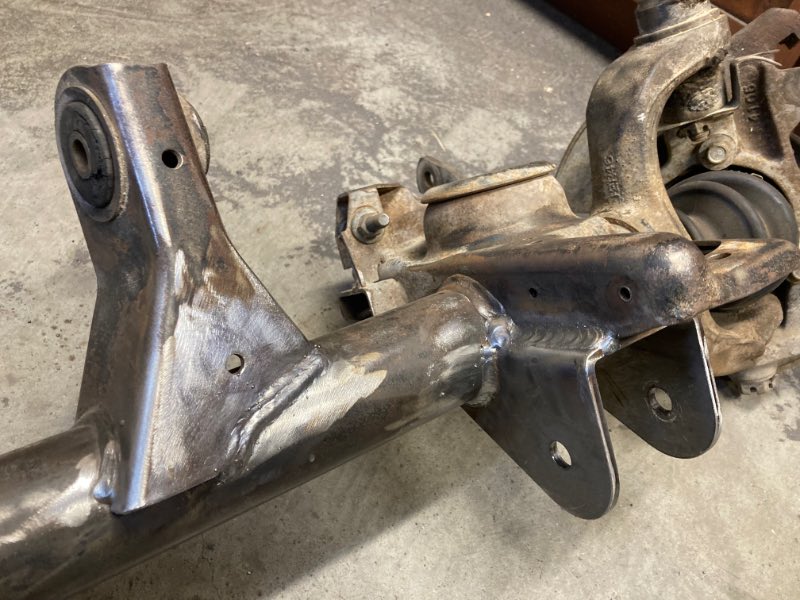
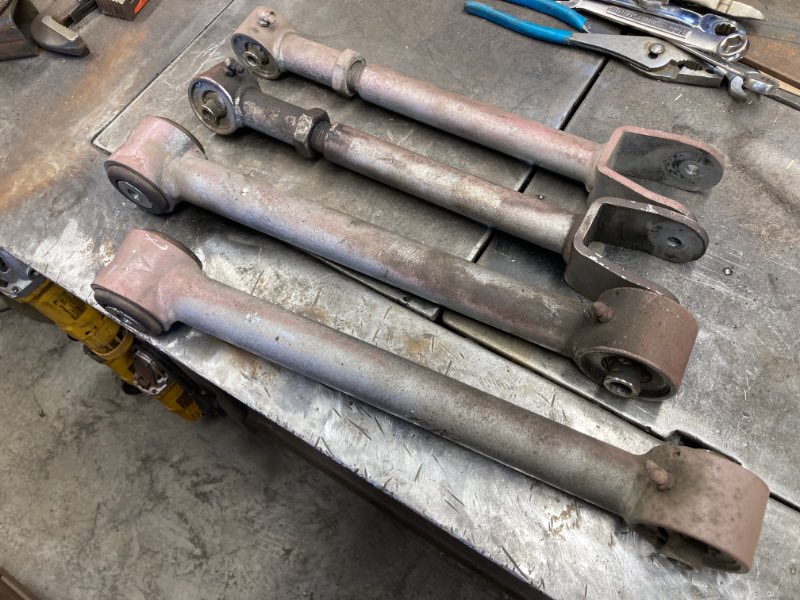
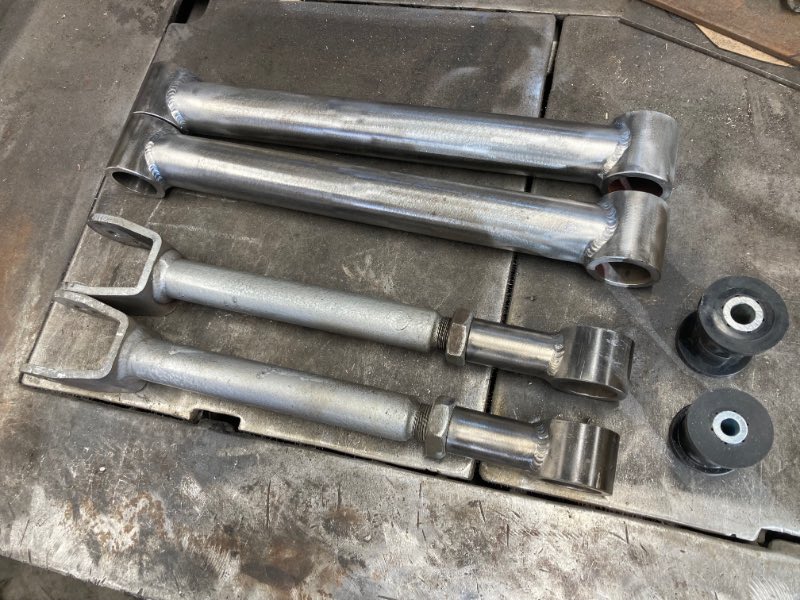
With all the parts here, I finally pulled the 4.10 Dana 30. The control arms needed to get reworked, however after pulling them I found that the lower bushings were completely wasted. I think these were Rubicon Express arms and they had a flex joint at the frame side that were noisy since the day they went in the truck. Being these had a goofy axle side bushing, I decided to just start from scratch. The uppers were fine to just cut the flex joint off. They got replaced with 2”x.250” tube so I could run a standard poly bushing. The new lowers also use 2”x.250” but I used a scrap of some fancy 1.75”x.120” DOM to connect the dots. They’re overkill for what they need to be. As for the 3.73 Dana 30 going in, the lower control arms got cut off because they were well on their way to falling off. I replaced them with Ruff Stuff 3/16” brackets and put it under the truck on jack stands. Everything needs paint then it should all just fall back into place.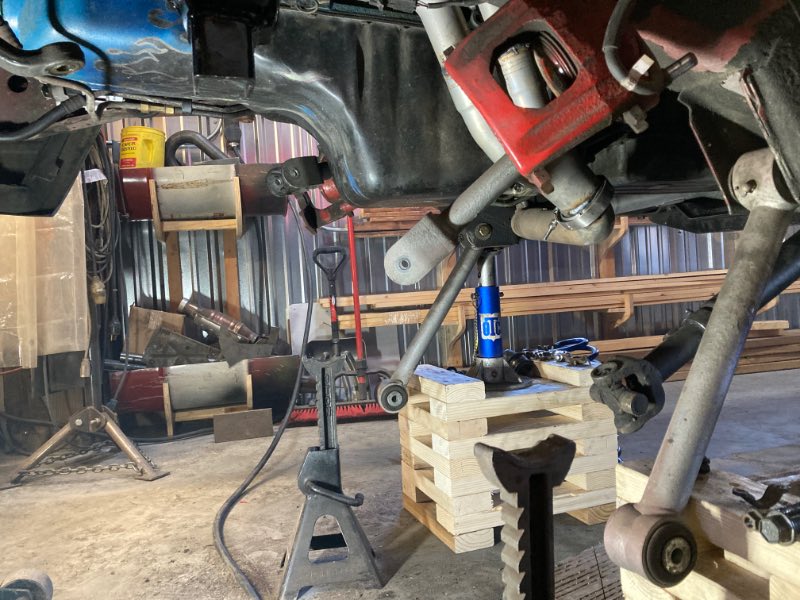
-
1975 Brutally Simple Daily Driver
neohic replied to neohic's topic in Member Projects: Other Cool Stuff
I've got a "CJ to Moab" list in my phone that I cross things off from time to time. Everything you mentioned is on the list to do and I don't think any of it would affect the day-to-day. I used to wheel with a guy that his TJ was equipped very similar to the direction I've been going with my CJ: limited slip in the rear, locker in the front, 33s, manual transmission. Someday I'll get everything crossed off that list. By a dedicated wheeler, I mean something that could keep up with the "big tire" crowd... 40s and up. These guys hit trails like Independence and Patriot in Penrose, CO along with Carnage Canyon outside of Buena Vista, CO commonly. I've had a build in mind for years that would've left off from my old XJ, but it would mean adding not just a wheeler, but a tow vehicle and trailer also. Would it be fun?... HECK, YEAH!!! I really miss challenging myself and my vehicles into bigger and bigger obstacles. This little CJ has been a nice little mountain goat that can get a little rad at times in place of that dedicated wheeler. -
1975 Brutally Simple Daily Driver
neohic replied to neohic's topic in Member Projects: Other Cool Stuff
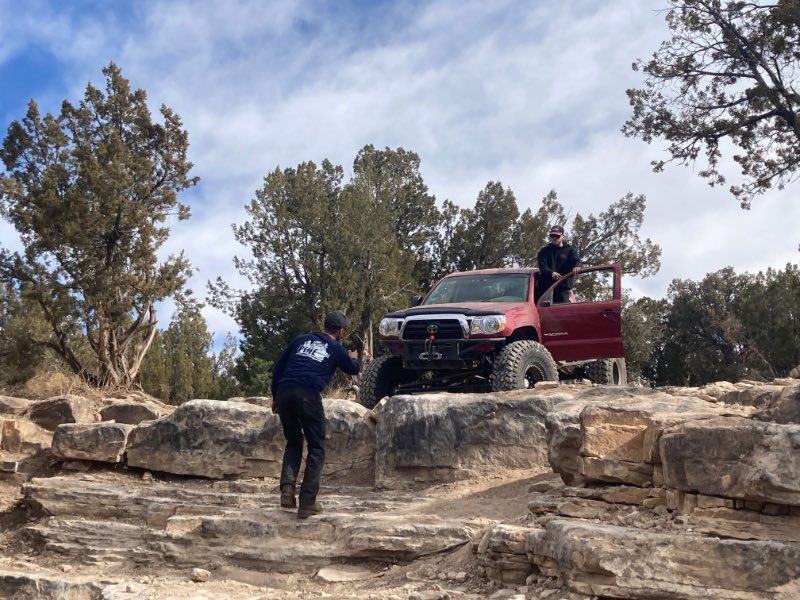
Arguably CJ content, but only because I drove it over to my buddy’s shop. These guys get it. Unfortunately, the Toyota guy screwed up his knee and my Cherokee buddy drove his truck out of the thick of the trail. I got behind the wheel of (what’s left of) the XJ and followed along. Felt like old times! I don’t need a dedicated wheeler… I don’t need a dedicated wheeler… I don’t need a dedicated wheeler… I don’t need a dedicated wheeler… I don’t need a dedicated wheeler… I don’t need a dedicated wheeler…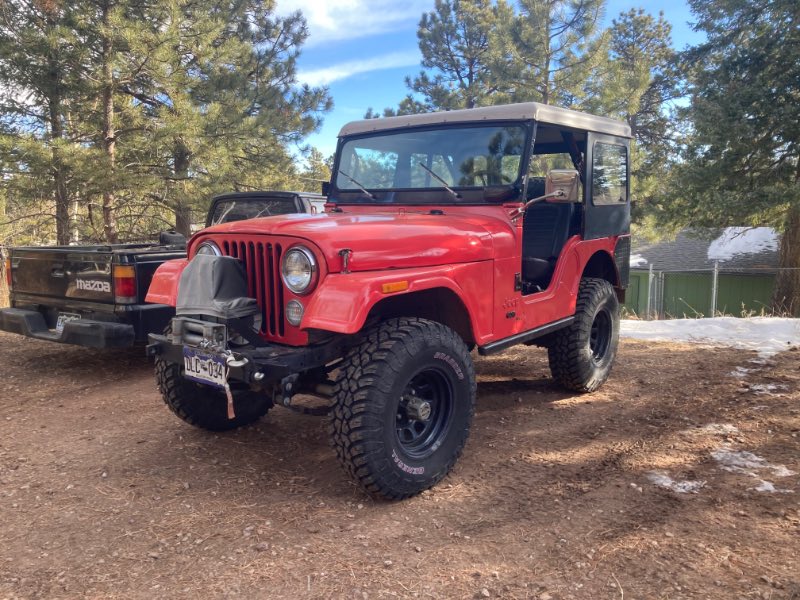
-
'88 Eliminator... Feb. 2009 - June 2026
neohic replied to neohic's topic in Member Projects: Your Comanches
I wish I had more to report but I’ve just been very busy. Today I received the last of my Ruff Stuff order though. Two full months to get two control arm mounts, leaf spring perches, u bolts, and a couple bushings. I’m grateful that towards the end I did get an email response from them, but overall I wish I would’ve been completely done with this project a while ago. Can’t say I'm mad, but I definitely have that disappointed dad feeling. -
Swapping an 87 renix system into a 94
neohic replied to Rebel87's topic in Member Projects: Other Cool Stuff
I was thinking the same thing. Honestly, I’d consider doing the same thing if I had a known good drivetrain that needed a chassis. -
-
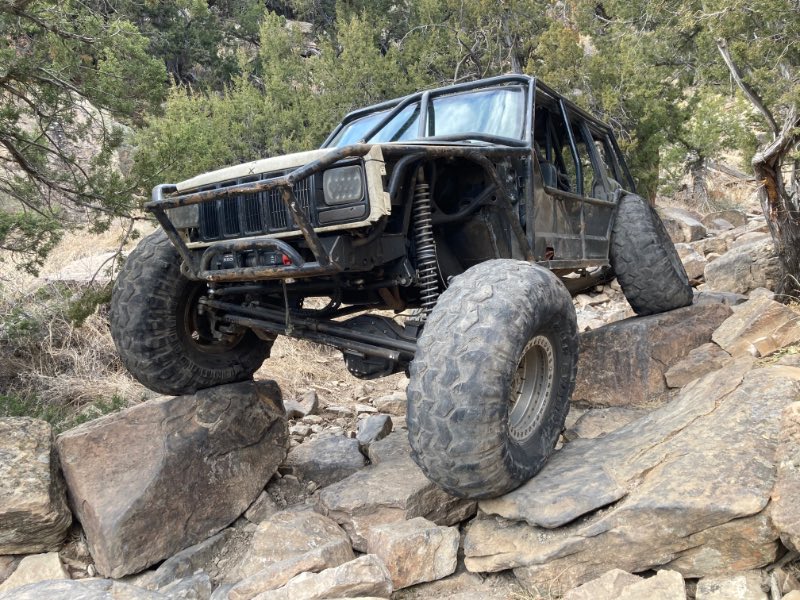
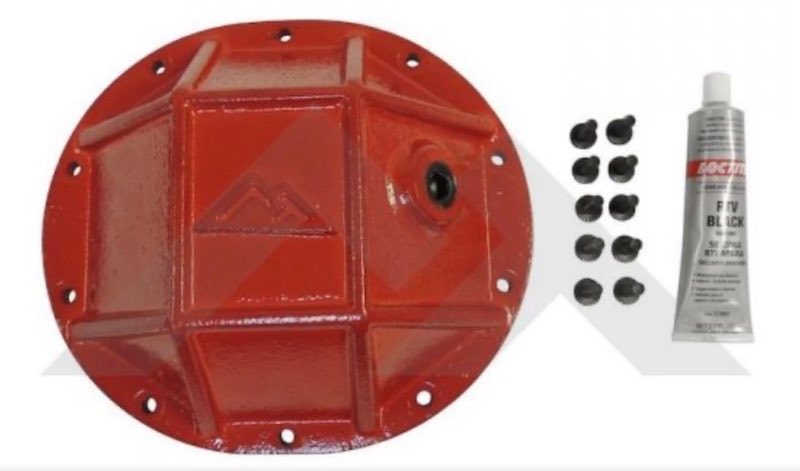
Looks to me like a Chrysler 8.25 diff cover from RT Offroad. https://www.rtoffroad.com/825-hd-differential-cover-rear.html I’d bet the axle is from a Liberty/KJ with the four little additional castings around the pinion yoke. Can you measure the axle tube diameter and overall width from outside of hub to hub?
-
Exactly. I love it when classic topics come back to the top.