
mj Mike
-
Posts
377 -
Joined
-
Last visited
Content Type
Profiles
Forums
Gallery
Everything posted by mj Mike
-
my motor mounts were not in very good shape. I went with M.O.R.E boom proof motor mounts http://www.mountainoffroad.com/ :cheers:
-
my Jeep Comanche is a 91 so it has a 3/4x16 oil filter neck. this allows me to use a over sized oil filter. allowing me to use 1 extra quart of oil & 5,000 miles between oil changes. if you have a renix 4.0L you will need to change the oil neck to the 3/4x16 on the H/O 4.0L. ease to find at your local junk yards
-
the XJ is not mine it was a friends. and he ended up pulling the motor 4.0L. that later went in to my red 1990 Jeep Cherokee :cheers: he then sold it!!! :doh:
-
some local jeepers and i on fire road near lake Castaic CA,
-
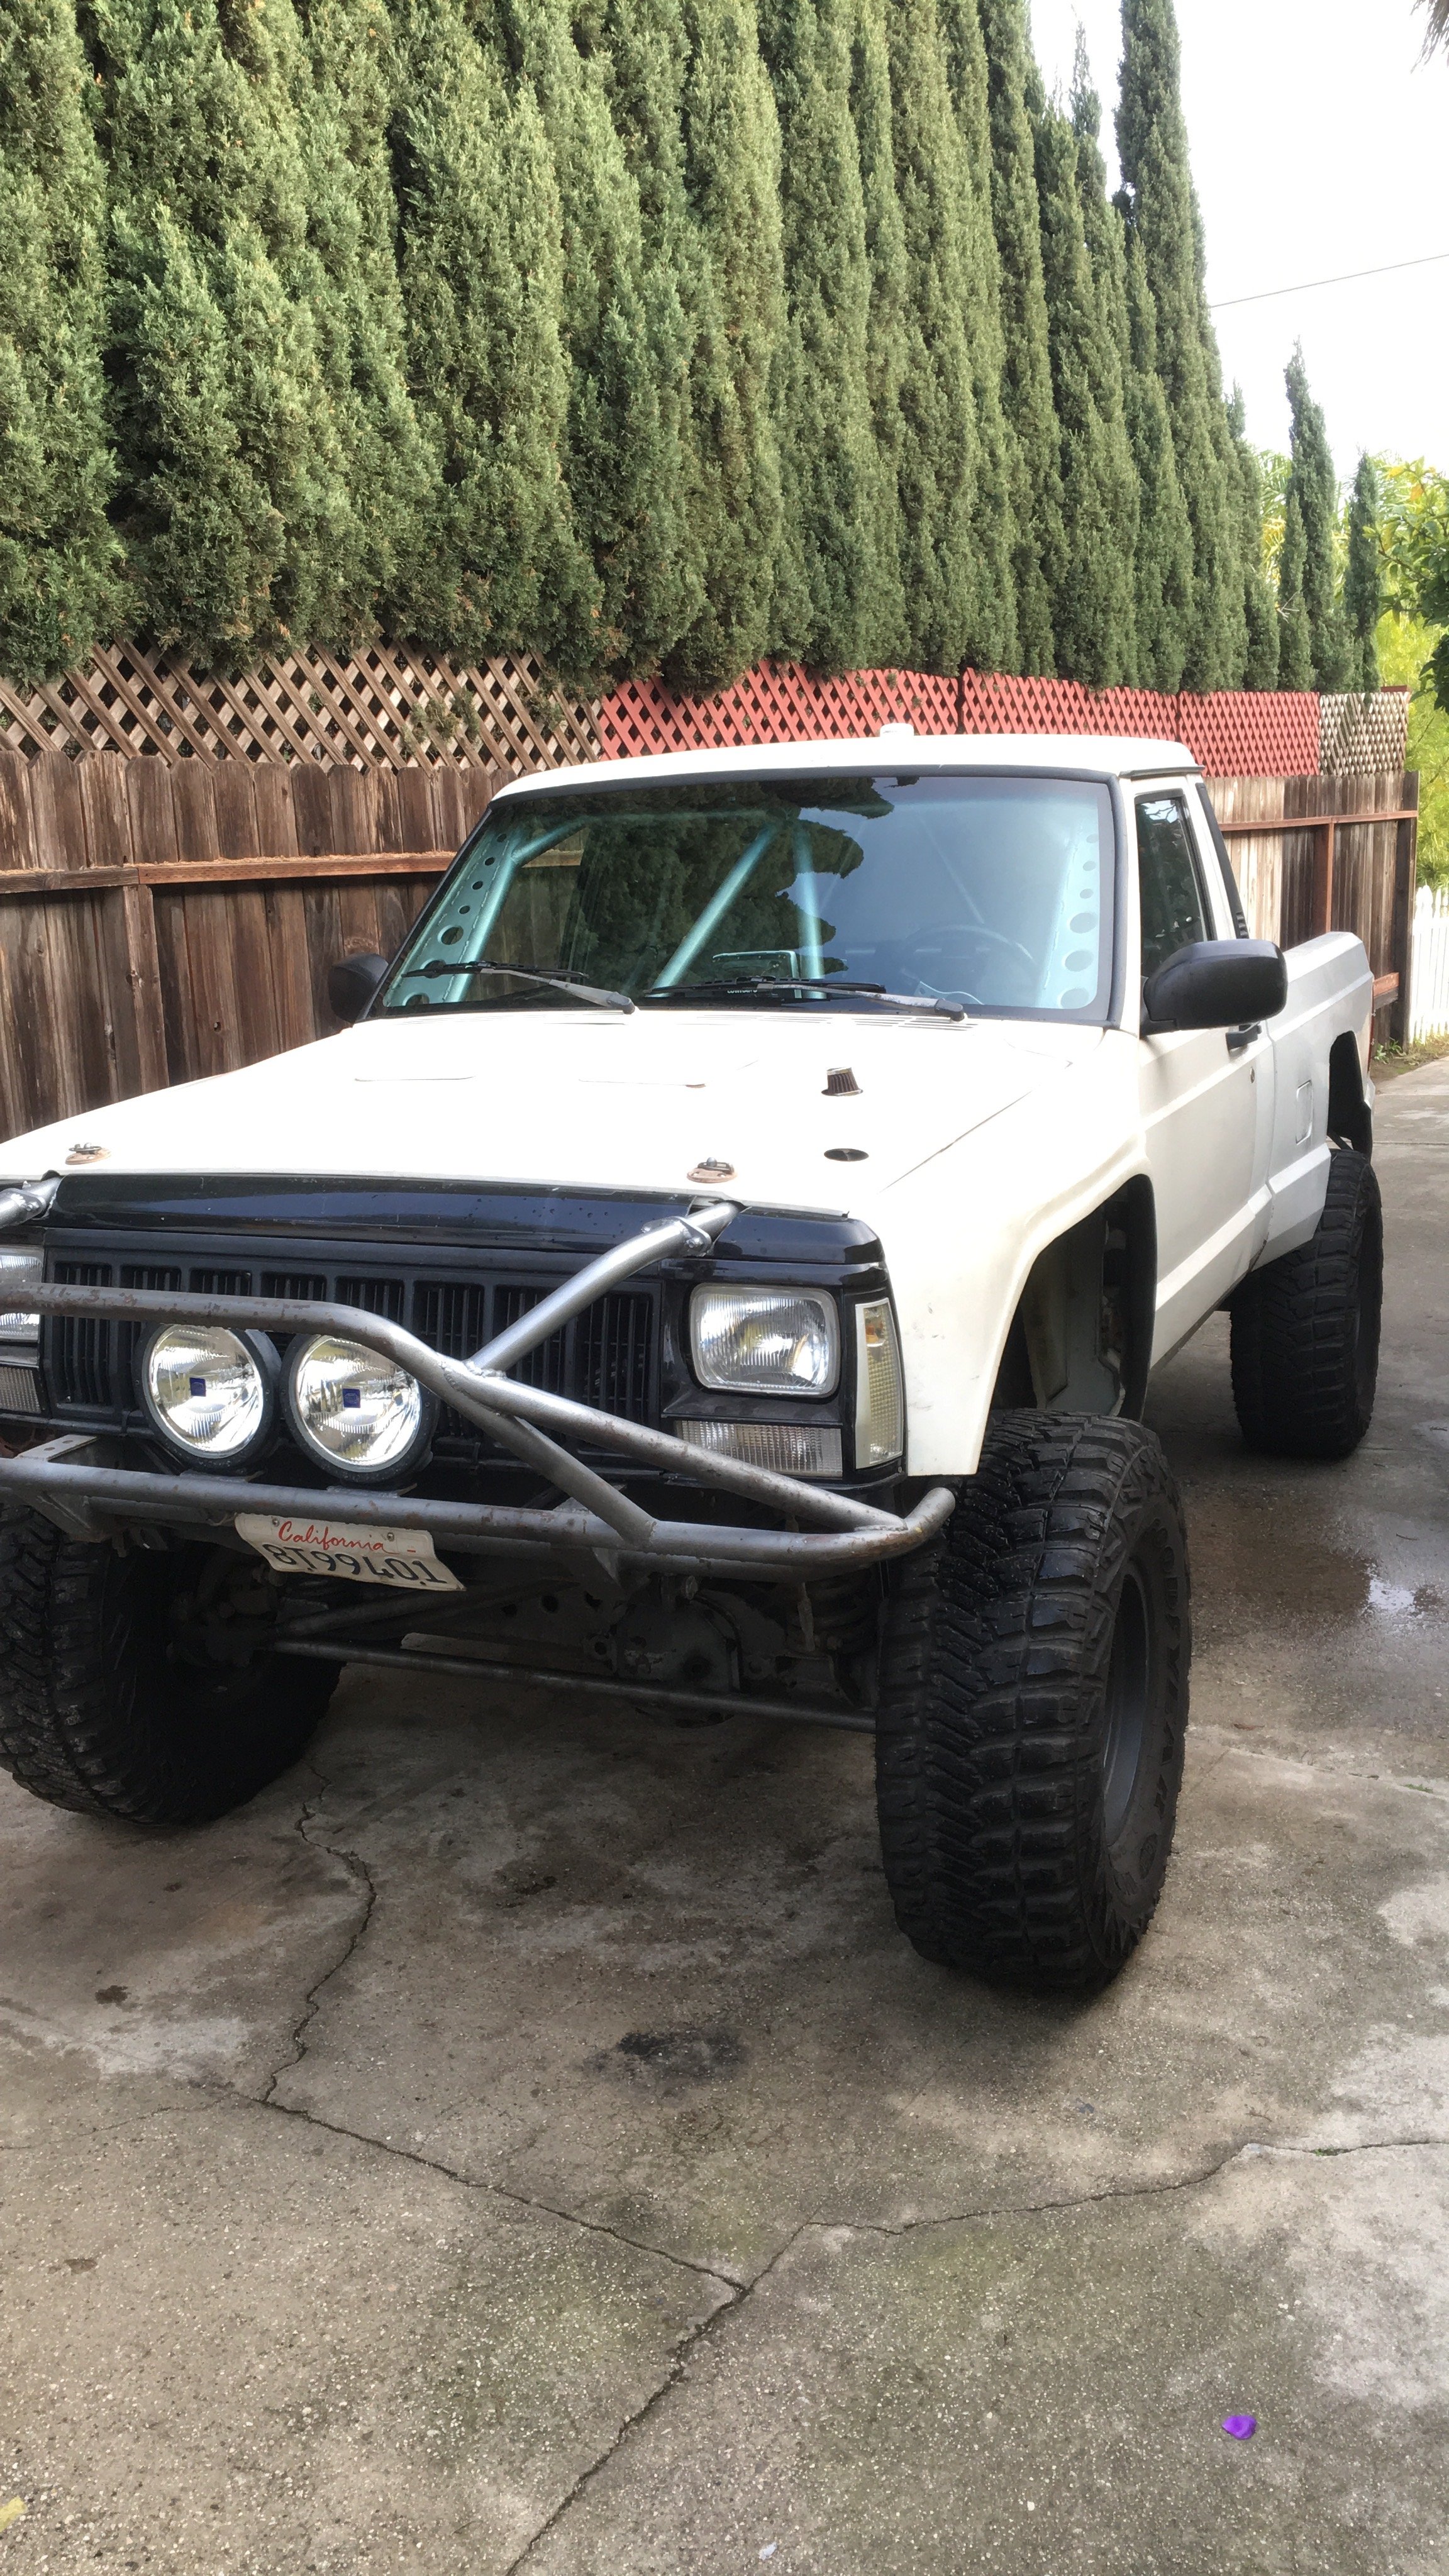
1991, Jeep Comanche 4.0L H-O Inline 6,AX 15, NP 242 TS, Front Axle is Solid 2 Wheel Drive Beam. Soon to be a Dana 30 w/ Ballistic Fabrication truss, TMR Gusset kit, Superior Axle Seals, By-Pass Shock Mounts and 4:56 gears, Rear Axle Dana 44 w/ TNT truss, TNT U-Bolt eliminators with Ford crown Vic Disc Breaks and 4:56 Gears w/ Aussie Locker. Short Bed Comanche. Build Date Nov 1991. Located in Los Angeles,CA. The Good Stuff - Front & rear 1 1/2" DOM tubing bumpers. Lights- Hella Rally 4000 converted to HID's, IPF OEM head light replacement housings converted to HID's, rear Amber Dust light. Lift Kit- Rock Krawler 3 link, Dever Coils, Fox 2.0 Bump Stops, Fox 2.5 2 tube By-Pass Shocks 10", TNT Track Bar system, JCR 1 ton Steering. The Rear has Spring over Conversions w/10" Bilstein 5150 Shocks. Tires are 33x12.50 BFG All Terrains, 15"rims Teflon Coated American Racing Wheels. Hood Vents are from a Chrysler New Yorker and Auto-Fab Hood Pins. MSD Ignition Coil and -6 Ignition Control Module. All Aluminum Radiator from Genesis Auto Parts. Gage Swap from Dummy light to Switch Gage. 1999 Cherokee Doors w/ Power windows (no wind wing) and larger mirrors. Front 4.5 Fiber Glass Fenders & Chopped Steel Bed sides.
-
Thanks , I believe it said Nov 1991, but it's been a while i changed to late model doors in early 2010.now i have power window and more visibility no wind wing and bigger side mirrors.
-
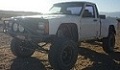
I purchased my Jeep Comanche in Dec,2007 in Los Angeles CA, it's my first Jeep & was my daily driver. it's a 1992 Jeep Comanche with a 4.0 L, inline 6 with a 5 speed AX 15, 2 wheel drive beam axle and a Dana 35 rear end with 3:07 gears. it also had manual windows, bench seat , dummy light gauges, all in all the truck ran good except for random death wobble at high speed hitting bumps.In Mar. 2008 I steeped up to a Rubicon express 3.5" super flex lift kit and a XJ add a leaf in the rear the benefit of the Rubicon express lift was to fit 31 10x50 w/15" rims BFG all terrains tires with American racing wheels Teflon coated.
-
looks good. what type of tube bender do you use? i use a JD2 model 3 . my front my rear
-
U-Bolt Elimanator install
mj Mike replied to MiNi Beast's topic in MJ Tech: DIY Projects and Write-Ups
looks very nice . i run T&T U-Bolt elimanators & T&T truss on my D44 in my MJ . good writeup! :clapping: -
they come in all different colors. the white ones turn brownish after awhile . and once again they are not for fashion they are for fire safety !!!! & get a fire extinguisher asap!
-
I have the same squealing sound in my MJ ??
-
LOOKS GOOD! :thumbsup:
-
Not the " LAST OF THE MANCHES " 2-92 build project.
mj Mike replied to DJM/78's topic in Member Projects: Your Comanches
I'm sorry man, but i have far to many projects and not enough time to complete them. The down side to buying the JCR bracket is they used the same 6 mounting holes I used.They don't include the shackle bolt or that bolt in the back. but that is a good idea and is strong. I think your suggestion was great. If i had the resource to fab a bunch of them, i would help you out. -
Hood Pins are not just for looks. They're for fire safety!!!!!!!!!!! The first thing that will burn will be the hood release cable and you won't be able to open the hood to put out the fire.You have a lot of options," I run Auto Fab Hood Pins on all my Jeeps". You can buy these Hood Pins at http://www.offroadwarehouse.com. The first step of mounting these Hood Pins is to mount the male Pin to the radiator support.Drill a hole through the radiator support. Then place the pin through the hole with a nut on bottom and a nut on top. Tighten the nuts so they sandwich the Radiator. I welded the bottom nut to make everything easier, if you can weld i would recommended it. Then place a dab of dark grease on the top of each male hood pin and close the hood to mark the hole location. Open the hood and drill a small pilot hole in the center of the dark grease dab on the bottom of the hood. With a 5/32 bit. Try to keep the drill straight as you drill through both pieces of metal, then close the hood and drill with a 1 1/2 hole saw. Use the 1/4 centering bit of the hole saw in the 5/32 pilot hole.Drill straight down through both pieces of metal. be careful not to scar the male pin :fs2: Then place the rubber female top and mark your four holes to mount it. Drill the hole with a 1/4 bit, place four 1/4 by 20 screws in the hole with nuts on the bottom . Close the hood to check your alignment,If needed ream the rubber female with a large drill bit or unibit . I left the spring and gutted the top latch so my hood still springs open when i pull the pins Another option is to add a strut so when you pull the pins the hood opens I placed a piece of aluminum to the hood,and drill a hole right through it to mount the strut. and make two because you will need another one for the bottom :cheers:
-
Deep in the heart of Comanche County
mj Mike replied to Comanche County's topic in Member Projects: Your Comanches
just a idea. thanks for the write up on the brakes. it on my list of things to do. :thumbsup: -
Deep in the heart of Comanche County
mj Mike replied to Comanche County's topic in Member Projects: Your Comanches
check out these Ballistic joints i got to replace my lower control arm joints on my Rock Krawler 3 link their BEEFY! got them form Ballistic fabrication -
Not the " LAST OF THE MANCHES " 2-92 build project.
mj Mike replied to DJM/78's topic in Member Projects: Your Comanches
It looks like there is enough room to slide the tailgate in and out , but I don't know . I'm trying to figure it out myself ... :dunno: I am going to fab a tire carrier to fill that space. it's a work in progress! and yes EVERY ONE in LosAngeles is a cellphone Driver. I try to use my jeep offroad. -
Not the " LAST OF THE MANCHES " 2-92 build project.
mj Mike replied to DJM/78's topic in Member Projects: Your Comanches
i used 1/4 plate to make my brackets. 2 pieces butted @ a 90* notched for the shekel bracket & butt welded to the 2x3 tubing Image Not Found -
very nice! :clapping:
-
Not the " LAST OF THE MANCHES " 2-92 build project.
mj Mike replied to DJM/78's topic in Member Projects: Your Comanches
rear tubing bumperImage Not Found just a idea. 2x3 and 1 1/2 dom tubing. i made my own brackets. i can take some pics if you are interested? -
Not the " LAST OF THE MANCHES " 2-92 build project.
mj Mike replied to DJM/78's topic in Member Projects: Your Comanches
very nice :clapping: -
-
very nice i am glad someone is taking care of those stock dome lights :wall: :headpop:
-
Mj rear Tube bumper
-
tube style mj front bumper