Gojira94
-
Posts
677 -
Joined
-
Last visited
Content Type
Profiles
Forums
Gallery
Everything posted by Gojira94
-
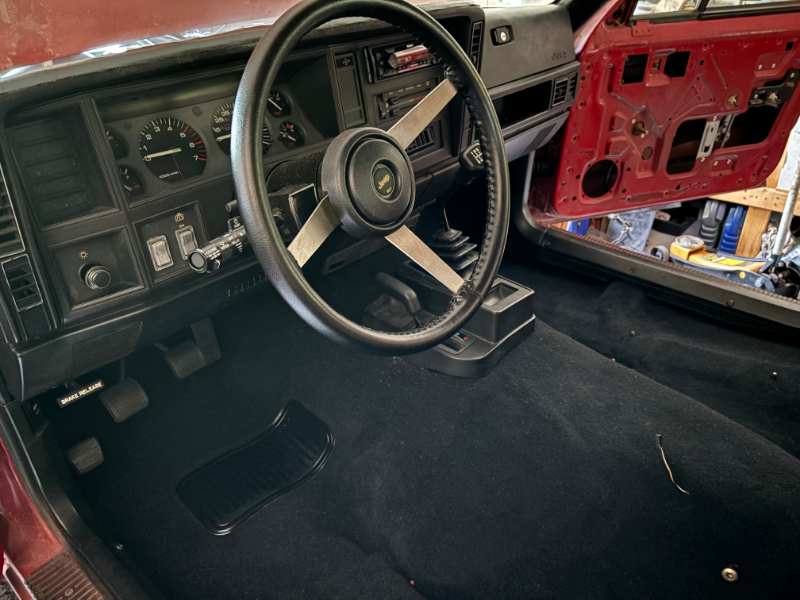
Carpet is in. I started the trimming at the front, just a little at a time until it lined up with the molded areas left and right. Then the sills, and rear last. I added a layer of 1/2" jute to all the areas the carpet didn't come with. Still have to install the rear corner trim/ seat belts and rear panel/ upper trim. And work the headliner in there while I'm at it. Really need to vacuum before I go any further lol.

-

AX-15 Spacer - Cushion to Crossmember (?)
Gojira94 replied to Gojira94's topic in MJ Tech: Modification and Repairs
Yep, you're right. I got confused. The StinkyFab are the ones I wanted, with the softer bushings. -
Park = Reverse, Rev=Neutral, etc., kinda
Gojira94 replied to AnotherOldJeepGuy's topic in MJ Tech: Modification and Repairs
w00t! Well done, sir! -
Park = Reverse, Rev=Neutral, etc., kinda
Gojira94 replied to AnotherOldJeepGuy's topic in MJ Tech: Modification and Repairs
The plastic pieces on either side of the metal bracket need to push together a bit. Once you have the 'collar' unlocked by backing out the U-lock about halfway, maybe a hair more, you should be able to get things to move toward each other. It will be a bit snug, but should move. Then use your thumb to snap the U-lock back into place. Notice the ridges you can see on the spring side? Those are what engages the U-lock 'legs' to hold things in place when it's snapped closed. -
Park = Reverse, Rev=Neutral, etc., kinda
Gojira94 replied to AnotherOldJeepGuy's topic in MJ Tech: Modification and Repairs
.jpg.fa734a293f5fae3609d462d970818a25.jpg)
-
AX-15 Spacer - Cushion to Crossmember (?)
Gojira94 replied to Gojira94's topic in MJ Tech: Modification and Repairs
This is still a concern for me, I'm keeping an eye on it. This is what I'm lusting after for near-future upgrades: https://dbmetalworx.com/4x4-products/Ultimate-UPGRADED-HD-TRANSMISSION-&-MOTOR-COMBO-Kits-Jeep-YJ-XJ-MJ-TJ-&-ZJ-p97355283 Made with a poly durometer on the softer end from what I understand. -
Park = Reverse, Rev=Neutral, etc., kinda
Gojira94 replied to AnotherOldJeepGuy's topic in MJ Tech: Modification and Repairs
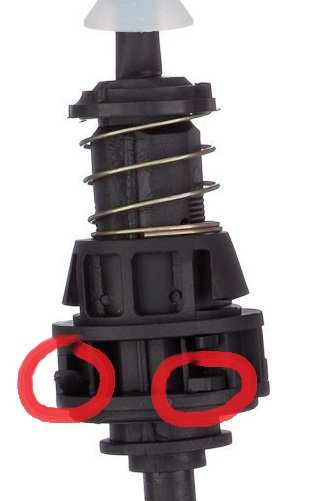
The adjustment point is right where your upper right arrow is. Leave the cable attached to the shift lever on the side of the trans while you do the adjustment. The locking tab on the adjustment collar has a U shape. It has a wide curved spot on one side and the tips of the 'U' shape just peek out the opposite side. Gently pry this side out, and the 'legs' on the opposite side will follow but remain partially inserted. You don't want to remove the locking tab, just back it out to where the grooves that hold things in place are disengaged. Then you can adjust the length of the cable. You'll want to pull the cable sheaths on either side of the bracket together with the shift lever in park when you do. Get it as tight as it will go by hand against the spring pressure and lock it down by pushing the locking tab back flush into the collar. Opposite side. Interestingly, one tip of the 'U' shape in this pic is slightly damaged (left one in pic): You may want to spritz it with brake cleaner first to get any grit/ oil/ fluids out so it will move more easily.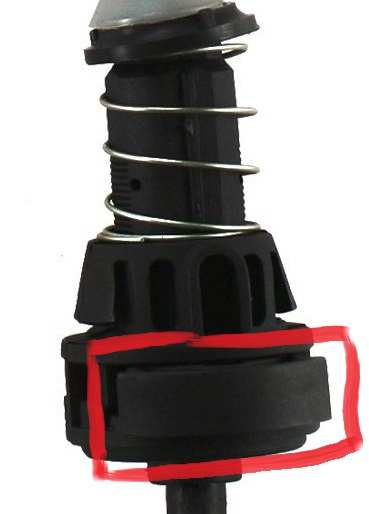
-
Park = Reverse, Rev=Neutral, etc., kinda
Gojira94 replied to AnotherOldJeepGuy's topic in MJ Tech: Modification and Repairs
The adjuster is on the top side of the cable bracket at the transmission end. The collar comes off with a couple of locking tabs and you can adjust the length of the cable to match the indexing on the PRNDL. Your issue is that the cable is now too long for some reason, that's why it's not going the full distance into Park. It may have slipped inside the adjustment collar due to oil/ debris. Since the locking collar material is a HDPE-type plastic, once the locking ridges distort a little and it slips, it may do it again after adjustment. Here's one writeup I saw out there with a quick Google search. If you get it adjusted and it does it again soon after, you'll need to replace the cable. https://www.jeepforum.com/threads/transmission-shifter-cable-adjustment.1439633/ -
AX-15 Spacer - Cushion to Crossmember (?)
Gojira94 replied to Gojira94's topic in MJ Tech: Modification and Repairs
First, welcome to the forum - the (IMHO) greatest MJ site on the planet... please add your VIN to the registry so it can be counted and recognized. I can confirm the mount plate bolted to the bottom has that riser layer on mine as well. But I think that's just part of the mount plate itself. I did keep the spacer I made handy in case I want to install it due to trans cushion sag under the weight of the transfer case. It's a common complaint of the current aftermarket/ parts house trans mounts.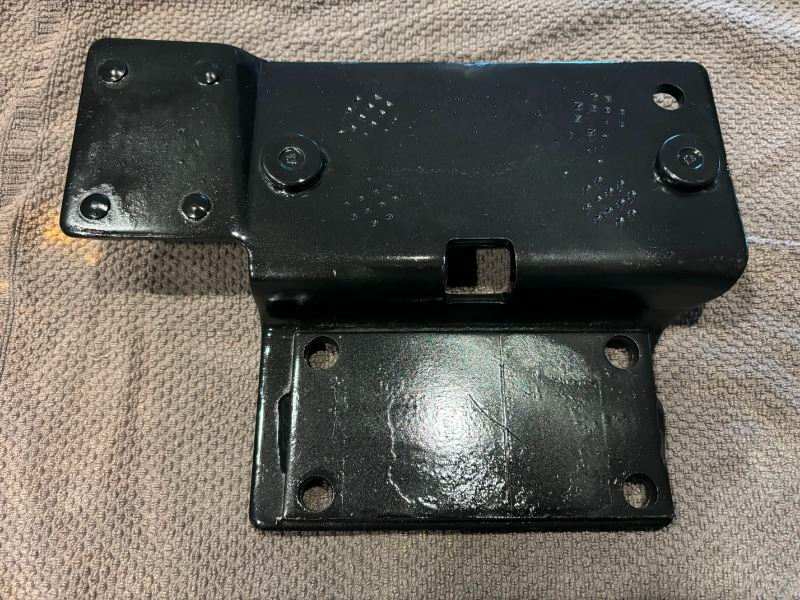
-
Started the day with another fuel pump replacement, found a NOS Bosch 69302 turbine pump. Went on to getting it up to temp and bleeding the cooling system.
-
What it took to get reverse lights...
Gojira94 replied to Gojira94's topic in MJ Tech: Modification and Repairs
3 cavity connector.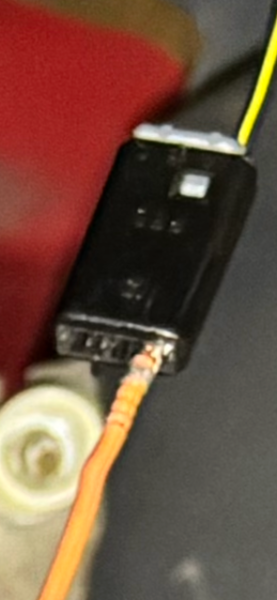
-
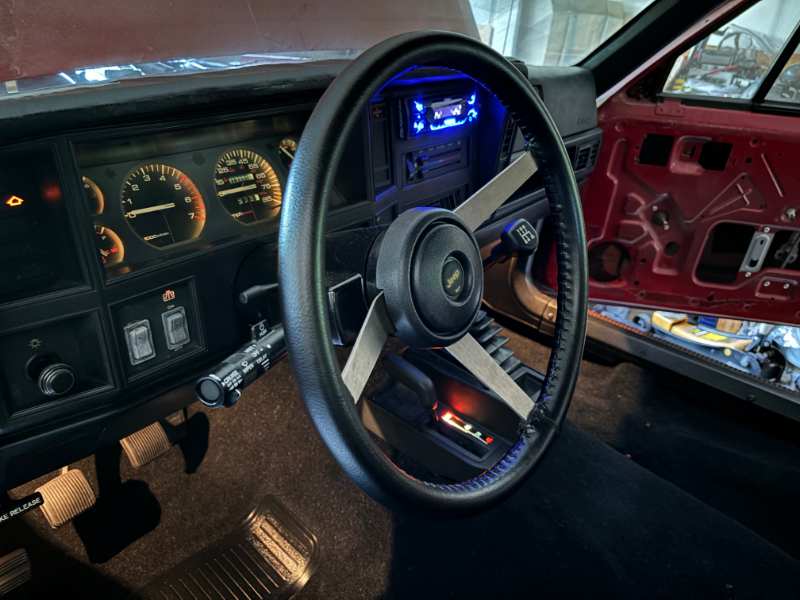
Tall boy shifter stick from a TJ. I kinda like it. In first it sits at 3:00 from the wheel about 4" away. The tall AX15 shift tower IS from a TJ so it's a shorter throw already. XJ/ MJ shifter on the TJ shift tower:
-
What it took to get reverse lights...
Gojira94 replied to Gojira94's topic in MJ Tech: Modification and Repairs
Pics on the 89 auto XJ don't show anything. I was focused on cruise parts and connections. What I can say for sure is that C111 (manual only) pin A for a 4L goes straight to pin H on C115. C111 pin B is power and passes through C100 C5 to the hot side of the trans fuse. What apparently is C115 (engine control harness side) on mine I'd ignored, thinking it was the emissions maintenance timer connector until I looked closer at the 87 and 88 electrical manuals and noticed 87 didn't have one. And the color of that BLK/YEL wire taunting me lol. Polarity of the reverse switch on the trans itself makes no difference, obviously. This is from the 87 manual, 88 is identical. Though 87 shows diesel-optioned connections.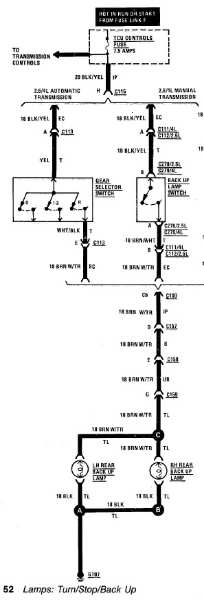
-
What it took to get reverse lights...
Gojira94 replied to Gojira94's topic in MJ Tech: Modification and Repairs
Well, one side in my pic above (larger connector with 3 wires) is attached to the instrument panel harness and shares a wire with the cruise power-cancel/ TCC unlock connector (also visible in pic above). The other side (small connector, upper right, one wire) is attached to the engine control harness. So I don't think so. I suspect I might have mismatched, by year and harness types, connectors for the 2 sides of C115. I took some pics under the dash of an 89 auto XJ when I was pulling my column and cruise parts from it. I'll have a look at those and see if I'm lucky enough to have captured anything relevant to this question. -
Let me preface this with an apology for being long-winded... My 1987 rig started out as a base 2WD, AX4, 2.5l. POs were in the beginning stages of 'making one good out of two' MJs. The engine harness MAY be original. The engine control harness is definitely from 89 or 90, no C101. The 1990 FSM shows C115 being the only thing on the tree besides the ECU connectors on the inside portion of the engine control harness. I strongly believe my instrument panel harness is original, 1987. Emissions maintenance timer wasn't in the electrical manuals until 1988, and mine has no provision for it. Now... C115. I have a theory, maybe some of you can confirm or correct- the type/ shape of connector C115 may have changed in 1989 or 1990. On top of that, if the engine control harness was for a manual, along with not having C113, two of the pins present in C115 for an automatic might be absent in a harness for a manual. Leaving just one wire- pin H, BLK/YEL. I'd have to see an unmolested auto MJ or XJ to confirm. So... I had no reverse lights. They're dependent on switched 12V in run/ start. Confirmed 12V power at the TRANS fuse socket, brown wire coming in through C100 pin C5 by touching a ground point with the negative lead of my meter. What I believed to be C115 on the IP harness side has continuity from the other side of the TRANS fuse socket on the BLK/YEL wire on pin H. That side of the fuse has another BLK/YEL wire going to "transmission controls." Pin K on C115, BLU W/TR goes to pin A on C260, cruise/ trans switch. Anyway, I tested continuity from C111, pin A, BLK/YEL to the lone pin populated in the engine control harness side of C115. There we go, confirmed. Next I took a leap and jumpered the BLK/YEL wire on these 2 very different looking connectors and tested. Et voila, reverse lights now work. Is there something I've missed here? I mean I can live with this, make it solid and neat and tucked out of sight forever, but surely... I must be missing something a little more obvious?
-
Off work from job 2 at 10PM, back on C100 TLC. LF turn signal now working. Conditioned all the female pins. A1 was slightly boogered. Took a little time with all pins on both sides, hoping my other issues can only benefit from the effort.
-
Yeah, I was surprised when I read that in the electrical manual. Most cars from that era the horn wasn't 12V switched. Go figure.
-
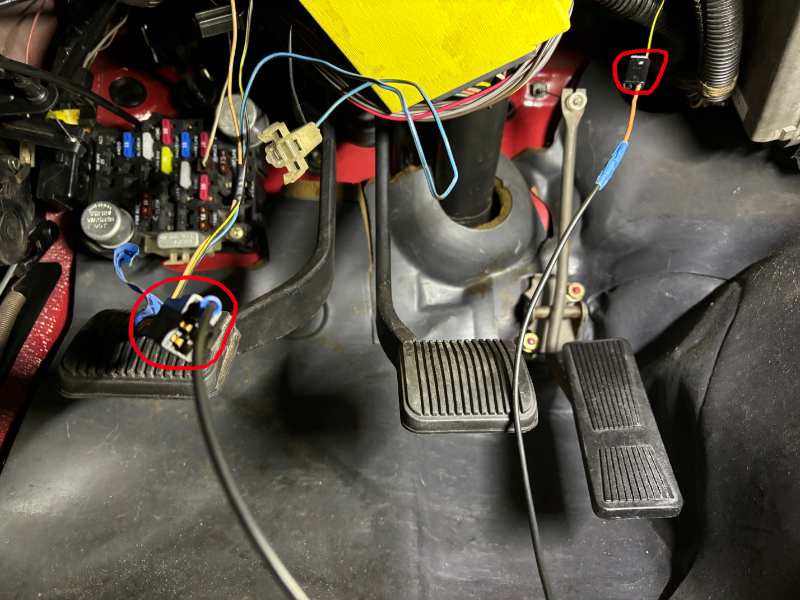
Battling electrical gremlins right now. So far: 1) Blower doesn't work. Back burner... 2) No power to turn signal flasher. Fixed. Involved pulling C100 apart and extra cleaning of contacts on the fuse box side. 3) LF turn signal gray w/tr wire is only seeing constant .3V w/ LF blinker on. 4) Reverse lights not working. Reverse lights switch definitely bad, found one locally. Back burner... 5) Horns not working, no click from relay. Back burner... Hazards/ parking lights work on all 4 corners, rear turn signals work, brake lights work. #3: confirmed continuity from C100 pin A1 to C102 pin 3. All other Front Lighting harness pins have good voltage/ ground. RF turn signal works after replacing socket with broken ground pin. Pulled C100 (engine compartment side) again, in the process of cleaning & tweaking contacts on both sides. Next check is continuity from C156 pin H to C100 pin A1 (instrument panel side). Lunch break over, back to day job...
-
I roughed in the uppers with about 1 1/4-1 1/2" thread showing for the approximate pinion angle. Also need to get the SOA and shackles done for the rear pinion angle setting. Then make final adjustments and nut and bolt the whole suspension. Working my way to the rear bumper, still in the cab lol. Lowers I set to make the wheelbase at first as close to 113" as possible. I came in right at 113.5" which should be fine, and help with that caster angle a few tenths of a degree positive. I left about .125" of thread showing on the lowers, and dead center in the drop brackets' adjustment range F-R.
-
Those drop brackets are nice, I really like mine. Be prepared to do a fair amount of very small grinding in the frame's LCA pockets to get the fitment just so. The bracket kit was welded together with a MUCH higher degree of precision than your MJ was Also, you'll find when setting the wheelbase with the Core 4x4 arms and the RRO brackets it'll want a very close to stock LCA length, with the arms adjusted just about to their shortest length, with the brackets set to dead center adjustment. That's what I found to be the case on mine, with about 6.75" lift up front on OME 2934 coils and ACOS.
-
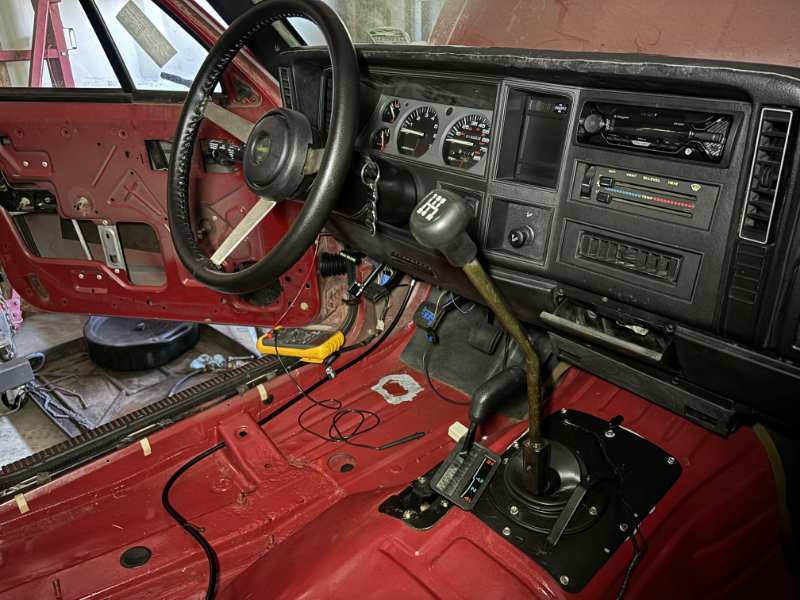
Group 34 battery does fit after all. Today she got cab harness, a battery, new hood release cable, door checks, stereo and speakers installed, wiring for the cargo light repaired. Last interior electric item is to finish up the feeds for the Euramtec lights. Then carpet, panels, and a seat!! w00t! Also... this afternoon at lunch break I got 5 gallons of 89 and fed it in. I've confirmed tonight there are no fuel leaks. Fuel pressure at KOEO/ prime is 38psi according to the mechanical gauge on the regulator. It spun strong and even... and barked off almost immediately. Before I remembered I'd pulled the IAC off and hadn't yet swapped in the Renix TPS. So I shut it down promptly lol. Tomorrow, hopefully a video of it running while I top off/ burp the cooling system.
-
-
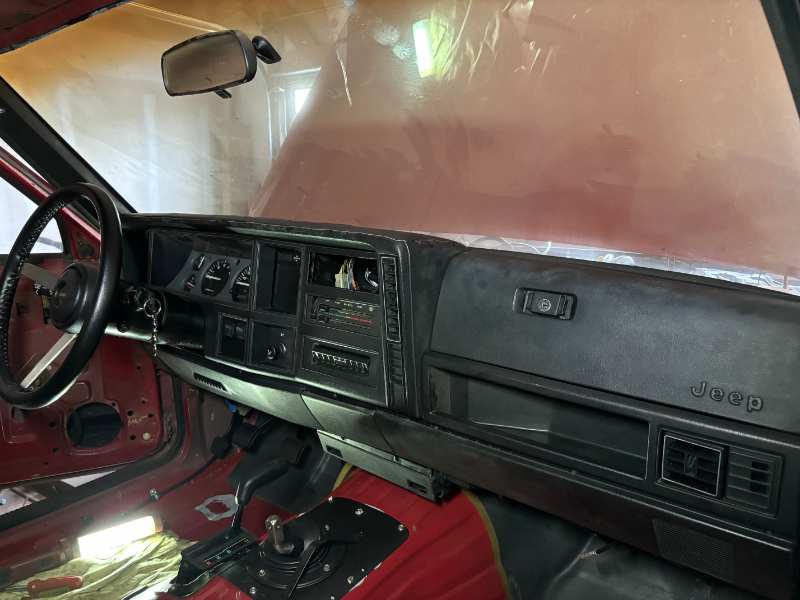
Dash and everything in it/ behind it is situated and secured. All the cruise components are fitted. Headlight sentinel and intermittent wiper module are installed. Also added footwell lamps. Next, I'm working my way back from C118 and C157 at the instrument panel harness, door speaker, dome lamps and cargo light. My truck has zero power options so no crossbody or actual door harnesses to deal with.
-
I guess I never knew better lol. First one I ever pulled in the boneyard was for my 92 Chevy C1500. That's how I did it, just dropped the column. It's easier in an XJ that has the parking brake assembly in the console/ tunnel. MJs with the pedal parking brake are trickier, with limited space at that brace bolt next to the chime module. I suppose the next time I'd try unbolting the steering box. Thanks for cashing my reality check...
-
Now it's on... like a pot o' neck bones!