
howeitsdone
-
Posts
691 -
Joined
-
Last visited
Content Type
Profiles
Forums
Gallery
Everything posted by howeitsdone
-
Someone was forever ago. But I don't think they're on here anymore. I'll see if I can put one together. I can't print it, but I can design.
-
Helper Springs w/ AAL
howeitsdone replied to howeitsdone's topic in MJ Tech: Modification and Repairs
The lift is a 4.5". So I'm thinking it won't really lift fully without the AAL. It'll be a camper truck so the added stability is a plus. Just not sure how much lift will come from the shackle itself. I think it's roughly 2" longer than a stock shackle. My gut says 2" longer = 2" lift, but I'm not sure. -
So apparently I have helper springs on the rear. I kept wondering what the extra springs were since I've never seen them. A Google rabbit-hole lead me to their name and had a photo. From reading, it's my understanding they increase payload stability. I don't mind leaving them on, but wondering if also doing an AAL with the drop shackle will be too much or not worth the hassle of removing all the rusty bolts. I'm assuming there is probably a slight lift from the helpers already.
-
89 Comanche Base Model Project Begins
howeitsdone replied to VagaBond Comanches's topic in Member Projects: Your Comanches
No real reason to replace your other components unless you want to or they're worn. 4"+ lift is that spot where everything needs replaced or dropped. At 2-3" you should be just fine. Someone will always suggest to upgrade everything even if you lift 1", but sounds like you'll just be driving around town so no real reason to spend the extra money IMO. If you post requests for part info or questions on the equipment/parts in the Tech section it'll get more eyes and responses. Can't wait to see with the turbines. My favorite style. -
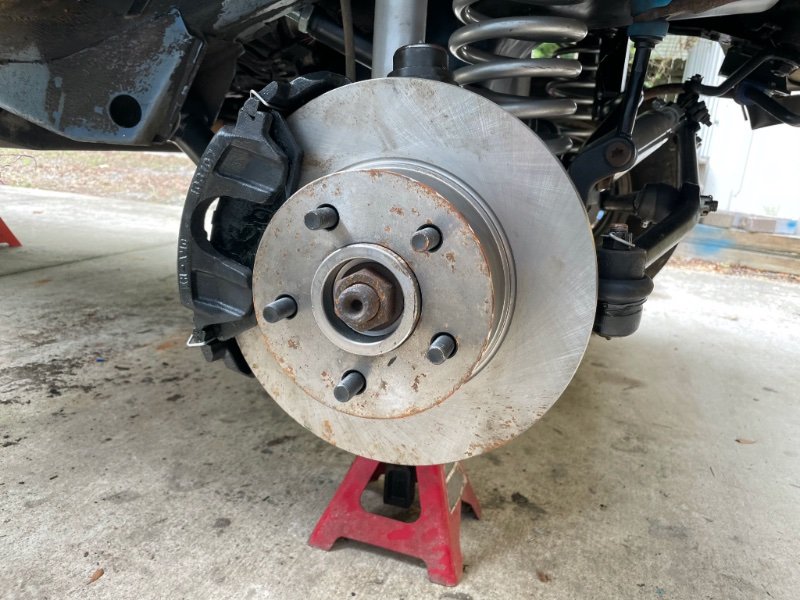
Back to work after taking some time off from the truck. New driver's knuckle installed after I ruined the original. If you saw the thread, you know... Honestly, it does fit better than the other one anyway so I'm happy I had to get another one in the end. Got the front brakes all mounted except for the lines. Still need to buy them. Not too concerned at the moment since the rear is in the process of being torn apart so it's not going anywhere. I'll have to swap out the pitman arm joint because the one in there currently won't accept grease. Tried 2 guns and multiple fittings. Good thing I accidentally bought 2 initially. The rear leaf bolts are quite fun... Got the two bolts that attach each leaf to the shackles, but having a tough time with the front ones. Got the nut off the passenger side after cutting down the bolt itself (too long for my socket to fit over) but now the bolt is stuck. Going to try and use the bj press and see if it'll pop out. Worst case scenario I'll have to take a cutoff to the head. The real challenging one is the driver's side. There is almost no clearance between the bolt and gas tank skid. Even if the skid was off, the tank is still too close to fit an impact up there. VERY cautious to use heat in that area too. Really don't want to drop the tank. Currently brainstorming. Took out the airbox and cleaned out all the squirrel treats. Replaced the "front" and "rear" vacuum lines with the Doorman replacements. The rear came with a hose that is too small for the air box nipple, so I sliced the inner part of the hose a few times to get it to fit. Then I replaced the oil filter and poured in the new oil. Started on the 1st try with a little love! I will need to replace the battery cables as the shielding is gone for the positive to starter. When I changed the filter, I went to wipe off the oil beneath and found a bunch of goo. When I grabbed it to inspect I thought it was red RTV that someone never cleaned up. Nope, that was the plastic shielding of the cable...

-
My Ryobi drill would overheat and slow down so it wouldn't really take any material off. The press obviously didn't have that issue so it kept on drilling. Essentially, yes, it removed more material.
-
UPDATE: This did & did not work. While it enlarged the hole enough to fit further onto the ball joint shaft, the nut bottoms out & now the threads block the hub bolt. Also note in the photo that the cotter pin pretty much does nothing. It appears this is how they were designed for some reason. So I took the Spicer bj and installed it in it's place since it's about 5mm shorter, but now there is a gap. I used the Spicer joint as a constant checkpoint when reaming out the hole to make sure I didn't go too far so I'm not sure how it's not lining up. On the other hand, Amazon screwed up and the castle nut and cotter pin were not included in the box so I can't even tighten it down to see if I'm good. Both joints are different threads. I have a very sneaking suspicion this will lead to DW though as it's the only real weak link in the system. So I'm thinking I will have to source another knuckle after all of this work.
-
This has been solved. Needed a drill press. Thanks for the help.
-
1991 Eliminator Resto-Mod
howeitsdone replied to ghetdjc320's topic in Member Projects: Your Comanches
That's a good looking floor! -
It's whatever looked close to me when I was at Oreilly's. I think it's DupliColor, but not make specific. Kinda looks like it though right?
-
Back Tires don’t fitting
howeitsdone replied to Hi..mynameisHeep's topic in MJ Tech: Modification and Repairs
If you're able to put them on the front then they are not JK wheels. Those wheels are 5 lugs on 5". A Comanche is 5 on 4.5". You would need an adapter to mount the wheels. As stated above, unfortunately these will not work. -
Finally went ahead and tackled the VCG. 1000x easier than the oil pan gasket Decided to give it a face lift also. Color doesn't quite match. I'm sure I'll change it down the road, but for now it's way nicer than looking at oil residue.
.JPEG.b787509bedf23ceecaeb741b5e8dd512.JPEG)
.JPEG.b01e60253531b64a1384572726942e1c.JPEG)
-
Yes I did. A handheld one. I have access to a drill press if needed.
-
Used the reamer you linked in your thread from RC. Sprayed it with oil and tried to ream the upper hole in the knuckle like you said. I got about the same result as you posted in this thread.
-
Upper Control Arm Bushings
howeitsdone replied to CGCWO's topic in MJ Tech: Modification and Repairs
This is what I used to remove and install. A Ball joint press. But I also had my axle out as well. https://www.amazon.com/dp/B01N7CO50E?psc=1&ref=ppx_yo2_dt_b_product_details -
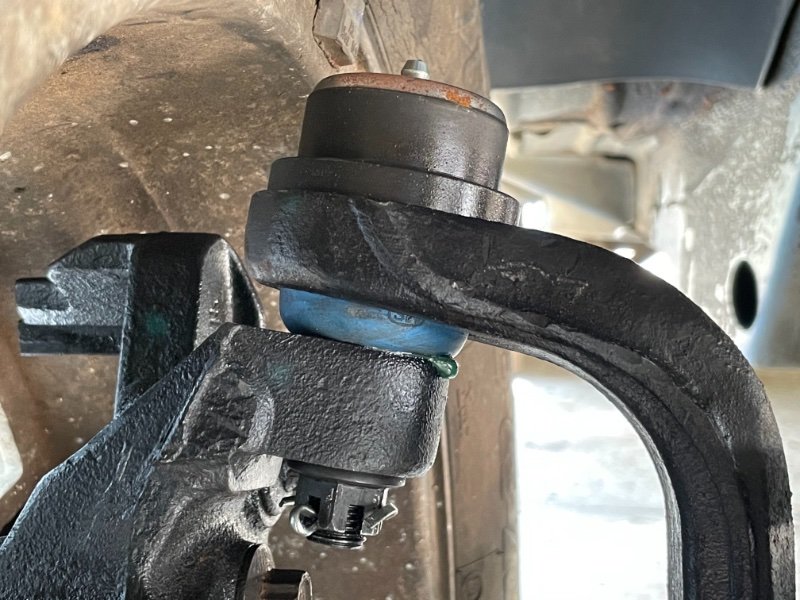
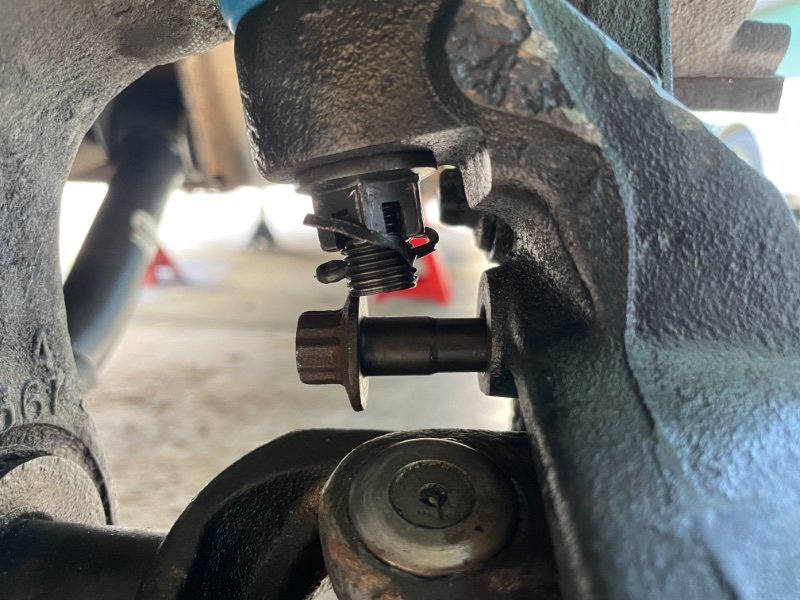
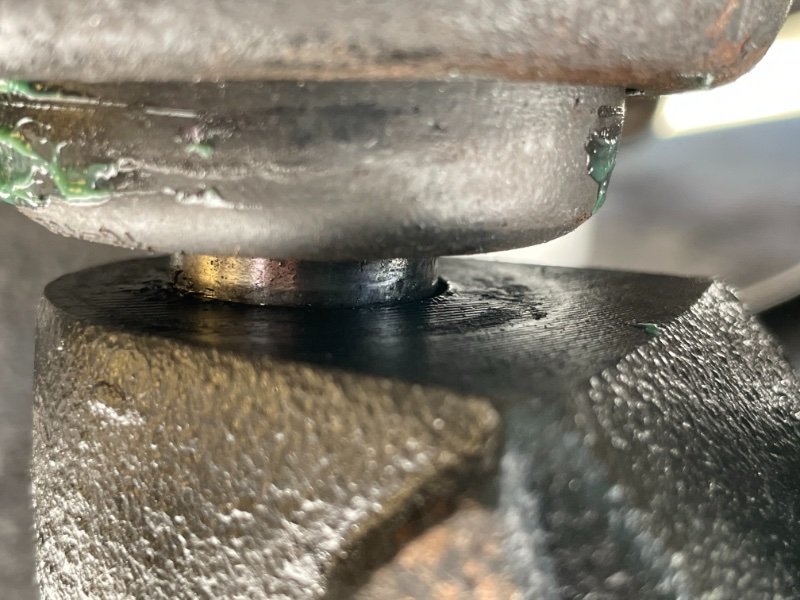
New ball joint and reamer came in today. Put the Spicer joint up to the knuckle and while the gap wasn't as bad, it still remains. No bueno. So I took the reamer to the knuckle and it took some material from the bottom, but, like mentioned, would never take any off the top. So my problem still exists. I spent about an hour trying to ream out the hole with no success. @Jeep Driver how did you end up fixing it?
.JPEG.680f75a4aa2a2dfd1b5cf30e856deed8.JPEG)
-
Back Tires don’t fitting
howeitsdone replied to Hi..mynameisHeep's topic in MJ Tech: Modification and Repairs
Would that make the wheel too small? If it came from a Wrangler then it should fit, right? Guess I just can't picture it. -
Back Tires don’t fitting
howeitsdone replied to Hi..mynameisHeep's topic in MJ Tech: Modification and Repairs
I would highly recommend against grinding your tire OR the wheel. I've never heard of someone grinding a tire, but doesn't sound like there is a happy ending involved. There is no 2008 Jeep YJ. Do you mean JK? Because you'd need spacer adapters to make it work with the lug pattern. Sounds like there is something strange going on here... -
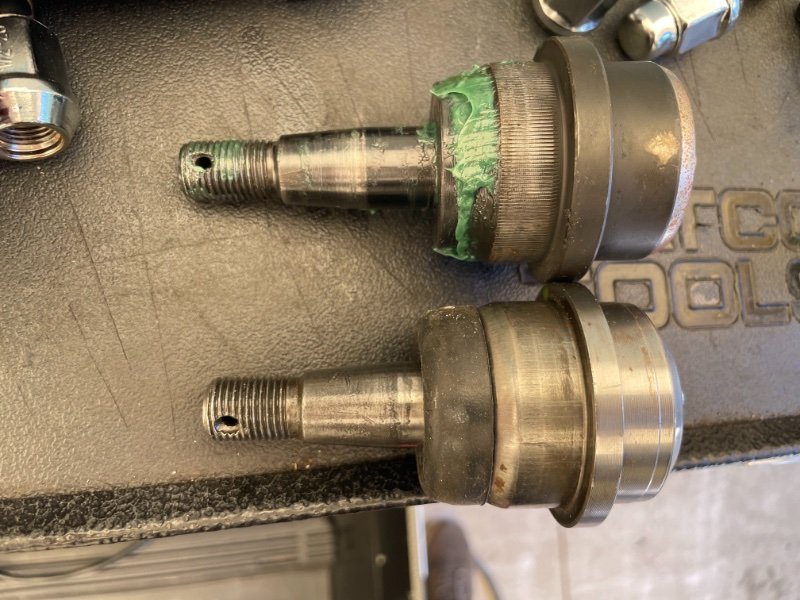
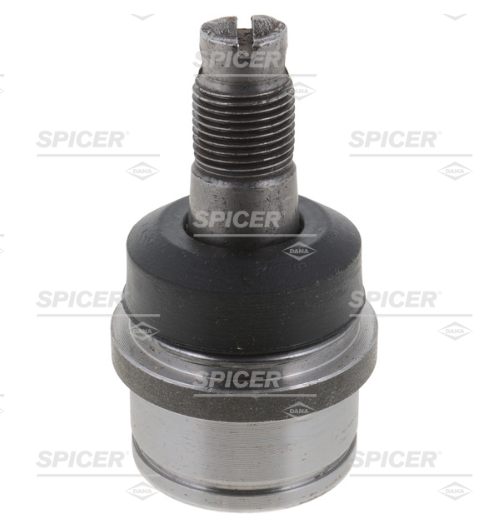
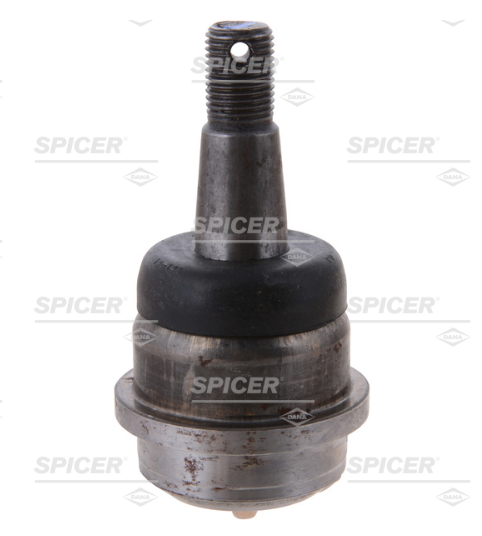
I found it strange that Dana offers 2 different BJs for both upper and lower on the MJ D30. It states in the description that one is specific to reverse rotation. How that makes a difference? I don't know. The LP D30 wasn't even offered on the MJ IIRC. I searched for a long time last night to find the individual part numbers that came in the 83500202AB kit but ended up empty-handed. Even the parts catalog just list the kit instead of each one. After looking at the pictures, it appears that the 40112 (03820872 or 5950542) may be too short of a stub. Also looks more like a lower to me. And 40916 (53000707) looks pretty close to what the new one looks like, but a slightly shorter/smaller tapered shaft. So I went ahead and ordered the 40916 to experiment. Now, Spicer states that these parts fit all 3 versions of the knuckles. Which I thought was strange assuming they changed the taper. And if the taper changed in the knuckle but not in the joint, then to me that is much more prone to DW of some sort. I really don't want the answer to be "buy Spicer", but I guess we will wait and see.
-
Went ahead and purchased the reamer. I'll keep this thread updated on results. Should be here Friday. I also purchased the Spicer 40916 just in case. If it works, I can easily return the reamer, but if it doesn't then I can just return the ball joint back to Amazon. Either way I figured I'd experiment. After thinking about it, it's awfully difficult to bend cast metal like that without a great amount of heat.
-
Not dismissing it, but what exactly would this affect other than the angle the UBJ sits? The LBJ shaft is moveable so I can move it around to try and get the knuckle mounted, but it just won't go up any further. I was thinking about doing this, but I've already purchased all the brake parts and hubs for the pre-90/91 knuckles. I can return the hubs, but the other parts are past the window. I think I also need to purchase the calipers that match too, right?
-
That's what I feared. I suppose my options are either spend $80 on a reamer or about double that on a JY axle with 3.55 gears to upgrade my 3.07s. But that means I'll also have to upgrade the rear axle with it.
-
Damn Pete, starting up a parts/service department?
-
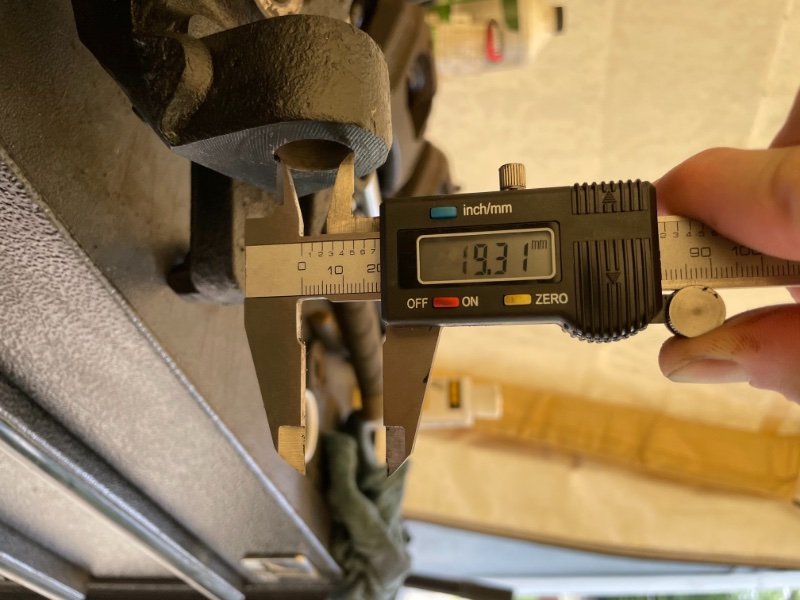
My initial thought was to use a reamer, but I wanted t make sure I'm not ruining the knuckle that way. I also was curious if there may be another reason, but after measuring it seems to be a bit oblong. I also don't know what the factory size is either. I can measure against the other side but I'll need to take it all apart to do so.

-
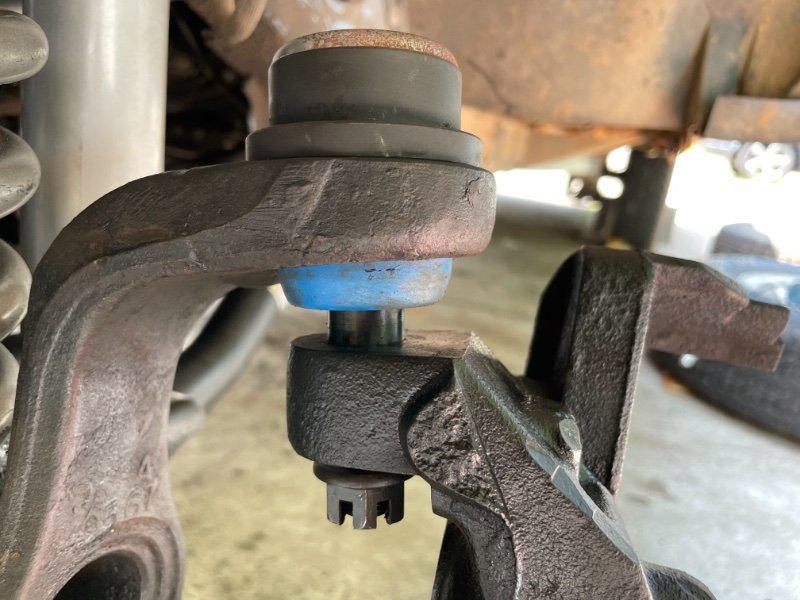
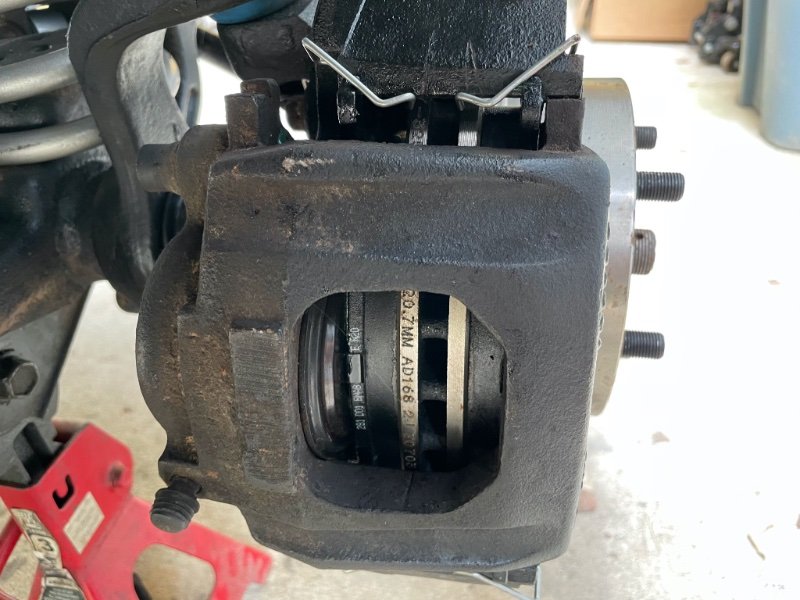
I only found 1 other post on this when I searched, so if I missed another post feel free to link it. The UBJ on the driver's side won't seat into the knuckle properly. The passenger side (pictured) is just fine. I used Mevotech 3134 & 3137. This is the only one out of all 4 giving me an issue. I no longer have the original ball joints to compare thickness, but I can tell you they were aftermarket with fittings. Wondering if this means I bent the knuckle when trying to remove the frozen hub? I don't want to "just buy Spicer" but I'd rather figure out the possible causes to then come up with a solution.