

JACKED88
-
Posts
529 -
Joined
-
Last visited
Content Type
Profiles
Forums
Gallery
Everything posted by JACKED88
-
All men should have what I refer to as "hide-a-bucks". Any time I get a little cash the wife doesnt know about it goes directly into my hide-a-bucks stash. I've had it as high as $1000 bucks but ended up having to use it to pay a few bills that couldnt wait. Needless to say the wife was shocked when I whipped out $900 bucks to pay the civic association bill we owed for the last two years. (the sob's were threatening foreclosure) I do all kinds of things to earn a little extra cash. Here lately I've been collecting scrap metal. You'd be surprised what people set out on the curb on trash days. Everything from appliances, bed frames, BBQ pits, lawn furniture and the list goes on. Over about a 2 week period I just drug my trailer around the neighborhood the night before garbage pick up. My last load was kinda small but it still brought me $178 bucks. Been doing some little side jobs too. Fixed a water leak for a neighbor. $50 bucks. Worked on another neighbors swimming pool equipment for another $50. All total for about 4 hours of work ..... $278 bucks. About a month ago I did some pressure washing. Charged um $125 bucks. All I'm saying is where there's a will, there's a way. You just gotta keep your eyes and ears open. The trickiest part is not letting the wife know how much your making. I'm not getting into that. Your on your own there. Good luck.
-
No doubt. Lighten up. Thats some funny sh-t. Besides, I thought ole George looked pretty good in that Challenger. :rotf:
-
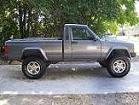
I gave it a bath. AINT SHE PURDY??? And detailed the interior ........ (oops, looks like I missed a spot inside that passenger vent) Consider it done. I don't need a new truck to get that "pride of owning a new truck feeling". I get more looks and more compliments on this 22 year old truck than most people get on their brand new ones. Gotta love it!!!
-
OK, although the noise itself is constant, does it have a constant rhythm? Or is it more sporadic like your description of a loading hard drive? Without a constant rhythm leads me to think its more of a rattle. If you pretty certain its in the valve train, pull the valve cover and see if there's something loose or rattling around on top of one of the rockers. If there's nothing visible and although its gonna make an oily mess, start it up with the valve cover off and try to pin point the noise. (some rags laid on top of the intake and along the other side of the head will help catch some of the oily mess)
-
I've never heard of the word "marbley" but for the sake of this diagnosis we're gonna go with it. :rotf: I'm assuming by "marbely" your talking about the way a hand full of marbles sounds when rolled around in your hand. Right? First, I've never heard a valve train make any kind of a "marbely" sound. Tick tick .... yes. And even a low "grumbley" sound when heard through a scope or screw driver as they all work together but never a loud enough marbely sound to be audible by the naked ear. Noises have a funny way of jumping around in an engine compartment. OK, maybe not jumping around but sounding like their coming from somewhere other than where they actually are. By your "marbely" description, I'm thinkin Idler pulley. Remove the belt and check the idler pulley bearing. Quick test to eliminate other accessory bearings ........ While the belt is off start the engine for a few seconds and see if the noise in still there. If no noise, you now know its something the belt turns. Turn all the pulleys by hand and see if they feel smooth. Check for excessive play too. (try to wiggle um back and fourth or up and down) If none of the above, try listening down around the distributor and on the front of the engine near the timing chain. BTW, for listening to the engine a pc of dowel rod or even a cut off broom stick works too. Unless you have a screw driver thats 2 feet long, they can also give you a longer reach. I use a pc of 3/8" dowel rod thats about 2 feet long. Like the handle of a screw driver or a broom stick, I rounded off the end so its a little easier on my ear. Works great.
-
Does being a Comanche addict who's addicted to their nightly fix of Comanche Club :bowdown: qualify them as an active user? If so, count me in. :thumbsup: Addicted??? Naaaa, not me. I just need a little bump now and then. :chillin:
-
Well ..... it looks like you know what your doing and do pretty nice work. But I still think your best bet is to find another bed. Your labor may be free but your gonna end up with a pretty good chunk of change in materials. What about all the rust in places you can't reach? You know its gonna continue to spread. Sorry, but there's just no way I'd put that much time and money into that bed. To bad your so far away. Otherwise you could buy this bed for $275 bucks. As you can see, its only damage is that small dent just above tail light. Or this one less the parts I'm taking off of it. (tail gate, lights & flares) Its only damage is that small dent you can see in rear quarter. Yeah, it pretty @%ed up for me to tease you with these rust free beds knowing their too far away for you to consider buying one. Its just my way of getting you to think about it before you waste your time and money on the one you have.
-
Best way to keep the AW4 cool?
JACKED88 replied to Jerry's topic in MJ Tech: Modification and Repairs
:agree: Sometimes I forget I'm talking to people who live where cold weather is a factor. That being your case, use both coolers. -
Best way to keep the AW4 cool?
JACKED88 replied to Jerry's topic in MJ Tech: Modification and Repairs
Most if not All auto trans vehicles have a small cooler in one of the radiator tanks. Problem with um is your trans fluid can never get any cooler than your engine water temp. As your trans gets hotter, the heat from its cooler can and will raise your engine operating temp. As a result your trans and engine both end up running hotter. This is easily eliminated with the installation of a trans cooler thats separate from your radiator. As Eagle pointed out an external cooler mounted in front of your radiator/ac condenser is the best solution. -
ON!!!Why??? Because those rails are one of the very few factory/dealer accessories that were available for our trucks. In other words, If you've got um .... flaunt um. Kinda funny in a way. If you didnt have any you'd probably be looking for some. But since you do, you can't decide if you want um. :dunno: As before, although I'm a little prejudice I say ON. EDIT .......... On second thought after taking another look at your bed, definitely OFF. I'm sure there's somebody on here who'd like to have um. Sell um and save up the cash for a new bed.
-
1200 is pretty hot. Keep in mind your gonna have to get the thin walls of the tank close to the same temp for the rod to stick. If your tank has pin holes that means its probably rusting from the inside out. If thats the case your likely to burn an even bigger hole in it. IF .... you could find some, this is what I used to repair pin holes in a 40 gallon built in tank in one of my boats. http://www.amazon.com/Bondo-Marine-Epox ... B0009LPISE That stuff is great!!! Its impervious to gas and still holding after years of pounding waves in the Gulf of Mexico. Problem is I can't find it anymore. :headpop: I used a disc grinder and cleaned the entire bottom and about 3 inches up the sides of the tank. The grinding disc did a great job of not only cleaning it but also made the surface rough enough for the epoxy to adhere to it better. I then mixed the epoxy and painted it on. Then I covered the bottom and up the sides with fiberglass mat. Once matted I painted on enough epoxy to soak the mat completely. Once it hardened it was done. Trust me when I tell you out in the gulf is no place for fuel to be leaking into the bilge of your boat. That sh-t works. Short of finding some Bondo 2 part Marine Epoxy epoxy ..... try one of those 2 part epoxies you find in self measuring tubes at the hardware store. Just be sure to find one thats impervious or at least says its resistant to chemicals/gas. If you prep the area properly one of those aughta work fine. You could also try Permatex fuel tank repair. http://www.permatex.com/products/automo ... Repair.htm Other than JB Weld (in which I've used with some success) I don't really care for putty type repair products. Putty can't get into the pores of the metal like a liquid can.
-
Drain the tank, fill and rinse with water a couple of times. It'll still smell a little gassy but it aughta be good to go. (test leaks with water in case you have to do um again) You mean to tell us all that flame throwing was just the idle screw??? :shake: I've never seen an idle screw make an engine backfire and throw flames out the carb. Oh well ..... glad to hear its running.
-
First .... what exactly does "grinding" smell like? :dunno: Have you checked your brakes? You may have one that's sticking.
-
Compression sounds good and your valve lash should be OK. If the pre-owner pulled the rotor assembly its possibly that he didn't get the key way key in properly. As a result allowing the rotor assembly to slip on the crank shaft causing the ignition timing be off. Remove the rotor assembly and be sure the key was first re-installed and second re-installed properly. You should have that thing running in no time. Have fun!!!
-
Popping back through the carb does sound like a timing problem. Being an 86 model and no telling how many hours are on it or how it was ridden, I'm thinking worn/stretched timing chain. As you may know, when the chain gets worn and stretched it will start causing excessive wear to the timing chain gears. Once that happens it is very possible for the chain to slip a few teeth making the crank and cam to be out of time. Only way to check it will require taking a few things of the motor. First being the valve cover and the second being the left side cover exposing the stator and rotor assembly. 1. Rotate crank to top dead center. The key way on the crank shaft should be pointing up. (you'll have to remove the bolt in the end of the crank shaft to see it) 2. Remove valve cover and check cam position. There should be a mark on the cam gear that also should be pointing up. Both cam lobes should be pointing down. 3. If none of the above line up properly, the timing chain is most likely stretched to a point where it jumped time. (slipped a few teeth either on the crank or the cam gear. If thats the case, replace the chain, cam gear, and both chain slippers. Here, this might help ......... http://www.kawasakipartshouse.net/pages ... KgoddlaTDg There is one other thing that can cause the timing to be off. That being the key in the key way for the crank shaft and rotor assembly has sheered. Again you'll need to remove the bolt out of the end of the crank shaft to see the key way on the crank and rotor. If they are not in line with each other you have found your problem. Remove the rotor assembly and replace the key way key. BTW .... There is no adjustment for the ignition timing. Only the cam to crank shaft timing or a sheered key way key can cause a timing issue. WAIT!!! HAVE YOU DONE A COMPRESSION TEST??? You could have a stuck intake valve. That or one thats staying open a little due to being out of adjustment. (too tight) Remove the two screws holding the intake rocker arm cover and check your valve lash.
-
Fuel pump suddenly got loud
JACKED88 replied to JACKED88's topic in MJ Tech: Modification and Repairs
The pump description says its a kit and as such comes with the strainer. $50 bucks with the strainer included sounds like a pretty good deal. I'll shop for other brands before I order one since Airtex has about a 50/50 reputation on their pumps. I know they weren't building um themselves so does anybody know who was supplying AMC/Chry with their factory pumps? My guess would be Carter. -
See this thread .......... viewtopic.php?f=2&t=25934 No guarantees but that likely to be your problem.
-
OK, its time to get back to work on my light bar. With winter on its way and daylight saving time coming up its gonna be getting dark by 6 o-clock. Gotta have good lights to run my traps at night. Nothing worst than walking up to a trap with little piglets inside and unknowing a pissed off mother on the outside thats about attack your a-ss while your standing there in the dark. Not happenin!!! I want enough lights to make it look like daytime out there. Its been a while so in case yall forgot what I'm building ......... I've got the angles I want figured out so all I really need to do is tack weld it together for proper fit and final welding. And yes, I am going to weld a pc of flat steel to the uprights that will go down between the bed and cab. No holes will be drilled in the front wall of the bad. Those pcs will be bolted below the beds floor level into the the part of the bed (or should I say side of the bed) that wraps around behind the cab. :huh???: Yeah I know ..... pix will be easier. I'll take some in a few days. Meanwhile ....... I was doing some front right running light repairs today and decided to go ahead and replace my bumper mounted fog lights with a couple of the spot lights I bought for the light bar. The new spots came with wimpy 55 watt bulbs so already knowing I wanted um to be brighter I had already replaced the 55's with 100's. WOW!!! What a difference. Now I need to bypass the relay that only lets you run your fog lights when your headlights are on dim. Once the light bar is finished and if I'm satisfied with its lighting performance, (and I think I will be) I'll probably go back to fog lights on the bumper.
-
Blowing same fuse every two days
JACKED88 replied to Rustybucket's topic in MJ Tech: Modification and Repairs
I had the same problem with the right running light not working and the in dash light staying on all the time. I replaced my right socket today with a new one I got from O-Reilly in their lighting help isle. The product name is Dorman with part number 84716. Yes, it says its for a Ford but it works on our Jeep trucks. Warning!!! Although the colors of the wires on the new replacement socket are the same colors as on our trucks, (black. brown, blue) the brown wire and the blue wire have to be swapped for it to work properly. (brown on truck to blue on socket / blue on truck to brown on socket) (black to black is OK) I tried hooking it up by matching the colors but ended up with a very bright running light and a very dim blinker. After swapping the brown and blue wires it works great. Oh, I did have to do one more thing. When I installed the new socket into my lens, the seal didn't seem very tight making the socket feel kinda loose. I fixed it by removing the seal off my old socket and added it on top of the new seal on the new socket. Now it has a nice tight fit and seal. -
Fuel pump suddenly got loud
JACKED88 replied to JACKED88's topic in MJ Tech: Modification and Repairs
I tested the resistor by disconnecting it and putting a jumper wire on the two wires. The result was no change in pump noise. Same here. When it was making noise it was also vibrating more than normal. I'm gonna buy/order one next week. Anybody know if the ones on ebay for around $50 bucks are any good? http://cgi.ebay.com/ebaymotors/ws/eBayI ... K:MEWAX:IT This one is an Airtex. -
While driving around checking my hog traps today I noticed a humming noise coming from my truck. I turned it off to be sure it was in fact coming from my truck. Turned the key back on and sure enough it's my fuel pump. Till today the pump has always been pretty quiet. My guess is its on its way out but wanted to ask if anybody else has had this happen. Suggestions??? Decided to do another little test before finishing this thread. Its been several hours since I drove it so I just went and turned the key to on and listened to the pump again. Apparently now that its had time to sit and or possibly cool for a while the pump sounds normal now. I also checked the porcelain fuel pump resistor by putting a jumper across the two wires but got no change in pump sound. Guess I'll have to drive it around for a while and see if it gets loud again. My luck it'll quit leaving me sittin on the side of the road. :(
-
Measuring a cylinder wall score
JACKED88 replied to Geonovast's topic in MJ Tech: Modification and Repairs
Your worried about those little things??? I'm betting they aren't any more more .005-.007 deep. Boring that cylinder .020 should be more than enough to clean um up. Of course that depends on how much wear the cylinder has. The piston ridge looks pretty deep so if it's worn any more than .010 over you'll probably need to go .030 to get the scratches out and to make sure the cylinders are straight and round again. Good luck with it. :thumbsup: -
Nope, I don't have any pix but I'm sure my mother does. The one my parents bought new was a 1962 Apache Eagle. The best I'm gonna be able to do are these brochure pix I found on the web. It had the additional canopy. I had forgotten that mechanical problems weren't the only reason my mother finally had to let it go. A tree fell on it forcing her to get rid of it. She cried as she watched it get loaded onto a trailer headed for the scrap yard. Needless to say there were lots of good memories in that thing. (see pages 2 & 4) http://www.popupcamperhistory.com/apach ... hure.html# Here's a brochure of a 1969 Mesa like I bought for my family sometime in the early 80's. (see pages 4, 5, 6 without drawers & 7) http://www.popupcamperhistory.com/apach ... hure.html# Our 69 Mesa didnt have the stove or sink. It did have the table and benches that made into another bed and a storage cabinet that flipped up to be a counter top.
-
smokey cab, where can it be coming from?
JACKED88 replied to lostissues's topic in MJ Tech: Modification and Repairs
The resistors in the resistor pack get hot enough to burn leaves ... :doh: Your right. I forgot about the resister coils. That'll do it if his rodent buddies carried a bunch of who knows what in there. -
smokey cab, where can it be coming from?
JACKED88 replied to lostissues's topic in MJ Tech: Modification and Repairs
If that was my truck and I intended to keep it for a while, there's No way I'd do all that work and not go ahead and replace the 20+,- year old heater core. :nuts: BTW, although you may have a rodent issue and need to clean out their debris, there's just not enough heat created within the heater system or anything else under the dash to burn leaves. The heater being able to burn leaves would be like laying a dry leaf on top of your radiator and expecting it to burst into flames. Not gonna happen. The only thing on an engine that will get hot enough to actually burn a leaf is the exhaust manifold/header pipes and possibly the first half of the exhaust system. Beyond the catalytic converter it's not really hot enough to burn anything but you. Melt? Yes. Burn? No. Are you sure your little rodent buddies haven't built a nest on top of your exhaust? Try looking under the intake manifold on top of the exhaust manifold/header pipes. They seem to like it there. Also look on top of the exhaust pipe as far back as and including the catalytic converter. It'll be interesting to know what you find. :dunno: