

JACKED88
-
Posts
529 -
Joined
-
Last visited
Content Type
Profiles
Forums
Gallery
Everything posted by JACKED88
-
Thanks for sharing tha pix. :thumbsup: Whats with tha spacers? I assume you had to use those to make tha receiver level. Is there a season why you couldnt have put that bolt through um? By no means am I knocking your installation but it looks like that thing hangs pretty low.
-
Nice work. :thumbsup: I'm still gonna modify mine by making um out of 3/8" plate and adding that couple of inches to tha bottom for recovery hooks/clevises. Weather they ever git used or not they'll look tough hangin there. If I ever need to use um :help: I think 3/8 material should be plenty strong to be pulled out of an average ditch or mud hole. I know there's still front hitches available but does anybody have a template for one? I'd like to build one tha same way for tha front.
-
I think if you welded the H/F receiver to the cross section properly it'll have plenty of strength putting very little stress on tha bumper. You wouldnt necessarily need to bolt it to tha bumper at all. But by doing so it would make tha whole assembly that much stronger. On my Curt receiver tha bumper mounting plate and the receiver itself are flush in the rear meaning both can be welded to the cross section. It aint goin no-where. Your right about tha Harbor receiver. You can't buy tha materials for $16 bucks much less tha time it'll take to cut and weld it all togather. IMO its money well spent let alone tha time saved. As for tha tow rings ..... as long as your pulling straight it should be fine but to be honest I was going for looks more so than functionality. You can buy/build a recovery hook to go in tha receiver. Back to tha rings, there's no reason why a person couldnt go extreme with 3/8" or even 1/2" plate for their mounting brackets. You'd bend tha frame or break tha bolts before you bent two pcs of 1/2 plate. That and we could use the additional weight in tha @$$ anyway.
-
Thats pretty cool :thumbsup: as long as you don't have a lift or need to run a drop receiver. :hmm:
-
Thats a great idea so long as your truck isnt lifted and you don't need to run a drop receiver. Why again was it you said tha plate couldnt henge upwards? :hmm: Couldnt you make a hook out of clothes hanger wire or something going from tha top edge of the bumper to tha bottom edge of tha plate to hold it up and out of tha way? Instead of wire, how bout a spring thats just strong enough to overpower tha plate brackets spring? :dunno:
-
Wouldnt it be easier to take a MJ hitch and make side plate templates off of it? Thats how I intend to do mine. I already have a hitch something like that Harbor Freight one mounted to my bumper. When I weld my 2" square tubing cross pc between the side plates I'll do so in a location that will allow me to weld that Harbor type hitch to the rear face of the cross pc. I'm also gonna change tha side plates a little. I'm gonna add a little more material so tha side plates extend down below the cross pc enough to drill 1/2 holes for recovery hooks/clevises. I can't draw like you so I edited your drawing to give you an idea what I'm talking about. (like you I didnt include tha safety chain slots) Here's a pic of a Curt receiver like I have on my truck. Bought mine still new in its box at a garage sale for $5 bucks. I've drawn how it'll be welded to my cross pc. Tha two large holes on top are the ones used to bolt it to the bumper. Keep in mind that receiver will be bolted to the bumper so I'll have to tack weld everything from the bottom side and then remove the entire assembly for final welding.
-
You talkin about on a bar napkin or a real set of prints/drawings?
-
No doubt you got lucky on that one. You did buy both of um RIGHT???
-
I've just completed an extensive search for an MJ receiver hitch. Notta!!! Draw Tite made all of U-Hauls hitches and having talked to them there are non available. They gave me phone numbers to several of their larger retailers none of which still had any in stock. I went as far as to ask if Draw Tite would be interested in doing a limited production of receivers for the MJ enthusiast community. I'm supposed to get a response sometime today or tomorrow. I'm also supposed to contact their tech support for universal hitch options for our trucks. As far a universal goes I'm thinkin it may have to be their 37152 in which is still being produced. Unless you happen to find one on still sittin on a retailers shelf their universal 37042 is no longer in production. BTW, Draw Tite not only made all of U-Hauls hitches. They also make both Reese and Hidden Hitch. Good luck finding a rear receiver hitch for your MJ. There's plenty of front mount hitches if you don't mind pulling your trailer down tha highway in reverse. :huh???: Yeah, you can still buy a front receiver but not a rear. :nuts:
-
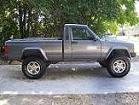
Build one. Here's tha best pic I could find of a new U-haul receiver hitch for a 86-92 Comanche. No its not mine. :( It looks like a pretty simple hitch to build having no special bends in the frame brackets. Thers's a couple of mounting tabs sticking up but I wouldnt think they'd have to be exactly like tha ones shown. Yeah, tha bolt holes would have to be exact but tha rest of tha brackets are nothing that couldnt be done with a cuttin torch and a grinder. As for tha square tubing, its just cut to length to fit between tha brackets. Pc a cake. :thumbsup:
-
Tha wife and I did something Sat night we havent done in 30 years. NO, git your mind outa tha gutter. LOL!!! We were given some tickets and went to tha Foreigner and Styx concert in the Woodslands. We got there late and ended up missing most of Foreigner but hearing Styx was worth tha trip. I thought they put on a pretty good show getting everybody in tha whole place singing a few of their songs. We enjoyed getting out for a change plus it brought back some OLD memories. can't believe we havent been to a concert in damn near 30 years. Last one before this was Sammy Hagar and I don't even remember who was with um. This was tha first time either of us had been to tha pavilion and have to say its pretty cool. Next time we want floor seats instead of tha lawn seats we were given but we didnt complain. Tha ground was pretty wet having just gottin all tha rain we had tha night before. All and all we had a great time and are gonna see about getting tickets to up coming Lynard Skynard concert. If you Houstonians have never been you really aughta go sometime. As above I highly recommend tha floor seats otherwise count on sitting on tha ground or renting lawn chairs for $6 bucks each. No, you can't bring your own chairs and be sure to leave your pocket knife in tha truck. Otherwise you'll have to take it back to tha truck or leave it with security at tha gate and pick it up when you leave. I wasnt walking back to to tha truck so I left mine at the gate along with tha TWO my wife had in her purse. Never knew she carried one much less TWO plus a little pair of scissors. Seems like going anywhere now days is a pain in tha @$$ but all and all its usually worth tha trouble to have a safe trip and a good time. See yall. Robert & Stormi
-
Brakes and proportioning valve questions.
JACKED88 replied to JACKED88's topic in MJ Tech: Modification and Repairs
Bypass to the front brakes? The front brakes are completely independent of the rear brakes. Moving the arm up does not "close" anything, and moving the arm down does not bypass anything to the front brakes. Wherever you found that explanation of how the valve works, it is incorrect. You either bleed the rear brakes the way the FSM says to bleed them, or it isn't done right. :thwak: My bad. Thanks for trying to set me straight. I've done my homework since then and know how it works now. I should have just taken your word for it in the beginning but I wanted to know exactly how this system works and I wasnt gonna quit till I did. Now, thanks to you I know how it works and what to do to improve my braking without sacrificing safety. Without going into detail I'm thinking about making sure mine works and then make it adjustable. Doing it that way I'll also retain the intended function of the front valves emergency rear braking in which is activated upon front pressure failure. Hence the purpose of that third line. Thanks for your help. -
Brakes and proportioning valve questions.
JACKED88 replied to JACKED88's topic in MJ Tech: Modification and Repairs
When the previous owner did the SOA, and installed an XJ axle, he didnt re-install the rod that goes from the axle to tha valve arm. He just tied the arm up so it wasnt just hanging there. In theory, having that arm tied in an upward position, wouldnt that make the valve think there's a load in the bed and allow the rear brakes to be applied? Found this write up and pix. Since mine isnt operational I've never looked at one that is. Its tha pic I was mostly interested in however his adjustable rod looks is good idea. viewtopic.php?f=9&t=17968&start=0 Looking at the above pic with everything installed and if I understand how it works, the further up that rod pushes the valve arm the more rear braking pressure is applied. So if you were to a-fix that arm in an upward position then the valve would be in a closed position allowing rear brake pressure to be applied. While in the down or level position, the valve is open allowing the braking pressure to bypass the rear brakes and be diverted to the front brakes. With my valves arm in its fixed upward position I'm pretty certain my rear brakes are working. That may not be tha best way to bypass the system but its apparently working. Now, to bleed my system couldnt I first bleed tha rear by moving the valve arm up to the closed position and then bleed the front by moving the arm down to the open position? -
Brakes and proportioning valve questions.
JACKED88 replied to JACKED88's topic in MJ Tech: Modification and Repairs
Worried??? I aint worried. I just wanted to know how the brakes react without it before I take it out. Sounds to me they'll work about tha same as we had on our older 60's/70's cars/trucks. Thanks for correcting me on tha "Double diaphragm" and for the info on where to look for one. OK, maybe I shouldnt have refered to that bleeding procedure as b/s. But you gotta admit it sounds like a royal pain in tha @$$. One well worth eliminating so long as your brakes still work properly. Back to that valve I'm not worried about :roll: With an upgraded booster, master cylinder and wheel cylinders, and making sure the valve is working properly, wouldnt your braking be considerably improved even if you leave tha valve operational? How does that valve work anyway? I understand its purpose but we didnt have um on our older trucks and tha brakes worked just fine. No, not as good as these new anti-locks but they kept us from running over everything in our path. -
I'm about to do a 4 wheel brake job and while I'm at it would like to do what I can to improve my trucks braking. Short of installing disc brakes on tha rear .... What is it you guys are doing to improve braking? I've heard about using a "double booster" but don't know what booster your talking about. I've heard about using a different master cylinder but don't know which one works on our trucks. I've heard about using larger rear wheel cylinders but again don't know which ones to use. And then there's tha rear proportioning valve. I don't know what the hell yall are doing with that. Some say to dump tha rear valve and re-route the front lines giving you full 4 wheel braking. Replacing tha booster and master cylinder are simple enough but if the rear valve is removed, what do you put in its place to connect tha now disconnected brake lines together? Beep, Beep, back up a minute. ..... Is removing that rear valve a good idea on a daily driver? I don't want tha rear catching up with tha front every time I try to stop on a wet street. :eek: I often pull a trailer in which obviously increases my stopping load. Doesnt that valve have something to do with load sincing and how much rear braking to apply? Once removed, whats it gonna do without it? If I leave tha rear valve operational, whats all this b/s ya gotta do to properly bleed tha system? If tha brakes will work properly without it ..... I'm all about removing it. Instead of removing tha valve and having to deal with reconnecting tha lines, whats this about removing its piston and or its spring essentially disabling its operation?
-
Good to hear ya got it out. Just one question ..... where's that little pc you hammered out with a screwdriver? If it fell into tha cylinder, are you sure you got it out? Bad thinks could happen if its still in there.
-
Do you have a Dremel tool? If nothing else is working for you (short of removing tha head) and if you can git to tha plug with a dremal, using a cut off wheel try cutting a narrow slot in each side of the plug and use a BIG flat screw driver to unscrew it. Although I havent done that on a spark plug I have done it on broken bolts. Before you start grinding, stick a small pc if tissue in the plug to keep debris from going into tha cylinder.
-
Keep in mind heat is going to make tha plug expand. You might aughta try what 'sinkrun" suggested and hit it a couple of times to break it loose. If that doesnt work then try applying heat, hit it again and allow to cool/contract before trying to remove it. Your pb aughta cool it down pretty quickly in which should be a good thing. The expansion from the heat and quick contraction of being cooled should break tha rust loose. If that doesnt work ...... then try it while hot. I personally don't like tha hot idea because it'll be dry having burnt off all your pb. What kind of EZ-out are you using? One of the old school long ones or one of those new stubby jobbers? Those new stubby ones work pretty good but I've only seen um sold in sets. $$$
-
:doh: Your right. Somehow my math got turned all @$$ backwards. :dunce: I woulda caught my mistake but thanks for being on your game and correcting me. :thumbsup: I'll go with tha 6.5 and 2.5 angles.
-
Hot damn son. Are those tha OEM spark plugs??? :rotf: How long's it been since ya changed them thangs??? LMAO!!! An easy-out is you best bet without removing tha head. First do as suggested and spray it with penetrating oil several times allowing it to sit for as long as you have patients. (By tha looks of that OEM spark plug your apparently a very patient person) LOL!!! Stick the easy-out in whats left of your OEM spark plug. Be sure its straight and tap it in with a hammer. Now slowly turn it while applying downward pressure at tha same time. The easy out should bite into the inner walls of what left of your OEM spark plug and unscrew it. Before you install a nice new non OEM spark plug, start the motor without a spark plug installed in that cylinder. That will help blow out anything that may have fallen into tha cylinder. You'll only need to run it for about 5-10 seconds. No, it won't hurt it although it will be pretty loud. Now install tha new non OEM spark plug and your done. I'm just messin with ya about tha OEM plugs. ;) I've seen worst when I was turnin wrenches on boats. Ya ever seen an oil pan rust all tha way through with oil still in it? That was in a big twin v-8 cabin cruiser. Tha man couldnt figure out where all his oil was going. Yet every time he'd turned on his bilge pump he'd put a huge oil slick on tha water. :hmm: It rusted out because of all tha salt water that collected in his bilge all tha time. Hence tha reason for his automatic bilge pumps that didnt work and he didnt bother to repair. Over $1000 bucks later having to remove his engine out of his boat he had me repair um. Moral to tha story, preventative maintenance. :thumbsup:
-
OK, so a 6.5* caster angle should give me a 2.5* pinion angle. A 7-8* caster angle would give me up to a 4* pinion angle. I'm goin with 7* on tha caster in which should give me a 3* pinion angle. Perfect. :thumbsup: Thanks again for all yalls help. I'll let ya know how it turns out. Something tells me that new computerized alignment machine is gonna go nuts when it starts reading this thing. :rotf:
-
Guilty as charged for over thinking everything. I'll do whats needed as far as adjusting the arms to around 7* as suggested and then do the alignment. Just one more thing thats still bothering me. Thats tha fact that my upper and lower arms are gonna be damn near if not exactly tha same length. Does it matter or is that something else I'm over thinking and need to quit worrying about??? I know I seem a little hard headed sometimes but I'm tired of half @$$ ------ rigged sh-t and just want everything right. I really appreciate yalls help. (and patients too) Thanks guys.
-
Sorry, shoulda called it tha pinion or drive line angle. The angle needed to keep tha drive shaft from being in such a bind. Right now my pinion is pointed down about 3* instead of a few degrees up like it aughta be.
-
See edit in my last post. Where does that put you dif angle? Lets say I'm at 15* at tha ball joints and negative 3 at tha dif, going to 7 on the ball joints will give me positive 5* at tha dif. Does that sound about right for tha dif angle?
-
Wow! That much angle huh. I've got an angle finder sittin in front of me and 5* is actually quite a bit of angle. (I still think I have more than 5*) But if thats correct, I'm not as far off as I thought. I'll pull tha wheels with the axle on stands and take a closer look using the angle finder. How much angle should my dif be set at? Considering my 6.5" lift, setting the dif angle is gonna change tha ball joint angle. EDIT ....... Yeah, from what I can tell by just taking a quick angle reading, my dif is at a negative 3* and my ball joints are pushin 15*. I don't think I have a choice but to extend the upper arms till I get some positive dif angle and closer to a 5* ball joint angle. I may even have to shorten my lower arms as well. I'm thinkin maybe an inch out on the uppers and a half in with tha lowers. At that setting both the upper and lower arms will be the exact same length. Their at 15 5/8 and 17 1/8 now. (1 1/2" difference) Plus 1" = 16 5/8 and minus 1/2 = 16 5/8. I still don't see how that could be right. :???: