
schardein
-
Posts
2190 -
Joined
-
Last visited
-
Days Won
2
Content Type
Profiles
Forums
Gallery
Everything posted by schardein
-
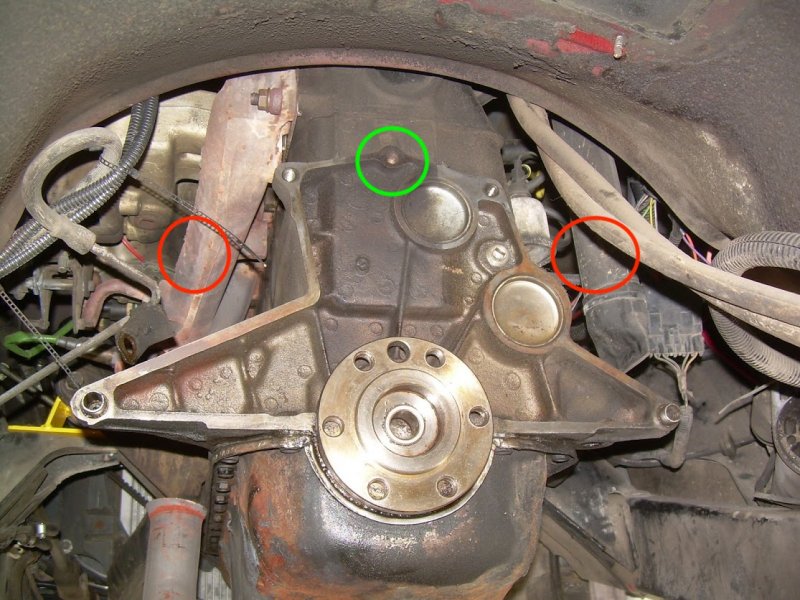
I think I remember those bolts w/nuts. They go through the bell housing, and through the bell housing spacer plate, but don't actually go through a block hole, if I remember right. The I6 block is tall and narrow, so no bolt holes there. See pics. Green circle is top center, red circles are holes in question. No block material there, bolts just go through the plate. EDIT: Spacer plate should be "flipped over" to match block correctly in these pics.

-
I have that oven cord (4 prong) it was from the sellers new stove but they gave it to me with the old stove.
-
I don’t know how to determine single/3 phase. Does this help?
-
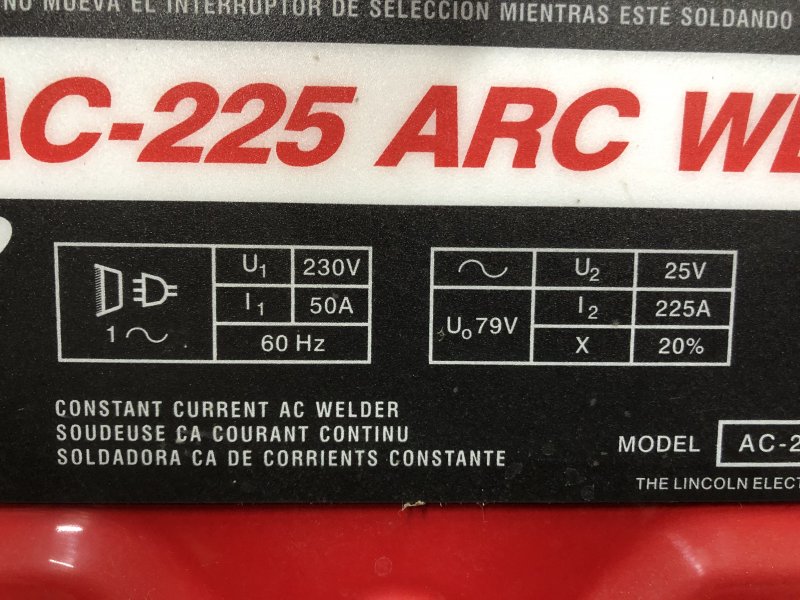
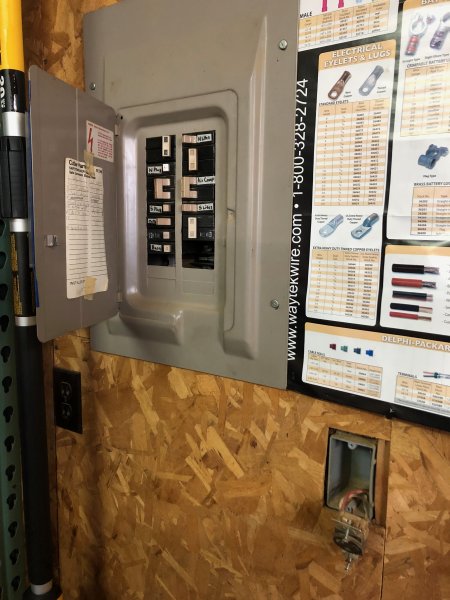
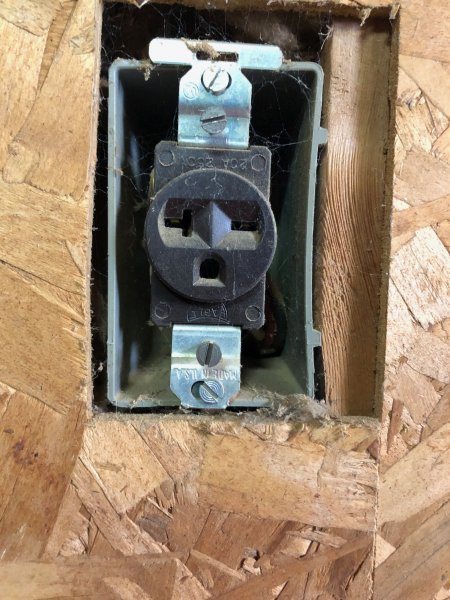
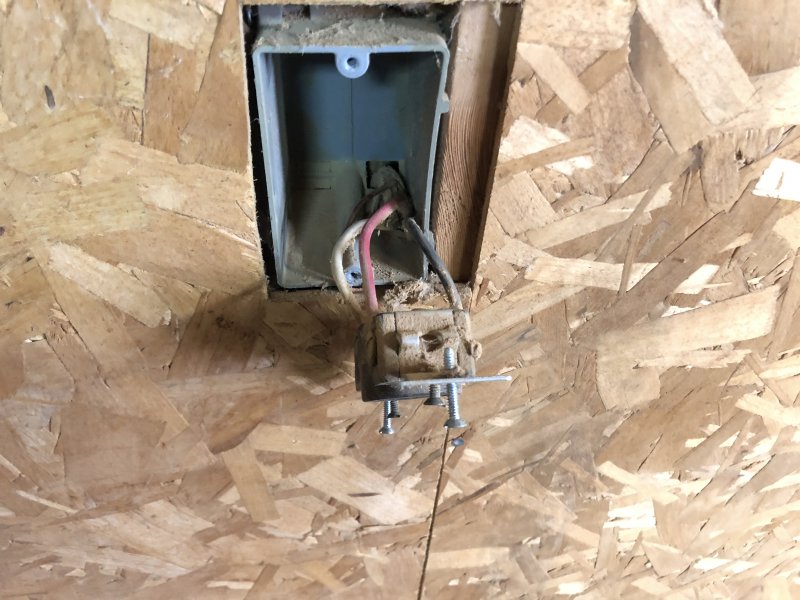
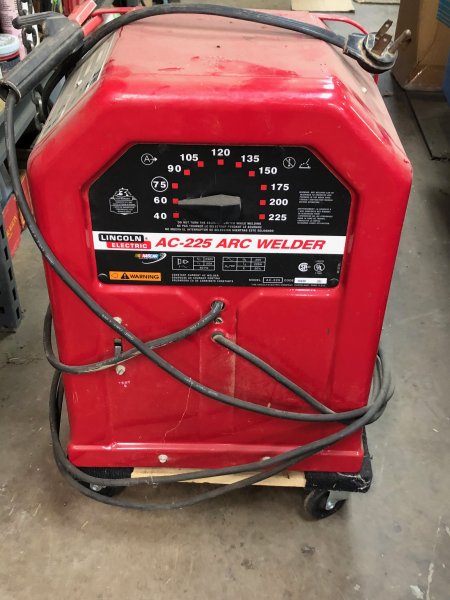
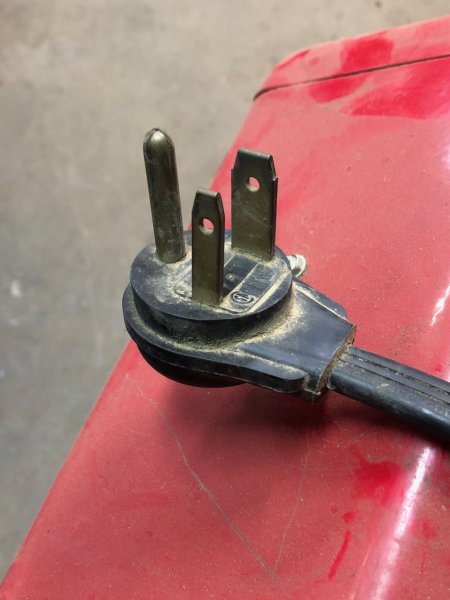
OK, time for an update. But first, THANK YOU to everyone who has replied. It's great being able to post about nearly anything here at COMANCHE CLUB and get helpful responses. Quick points: My limited research shows I need to get to 400 degrees to cure powder. My workshop breaker box gets power straight from the pole. Main breaker is 100amps. I have a pole barn behind the workshop, and there is one 15 amp circuit in there, which comes from the workshop breaker box. I have LED lighting in the pole barn and occasionally run a small air compressor. Battery trickle charger also, running most the time. I have a vintage Lincoln 225 arc welder that I've been meaning to try out. It requires 50amps. I decided to buy a 50 amp plug to match the plug on the welder. I will buy a matching cable for the stove. I will switch between the two. I plan to put the stove on casters, or a base with casters so I can move it out of the way easily when not in use. There is an existing 240v outlet right near the box. But, the wire is maybe 10 gauge? I plan to replace the wiring with 6 gauge based off internet research. I still need a 2gang box to mount the outlet in, a new breaker (50amp?), and maybe the wire. I have some on hand, just need to check its size. 1st pic: Breaker box and outlet (lower right) 2nd pic: outlet to be replaced 3rd pic: existing outlet wiring 4th pic: welder 5th pic: welder plug Outlet I bought https://www.amazon.com/gp/product/B01N8SKDY4/ref=ppx_yo_dt_b_asin_title_o00_s00?ie=UTF8&psc=1 EDIT: and a quick correction to some of my above posts, I have FOUR 240v outlets. 2 on the walls and 2 on the ceiling. One wall outlet is upright air comp. Other is the one I plan to replace. Two ceiling drops are wires taped off in a junction box, unused. Appreciate any input.
-
I wonder too. The last thing I need is another project, but I've often thought it would be cool to get an AMC Eagle, swap in a fuel injected 4.0 and drive the heck out of it. Around 1985, my Mom was looking at replacing the family transportation, a Ford station wagon. I came home and found a Jeep dealer brochure on the kitchen table. I thought OMIGOD WE ARE GETTING A CJ (which makes absolutely no sense). She came in, flipped the brochure to the 4 door Eagle, and asked what I thought. Needless to doggone say, what I thought isn't worth printing. We ended up with a Suburban, which I got to drive home with 16 miles on it.
-
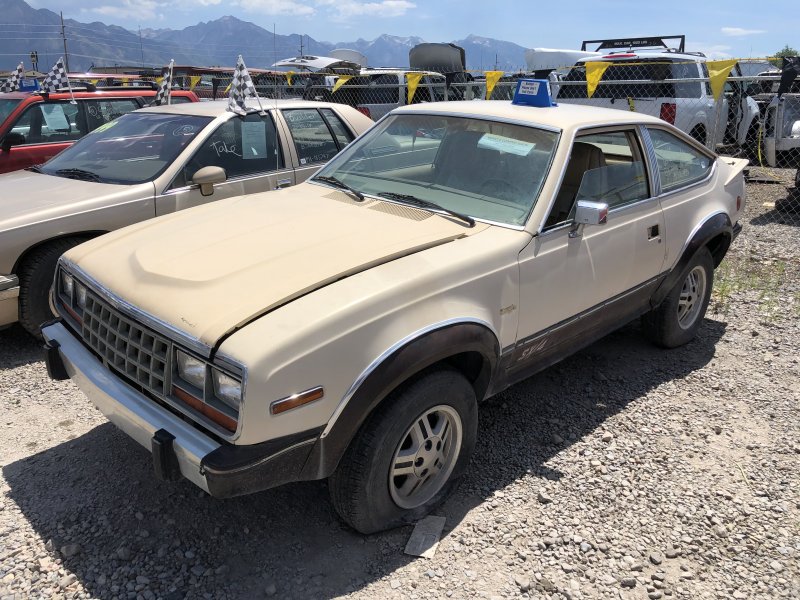
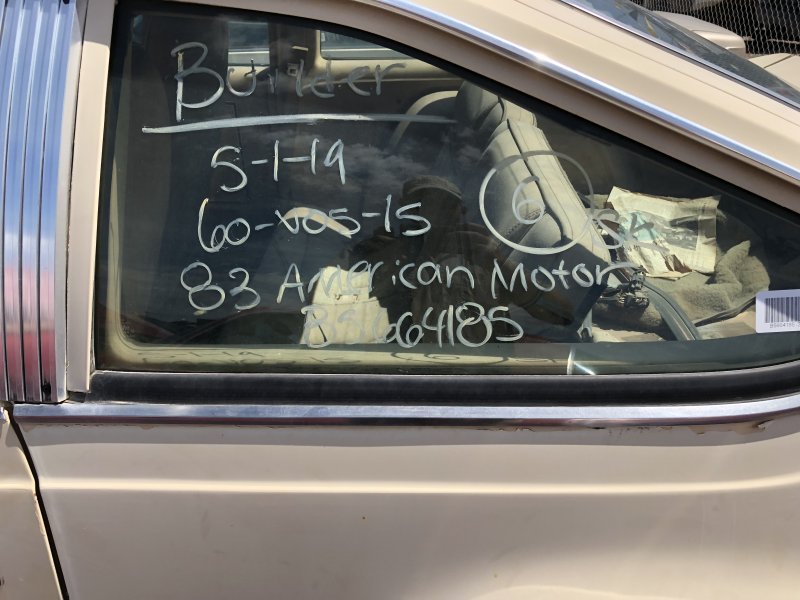
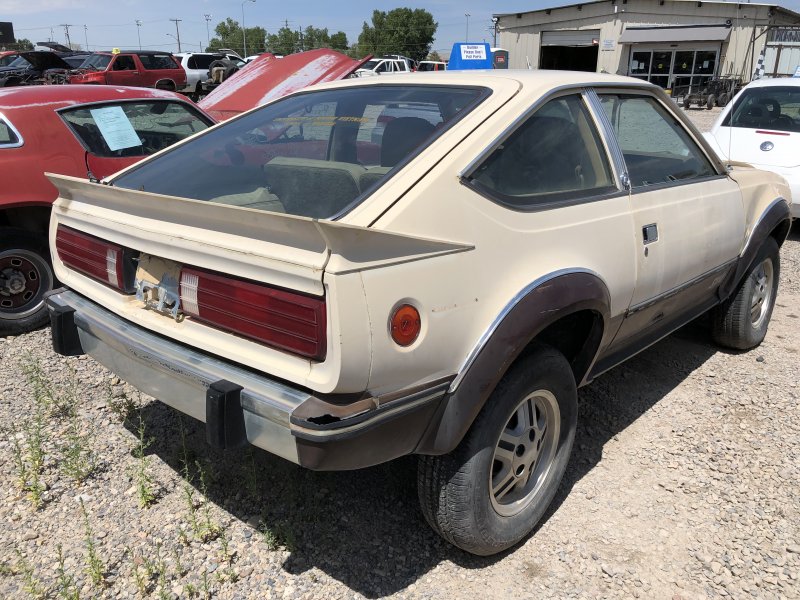
Saw this AMC at a yard last summer, being sold complete as a "builder".
-
Same here. It's one of those books I took a chance on, and was happily surprised. You know there is a sequel- Children of Ruin- but I haven't read it yet.
-
Dana 44--I found one. Swap questions....
schardein replied to coolwind57's topic in MJ Tech: Modification and Repairs
As long as you trust the shop... if the axle came from a running/driving vehicle, the gears are probably fine. Having to little backlash is just as bad as having to much. And making adjustments to the shims in a high mileage gearset (to adjust backlash) is likely to produce a noisy gearset. Checking backlash is super easy, and a dial indicator is less than $30 (with 20% off coupon) https://www.harborfreight.com/clamping-dial-indicator-63656.html?_br_psugg_q=dial+indicator Once you own it, you can check other things, like runout on brake discs, flywheels, driveshafts etc. And just for the record- The AMC 20 axle in the full size Wagoneers (and the 86 Comanches for that matter) is much beefier than the CJ version. Wagoneers (and Comanches) used thicker axle tubes and one piece axle shafts. Also, as for sealant on the axle tubes, some axles have it from the factory when assembled. I have a 77 J10 D44 in the front of my CJ, and there is a bead of sealant inside the case, near the carrier bearings, where the tube presses into the center casting. I've seen it on other axles as well. However, I doubt adding sealant around the tube, on the outside, where it meets the center section, would be effective. I've personally never seen a D44 leaking at the axle tubes. I have seen a full size square body Chevy do a jump and crack the center section in half (front D44). I've also pulled a rear D35 out of a bone stock YJ and you could wiggle the axle tube up and down in the center housing (center housing was cracked). The owner said the Jeep "made a weird noise from the rearend sometimes, and handled funny. And it leaks". Yeah, I bet it did haha. -
Dana 44--I found one. Swap questions....
schardein replied to coolwind57's topic in MJ Tech: Modification and Repairs
Yep, 1991 MJ 4wd conversion! My progress has slowed, I have competing projects, garden, upgrading trailer lug studs from 7/16" to 1/2", wiring workshop for a 50A plug for an oven to experiment with powder coating, and plenty of work on the property as weather improves and ground dries a little. But yes, getting the D44 & D30 put together are definitely on the list! -
Dana 44--I found one. Swap questions....
schardein replied to coolwind57's topic in MJ Tech: Modification and Repairs
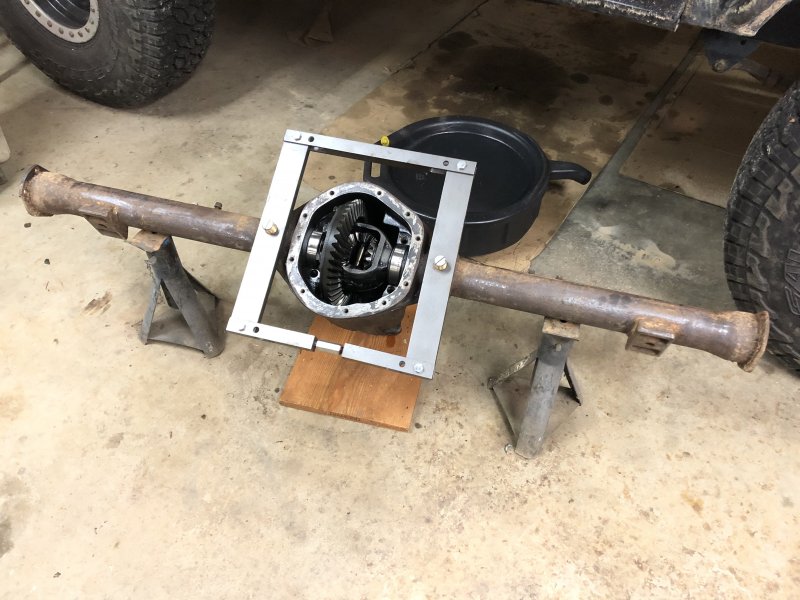
On my MJ D44, there are 6 places for plug welds on each side of the diff casting. 3 on top, 3 on bottom. You can see the 3 top ones in the first pic. I definitely would not weld in the case spreader holes, so you can use a case spreader, 2nd pic.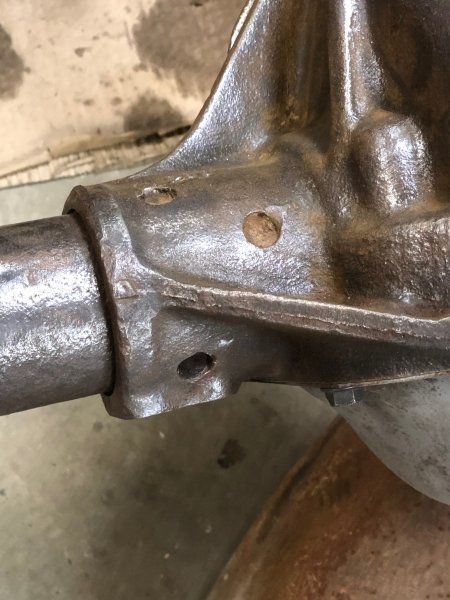
-
Dana 44--I found one. Swap questions....
schardein replied to coolwind57's topic in MJ Tech: Modification and Repairs
On an axle this old, new seals are a good idea, but be sure it isn't just a leaky brake wheel cylinder. Replacing axle shaft seals is way more involved (and expensive) then replacing a wheel cylinder. That's a good thing about drum brakes- replacement components are inexpensive, except sometimes the drum, although many times they can be inexpensive too. -
Dana 44--I found one. Swap questions....
schardein replied to coolwind57's topic in MJ Tech: Modification and Repairs
Thank you for the offer. My axle does have the bracket and I plan to retain my LSV. But I'm sure someone here will be able to use it, rare part for sure. -
Dana 44--I found one. Swap questions....
schardein replied to coolwind57's topic in MJ Tech: Modification and Repairs
Getting the axle shafts out is just removing the brake components, and removing the four nuts and bolts holding the backing plates on. Sometimes the axle shaft will pull right out, sometimes it helps to have a slide hammer to persuade it. Once out, you have to remove the bearing retainer. I center punch it, start with an 1/8" drill to get a centered hole started, then move up to a bit about the same size as the width of the ring. Drill about halfway through (don't drill the axle shaft!) and put a chisel on it and give it a good whack. The retainer will split and slide off. The bearing must be pressed off. Even some smaller shops won't have a press with enough "length" or a wide enough platform to do this work. I use a puller specifically for the job (blue part in the pic). They are rather expensive. https://www.amazon.com/Yukon-Gear-Axle-YT-P70/dp/B0078U9JSY/ref=au_as_r?_encoding=UTF8&Make=Jeep|42&Model=Cherokee|347&Year=1991|1991&ie=UTF8&n=15684181&s=automotive&vehicleId=6&vehicleType=automotive With this tool, even my HF press can do the job, although it's barely tall enough. It's difficult to get the bearing off without damaging it, without a puller like this. I've damaged one even with this puller. Once the bearing is off, the seal slides off. Clean up the shaft, replace any damaged lug studs. Slide on the retainer plate (I ordered new, since mine were pretty rusty), slide on the new seal (smear a film of grease on it first)(make sure it faces the right way!), press on the new bearing. I place the shaft in my deep freezer overnight, and heat the bearing for 30 min to make assembly easier. Then press on the new bearing retainer, and reassemble the axle. Most likely, do-it-yourselfers will need to take the shafts to a machine shop or local repair shop to have the axle bearings and seals replaced. I searched for work arounds before purchasing the puller, and didn't find any. This MJ axle is my fourth Dana 44 rebuild, so I'm getting my money out of it. EDIT: I meant to add that I have re-used axle shaft bearings after replacing a seal. But many shops will frown on this, as they can't guarantee they won't damage the originals during removal, and that's a valid concern.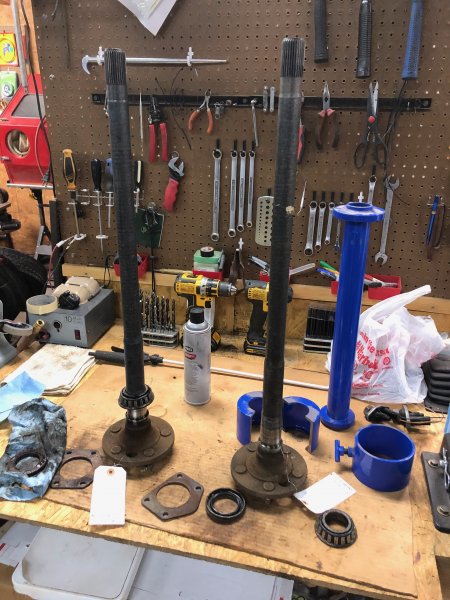
-
Dana 44--I found one. Swap questions....
schardein replied to coolwind57's topic in MJ Tech: Modification and Repairs
Keep us updated. Here is the current state of my MJ Dana 44. It was a 3.07 ratio, I am changing to 3.73 gears with a Truetrac limited slip diff. New bearings & seals on the diff and axle shafts. New brakes & new hard lines. Just got the brake backing plates back from being powdercoated, so can begin bending the lines. I'm glad to hear the D35 spring plates will work, because the original D44 spring plates are heavily rusted, slightly distorted, and one of them the shock mount stud is damaged.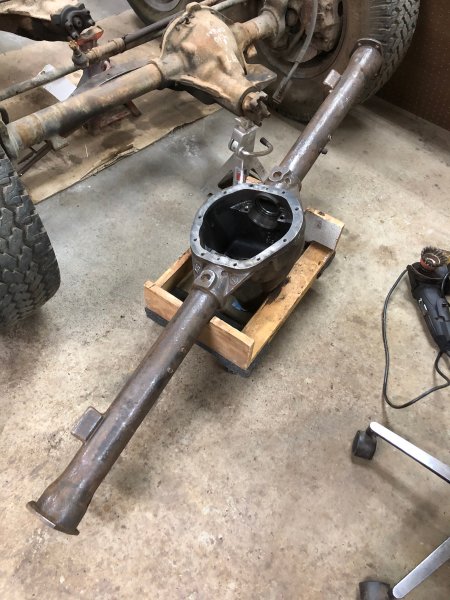
-
Great question. Among my favorite books are Stephen King's Dark Tower series. The Dark Tower movie was a let down. The story deserved a treatment like The Lord of the Rings or the Marvel Cinematic Universe.
-
Dana 44--I found one. Swap questions....
schardein replied to coolwind57's topic in MJ Tech: Modification and Repairs
I can't recall where I got my leaf spring center bolts last time I ordered them. New ones are often quite long, the idea being you are assembling a loose spring pack. Once tightened down, hacksaw off any length that sticks out past the nut. But like Derf said, secure the spring with a C-clamp to keep it together. Surely someone on here has a set of standard springs they can check the bolt diameter on. Here is one source: https://www.rockauto.com/en/tools/suspension,leaf+spring+hardware,leaf+spring+bolt,10353 Another. A local store probably has some in stock, you'll just need to find a counterperson who knows what you are talking about. https://www.oreillyauto.com/shop/b/suspension---steering-16778/coil---leaf-springs-16803/spring-center-bolts---universal-18243/5ae38b679375 I don't know offhand if the D35 and D44 axle tubes are the same diameter. Even if they are, the heavy duty suspension used a larger diameter u-bolt. My point is you may need or want new u-bolts. If the MJ is your only ride, you might want to look at the brakes and brake lines on the new axle and order parts/repair as needed before the swap. Other items to consider: new center pins, u-bolts, cover gasket and gear oil. Any signs of leakage at the pinion yoke? Now would be the time to replace the pinion seal, and pinion yoke if the seal surface shows wear. I would also inspect for leakage where the axle shaft enters the axle at the brake backing plate (axle shaft seal). Have you had your leaf springs off before? With the axle sitting on top of the springs, you will have to drop one side of the spring (front or back, doesn't matter) to remove the old axle and install the new. One frozen leaf spring bolt can turn an afternoon job into an all weekend job. -
Dana 44--I found one. Swap questions....
schardein replied to coolwind57's topic in MJ Tech: Modification and Repairs
Yes, That centering pin actually locates the axle on the leafspring. The U-bolts and plate secure it. Replacement pins are available with different shank diameters and head diameters. The shank diameter should match the hole in the leaf springs. The head diameter should match the recess in the spring mounting pad on the axle. You should always check for a proper fit. If the head diameter is too small, it will allow the axle to shift on the leafspring. If the head length is too long it could bottom out in the leaf spring pad and prevent proper tightening of the U bolts. -
Dana 44--I found one. Swap questions....
schardein replied to coolwind57's topic in MJ Tech: Modification and Repairs
87-90 Parts Manual actually shows different part numbers for reinforcing plate for standard duty & heavy duty. Whether they are actually different, I don't know. Parts Manual also shows different U-bolts for standard and heavy duty, with heavy duty having 3 different part numbers depending on the year. I would guess that to be a difference in bolt diameter (larger) and a length difference due leaf pack thickness variations and/or spring plate thickness variations. For center pins, on several occasions I've used pins with a large locating head, and custom ground the head on a bench grinder and/or disc sander to fit its specific application.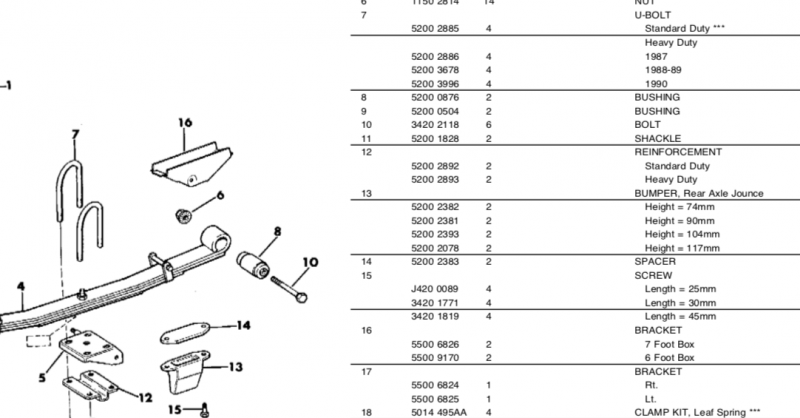
-
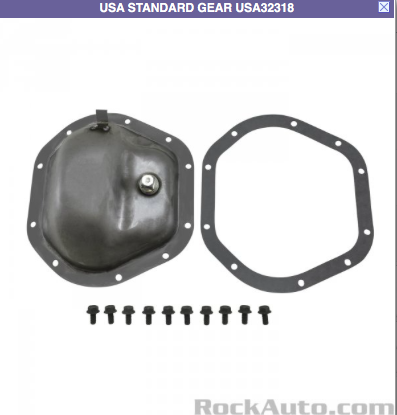
Also, check out this comparison of two stock type Dana 44 diff covers. One is low pinion, one is high pinion. The high pinion requires a higher fill level. The difference is small, but still there. Some aftermarket covers may be designed with a higher fill plug so they will work with a LP or HP axle, but that doesn't mean the fill level is correct for both.

-
The axle was designed to run with a certain amount of lube, and the fill hole ensures it is at the right level. Most manuals state the fill level should be right at the level of the hole, or just below it, so you can check it with a finger. Aftermarket units may be doing that because many times the axle is "tilted" more to compensate for driveline angles, and this gives the ability for them to be filled to an equivalent factory level, not necessarily "more", or overfilled. Added fluid is added drag. It can also cause seals to leak. Moving the fill hole in a stock application only makes it harder to check and maintain proper fill level. The transfer case in my CJ7 has been "clocked" to increase ground clearance. To maintain proper fill levels (right at the bottom edge of the idler shaft bearings), I have two options: Build a tiny dipstick out of a bent wire (what I do), or drill and tap the case to install a sight tube (would be much easier to check and maintain, but I don't want to do that). Think about adding extra oil to the engine or transmission. Good idea? Of course not, unless adding a deeper pan to accommodate it. Jeep Driver posted this thread where Gale Banks talks about diff fluid level, among other things. I haven't watched the vids all the way through, but I bet there is some discussion there about proper fill level.
-
Dana 44--I found one. Swap questions....
schardein replied to coolwind57's topic in MJ Tech: Modification and Repairs
Even if the driveshaft fit, I'd be careful- I'd inspect it before handing over the cash. Unless it was in pristine shape, u-joints looked fresh and caps were taped to stay on, slip yoke wasn't excessively worn, no excessive rust and especially no dents- I'd pass, or talk the price down, . If it spent time in a junkyard, the rear shaft is almost always bent when they move the truck with a forklift. A pair of Spicer u-joints run about $30, then you need to install them- straightforward job, but if they are the originals they might be a pain to get out. Sometimes ponying up for a new shaft in a custom app (lift) is worth it in the long run. I've had local machine shops shorten shafts for me before, even though they didn't normally build complete shafts. If you plan to retain your factory rear brake load sensing setup, the bracket on the axle end is different for a Dana 44, make sure it is there, or you will be fabbing one. I don't know if the connecting rod is the same or not, but I would assume not. See if it is there also. And I believe the spring plates are different, I would hope those were present and included in the price. -
I found my build seat stuck in the springs in the bottom of the bench seat on the pass side, 1991.
-
The website mentions this mod for axles that have been rotated (for driveline angle, preventing proper filling). Not a good mod for a stock arrangement. The other idea on that page is good info, the factory "thick" covers are actually pretty strong.
-
Not really comparing apples to apples, but I shipped my CJ7 from CA to HI, then back to CA five years later. It was between $900-$1000 each way, this was 2000 & 2005.
-
Is it correct to say 9300 watts divided by 240 volts is 38.75 amps? Downloaded the installation guide and owners manual. Will read tonight, need to get started on the garden project while still daylight.