


TheJeepNut
-
Posts
118 -
Joined
-
Last visited
Content Type
Profiles
Forums
Gallery
Everything posted by TheJeepNut
-
not since 1990.
-
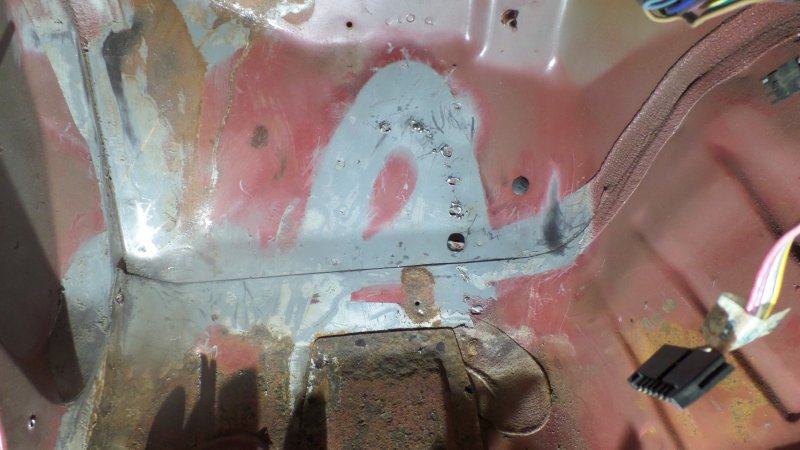
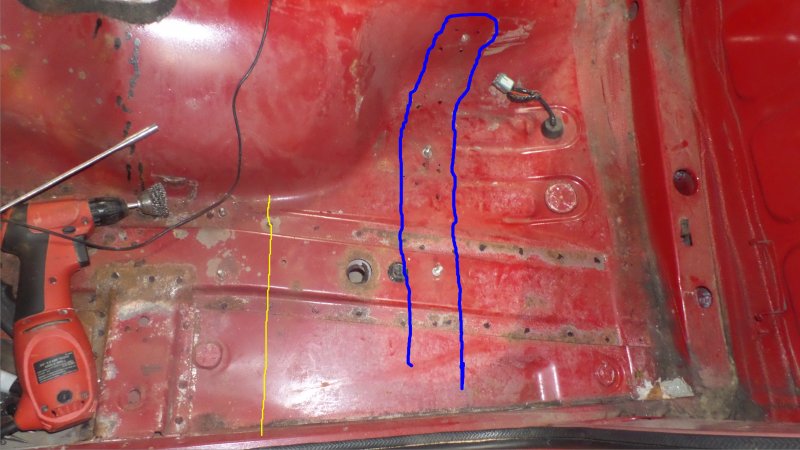
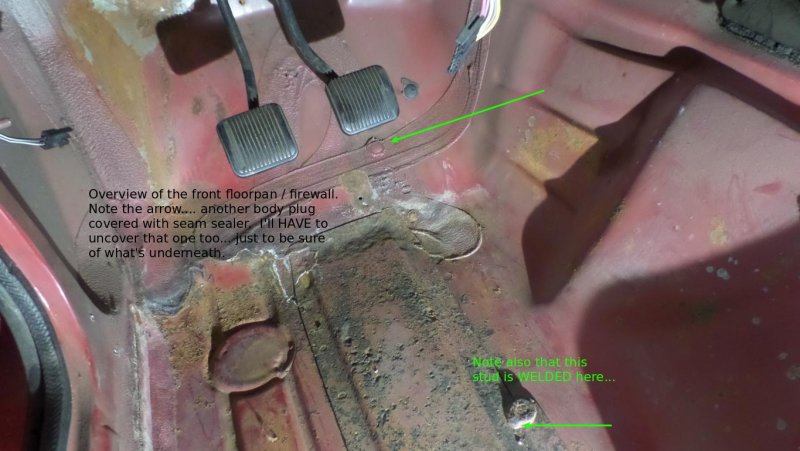
Nice discussion! I'd put all this to the Street Comanches new home but I've not added in all the previous detail there yet. I got the boroscope and that's fun. Inside the lower frame channel looks amazingly good. A few spots here and there that just look surface rusty... Just got the Rotabroach tools & some lube and have looked over pretty extensively what I'm about to do and have more questions and comments. My buddy who's my body & paint expert just had a heart attack so I MAY end up actually being the one to do this welding. I'm going to be practicing first obviously on some scrap to see if I can even lay a decent bead. Wish me luck. If it's ugly I'll seek an alternate for sure. Also have been on the Eastwood site and raised even more questions. 1. In terms of the lower box frame I think the appropriate product is Eastwoods Heavy Duty Anti Rust (Amber). It doesn't require any attention once sprayed in and penetrates through to seal and prevent further rust. Alternate ideas? In terms of the floorpan. In this image.... See those multiple "spots" in the inverted U shape there where welding was done during assembly.... The factory slopped seam sealer over it all. All of the "gray" area there in the upper 2/3 of that image is where I scraped off the seam sealer. And I have this really rough rusty metal that I'm not going to replace. It's double thick there with a panel opposite the firewall and is not at all soft even though it looks pretty eaten away. Specifically the area just below and to the right of the fuseblock. But all the metal around that little stud sticking out there is pretty rough but doesn't "give" at all when probed with my implement of destruction... 2. Should I just shoot Eastwood Rust Encapsulator over all of that and then put seam sealer over the areas where it was before? I'm thinking I might spray the ENTIRE lower half inside the cab with Rust Encapsulator. Bad idea, good idea? I wasn't sure if the Rust Encapsulator should get seam sealer over it or not. Apparently both can be painted. Seam sealer didn't seem to be all that helpful in stopping rust so I THINK first Rust Encapsulator and then seam sealer but I don't know for sure. 3. I don't think I want to use this entire floorpan piece I bought. I think I am going to cut the floor pan along the yellow line. My question here is do I overlay the edges 1" and weld top and bottom along the yellow line? or do my damnest to butt them, tack and weld in sections? The back 1/3 of it is solid anyway, but complicating matters is this brace that's spot welded from up on the trans/shaft tunnel wraps under the floor and over into the lower boxed framerail section. It seems it would be hella difficult to extract intact. It is seat support and seat BELT support and I think I should leave that all alone. Marked out in Blue on the floorpan. Thoughts?
-
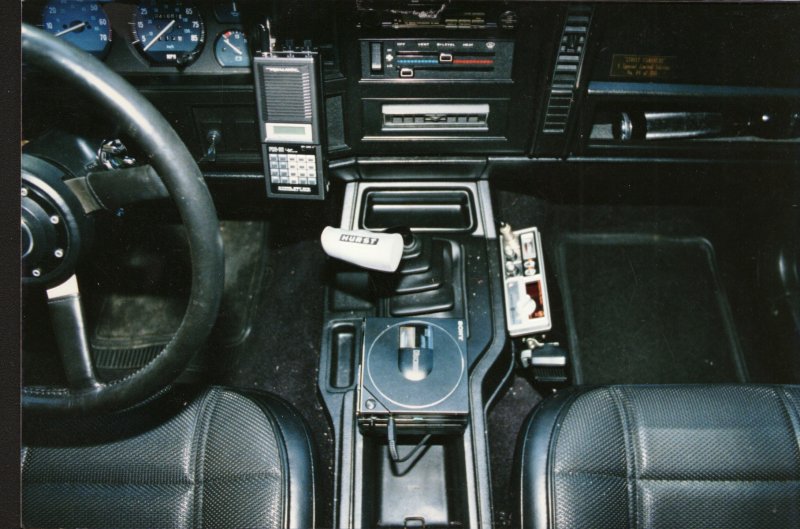
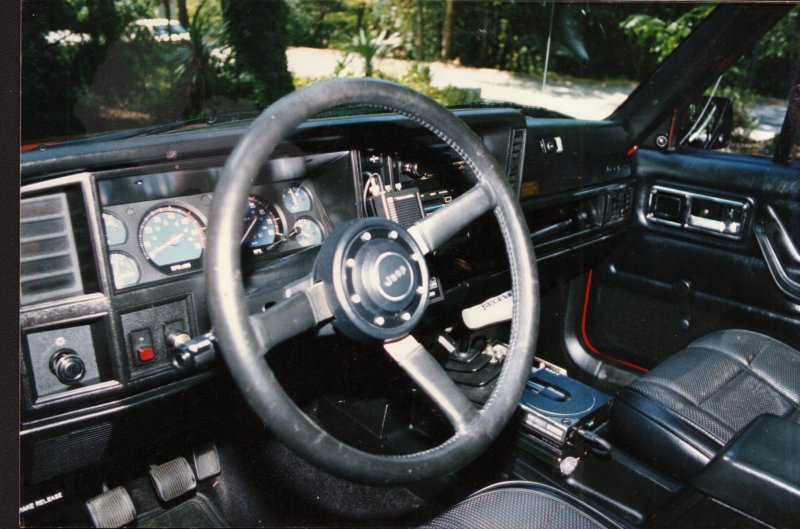
A view of the cockpit. It's funny now looking at all the out-dated technology cluttering the cockpit. This truck was delivered sans radio from the factory, so I had a cassette player in the dash with this external disc player on the requisite "Scoche" mount, CB Radio, scanner, Hurst shift handle on that pathetic BA10/5... No A/C. It's hard to find newer vehicles delivered without A/C from the factory any more. If you look real close at the control panel, you can tell there are no AC settings. I've not noticed it being a problem. Throw the sunroof open, drop the windows, and all's well... And I've never had to service, recharge, or replace ANY failed A/C junk either. That's saved me thousands over the liftetime of the truck. And now, finally with about 170k on the clock and having never been driven on salted roads, she's been seriously violated as the resurrection is underway...
-
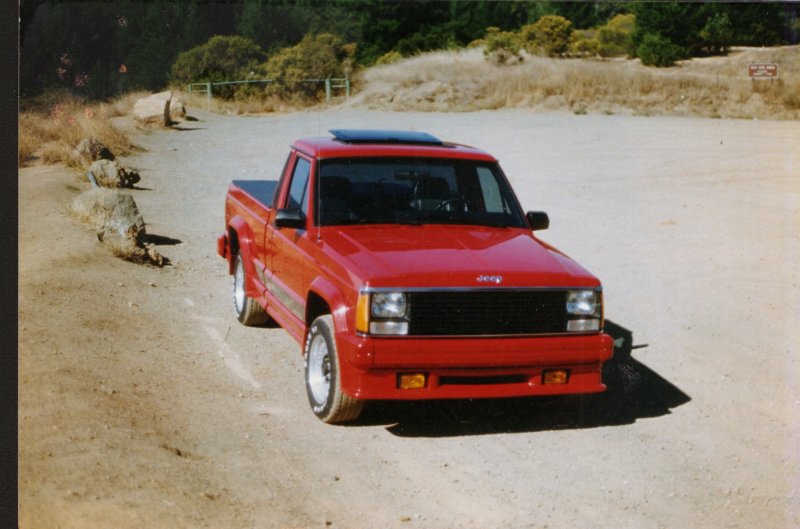
Indeed I made a variety of changes soon after acquiring this little gem. Quickor, back in the day, made a "drop kit" for the Comanche. The kit consisted of shortened springs for the front and a couple of blocks n' straps for the back. So I dropped it. But I didn't care for the blocks. And it still wasn't handling like I wanted. It needed "tweaked". So I bought brand new factory OEM Rear Leaf Springs for a Metric Ton. Heaviest duty spring kit available for an MJ. Not gonna lower it though right? WELL... I pulled the leaves down nearly tight with shackling kits. So that fixes the height issue AND with the springs pulled tight that puppy drifts SOOOO nice on a highway full of twisties... I'm not Jackie Stewart but without a doubt, the best handling vehicle I've ever driven. As I exercised it in the hills of Bonny Doon, Boulder Creek, and along the Skyline Highway above Stevens Creek, toward Palo Alto and beyond, I proved to myself something I'd always heard. Centerline Racing wheels are not designed for highway use. That's what the dealership put on this one originally. They were a true split-rim design and CONSTANTLY leaked air from the seam. I was driving it "spiritedly" through the curves, sweepers and doing some occasional drifting ;-) along the upper reaches of SR9 above Boulder Creek and those wheels would not stay sealed. But I understood that they were never designed with that kind of driving in mind. They're a straight-down-the-track wheel used in the wrong application by the dealership because they looked great! So as you can see in this image from the mid 1990s, #24 got a set of smooth dish American Outlaw wheels soon after I acquired it. HEY. I'm old enough to recall when Baby Moons were hip and looked soooo cool even on painted wheels, so don't make fun of my old Outlaws. :-) I just love classic, clean styling.

-
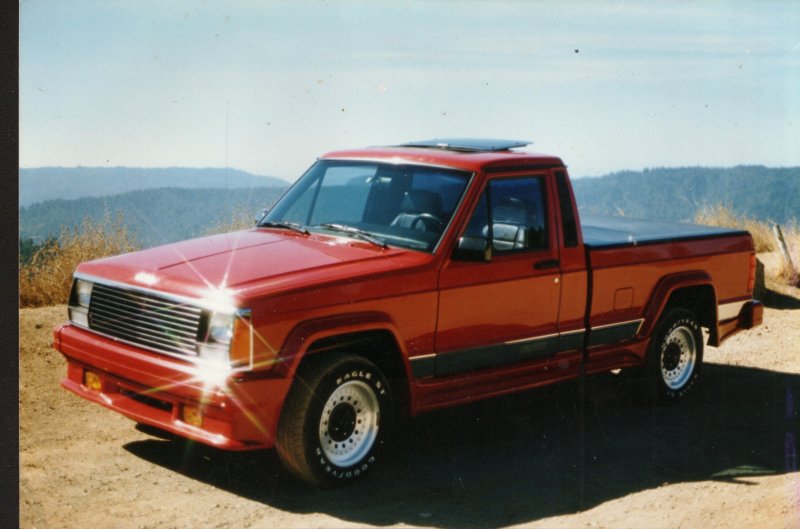
I found #24 sitting on the lot a Don-A-Vee Jeep in Bellflower, CA the first week of Sept 1989. My ship (USS Paul F. Foster DD-964) had just returned from a WestPac a few days before and for some reason I found myself driving through the Bellflower area enroute from Long Beach to Irvine where we lived at the time, and spotted it sitting on the lot! What timing. It clearly was destiny. They were closed but I was back as soon as they opened next morning checkbook in hand. Paperwork shows that the truck had 21630 miles and cost $7995.00 BEFORE taxes, fees, and nonsense, which jacked it up to $9388.60. Which is why I just buy cars from individuals now... I haven't been in a dealership since 1992 when I bought a brand new Cherokee Laredo for the wife, the only new car I ever bought. The original owners manual shows the original owner's name, address, and is stamped as being delivered from Pasadena AMC/Jeep/Renault 1951 E. Colorado Blvd. Date of first use Sep09, 1987. Date on my contract is Sept02, 1989. Pretty bizarre it's so close. No idea why someone would have traded this puppy in after 2 years but I'm SO glad he did. So now in all it's radiant glory in the California hills, the Street Comanche shows unmolested since delivery from the dealer. Even the Centerlines are still on the truck at this point. Yes the image quality is poor. No I am not a photographer. And this is a 30yr old picture scanned so not superb. I just love the Webasto sunroof. When you crank it open the back pops up, then the whole thing slides backard. Ends up looking like a "wing" on top of the cab. Very slick. The caption at the top of the window read: "If you can't crank it, yank it." And oh, did it crank.
-
Am I missing something obvious? I started to create a post for #24 but found immediately that I can't seem to load images to the site. I mean... Ive done that before so don't know what gives. A pending post I've started in another thread has 4 images I "attached" but it won't let me save the post as it says the images are still uploading. They're only 15Mb total and all are .jpg files. ?
-
Well that's great! I'm not married to any particular concept really. The "site" is just a container for the detail. We can reorganize whatever is needed. The stuff not SC related can go away of course. I do need to get back to working on those Altecs but that's a whole different thing...lol So is the vision for a subforum structure similar to the Comanche Registry forum? A new Street Comanche Tracker forum or whatever title works and then maybe subforums under for the individual#s and then maybe one subforum for images and posts of the "retired" and pictures of unidentifiable remains in scrap yards, etc? How would the team prefer I pursue the build site for #24...just keep adding to whatever gets dumped in the #24 subforum? Although, I suppost properly done I should start a new thread on Member Projects: Your Comanches sub for #24... Should I just cut'n'paste the zoho site into the #24 subforum first and build on it from there? Is there a better way to import that? I just have no faith that what's out there on zoho will remain ad nauseum. As with all on the internet, history is subject to deletion. I actually sort out what I post on the zoho site in a LibreOffice document and then copy'n'paste into the zoho site. So I've got that original document always, but the entire site is also backed up on my personal server. But none of that does any one any good once I drop dead. What's the best way forward?
-
The Street Comanche Registry needs a new home. I'm not a web designer nor want to be and I know little about the whole thing. Websites are just fancy LibreOffice documents to me. A place to post some text and photos. That being said the Zoho.com site will die in July. It will (theoretically) remain visible but no further changes will be allowed. Zoho for those that don't know is the Asian google. Using Zoho services you'd swear it was google. They've grown enough now they don't need to give a hoot about people who aren't paying them. I won't argue the pros and cons, benefits and detriments of payers, freeloaders, site providers and such. I just won't pay money to post this stuff. It occupys a lot of time frankly that I'd rather be spending in JeepNut's Garage. I'd be as happy keeping track of it all privately in a LibreOffice document and send it to a mailing list of interested parties when I update it. But I think we can do better. There are two major options I'm considering at this point. Weebly and Wix. If anyone has experience with either, please do share an opinion. I know about WordPress but there seems no real viable free option there. I know there are "page counts" and "Gb" considerations but some sites say they give you x pages and some say they give you x Gb. I don't know how those correlate. So I'm not sure how many Gb my little registry site occupies but Zoho says I'm over 50 pages, which would include the #24 build site. I might have to split out the build log for #24 to a separate site to keep the size of my site(s) down to limits allowed for freesites on Weebly or Wix. But that would be just fine as long as I don't get to the last 6months of the build and not be able to update anymore without upgrading to a pay site. I know the CClub site takes money to run and I've not any idea how Pete keeps this thing afloat, other than some bling sales, so I hesitate to think I should presume to occupy space & bandwidth wih a registry site somehow attached to the club site. Is that even an option? Just a really bad idea? Member Projects for the #24 build sheet...? I'll want to post lots of photos... Looking for ideas on a way forward with the site and only have a few weeks before the site becomes static. Like I need something else to fool with right now...
-
an entire set of skirts for a SC is .... it's like looking into a nuclear reactor.... just not something you'll see everyday... nice work.
-
And that's me as well. It may be overkill but it's the "right" way in my head anyway. Not that I won't make IMPROVEMENTS to the factory's efforts...lol And what a brilliant response. Thanks very much. Got to looking at some video and I guess I should stop whining. MY rust issues are quite minor by comparison. Still... they bug me. And I do what this to pass down to someone once I'm done with it. Showing my lack of experience again.... diff between a "spot" weld and a "plug" weld? I probably WON'T be doing the welding tho I've got a li'l wire feed welder. I've not done much but "farm" welding at this point. Pieces that don't' have to be nice and nothing fancy. I'm not sure I want to start training on THIS truck. My bodyman is great and has done some jobs for me that are outstanding but he moved on me so doesn't get around often anymore. I'll end up taking it to him for bodywork and paint once I get it prepped some, or maybe he'll come here to do these floorpans. I need to call him anyway....
-
THANKS! We shall see... messages sent today....
-
An option that I'd not considered b/c I suppose any other harness that's +30 yrs old would be in no better shape. Since it's a REXIX still... (pondering that too)... I don't see anything much newer than what I've got is available. Given the connectors on mine are green in places and connector bodies melty / wires at the connectors as well melty on some... Corrosion adds resistance, adds heat, and end up at best with a failed component or at worst the truck on fire. GRANTED that's a worse case scenario, but the way things go for me.... I'm not dropping +$20k into this thing and not TRY to replace everything critical with new stuff. But maybe get several, check all the connectors and such, then make one good one out of 3 or 4, though I HATE doing that as there might be a guy out there that NEEDS a harness and can use whatever they can find. Not that I think it would be any cake walk to find 3 or 4 harnesses... Maybe I think too much. lol Buying a new harness just seems the best answer IF it can be found... more homework to come.
-
Sent mail to Painless Wiring and they stated simply that they have nothing for this vehicle and cannot help. Seemed curt and left me with the impression that they'd be uninterested in pursuing any custom work. I'd gotten the impression that they were a better comany than that but there it is. My firewall fuse boxes are intact. But insulation on wiring under the bonnet is dry and cracking on a lot of wires and I don't trust it. I'd as soon have an entire new harness firewall forward AND the interior harness as well firewall in. I'm NOT opposed to building them myself but sourcing the connectors would likely be a tremendous task as there are many variations. The other thing would be finding the plug housings themselves. I'd much rather pay someone else for the harnesses professionally prepared but if I can source the components, I CAN do it myself. Any vendors for these?
-
Awesome. lol I kinda thought that might be the general consensus but not having been down this road it's a little scary so I needed the confirmations. Nice drawing Minuit! It's exactly what I presumed this package looks like. GIMP is hella nice but I'm not bright enough to figure it out. I recently added Shutter to my CentOS system. That's what I've used on my images to mark them up. But not a software thread so... I'm a tool junkie so just dropped an order with King Bezos on an endo/boroscope kit. Had a $15 plug in camera but never could get it to work with the Blackberry which rarely works anymore itself so I've abandoned both and guess I'm done with wasting money on THAT technology. My old landline works great. Next questions: 1. Issues with supporting the underside of the vehicle somehow while I essentially destroy it's ability to NOT fold in the middle of the cab once I take off the top cap? Or will that not cause any issue? 2. How about if I need to pull the lower UFrame Channel as well. Need to brace it up if that is necessary? Or will the rest of the cab assy and other side be enough support for temporary work? If you've not guessed, I'm not a structural engineer. 3. Once I drill out the spot welds, assuming I drill all the way through with a bit about the size of the weld spots... makes me wonder... will the lower frame channel drop off the truck too? Or will it need to be seperated? What about that top channel and side brace? Thinking I don't want to pry on them if I'm gonna bend up thin metal. Anything to consider here? Perhaps just a heavy flat scraper tapped under will seperate them? There is nothing in the interior, no seats, dash, no weight other than the windsheild and rear windows are still intact. Bed is still mounted on the rear frame assy. It's still got the full suspension under it so is sitting on jackstands under the "axles". The engine is still in it, no tranny or shaft. Gonna spend the day with a heat gun it seems! LOL Thanks all!
-
I tried to look back to be sure I'm not repeating but.... Guy called his buddy up said, "Hey, how long is this social distancing thing supposed to go on?" Friend says, "Well I'm not sure why?" "Cause the ol' lady keeps trying to get int the house and I don't know what to tell her."
-
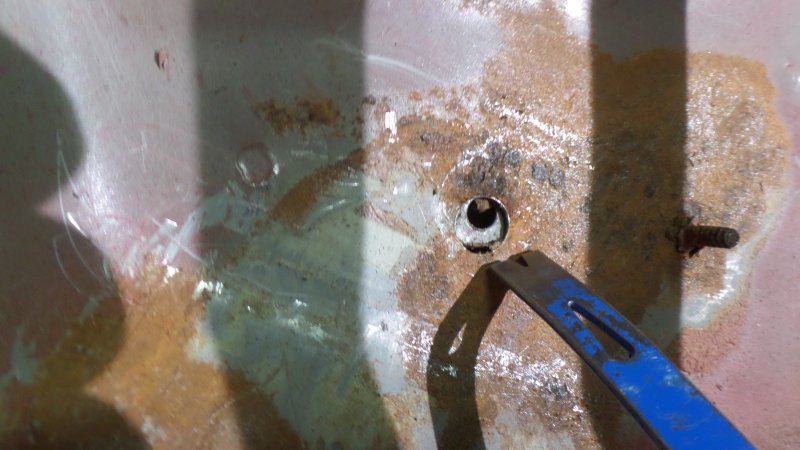
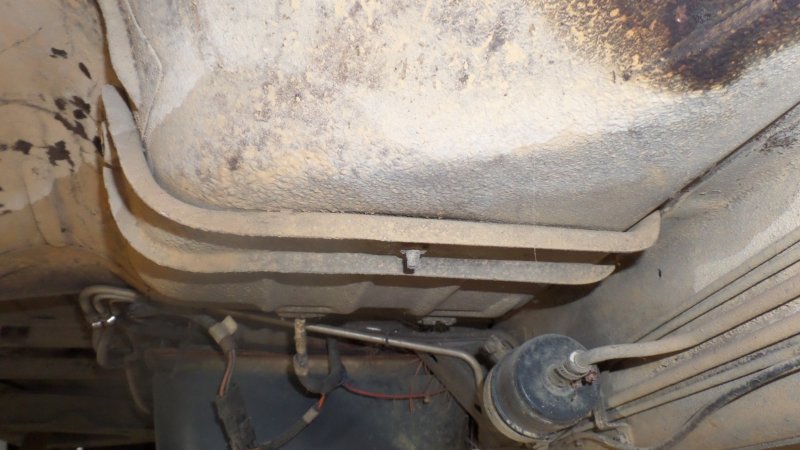
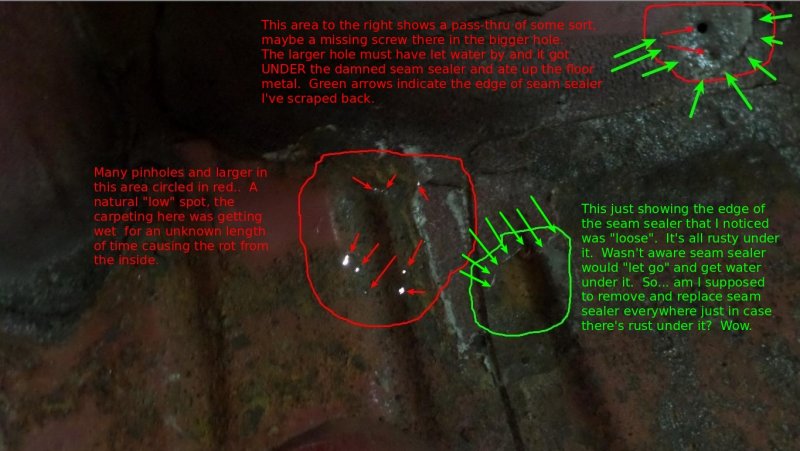
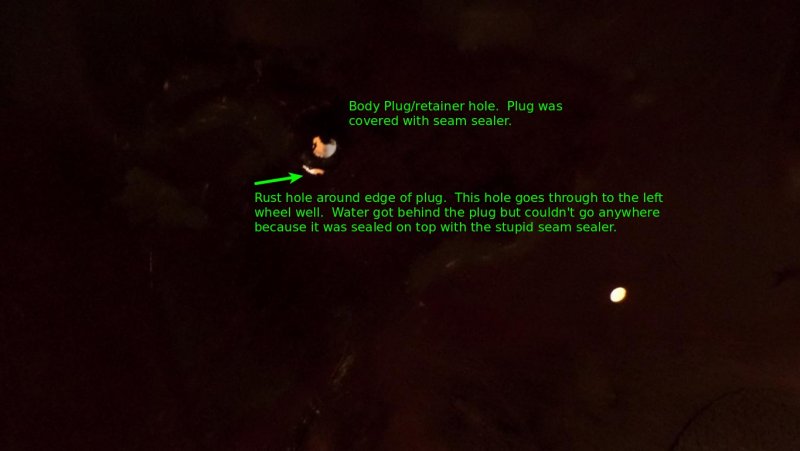
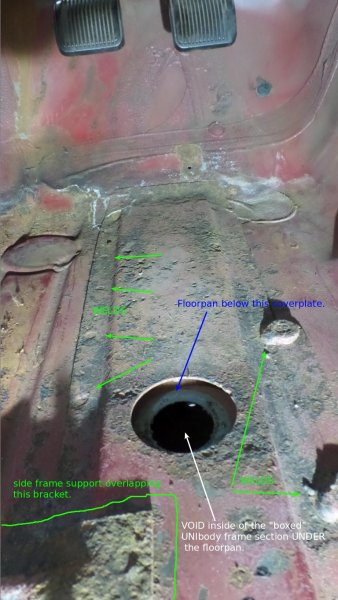
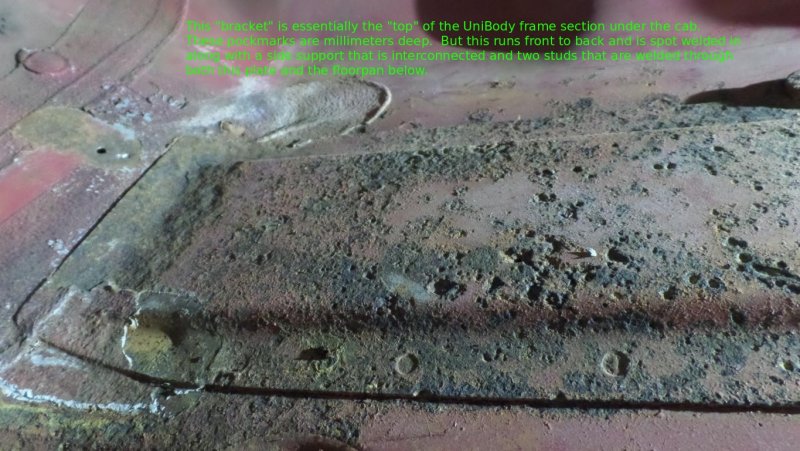
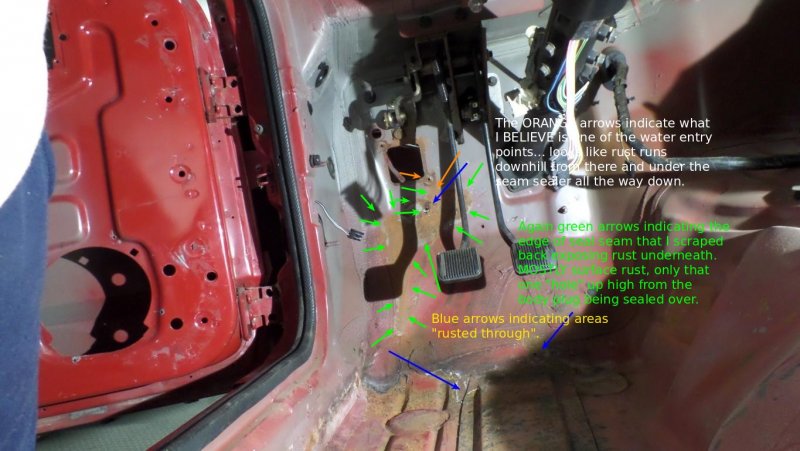
Hi all. As I've explained to some members who've posted to the Street Comanche Registry, I've not been active over the last 5 or 6 years as my wife battled cancer. She lost that battle last May and it's been (still is) tough. But I'm finally returning to other things important in my life and it's been a long while since anything substantial was done with #24. I didn't read closely enough or thoroughly enough Pete's ongoing mantra about pulling up the carpet. I didn't have a spot of rust on the exterior, under, on any fenders, or doors, didn't think I really had to worry. I missed the part about other water entry points...sigh. Some time ago I discovered the carpeting wet and found the sunroof had been leaking ever so slightly but for ever so long apparently. But in the process of getting my feet wet with restarting the project I note water entry / rust in some unexpected places. At least the master cylinder hasn't eaten up the fusebox assy. So that's a bonus. I've not yet posted new images or made updates on my build sheet but owe the site a lot of attention as well and plan to get that done very soon. Meanwhile I come seeking wisdom and experience. Now that the interior is fully stripped, I pulled the fuse box assy apart and note that there is evidence that water seeped past and into the interior. What I did not expect was to find that the same water had infiltrated UNDER the seam sealer. I can only presume that the surface wasn't prepared correctly or the sealer SHOULD have been well connected as it is in most places. But now I'm leary of ALL the seam sealer. Am I crazy to think it ALL has to be somehow removed to check to see if it's eaten up underneath? GAWD there's a lot of seam sealer... Is it overkill? Should just look maybe for loose edges and cracks (which I've found). I've pulled the sealer out of a corner where it was cracked by 1/4" x 1" so I pried it out. Sure enough rusty metal underneath. Just surface rust at that specific point but ...concern seems justified. So you experienced bodymen.... take a look at the images and tell me... what do I do / have done? I'll live another 20 years if I'm lucky and if I'm still driving that long even LUCKIER... but I want it fixed RIGHT not halfassed. The truck may well be passed to a grandkid going forward... not quite sure what to do with this in my will frankly, if it ever becomes worthwhile to will to someone... and not to be morose but... think about it folks... who gets YOUR projects...lol It WILL become an issue... pun fully intended. But similarly (and apologies for not having the correct terminology, but there is this sort of U Shaped channel with flanges that is spot welded to the floorpan in the cab. It essentially acts as support and I'm supposing as part of the Uni-Frame section under the cab. It's kind of like the cab floorpan is sandwiched between a deeper U shape under the pan and a shallower U shape on top of the pan, creating a defacto "frame" unit, integrating the cab floorpans. So this top channel is ate UP with pockmarks millimeters deep in the front 1/3 of it's length. Do I need to replace that channel? or just fill and paint? I've bought a full left floorpan to resolve what holes that I KNOW are there, delivery pending... But how does that work. Do I need to grind out every single one of those spot welds, UNweld the studs that mount thorough it, UNweld the side frame rail that runs to the driver's door opening and take ALL that off to cut out and weld in the floor pans? What about that uchannel frame section below? Those who know.... how does that work exactly to replace the floorpan? Can't see how you'd do it without "disassembling" the frame in that area....sounds like a bad idea. Yet they sell this full cab length floorpan... He'p me, he'p me... LOL
-
Awesome that it's home finally. Best of luck on the project! I'll have to look around for a build thread on here.
-
Looks like I'm slow to the game... but I've got good excuses. Just my 2cents.... the louvres are JC Whitney or equivalent aftermarket pieces. Not knocking Whitney, but they're not stock nor issued on any Jeep much less a Street Comanche. And yep the grill is different but guys, they aren't really special. Any goober with a welder and access to material can knock one like mine out in an hour. I'd guess these were made in the Archer shop. 1" x 1/4 bar stock for the back bracing and some tubing, a little prep & paint and viola! Indeed that's the original grille on #24. That being said, I have only been able to make minimal contact with the Archer's over the years so I would never tell someone that NO Street Comanche left Duluth with a plastic grille. I didn't work at Archer Racing in 1987 so I can't say. These WERE dealer specials so maybe no one can say too much definitively about these trucks. Other than Pete. The pull-the-carpets mantra is so real... more on that in another thread... but that is definitive. Indeed in ANY case, #25 has been sportin' that plastic grille since I've known her, but I didn't know her from birth... The only guys with the truth are the Archer Racing guys. I'd love to talk to the guys who were in the shop back then actually putting on parts and making mods. Anyone know any of THOSE guys? Seems odd that not ONE of the shop people from back then are on this list....lol. I suspect a bad bondo job on the bonnet there but for $6k he'd have to be joking or intending to have it repaired correctly first. I don't understand how it's all the way toward the front. Installing the louvers like those might entail some bodywork but not that far down the bonnet. And it doesn't appear that any integration was done on this bonnet. Cutouts MAYBE (we can't tell with no under the bonnet shots) but the panels were either screwed or rivited, I can't really tell. But I can tell they weren't smoothed into the bonnet. Just a tack-on. I want to have the bonnet for #24 louvered. But properly. The look of these louvers is the antithesis of what I wanted. BUT I find out that this is a HORRIBLY expensive thing to have this done and the stamping would be limited due to bracing. And of course I'd need to obtain a new bonnet for storage in case I ever wanted to transfer that $$$$ bonnet to something else. I'd love louvers... but not that much love. Alternately I'd love the cowl induction hood stamped in metal but with the mold broken and little interest we'll never see those again either. I may have my body man do some sort of induction hood... I'm a long way from that at the moment. Seats.... wonder what those seats are. I like the red stitching but that's not something you'll buy stock either. Wonder if those are pull outs or if upholstery work was done? My "sewing ladies" have informed me that they won't do auto upholstery work... sigh... so if someone could contact the poster about the seats I'd appreciate a push. I don't do any socialist media. This is as close as I get. What REALLY bugs me in the photo is.... are those some cheezy freak "side lamp" indicators that they've put HOLES in the ground effects to install? Good god. As if this were some FIAT Jeep.... !
-
Poly Transmission mounts
TheJeepNut replied to MeanLemons's topic in Vendors- members making products for MJs
apologies... my life is ridiculous and just getting round to mail again. That's the p/n circled in the drawing from HOrnbrod. My point I guess was that I'm not worried about fit. I'm junking the Pug tranny and will be swapping in all AX-15 parts, supports, etc. So, I didn't initially realize it, but the comment was redundant as you'd already noted in the post that the offset is in the crossmember not the support cushion. -
Poly Transmission mounts
TheJeepNut replied to MeanLemons's topic in Vendors- members making products for MJs
Yikes. Guess I should see about a set for #24.... yeah I'm still alive and the project as well... '87 but it'll have an AX-15... 5200 2334's good way back... it'll be fine. PM'd addy. -
These are so nice! Got these as few days ago and they are just outstanding. I think they're more robust than the originals! Well done sir. How much to reproduce all the interior plastic? LOL Thanks for these.
-
Never ever trust your data to someone else if you value it. There is rain in that "cloud" they keep blabbering about. 3TB drives are just too cheap to not keep my own archives...or so says me anyway.
-
The thin plastic inner liners on #24 are returning to dust... Not finding any source of course, ... unless someone has some NOS or mint/live plastic liners they're willing to part with... Thankfully the front and the big liners in the rear I could still get. The front ones too were just crumbling to the touch.
-
Thanks! I just PM'd schardein on his offer. His looks really good too.
-
If you've got a decent starting point, perhaps this gent can resolve the chroming issue. I've not had any work done yet, just one of the many links I've been browsing for 30 years... http://chrometechusa.com/index.html Or you could just go hog wild and gold leaf the shiny edges...