Gjeep
-
Posts
1221 -
Joined
-
Last visited
-
Days Won
3
Content Type
Profiles
Forums
Gallery
Everything posted by Gjeep
-
Wires bundled and wrapped...Will be putting a cover on the power lead into the PDC. The 200A MEGA fuse and 2GA wiring from the alternator to the PDC runs through the underside of the DirtBound all metal battery tray. Aiming to complete the engine compartment this week and set the SPAL primary fan controller this weekend. Possibly finish the suspension up and get the driveshafts on for a first test drive this weekend. Buttoning up the details takes longer than it should...
-
Had a few hours and got the PDC wiring done...Still need to wrap the wires in electrical tape, but much neater as I put the IPF, winch in-cab control, and SPAL fan controller wiring in this bundle. So instead of 3 separate looms running up and down the passenger side of my engine compartment I have one, with fuses consolidated in the PDC.
-
A subtle thing about your truck that is unique is the "type 2" Laredo pin-stripping package which includes the extra stripes around the driver and passenger door windows.
-
Comanche Rear Sway Bar, Short Box
Gjeep replied to Jeep Driver's topic in MJ Tech: DIY Projects and Write-Ups
I ran the TrailBlazer rear sway bar on my Dana 35 SB MJ and it worked out great. Once I replaced the D35 with a D44 it just didn't look right because the pumpkin on the D44 is off-center. I purchased a used TJ rear sway bar that comes with the 44 rear axle. The factory TJ bar is a small diameter and wouldn't really be of use on the MJ -- for me it's a test project to see if this bar will work as the aftermarket produces several beefy sway bar options for the TJ44. I'm hoping to have some time this weekend to see how it might fit. This bars legs would face to the front of the MJ (unlike the TrailBlazer set up). The TJ legs are about half the length though and should work out. Will see... -
I'm running factory wiring for my power window/ locks/ mirrors...so there's a couple factory location taps in to the under dash fuse box and relays behind the passenger kick panel. All I needed to change on the ElectricLife power window regulators was the connection plug at the end and it mated up to the OEM wiring.
-
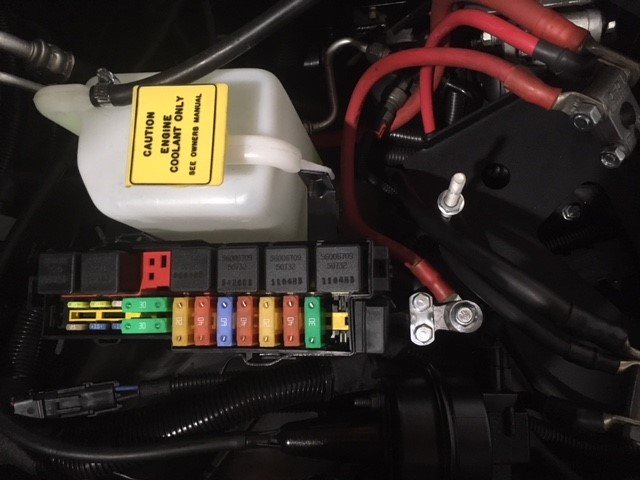
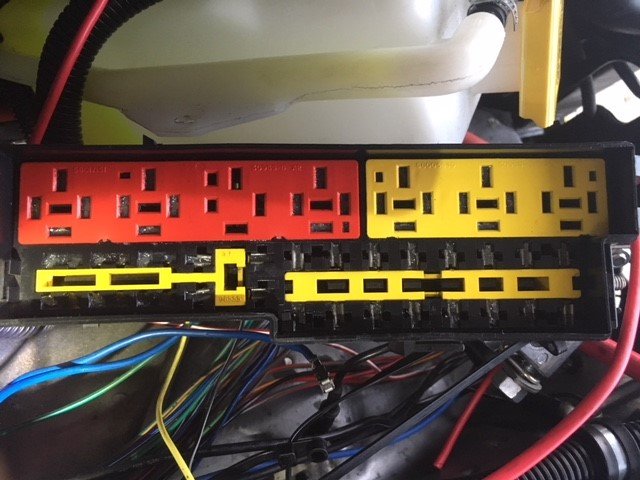
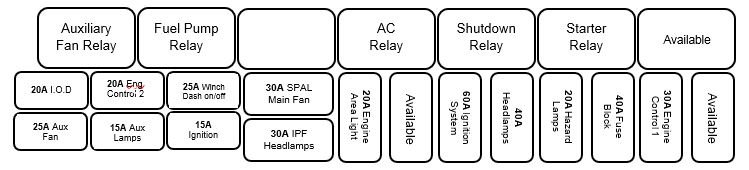
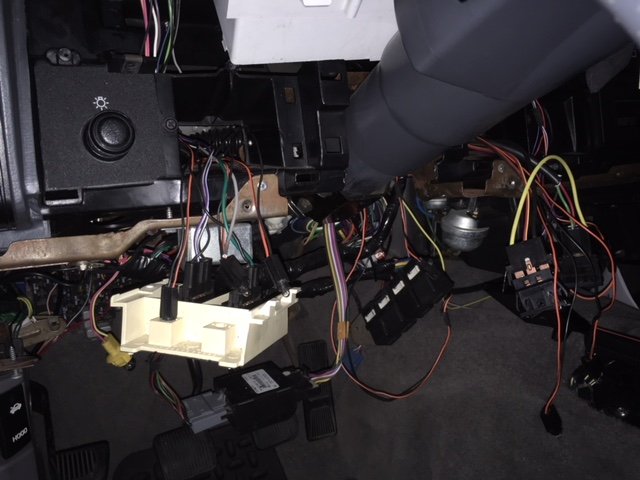
Was away most of the weekend and only had a couple hours to play on the MJ... As I add electrical goodies to the truck (winch, IPF lighting, SPAL fan controller, etc) I have more and more stand alone inline fuses scattered around the engine compartment... Drives my OCD nuts. Since I knew there were unused slots in the PDC, I wired these new fuses into available fuse locations. Not a small task as you have to disassemble the PDC. The BUS bar that runs the stretch of the MAXI fuse section needs to be removed an new fuse terminals/ inserts need to be installed to fill the open slots. These connectors simply pull on/ off the bus bar as needed. The original MJ bus bar was missing 3, so I added those 3 in (making power available to that fuse location). Since the MJ didn't have ABS, those 2 were available, as became the 2 alternator spots (as I will be upgrading the alternator wiring). I had a spare/ scrap wiring harness I used to scavenge parts I needed. I also needed to harvest the MAXI fuse wire terminals (as they are nothing that can be found online or in local parts houses). Basically, I needed to carefully bend back the wiring strap tabs of the terminal and remove the wiring with out over-bending/ breaking those tabs...then put those terminal ends on my new accessory wiring. This is how my PDC looks now. I still have some MAXI fuse and relay location available for future use.
-
I agree...Nice looking truck!
-
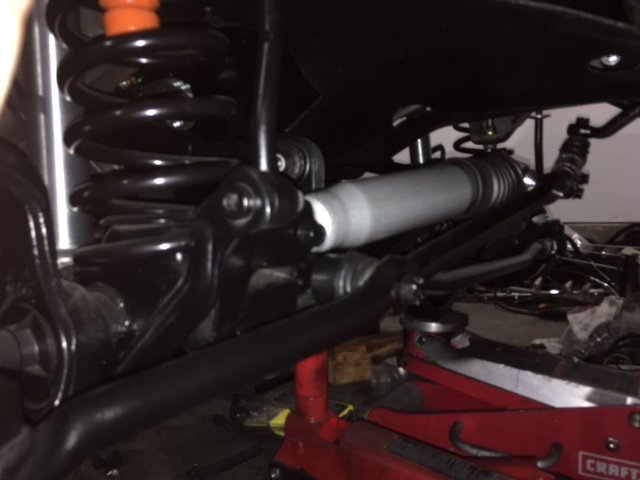
No photo updates from this past weekend... I've given up on getting the temperature switch at the radiator to work to turn on my primary OEM efan. I'm sure I would have found some switch that worked, but want to get behind the wheel of this thing some time soon....so, using a SPAL controller (similar to Hornbrod) to kick-start the fan at both low and high temperature settings. (For the future, if I don't like what's happening with the SPAL, I've ordered Hesco's high flow thermostat housing with a 1/8" NPT threaded hole for a temperature switch in addition to the factory temperature sensor hole. With that I would install a 1/8" NPT American Volt 180* on/ 165* off temperature switch). Got the stronger Spicer U-bolt yoke kit on my D30 and D44 installed, and completed a front wheel alignment using Longacre LON52-79501 Toe-in Plate -- Made it really easy to get the front end dialed. I have leaks in my Teraflex bleeder screws to address, the Hesco relocated CPS still doesn't work no matter how I wire it, need to replace my alternator (as it was a turd out of the box) with a just-ordered Nationals 180 amp alternator, install linkage for the transfer case, and still need to go through the suspension and torque all hardware to spec. I think that will get me driveable.
-
I got them back a few weeks ago...They looks as I posted somewhere further up this build thread. Came out great! And were cheap! Left side of column is fog light and aux fan override; right of column will be winch on/off and winch in/out. And the winch works using factory XJ and SJ rocker switches! Very happy with the outcome.
-
Didn't have a lot of time this weekend to tinker on the MJ, but chipped away at a few things...Installed the front suspension and brake assembly. Finished the D44 Teraflex kit install and rear parking brake cable set up. Got all the new/existing brake lines connected, but have not filled/bled yet. Installed taller rear frame axle stops, and a few other odds and ends. Pillaged a '89 XJ at the local pick and full for switch pod lighting. The Renix-era Laredo/ Limited XJ's typically had 2 switches to the left and right of the steering column. I needed these little lights for my custom switch pod set up. My '92 MJ only had one of the switch pod lights from the factory (for the fog light option). I've yet to get that damn temperature switch to work for the primary fan. Did some more research and ordered a couple more online. It's gonna happen.
-
I think I may have found the issue. One of the tabs inside the alternator held on by small bolts is broken. The bolt spins...like mentioned above....one wire triggers the voltage gauge, the other is for an AC feed. It must be the tab for the voltage gauge. Brand now Mopar alternator too. Need to swap it out.
-
I'm putting my 92 MJ back together. Just about everything is new. New battery, mopar alternator, etc. The Gauge is negative in the red though it's running fine. Confirmed all wires connected. All other gauges read properly. Any ideas?
-
Yes, I do have return springs between the Explorer clevis and the mounting tab of the parking brake cable on the backing plate.
-
Had fun this weekend bending new rear brake lines to accommodate the Teraflex soft lines. Also needed to modify the MJ parking brake lines a bit, and drill-out/ notch the Ford Explorer clevis to connect the parking brake lines to the Teraflex back plates. Not too bad, but time-consuming attention to detail things. Attached the Borla downpipe, MagnaFlow catalytic converter, and muffler. All the suspension on the front end is loose and needs final adjustments, but the MJ is now standing on its own 4 tires. Filled and checked the fluids and fired it up for the first time. And first time it didn’t start…was using the Hesco crank CPS kit and nada. Just kept cranking. I had a failover CPS at the flywheel and it fired right up. Will talk to Hesco this week to figure out the issue. The MJ sounded good, though it chugged a bit because I forgot to attach the vacuum football behind the front bumper…also, the primary electric fan didn't come on when it should have, so I need to look in to why. Also, the dash mounted on/off and in/out switch for the winch worked as they were supposed to. I’m using factory pods with a XJ/MJ fog light switch for the on/off and a SJ (Grand Wagoneer) tailgate power window switch for the in/out. Hoping to drive it around the block before the end of the month.

-
As far as identifying goes... That original inside the bed color is an '86 or '87 color only. My guess is '87.
-
I replaced the dashboard in my '92 when I purchased it from a good donor from the wrecking yard. Not too difficult a job (especially if you are doing HVAC work). Just remember to pull off your VIN plate and attach it to the replacement dashboard.
-
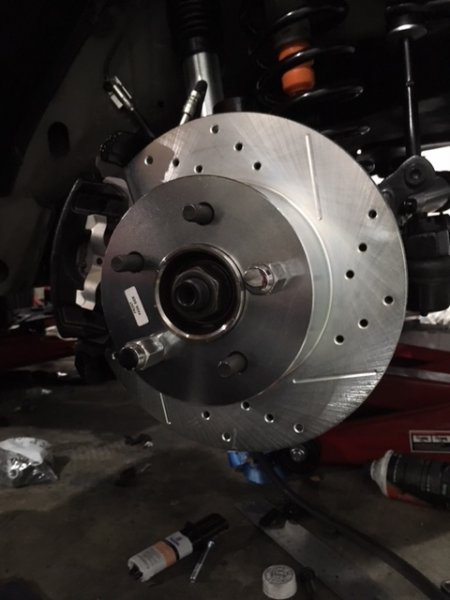
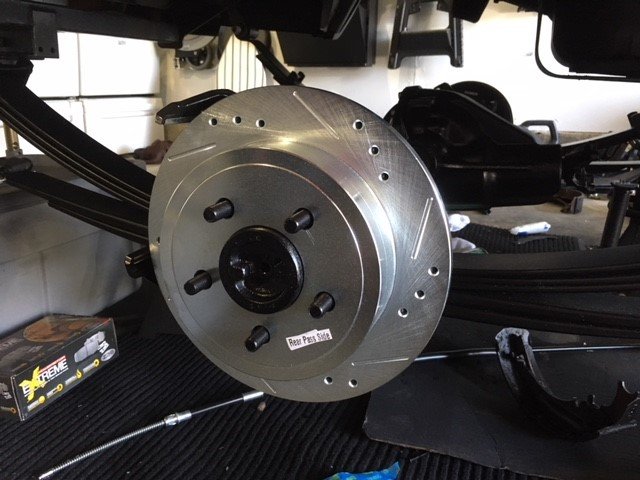
Didn't get a whole lot done this weekend outside of filling fluids and beginning the install of the Teraflex rear disk kit. I'm using PowerStop cross Drilled/ Slotted rotors to match what I'm running in front.
-
I had it built by a local welding/ 4x4 shop. I think they were $250 each.
-
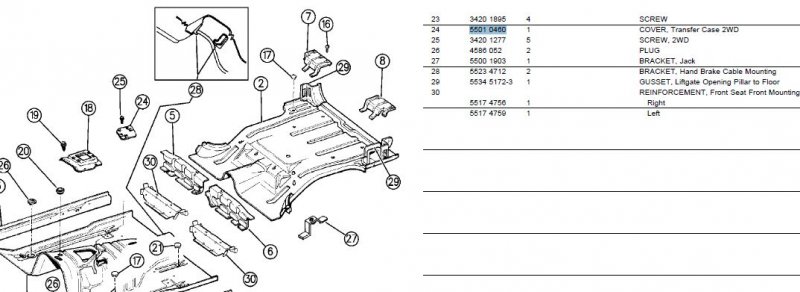
I'm looking for the 2wd cover plate used on MJ's and XJ's that attaches to the floorboard (where the transfer case lever would go)... anyone have that? Thanks
-
The gray jackstands? I got those on Northern tool. ESCO brand jackstands. I like them because they have a thick rubber isolator on the top to prevent damage. This truck will have the same hidden winch as my other project 'Son of Stink'. I have photo's of that hidden winch carrier in my other build thread.
-
That's probably the best way to put it -- 'what Jeep should have built' model. More than likely once I paint/ finish it up it will be my twice a week driver along side my '01 XJ. My '89 MJ is the one I'm aiming to be the show-ish truck as it's a complete resto/ stripped down to nothing. The '92 is kind of a testing ground for that one.
-
It's a dual ABS package. I wouldn't use that one. A diagram from a '95 XJ is best. WJ is an option also.
-
Dual OEM Aux Fan Installation, Part 2...An alternative.
Gjeep replied to Gjeep's topic in MJ Tech: DIY Projects and Write-Ups
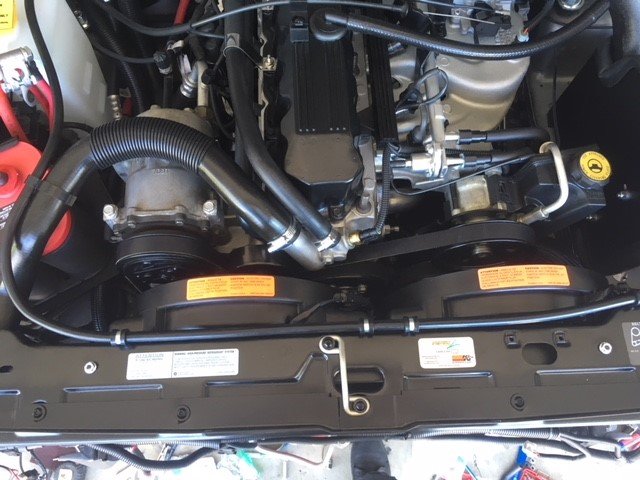
Here the RHD and LHD OEM fans are installed. Hoping to fire the truck up for the first time next week and I'll know if the temp switch in the radiator works well for the primary fan set up.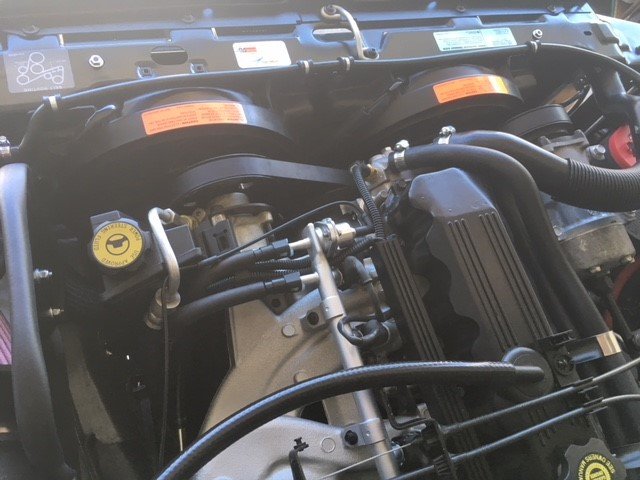
-
Thanks, that's the one I assumed but wanted to confirm. Appreciate it.
-
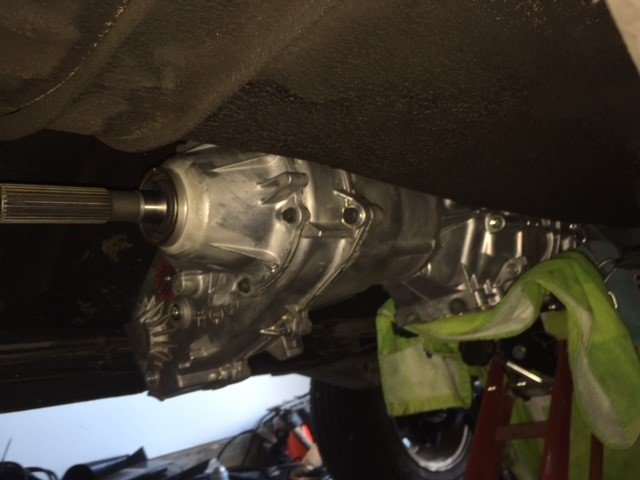
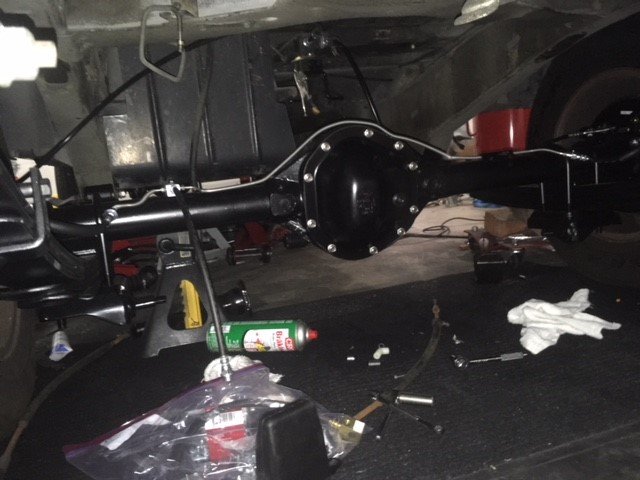
Productive day...Got the transfer case bolted to the trans. Lucky NOS find on ebay.