


gogmorgo
-
Posts
5984 -
Joined
-
Last visited
-
Days Won
4
Content Type
Profiles
Forums
Gallery
Everything posted by gogmorgo
-
1994 Grand Cherokee 5 speed
gogmorgo replied to Dickinson County Comanche's topic in Member Projects: Other Cool Stuff
Nice. I’ve sorta but not super seriously been looking for the splash guards. With my lift and tires I’m just barely outside the requirement for running mud flaps. I managed to get one rear one at pick n pull a while back, but the rest on that Jeep were damaged. Although looking at your picture now I’m not sure how they’ll look with base model moulding. -
I’ll second the fuel filter. 4 gallons should be enough to run the engine, assuming you’ve got good seals on the pickup side and the fuel line connecting the pump to the sending unit isn’t leaking. You might want to toss that battery on a charger, too. A fully charged battery sits around 12.6V, if it’s down to 12.0 it’s around 25% state of charge. If it’s still got enough juice to crank the engine over its probably not that big a deal, but a fully charged battery shouldn’t be dropping below 9.5 volts during cranking. Can’t speak for the Renix specifically, but not all ECUs are going to be happy getting less than 9 volts.
-
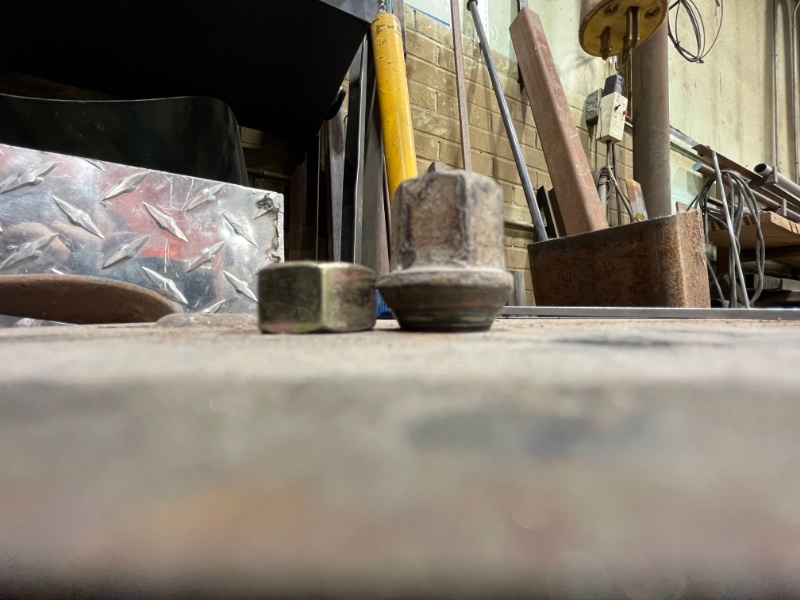
Going back to my original point. I’m still not convinced you actually need longer studs. Rule of thumb on thread engagement is generally you want the same as the nominal diameter of the fastener. 1/2” bolt needs a 1/2” of thread engagement. If your lug nuts are threaded to the tip of the cone, like most are, that’s where you start measuring the 1/2”. As long as you have the thread engagement, it doesn’t really matter whether you’ve got stud filling out the rest of the nut or not. And for what its worth, that rule of thumb is mostly just for cutting threads. On properly designed and manufactured fasteners you can get away with less. That 1/2-20 nut I took a picture of up there is only 7/16” tall.
-
Yup. I talk to parts people every day. You tell them what part you need, for which vehicle. They come back with one or more options. Then you go through and choose which is best for you. Same as if you’re looking up your own parts on Rockauto or otherwise. Sometimes you can open up the part and view specs, sometimes you can’t. If they only give one option, great, get those, just don’t do anything to prevent you from returning them until you’ve confirmed they’ll do what you want. If they give you a couple options, ask about length. If they can’t find it, write down manufacturers and part numbers and Google them. If you can’t find it specifically, maybe the manufacturer has a spec document you can go through. Or you can look up parts numbers yourself, whether on RockAuto or maybe find the manufacturer they're using and hunt through their online catalog until you find something that’ll work. Or better yet, find whatever manufacturer’s spec list you want and find some application that’ll fit what you want. Maybe studs for a 2003 Liberty are exactly what you need. In which case you go ask for those. If you walk in ask for whatever crazy combo to make stuff from different vehicles work together, you’re going to get an answer as dumb as what you just fed them. Because their catalog system is set up only to look up OEM equivalent parts for unmodified vehicles, and it’s not going to do anything else. If you’re modifying things, you’re going to be the one doing the legwork.
-
Did they give you options for studs at all? Generally speaking if they only have one size listed they’ll be good for aluminum wheels. But also I’ve been running aluminum wheels for five years on my steel-wheeled base ZJ on the original studs, and it hasn’t been a problem. This is a regular 1/2-20 grade 8 next to a conical lug nut. They both have threads the whole way down. As long as you have thread engagement through the cone you’re not losing out on much clamping strength.
-
Especially not when they designed it back in the 70’s. Last ten years or so they’ve been building more “refined” versions for paved roads. Single-speed transfer cases, more modern appearance package, luxuries like a power windows and a stereo, a/c even. Mine I’d just be happy if I could shut the heat off for the summer.
-
Been cruising around in this thing again today. Forgot how much it doesn’t feel like it’s built for highway driving. Picked up a muffler for it. The glass pack is still hilarious at low speeds, but between the top gear being direct drive, 4.10 gears, and high range also being a 1.20 reduction, 100km/h is 4200 rpm and that gets real old, real quick. Nothing fancy, just a thrush welded. Haven’t decided if I’m going to swap out the glass pack, or leave it where it is as a resonator ahead of the rear axle and hang the muffler transversely behind it in the stock location. Also the starter has apparently packed it in. You get looks using the hand crank, let me tell you. Videos are hard.
-
1992 jeep cherokee blower motor issues
gogmorgo replied to garrett6410's topic in MJ Tech: Modification and Repairs
Doesn’t take much. A little corrosion or slightly loose connection, coupled with heavy current from an aging blower motor, and things are gonna get HOT. But there’s your classic example of a multimeter misleading you. Just a hair of connection to show you 12V at the motor, but put a little current through and it can’t handle it anymore. -
Is my hood dented.... or is my front clip drooping?
gogmorgo replied to VorTekX's topic in MJ Tech: Modification and Repairs
No point doing anything until you know the latch is working. Push a screwdriver shaft or anything with a similar shape into it. If it does catch on its own then you can try adjusting things or massaging the hood. If not, I guess it’s up to you. If it was my truck I probably would only change out the latch unless I already had a good hood sitting around and the existing one wasn’t salvageable enough to be functional. Or maybe if I was doing a complete repaint I guess. Personally I’d rather a bit of character on the edge of the original hood than mismatched panels. But I’ll acknowledge my taste isn’t everyone else’s.
-
No head lights/ cluster lights
gogmorgo replied to Myles Cyncora's topic in MJ Tech: Modification and Repairs
Check out this thread: I’m sure there’s a better reference out there but basically it’ll link you to this: http://gojeep.willyshotrod.com/HowtoHeadlightLoom.htm And this diagram: Or if you don’t want to make your own, follow cruiser’s instructions with any commercially available H4 relay harness. Yes, they aren’t H4 bulbs (unless you want them to be) but they use the same socket. Note that on any vehicle equipped with daytime running lights, like every vehicle sold or imported to Canada after Dec 1 1989 is required to be, it will interfere with the DRL function. It’s easily overcome with a couple basic splices, but it is still something to be aware of. -
Head gasket replaced, now no start..
gogmorgo replied to Jeep88Comanche's topic in MJ Tech: Modification and Repairs
I would follow cruiser’s tip for distributor indexing. But as far as working through the tips, other than looking at the ground refreshing for things you may have missed reconnecting, if you started with a running truck, it’s more than likely something happened during the process to prevent that. The first thing I would do is go back and check my work. Then I’d start basic diagnostics, do I have fuel, do I have spark, that sort of thing, then go back to worrying about timing when I knew all the other puzzle pieces are there. -

-
1992 jeep cherokee blower motor issues
gogmorgo replied to garrett6410's topic in MJ Tech: Modification and Repairs
Replacing parts without knowing they’re bad can cause more problems than it solves. For one it’s expensive. But also new doesn’t mean working. It’s rare to get parts DOA but it does still happen. And if it does and you pulled a good part for a bad one, now you’ve got two problems to diagnose instead of just one. Start at one end and work your way along. I like to work my way back from the component until I find power, but working the other way is just as effective, so long as you can isolate a point where you do have power and one where you don’t, and can slowly narrow down where it is between them that the power stops. If a motor goes bad it can pull a lot of current which can burn a ton of stuff. Power starts at the ignition switch on the same circuit as the horn, wipers, etc. If that stuff’s working it’s improbable the ignition switch is part of the problem. It then goes from the ignition switch back to the blower fuse in the fuse panel. If you look at the back of the fuse you should be able to see two metal flecks sunk into the plastic. These are probe points so you can test the fuse without removing it. There’s one on either side of the fusible element, if you’ve got power on one side but not the other, it’s blown. Change it. Either it fixes the issue (yay) or it pops again in which case now you’ve got a short somewhere you need to track down. If you’ve got power on both sides, move on to the next point. If you’ve got no power on either side, pull the fuse back out and check for power at the fuse socket, should have power on one side of it. If not, you’ve got a broken connection somewhere between the ignition switch and the fuse. The next point is the vent selection switch. But I wouldn’t necessarily start disassembling the dash to get at it just yet. In basic principle there’s a switch that turns the blower motor to off when the vent slider is in the off position. In this position you should have power on one side of the switch but not the other. If you have no power here, work your way back to the last point. If you do have power, move the slider to another position, and check to see if you have gained power to the other side of the switch. If you did, move on, but if you did not, then this switch is an issue. I don’t know if it’s actually replaceable though, unfortunately, without replacing the whole control panel. You might be able to disassemble carefully and scrub it up or rebend contacts or something, I don’t know. But where I would actually start with the fan switches, the next element is the fan speed selection switch. This switch works in combination with the vent selector switch and blower motor resistor. The circuit is quite complex here. Honestly for quickest testing I would do it at the resistor pack connector. Because it’s easier to get to. At the connector you’ve got four pins. I won’t pretend to know which pin is which number, but going off the diagram. Pin 1: should be energized any time the vent selector is set to anything other than off. This is the input for the lowest fan speed. It sends power through all the resistors in the pack, and is the same circuit that goes straight to the fan speed selector switch. It should be energized in all fan speed positions. Pin 2: gets energized when the vent is set to not off and the fan is switched to speed 2. It bypasses some of the resistors resulting in higher voltage to the motor and higher fan speed. Pin 3: speed 3. Again it bypasses another resistor for higher voltage at the fan. Pin 6: clearly this resistor is part of a family with extra functions this version doesn’t have and pins 4 and five do other things just not here. Pin 6 is the feed to the blower motor. The resistor outlet if you will. If you jump power here it should kick on the blower motor at full speed, or at reduced speed if you hook your test light to positive and poke it. Because the light bulb in your test light after all is just a resistor that gets so hot it glows. But because fan speed 4, the highest speed, bypasses the resistor pack entirely, with the resistor unplugged you should still get the blower motor to come on, and you’ll find that pin 6 is energized when you do. I suspect it’s not the case because the blower doesn’t work at all and you should still have the lowest speed available to you even if it does go bad, but the selector switch is a replaceable component. OE part number is 8350 2719. There’s a few aftermarket suppliers. Hopefully this is enough you can figure it out.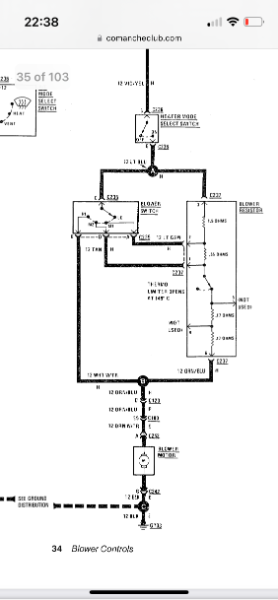
-
Is my hood dented.... or is my front clip drooping?
gogmorgo replied to VorTekX's topic in MJ Tech: Modification and Repairs
I’ll second what they’re saying. Looks like someone tried to pry their way in. Shame, especially since you can pull the headlight and simply unbolt the catch to open it. I’d double check that the latch is catching. If it did get forced open it might be damaged. You can push downwards on the corners to try and latch them individually instead of just slamming the hood down. Push the shaft of a screwdriver into the latch to see if it grabs it and let’s go when you pull the hood release. -
1992 jeep cherokee blower motor issues
gogmorgo replied to garrett6410's topic in MJ Tech: Modification and Repairs
You might find this helpful. Even if not specifically for your year of truck the circuits for most body-related things are pretty similar, for the most part you’ll only run into different wire colours depending on year. I’ve used the manual for a bunch of things on my ‘91s. When you find the diagram for the path of power, note other components that are sharing the circuit. If you have power to those, your issue is going to be between where they tie in and the blower motor. If you have other things not working you might be able to trace the set back to a common point. -
No head lights/ cluster lights
gogmorgo replied to Myles Cyncora's topic in MJ Tech: Modification and Repairs
If the red wire corroding through and falling off is a sign of other issues with the connector, then it could well be the source of the issues. That said generally you lose one connector pin at a time, not both high and low beams at once, unless it’s possible you just didn’t notice one failing if you don’t drive much at night. But it would make me look upwards to where one issue could take out both circuits. Simplest answer usually being correctest and so on. A VERY common occurrence is the headlight switch contacts go bad over time, frequently they get very hot and start melting things, quite often they catch fire. Installing a headlight relay harness can go a long way to alleviating the risk, as it substantially reduces current through the switch (but also screws with DRL if equipped) That would be the first place I’d look for no headlights at all, check to see what the connector looks like, and if you’ve got proper power in and out of the switch. After mine caught fire I went looking for another connector and the dozen or so junkyard XJs I checked all had melted connectors. I’m also going to be that guy and ask if you tried rotating the knob on the switch to see if the dimmer changes anything in regards to dash lights. The rheostat also doesn’t age gracefully and can develop dead spots and poor contact. Good news is it’s the same part to replace as the headlight switch. Two birds stoned at once if it’s your issue. I believe Cruiser also has a tip for upgrading the dash ground. Might be of interest. Cruiser54.com. -
Head gasket replaced, now no start..
gogmorgo replied to Jeep88Comanche's topic in MJ Tech: Modification and Repairs
The distributor spins once for every two turns of the crankshaft. If you turned the engine over while the distributor was out, even with a marked crank pulley put back to where it was, you might have lined it up with the wrong stroke of the crankshaft. But more likely what happened if you marked the distributor position, didn’t turn the engine over, and put the distributor back in, you’re off by a distributor tooth. The shaft rotates slightly as you drop it in and the gears mesh, so if you marked it before you pulled it and then line it up with your mark before dropping it in, you’ll end up lined up wrong. Another common spark timing issue that can happen while changing the distributor is clocking the firing order on the distributor cap wrong. If you didn’t mark one of the spark plug positions on the old distributor and put them back based on a diagram and the hold-down screws, it might not be correct. There’s a few diagrams floating around online with different clockings relative to the screws. And something else I discovered with an aftermarket distributor that has caused me grief twice now was that the clocking between distributor gear and rotor on it was not the same as factory, forcing me to insert the distributor in a different position than I had marked for the one I pulled out and reclocking the plug wires on the cap accordingly. Super frustrating. I ended up reusing the same distributor in two different engines in two vehicles, and it was when it didn’t directly drop into the second one either without screwing around again that I pulled and compared the OEM and aftermarket distributor gears and rotors and realized I hadn’t just screwed up the first time I put it in. But it may not be a distributor timing problem. Did you stuff anything into any intake ports or fuel lines to keep junk out and forget to pull it back out before reassembly? Did you put any ground wires you might have pulled off a head or valve cover stud back on? Plugged everything back in you unplugged? Made sure you didn’t pinch some wires under the head at the back of the engine? -
brake reservoir sediment (red mud, rust, ???)
gogmorgo replied to brucecooner's topic in MJ Tech: Modification and Repairs
I would think it would get stiff, yeah, but at the same time while you’re bleeding brakes you get a pretty good amount of pedal movement when you crack a bleeder on a fully bled system. When you’re adjusting brakes you don’t generally go only until you hear drag. Reason being the shoes can get off centre and you’ll only end up with one shoe dragging, making the noise. Usually you’ll want to adjust until they’re tight enough you feel resistance to turning the wheel, then back them off an amount. I don’t actually have a good answer as to how far to back them off. I’ve never gone and looked for one, it always seems further than I feel it should be, and it can be a little annoying to do, which is why I go for getting it close then relying on the self-adjusters to get it the rest of the way. But that requires self-adjusters that work and they do need to be close enough to correct adjustment for them to actuate. By all means follow through on any adjustment procedure Cruiser recommends. He’s got a ton more experience than I do. -
1992 jeep cherokee blower motor issues
gogmorgo replied to garrett6410's topic in MJ Tech: Modification and Repairs
Depends on what you’re doing. Some circuits you don’t want to load, in particular if you’re doing electronics work, where your test light could overload the circuit. Sometimes you’re looking at a poorly functioning circuit and using a meter to look for unwanted voltage drops, not really something you can do with a test light. -
1992 jeep cherokee blower motor issues
gogmorgo replied to garrett6410's topic in MJ Tech: Modification and Repairs
Simply using a meter on its own isn't always the best bet. A test light is almost always better. You may well get 12.7V or 0Ω with your meter but it could be through a tiny little strand that can't carry enough current to be useful. An incandescent test light puts a small load on the circuit. You can use it to check for supplied power by connecting the clip to ground and probing where you want to find power, and you can test your ground by clipping to positive and probing your ground. -
Basic socket set with a multi-bit screwdriver. Breaker bar. Brake clean and shop towels. 12V compressor. I've got some spare lug nuts, an old used serp belt, and some fluids. Occasionally I've ended up with a spare ujoint in the glove box. But mostly it's a good sense of ingenuity... I've done electrical repairs with a hatchet, fixed a fuel line with a piece of a dead tree. Generally though I make sure it's going to be good for the trip before it leaves. As an example, if you've got a good belt and make sure all your pulleys turn nicely, you're not likely to lose a belt. If you've got fresh grease in your ujoints and there's no play in them, they're not likely to fail. If you've got good tires with appropriate pressure, they're probably not going to explode. If you've got a functioning cooling system with good coolant in it, you're not likely to overheat. If your wheel bearings are tight, all your steering and suspension pivots are free of play and greased, it's unlikely you'll have issues in the next few thousand miles. Catastrophic failures rarely happen without ample warning, you just have to look for the signs, and choose not to ignore them. Most repairs are way easier to make in your driveway before you leave than they will be at the side of the road.
-
1992 jeep cherokee blower motor issues
gogmorgo replied to garrett6410's topic in MJ Tech: Modification and Repairs
What problem are you having? Does the blower motor not work at all or..? -
Honestly every vehicle I’ve owned has has a ton of deferred maintenance from the previous owner. I’ve never paid more than $3000 for a vehicle, and that was an 18-year-old 3/4 ton last summer. I’ll drive the thing until I get too frustrated with whatever symptom not to address it, and then when I pull it apart I’ll find a couple other problems I need to address before I can fix the one I wanted to. Usually end up replacing several times the purchase price in parts before it starts being reasonable. But there’s always that one small, seemingly inconsequential thing you do that just seems like putting the last puzzle piece in place to have a functional driveable vehicle. And it’s the best feeling when you do get there.
-
Are you running the AP or AK batteries? Looking at the Stihl RMA 460V and 510V. The 510 is a touch bigger and heavier, but seems like the battery lasts longer in it. The main difference is the battery series. I’m starting to get the impression Stihl just has two seperate battery systems for some reason, but I wouldn’t want buy into a system that’s on its way out where I wouldn’t be able to find replacement batteries five years down the road if need be.
-
brake reservoir sediment (red mud, rust, ???)
gogmorgo replied to brucecooner's topic in MJ Tech: Modification and Repairs
How much larger wheels and tires than stock? My ZJ on 31x10.5" AT's, same disc/drum as an MJ, will still lock the brakes. Or at least it cycles the ABS if I stop quick on pave. If you're turning 35's we might have a power issue.