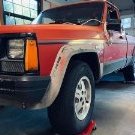
SCJ Steve Posted December 4, 2020 Posted December 4, 2020 Picked up this 88 Pioneer 2WD SWB back in September down in Illinois and I've been working on it little by little. I only get a couple of hours a week to work on it due to work and family, but the progress is being made slowly but surely! The truck has the typical Comanche rust in the floors and rockers, so I picked up my first welder and I'm giving it a shot! Eventual plans are a small lift, wheels and tires, interior refresh and paint, but this project is a marathon not a sprint. I have an Instagram dedicated to the work I'm doing and I'm documenting it all in a YouTube series, so anyone interested in following along can follow/subscribe. I also do tool giveaways on both IG and YT, so there's another reason to follow along! My latest video is below, as well as the entire YouTube playlist. I'll continue to update this post as content is available. Thanks for checking out the build!
Pete M Posted December 4, 2020 Posted December 4, 2020 the contrast between the paint and those flares is unlike anything I remember seeing. super good score though! looking forward to the progress
SCJ Steve Posted December 4, 2020 Author Posted December 4, 2020 50 minutes ago, Pete M said: the contrast between the paint and those flares is unlike anything I remember seeing. Yeah, somewhere along the line, the flares were coated with some kind of undercoating or bedliner and have severely faded over time. Luckily it seems like it'll peel off relatively easily!
SCJ Steve Posted December 5, 2020 Author Posted December 5, 2020 14 minutes ago, JMO413 said: Nice find. Welcome to the club. Thanks!
SCJ Steve Posted December 27, 2020 Author Posted December 27, 2020 Decided which floor pans to go with in my most recent video. Key Parts all day over C2C.
SCJ Steve Posted January 26, 2021 Author Posted January 26, 2021 Finally got the driver's side floorpan in! Here's the video. I'm also doing a tool giveaway if anyone is interested in free stuff!
SCJ Steve Posted January 29, 2021 Author Posted January 29, 2021 I wanted to retain as much of the floor brace as possible, especially since it includes one of the mounting bolts for the seat. I had to cut the rusty part away and then use some 14 gauge bent at 90° to replicate the original piece. It’s all welded together as one piece now and will be welded back into the truck tonight!
SCJ Steve Posted June 15, 2021 Author Posted June 15, 2021 I've gotten a little bit of work done since my last post! In this first video, I got a bunch of work done on the rusty driver's side outer rocker panel. Next, I picked up a bed in better condition and got the underside of it all cleaned up and ready to be put on the truck. And most recently, a quick project to save a few bucks and salvage the fuel tank straps. Having a ton of fun with this project! Hopefully you enjoy following along!
89 MJ Posted June 15, 2021 Posted June 15, 2021 @Minuit, could you do something like this with your floor braces?
SCJ Steve Posted June 15, 2021 Author Posted June 15, 2021 2 hours ago, Empty_Pockets said: Are you on a morning radio show? I am.
SCJ Steve Posted June 16, 2021 Author Posted June 16, 2021 Got everything rear of the cab sandblasted today. Easily saved me a week with a grinder and it seemed like a bargain to me. Next step is to get primer on it and get it coated this weekend!
SCJ Steve Posted June 18, 2021 Author Posted June 18, 2021 Suspension, rear axle and exhaust yanked. Painting the frame this weekend. One of my leafsprings was cracked, which sucks. I took them to a spring shop and the old timer there pulled them apart and they had a bunch of stress cracks, so I ordered a new set with a 2” taller arch, so I’m pretty pumped about that! Should have them on Tuesday!
SCJ Steve Posted June 20, 2021 Author Posted June 20, 2021 Frame primed and painted with Tractor, Truck and Implement Paint from Tractor Supply, sprayed through an HVLP gun. It’s an oil based enamel which I have read great things about so hopefully I never have to worry about rust! And since I had the rear axle blasted as well, I’m painting it too. It’s just in primer right now but will receive the same black paint as the frame today or tomorrow. New springs come Tuesday and it will hopefully be rolling again by next weekend! Sent from my iPhone using Tapatalk
SCJ Steve Posted June 25, 2021 Author Posted June 25, 2021 Got the second coat put on last night! Couldn't be happier with how it all turned out!
Empty_Pockets Posted June 26, 2021 Posted June 26, 2021 Paint job looks great! Are you keeping this 2wd or converting to 4wd?
SCJ Steve Posted June 26, 2021 Author Posted June 26, 2021 4wd eventually I’m sure. Just looking to get it drivable first. I’ll keep my eye out for conversion stuff though.Sent from my iPhone using Tapatalk
SCJ Steve Posted June 29, 2021 Author Posted June 29, 2021 better than new!! Thanks!!Sent from my iPhone using Tapatalk
howeitsdone Posted July 1, 2021 Posted July 1, 2021 Making me drool I've been following your approach for a while. My plan is to do a lot of the body & frame opposite. Currently in the process of getting completely upgraded & parts replaced. Then I'm taking the bed off and doing much of the same as you. I'm extremely impatient with this sort of stuff. The way I figure is that it's already rusted, and if the body isn't done within a few months it won't get much worse due to my location. But the patience you have... very jealous
SCJ Steve Posted July 2, 2021 Author Posted July 2, 2021 3 hours ago, PocketsEmptied said: Making me drool I've been following your approach for a while. My plan is to do a lot of the body & frame opposite. Currently in the process of getting completely upgraded & parts replaced. Then I'm taking the bed off and doing much of the same as you. I'm extremely impatient with this sort of stuff. The way I figure is that it's already rusted, and if the body isn't done within a few months it won't get much worse due to my location. But the patience you have... very jealous I appreciate the kind words. Trust me, though. I'm super impatient! Just trying to knock out little things here and there in the little time I have to work on it. I figure that if I can do the whole back end of the truck, that's an entire half of the truck I don't have to worry about anymore!
SCJ Steve Posted July 27, 2021 Author Posted July 27, 2021 A little more progress over the last few weeks! New leaf springs are in, rear axle is back under it and new brakes on. Plus, I found a great deal locally on some Rubicon wheels and tires, as well as a Fabtech spare tire mount for the bed! Slowly but surely coming together.
howeitsdone Posted August 1, 2021 Posted August 1, 2021 Did you go with General Springs for the replacements? If not, where did you source them?
SCJ Steve Posted August 2, 2021 Author Posted August 2, 2021 11 hours ago, PocketsEmptied said: Did you go with General Springs for the replacements? If not, where did you source them? I ordered them through a local spring shop in town. They're a stock replacement, but with a 2" taller arch. When they arrived, the label on them said "Stanley Spring 97-555." I googled that and that's the same part number as the springs available from General Spring, so I'm not sure if they're all made by the same company and just rebranded, but wouldn't be surprised.

Recommended Posts
Create an account or sign in to comment
You need to be a member in order to leave a comment
Create an account
Sign up for a new account in our community. It's easy!
Register a new accountSign in
Already have an account? Sign in here.
Sign In Now