rosco11 Posted June 17, 2020 Author Posted June 17, 2020 With the Comanche front axle on the workbench, I'm starting with some easy stuff. Removed the brake calipers and did a simple rebuild kit and a fresh coat of paint! I'll have a series of brake system posts coming up.. lots of cool upgrades to stop better! Sent from my Pixel 3a using Tapatalk
rosco11 Posted June 20, 2020 Author Posted June 20, 2020 Upgrading the Comanche brake system my brother and I decided to swap out the brake booster and master cylinder with a newer and better dual diaphragm version. We went to a pull a part location and luckily they had 17 donor vehicles to choose from.. we searched around and found the best one. It came from a 2000 Jeep Grand Cherokee. I broke it down, cleaned it up and flushed the master cylinder with brake fluid into a drain pan. We got the booster installed.. next step is making the brake lines from the cyl to the proportion valve!Sent from my Pixel 3a using Tapatalk
rosco11 Posted June 22, 2020 Author Posted June 22, 2020 Finished up the entire Comanche brake line overhaul. I ended up creating 6 of the 7 hard lines on the Jeep. I rented brake flare kits from O'Reilly and Advanced Auto and used the best pieces from each kit. I did multiple practice flares, over and over and over again until they looked like factory. I used copper nickel lines for most and steel lines from the master cylinder. I bought a tubing bender and took my time shaping and fitting them just right. This was a heck of a project. I think it turned out really good!
rosco11 Posted June 23, 2020 Author Posted June 23, 2020 For the Comanche fuel and electrical system there is a ballast resistor. My original was crusty and broke as soon as I started removing it. I replaced with a different style that takes ring terminals. Easy 20 min project! Sent from my Pixel 3a using Tapatalk
WahooSteeler Posted June 23, 2020 Posted June 23, 2020 Can you post the part # and where you got the new ballast resistor?
rosco11 Posted June 25, 2020 Author Posted June 25, 2020 Can you post the part # and where you got the new ballast resistor? WahooSteeler, yes definitely! I want to make sure it works first before I put up any bad info. Truck hasn't started in 2 years but coming soon.. hopefully!Sent from my Pixel 3a using Tapatalk
rosco11 Posted June 25, 2020 Author Posted June 25, 2020 Getting a new battery for the Comanche was definitely part of the plan. In the scope of the whole project we started with the rear axle and moved forward on the truck. Took out the old battery and noticed my battery tray bolts were disintegrated. Rrra Rrro! Upon further inspection check out the fender metal that holds the battery tray.. We found our next rust project! It stinks but ya know, we'll figure it out. Battery tray metal fix.. coming soon!Sent from my Pixel 3a using Tapatalk
rosco11 Posted July 15, 2020 Author Posted July 15, 2020 For the badly rusted out battery tray on the Comanche we found this good looking donor Jeep Cherokee at a junkyard in Tomball. My brother and I used a battery powered die grinder with a cut off wheel and cut out the battery area. Man, it was hot but the piece we got was so solid. Can't wait to clean it up and finish the fabrication and replacement!Sent from my Pixel 3a using Tapatalk
rosco11 Posted July 16, 2020 Author Posted July 16, 2020 On the Comanche battery tray project, I carefully cut out the bad, started prepping the new peice to put in. We got it coated with Rusty Metal Primer. Next step is to prep for welding and get it done!Sent from my Pixel 3a using Tapatalk
rosco11 Posted July 28, 2020 Author Posted July 28, 2020 Got the Comanche battery tray all welded in. Recoated it with Rusty Metal primer and then with rust-oleum pro enamel and an added hardener. I had cut out the template for the new piece using the old and because the sides were crushed in, I was off a bit. I had to weld fill some gaps around. I was a little worried about some of the gaps but it actually turned out really great considering. Battery tray project done!Biggest news of all.. that is the last major rust project on the entire truck. We are done fighting rust and cutting metal and fabricating fixes!
Pete M Posted July 29, 2020 Posted July 29, 2020 battery powered grinders and sawzalls are just the best thing ever in a junkyard! "hey, look at that cool thing! bbzzzzzzzzzzzrrrzzzzzzrzrrzrrrzrrrzzzz... and now it's mine."
rosco11 Posted July 29, 2020 Author Posted July 29, 2020 battery powered grinders and sawzalls are just the best thing ever in a junkyard! "hey, look at that cool thing! bbzzzzzzzzzzzrrrzzzzzzrzrrzrrrzrrrzzzz... and now it's mine." Haha! That's the truth!Sent from my Pixel 3a using Tapatalk
rosco11 Posted July 29, 2020 Author Posted July 29, 2020 With the Comanche rust-free (fingers crossed) it's time to move forward building it up. We have the front axle out and will take advantage of the extra room to add frame stiffeners to the unibody front frame section. This area receives quite a bit torque due to all the steering being connected here. I went with the JCR front section stiffeners and 3/16" steel. Used a wire wheel to work on all the very bad rubberized undercoating in the fender wells. Got it cleaned up nice and now we are mocking up the stiffeners. Clamped them down and beat them to shape with a dead blow hammer. They came out pretty good and fit nice
rosco11 Posted August 1, 2020 Author Posted August 1, 2020 The Comanche unibody and frame stiffeners are prepped and final fit. To prep I used bare metal primer on the insides of the stiffeners and rusty metal primer on the unibody. Once we got it all mocked up I hit the edges with a wire wheel to clean up the weld areas. Started welding them in. It's so much nicer welding to the thicker unibody metal vs all the thin patches and rust resto I've been doing. Actually got to run a few good hot welds instead of stich welding or just spots. Can't wait to see this project finished up!Sent from my Pixel 3a using Tapatalk
rosco11 Posted August 2, 2020 Author Posted August 2, 2020 The Comanche frame stiffeners (JCR Off-road) are done! They welded in very good. Then we hand brushed the stiffeners, unibody and fenders with Rusty Metal primer and finally.. an awesome topcoat of 3M rubberized undercoating. That stuff went on so good! However, you have to move quick.. it'll empty the whole can in just a minute. Once I got the coverage and speed down. It looks awesome Sent from my Pixel 3a using Tapatalk
rosco11 Posted August 7, 2020 Author Posted August 7, 2020 After the Comanche battery tray inner fender turned into a major restoration project, I decided I might as well get a new battery and a major cable upgrade.. these from Ksuspensionlifts are awesome and so we'll made. My terminals were not in good shape. I replaced them with the military style. I refreshed all the grounds. The ground from the back of the engine to the firewall was a beast to get in there, but lots of trying and finally got it done.. Good project!Sent from my Pixel 3a using Tapatalk
rosco11 Posted August 16, 2020 Author Posted August 16, 2020 We were on a tighter timeline to get the front end of the Comanche put back together, we had multiple projects happening at the same time... My amazing mom offered to help me primer and paint the front axle! Trudie rocked it! Sent from my Pixel 3a using Tapatalk
rosco11 Posted August 16, 2020 Author Posted August 16, 2020 A few little touch ups after the topcoat drys and the front axle will be ready to close up and back on the Comanche! These LubeLockers are awesome in place of gasket maker!Sent from my Pixel 3a using Tapatalk
rosco11 Posted August 19, 2020 Author Posted August 19, 2020 My brother helping trim the fenders just right on the Comanche! The type of front bumper makes this a necessary step.. Nice work!Sent from my Pixel 3a using Tapatalk
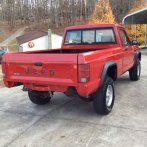
rosco11 Posted August 21, 2020 Author Posted August 21, 2020 Getting that front axle and brand new 6" springs under the Comanche!Sent from my Pixel 3a using Tapatalk
WahooSteeler Posted August 21, 2020 Posted August 21, 2020 A lot of work and time involved, great to see you getting close to the finish line. Looking forward to the finished product!
rosco11 Posted August 21, 2020 Author Posted August 21, 2020 A lot of work and time involved, great to see you getting close to the finish line. Looking forward to the finished product! Thanks WahooS..!Sent from my Pixel 3a using Tapatalk
Pete M Posted August 22, 2020 Posted August 22, 2020 I didn't notice the jackstand at first and it appeared you were just cradling the axle in your lap. ow.
rosco11 Posted August 22, 2020 Author Posted August 22, 2020 I didn't notice the jackstand at first and it appeared you were just cradling the axle in your lap. ow. Haha.. Yeah it looks that way.. and it was as I was a mess under there trying to line it up!Sent from my Pixel 3a using Tapatalk

Recommended Posts
Create an account or sign in to comment
You need to be a member in order to leave a comment
Create an account
Sign up for a new account in our community. It's easy!
Register a new accountSign in
Already have an account? Sign in here.
Sign In Now